

Before you begin
- Labs create a Google Cloud project and resources for a fixed time
- Labs have a time limit and no pause feature. If you end the lab, you'll have to restart from the beginning.
- On the top left of your screen, click Start lab to begin
Enables the Cloud Run API and creates the App Engine app
/ 10
Deploy the backend service
/ 10
Create a service account for the Apigee API proxy
/ 10
Create the Apigee proxy
/ 10
Enable use of the Google Cloud Geocoding API
/ 20
Create a shared flow to call the Geocoding API
/ 20
Add the ATM's address when retrieving a single ATM
/ 20
Google Cloud's Apigee API Platform can be used to modernize existing applications by adding new functionality to your existing APIs.
In this lab, you deploy a backend service on Cloud Run. The backend service implements a REST API that stores and retrieves bank data (customers, accounts, ATMs, and transactions) in a Firestore database. You create an Apigee API proxy that proxies the backend service. You also create a shared flow that retrieves and caches content from an external service. You then call that shared flow from your API proxy and use JavaScript code to modify an API response.
In this lab, you learn how to perform the following tasks:
Read these instructions. Labs are timed and you cannot pause them. The timer, which starts when you click Start Lab, shows how long Google Cloud resources are made available to you.
This hands-on lab lets you do the lab activities in a real cloud environment, not in a simulation or demo environment. It does so by giving you new, temporary credentials you use to sign in and access Google Cloud for the duration of the lab.
To complete this lab, you need:
Click the Start Lab button. If you need to pay for the lab, a dialog opens for you to select your payment method. On the left is the Lab Details pane with the following:
Click Open Google Cloud console (or right-click and select Open Link in Incognito Window if you are running the Chrome browser).
The lab spins up resources, and then opens another tab that shows the Sign in page.
Tip: Arrange the tabs in separate windows, side-by-side.
If necessary, copy the Username below and paste it into the Sign in dialog.
You can also find the Username in the Lab Details pane.
Click Next.
Copy the Password below and paste it into the Welcome dialog.
You can also find the Password in the Lab Details pane.
Click Next.
Click through the subsequent pages:
After a few moments, the Google Cloud console opens in this tab.

Cloud Shell is a virtual machine that is loaded with development tools. It offers a persistent 5GB home directory and runs on the Google Cloud. Cloud Shell provides command-line access to your Google Cloud resources.
Click Activate Cloud Shell 
Click through the following windows:
When you are connected, you are already authenticated, and the project is set to your Project_ID,
gcloud is the command-line tool for Google Cloud. It comes pre-installed on Cloud Shell and supports tab-completion.
Output:
Output:
gcloud, in Google Cloud, refer to the gcloud CLI overview guide.
In this task, you deploy a backend service on Cloud Run.
The service implements an API for SimpleBank. This API provides a simple representation of a bank, with customers, accounts, transactions, and ATMs. The SimpleBank service is built using Node.js with data stored in Firestore. The code is packaged in a Docker container, and this container is deployed to Cloud Run.
To clone the repository containing the code for the SimpleBank service, in Cloud Shell, run the following command:
Create a soft link to the working directory:
To change to the directory containing the REST backend, run the following command:
To update the region in the configuration file, run the following command:
The project initialization script, init-project.sh, enables the Cloud Run API within the project. These APIs will be required to deploy Cloud Run services.
The database for the service will be Firestore in Native mode. A project can host a single Firestore database in either Native mode or Datastore mode. This script will create the Firestore in Native mode database.
To see the commands run by the init-project.sh script, enter this command:
The script enables the Cloud Run API and creates the Firestore in Native mode database.
To run the script, enter this command:
Click check my progress to verify the objective.
The service initialization script, init-service.sh, creates a service account named simplebank-rest. This service account is used as the identity for the Cloud Run service. The service account is given the role roles/datastore.user, which allows the service to read and update data in Firestore.
It is a best practice to create a service account for a service you create, and give permissions to the account using the principle of least privilege. This principle says that an account should have only those privileges essential to perform its unique function.
To see the commands run by the init-service.sh script, enter this command:
The script creates the service account used by the service and adds the roles/datastore.user role to the service account.
To run the script, enter this command:
The deploy script, deploy.sh, builds the simplebank service application using the code in the current directory. It then deploys the service to Cloud Run, using the simplebank-rest service account. The deploy script would be run each time you updated your application code.
The service is deployed to require authenticated access, so you cannot call the service without a valid OpenID Connect identity token.
In Cloud Shell, to see the commands run by the deploy.sh script, enter this command:
The script builds the service using Cloud Build, and then deploys the simplebank-grpc service to Cloud Run.
To deploy the script to Cloud Run, enter this command:
Click check my progress to verify the objective.
To verify that the service is running, make a curl request that calls the service:
The command that sets the RESTHOST variable uses gcloud to retrieve the hostname for the simplebank-rest Cloud Run service. The variable is then added to the .bashrc file, which will cause the RESTHOST variable to be reloaded if Cloud Shell restarts.
The GET /_status command simply returns a JSON response indicating that the API is up and running. In this call you used gcloud auth print-identity-token to get an Open ID Connect identity token for the user logged into Cloud Shell. You are logged in with the project owner role, and the project owner is given very broad permissions.
To verify that the service can write to Firestore, make a curl request that creates a customer:
The POST /customers command creates a customer. The lastName, firstName, and email parameters are all required. The email address must be unique and is used as the identifier for the customer. The customer record is stored in Firestore.
To verify that the service can read from Firestore, make a curl request to retrieve the customer that you just created:
The GET /customers/ command retrieves a customer record from Firestore.
To load some additional sample data into Firestore, enter this command:
This gcloud command will use the Firestore import/export feature to import customers, accounts, and ATMs into the database.
To retrieve the list of ATMs, run this curl command:
To retrieve a single ATM, run this curl command:
The request retrieves an ATM by name, and the response contains the latitude and longitude for the ATM, but it does not contain an address:
In a later task, you will use Apigee and the Geocoding API to add an address to the response returned when retrieving a specific ATM.
In this task, you create an Apigee API proxy that acts as a facade for the backend service. The API proxy will use a service account to allow it to present OpenID Connect identity tokens to the Cloud Run service.
To create a service account that can be used by the Apigee API proxy, enter this command:
The gcloud command creates a service account named apigee-internal-access, which will be used by your Apigee proxy when calling the backend service.
To grant the role that allows access to the service, enter this command:
This gcloud command grants the service account the roles/run.invoker role for the simplebank-rest Cloud Run service, allowing the service account to invoke the service.
To retrieve the URL for the backend service, use the following command:
Save this URL. It will be used when creating the API proxy.
Click check my progress to verify the objective. There may be a short delay before the granted role is detected.
To open the Apigee console:
Apigee, and then click Apigee API Management in the search results.The Apigee console opens, and the landing page shows quick links to commonly used locations.
 ), next to Apigee, click Pin (
 ).
).Apigee is now pinned to the Navigation menu.
In the navigation menu, select Proxy development > API proxies.
To create a new proxy using the proxy wizard, click +Create.
You will create a reverse proxy for your backend service.
For Proxy template, select General template > Reverse proxy (Most common).
Specify the following for the Proxy details:
| Property | Value |
|---|---|
| Proxy name | bank-v1 |
| Base path | /bank/v1 |
| Target (Existing API) | backend URL |
The target should be the backend URL you retrieved earlier in the task, which should look something like this:
Click Next.
Leave the Deploy (optional) settings at their defaults, and click Create.
In Cloud Shell, paste and run the following set of commands:
This series of commands uses the Apigee API to determine when the Apigee runtime instance has been created and the eval environment has been attached.
Wait until the instance is ready.
When the text ***ORG IS READY TO USE*** is displayed, the instance is ready. The Apigee organization (org) may have been created before you started the lab, so you might not have to wait for the instance to be created.
If you are waiting for the org to be ready, you can learn more about Apigee, explore the Apigee X architecture, or learn about APIs and API proxies.
On the navigation menu, select Proxy development > API proxies, and then click bank-v1.
Click Deploy.
For Environment, select eval.
For Service account, specify the service account's email address:
Click Deploy, and then click Confirm.
Wait for the eval deployment status to show that the proxy has been deployed.
The eval environment in the Apigee organization can be called using the hostname eval.example.com. The DNS entry for this hostname has been created within your project, and it resolves to the IP address of the Apigee runtime instance. This DNS entry has been created in a private zone, which means it is only visible on the internal network.
Cloud Shell does not reside on the internal network, so Cloud Shell commands cannot resolve this DNS entry. A virtual machine (VM) within your project can access the private zone DNS. A virtual machine named apigeex-test-vm was automatically created. You can use this machine to call the API proxy.
In Cloud Shell, open an SSH connection to your test VM:
The first gcloud command retrieves the zone of the test VM, and the second opens the SSH connection to the VM.
If asked to authorize, click Authorize.
For each question asked in the Cloud Shell, click Enter or Return to specify the default input.
Your logged in identity is the owner of the project, so SSH to this machine is allowed.
Your Cloud Shell session is now running inside the VM.
Call the deployed bank-v1 API proxy in the eval environment:
The -k option tells curl to skip verification of the TLS certificate. The Apigee runtime in this lab is using a self-signed certificate instead of a certificate that has been created by a trusted certificate authority (CA).
-k option to bypass certificate verification for production use cases.
A 403 Forbidden status code is returned, with an error message indicating that your client does not have permission to get the URL. The request to the backend service was rejected because the client did not provide the required token with the request. The API proxy is running with the correct identity, but you still need to force the OpenId Connect identity token to be sent with the request.
Return to the bank-v1 proxy, and click the Develop tab.
In the left menu for the proxy, in the Target endpoints > default section, click PreFlow.
Find the following code (your URL will be different):
Inside the HTTPTargetConnection section, below the URL, add an Authentication section that looks like this:
Replace AUDIENCE with the URL value already in the HTTPTargetConnection section. Your code should now look similar to this, except with your specific URL in the URL and Audience elements:
Click Save, and then click Save As New Revision.
Click Deploy.
For Environment, use eval.
For Service account, specify the service account's email address:
Click Deploy, and then click Confirm.
Click the Overview tab, and wait for the eval deployment status to show that the new revision has been deployed.
Click check my progress to verify the objective.
If your SSH login has timed out, run this command in Cloud Shell to reestablish a connection:
Rerun the status command inside the VM:
You should now see a successful (200) response similar to this:
This response indicates that the API proxy is successfully calling the backend service.
Enter the command exit to leave the SSH session and return to Cloud Shell.
In this task, you enable the Geocoding API, which will be used in your API proxy to add address information to the response when retrieving an ATM from the SimpleBank service.
In Cloud Shell, to enable the Geocoding API, run the following command:
Next, you will create an API key that can access the Geocoding API.
To create the API key, run the following command:
The gcloud command creates the API key with the ability to send requests to the Geocoding API. By supplying the --format parameter, you select the keyString field in the response and store it in the API_KEY shell variable. The API_KEY variable is then stored in the .bashrc file in Cloud Shell.
Click check my progress to verify the objective.
To retrieve the geocoding information for a given latitude and longitude, run the following curl command:
This command calls the Geocoding API, providing the API key and the desired latitude and longitude. The response contains an array of results, each of which has a formatted address. In your API proxy, you will use the formatted address of the first result to add an address to the API response when retrieving the details for a single ATM.
In this task, you will create a shared flow for calling the Google Geocoding API. Shared flows allow you to combine policies and resources in a single flow so that it can be consumed from multiple API proxies or other shared flows.
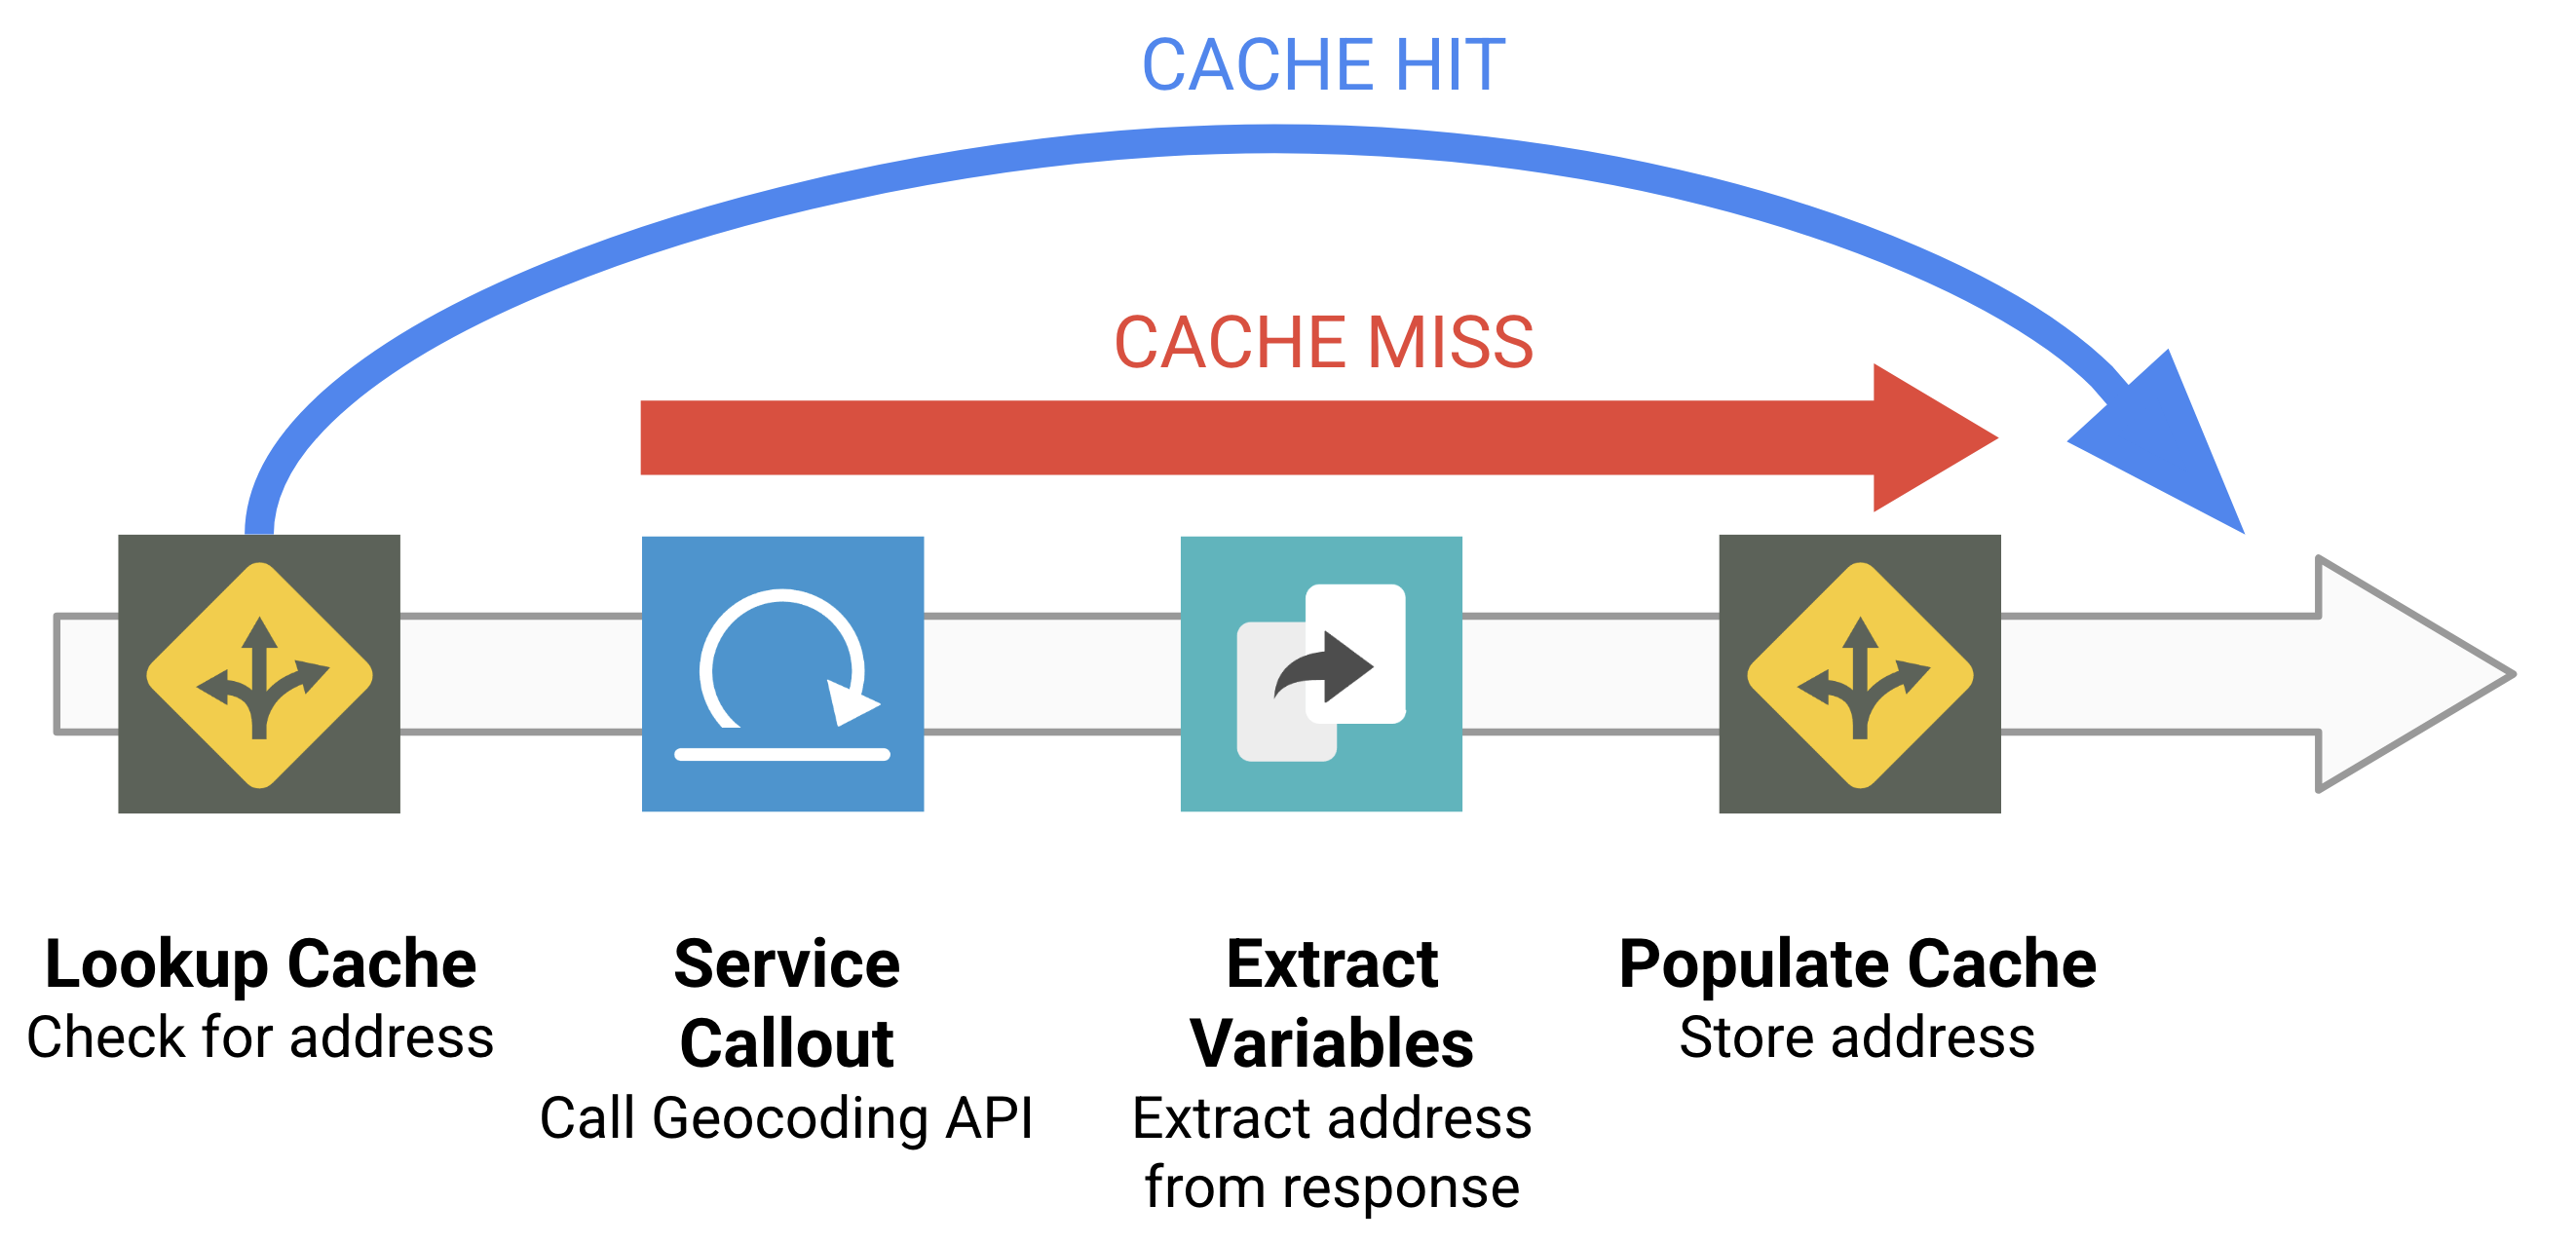
The shared flow will use this pattern:
The number of ATMs in our database is limited, and ATMs latitudes and longitudes do not change. To avoid excessive calls to the Geocoding API, the retrieved address will be cached, using the latitude and longitude for the cache key. If the address is not in the cache for the given latitude and longitude, the Geocoding API will be called, and the returned address will be stored in the cache.
get-address-for-location, and then click Create.The LookupCache policy will retrieve an address if it has previously been cached.
In the left menu for the shared flow, in the Shared Flows section, click default.
In the sharedflows/default.xml pane, click Add policy step (
Select Create new policy.
For Select policy, select Traffic Management > Lookup Cache.
In the Details section, specify the following:
| Property | Value |
|---|---|
| Name | LC-LookupAddress |
| Display Name | LC-LookupAddress |
Click Add, and then click LC-LookupAddress.
The policy is added to the flow, and the policy's configuration XML is shown in the pane below the flow.
Verify that the LookupCache configuration is in the pane, and replace the LookupCache configuration with:
The policy looks in the AddressesCache for an entry matching the specified latitude and longitude and, if found, assigns the value to the variable address.
The Service Callout policy will call the Google Geocoding API.
In the left menu for the shared flow, in the Shared Flows section, click default.
In the sharedflows/default.xml pane, click Add policy step (
Select Create new policy.
For Select policy, select Extension > Service Callout.
In the Details section, specify the following:
| Property | Value |
|---|---|
| Name | SC-GoogleGeocode |
| Display Name | SC-GoogleGeocode |
Leave the HTTP Target field unchanged, click Add, and then click SC-GoogleGeocode.
Verify that the ServiceCallout configuration is in the pane, and replace the ServiceCallout configuration with:
This policy calls the Geocoding API, using the geocoding.latitude, geocoding.longitude, and geocoding.apikey variables. The API call response is stored in the calloutResponse variable.
The ExtractVariables policy will extract the formatted address from the Google Geocoding API response.
In the left menu for the shared flow, in the Shared Flows section, click default.
In the sharedflows/default.xml pane, click Add policy step (
Select Create new policy.
For Select policy, select Mediation > Extract Variables.
In the Details section, specify the following:
| Property | Value |
|---|---|
| Name | EV-ExtractAddress |
| Display Name | EV-ExtractAddress |
Click Add, and then click EV-ExtractAddress.
Verify that the ExtractVariables configuration is in the pane, and replace the ExtractVariables configuration with:
This policy uses JSONPath to extract the formatted_address from the first result in the calloutResponse message JSON payload. The address is stored in the geocoding.address variable.
The PopulateCache policy will store the address into the cache.
In the left menu for the shared flow, in the Shared Flows section, click default.
In the sharedflows/default.xml pane, click Add policy step (
Select Create new policy.
For Select policy, select Traffic Management > PopulateCache.
In the Details section, specify the following:
| Property | Value |
|---|---|
| Name | PC-StoreAddress |
| Display Name | PC-StoreAddress |
Click Add, and then click PC-StoreAddress.
Verify that the PopulateCache configuration is in the pane, and replace the PopulateCache configuration with:
The policy stores the value in the address variable into the AddressesCache using the same latitude and longitude key fragments used by the LookupCache policy, in the same order. The ExpirySettings/TimeoutInSec setting specifies that stored data will be cached for 3600 seconds, or 1 hour.
When the address is found in the cache for a specific latitude and longitude (a cache hit), the ServiceCallout, ExtractVariables, and PopulateCache policies are not necessary and should be skipped.
In the left menu for the shared flow, in the Shared Flows section, click default.
The Code pane contains the default flow, which lists the four policies that have been attached:
Each Step specifies a policy that has been attached. The Name specifies the name of the attached policy. A Condition element can also be added, specifying a boolean condition that determines whether the policy should execute.
Look back at the shared flow pattern at the beginning of the task. When the address lookup succeeds, there is no need to call the service or store the data back in the cache. In this case, the second through fourth policy steps should be skipped.
The LookupCache policy sets a variable that indicates whether the item was found in the cache. If the variable lookupcache.{policyName}.cachehit is false, then the item was not found. The policies on the second to fourth steps should execute only when there was not a cache hit.
For each of the second through fourth steps, add the following condition inside the Step element:
After you have added them all, the shared flow should look like this:
Click Save.
Click Deploy.
For Environment, use eval.
Leave the Service Account blank, then click Deploy, and then click Confirm.
The shared flow uses an API key to call the Geocoding API, so a service account is not required.
A shared flow can only be tested by calling it from an API proxy.
Click check my progress to verify the objective.
In this task, you add a FlowCallout policy to the API proxy to call the shared flow that was just created. When you retrieve a specific ATM, your API proxy must extract the latitude and longitude from the Cloud Run service response and call the shared flow to retrieve the corresponding address. Then, a JavaScript policy will add the address to the API response.
A property set can be used to store non-expiring data that is easily accessed from within the API proxy. A property set value will hold the API key.
On the left navigation menu, select Proxy development > API proxies.
Click bank-v1, and then select the Develop tab.
In the left menu for the proxy, in the Resources section, click Add resource (
In the Resource type dropdown, select Property Set.
For the Resource name, specify geocoding.properties, and then click Add.
In the geocoding.properties pane, add the following property:
Replace <APIKEY> with the API_KEY you created in Task 3.
You can retrieve the API_KEY using this command in Cloud Shell:
Your geocoding.properties file should look similar to this:
In the left menu for the proxy, in the Proxy endpoints section, click default.
In the proxy-endpoints/default.xml pane, next to Proxy endpoint: default, click Add conditional flow (
In the Add conditional flow dialog, specify the following values:
| Property | Value |
|---|---|
| Flow name | GetATM |
| Description | retrieve a single ATM |
| Condition type | select Path and Verb |
| Path | /atms/{name} |
| Verb | select GET |
Leave Target URL blank.
Click Add.
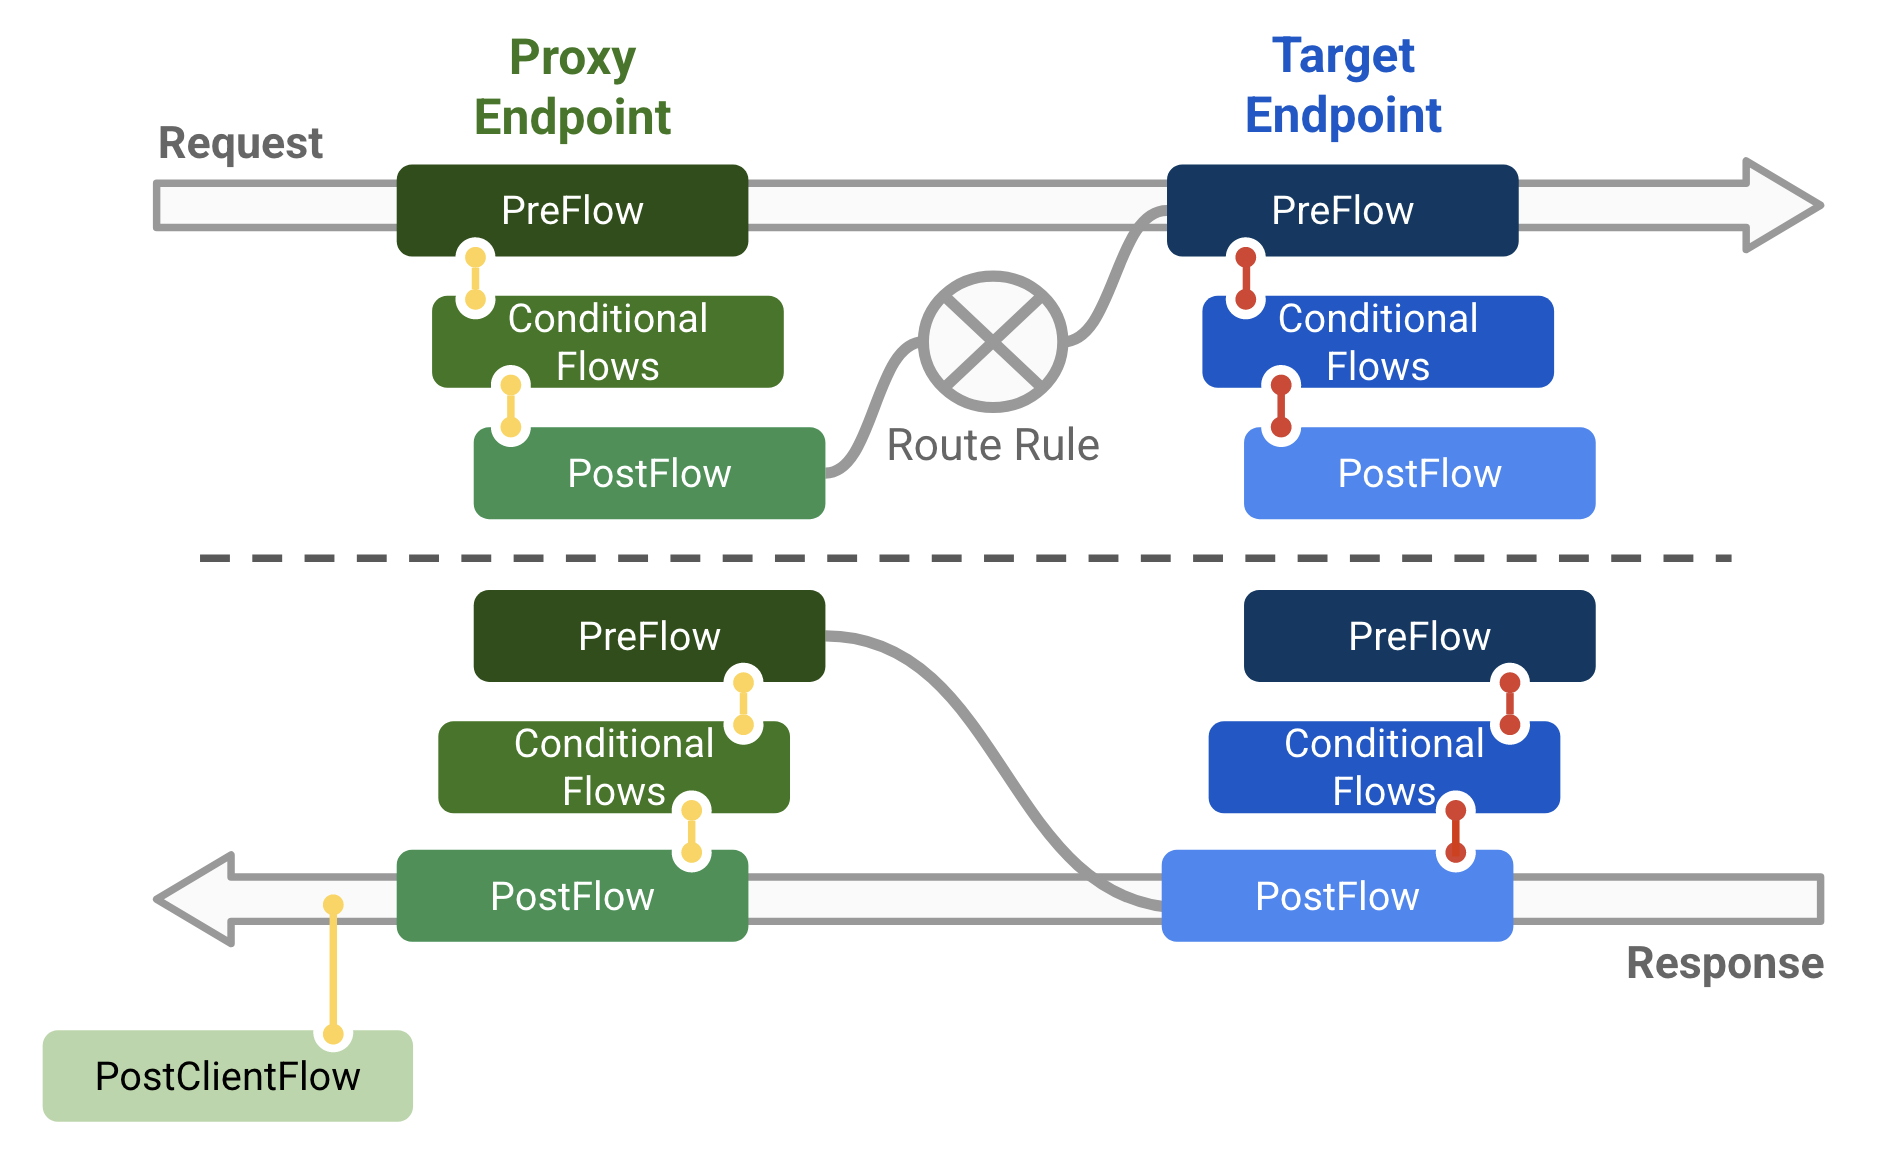
An API proxy is made up of many flows. Each flow provides a location for attaching policies as steps. Here is a diagram of an API proxy:
A conditional flow configuration will only be run when the condition is true. For this conditional flow, the proxy.pathsuffix variable must match the format /atms/{name}, and the request.verb variable must be GET.
You will attach some policies to the GetATM conditional flow so that they only execute for a GET /atms/{name} request. The policies must execute after the backend service is called, so they must be attached in a Proxy Endpoint Response conditional flow.
In the Proxy endpoint: default flow, in the Response section, to the right of GetATM, click Add Policy Step (
Select Create new policy.
For Select policy, select Mediation > Extract Variables.
In the Details section, specify the following:
| Property | Value |
|---|---|
| Name | EV-ExtractLatLng |
| Display name | EV-ExtractLatLng |
Click Add, and then click EV-ExtractLatLng.
Verify that the ExtractVariables configuration is in the pane, and replace the ExtractVariables configuration with:
This policy extracts the latitude and longitude from the GET /atms/{name} JSON response from the backend service. The IgnoreUnresolvedVariables element is set to true, which causes processing to continue even if the latitude and longitude are not found in the response.
In the Proxy endpoint: default flow, in the Response section, to the right of GetATM, click Add Policy Step (
Select Create new policy.
For Select policy, select Extension > Flow Callout.
In the Details section, specify the following:
| Property | Value |
|---|---|
| Name | FC-GetAddress |
| Display name | FC-GetAddress |
| Shared flow | select get-address-for-location |
| Condition | latitude != null AND longitude != null |
If either latitude or longitude was not retrieved for an ATM, the address cannot be determined, so the policy step is skipped.
Click Add, and then click FC-GetAddress.
Verify that the FlowCallout configuration is in the pane, and replace the FlowCallout configuration with:
This policy sets the latitude, longitude, and apikey variables as shared flow parameters and calls the shared flow. The shared flow sets the geocoding.address variable.
In the Proxy endpoint: default flow, in the Response section, to the right of GetATM, click Add Policy Step (
Select Create new policy.
For Select policy, select Extension > Javascript.
In the Details section, specify the following:
| Property | Value |
|---|---|
| Name | JS-AddAddress |
| Display name | JS-AddAddress |
| Javascript file | select Create New Resource |
In the Add resource section, specify the following:
| Property | Value |
|---|---|
| Source | select Create new file |
| Resource name | addAddress.js |
Click Add, and then select addAddress.js.
For Condition, specify latitude != null AND longitude != null.
Click Add, and then click JS-AddAddress.
In the left menu for the proxy, in the Resources > jsc section, click addAddress.js.
The code pane for the addAddress.js code is empty.
Add this JavaScript code to add the address to the response:
This code parses the JSON response payload into an object, adds an address field to the object, converts the object back into a JSON string, and then stores it in the response.
A try/catch block is used so that an exception isn't thrown out of the JavaScript policy. A fault is raised if an exception isn't caught, which would cause the API proxy processing to abort.
In the left menu for the proxy, in the Proxy endpoints > default section, click GetATM.
The Code pane contains the Get ATM flow, which lists the three policies that have been attached, with conditions on the second and third policies:
Click Save, and then click Save As New Revision.
Click Deploy.
For Environment, use eval.
For Service account, specify the service account's email address:
Click Deploy, and then click Confirm.
Click the Overview tab, and wait for the eval deployment status to show that the new revision has been deployed.
Click check my progress to verify the objective.
In Cloud Shell, open an SSH connection to your test VM:
Use the following command to call the bank-v1 proxy and retrieve all ATMs:
The response does not contain addresses, because the request does not use the GET /atms/{name} flow.
Retrieve a single ATM:
This response now contains the address that was added in the API proxy:
In this lab, you deployed a backend service on Cloud Run. You created an Apigee API proxy that proxied the backend service. You created a shared flow that retrieved and cached content from an external service. You called that shared flow from your API proxy and used JavaScript code to modify an API response.
Manual Last Updated: July 16, 2024
Lab Last Tested: July 16, 2024
Copyright 2025 Google LLC All rights reserved. Google and the Google logo are trademarks of Google LLC. All other company and product names may be trademarks of the respective companies with which they are associated.


This content is not currently available
We will notify you via email when it becomes available

Great!
We will contact you via email if it becomes available

One lab at a time
Confirm to end all existing labs and start this one