正在加载…
未找到任何结果。

    Networking in Google Cloud: Routing and Addressing

    Quick tip: Review the prerequisites before you run the lab
    Use an Incognito or private browser window to run this lab. This prevents any conflicts between your personal account and the student account, which may cause extra charges incurred to your personal account.
    欢迎加入我们的社区,一起测试和分享您的知识!
    done
    学习 700 多个动手实验和课程并获得相关技能徽章

    Cloud DNS - Traffic Steering using Geolocation Policy

    实验 1 小时 30 分钟 universal_currency_alt 5 积分 show_chart 入门级
    info 此实验可能会提供 AI 工具来支持您学习。
    欢迎加入我们的社区,一起测试和分享您的知识!
    done
    学习 700 多个动手实验和课程并获得相关技能徽章

    Overview

    Cloud DNS routing policies enable users to configure DNS based traffic steering. A user can either create a Weighted Round Robin (WRR) routing policy or a Geolocation (GEO) routing policy. You can configure routing policies by creating special ResourceRecordSets with special routing policy values.

    Use WRR to specify different weights per ResourceRecordSet for the resolution of domain names. Cloud DNS routing policies help ensure that traffic is distributed across multiple IP addresses by resolving DNS requests according to the configured weights.

    ​​In this lab, you will configure and test the Geolocation routing policy. Use GEO to specify source geolocations and to provide DNS answers corresponding to those geographies. The geolocation routing policy applies the nearest match for the source location when the traffic source location doesn't match any policy items exactly.

    What you learn

    You will learn how to:

    1. Launch client VMs, one in each region
    2. Launch server VMs, one in each region except asia-south1
    3. Create a private zone, for example.com
    4. Create a Geolocation routing policy using gcloud commands
    5. Test the configuration

    Architecture

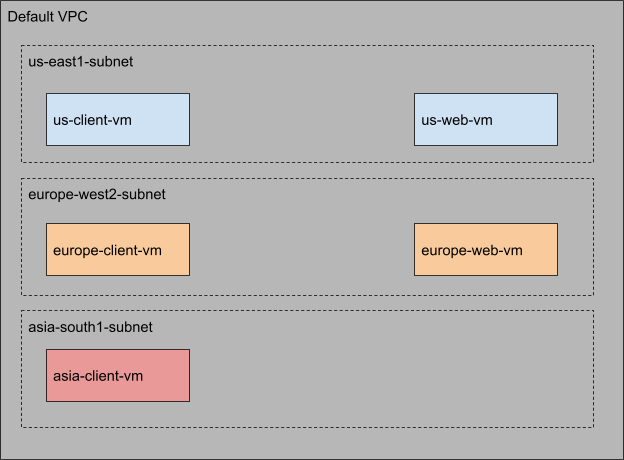
    Use the default VPC network to create all the virtual machines (VM) and launch client VMs in 3 Google Cloud locations: one in the United States, another in Europe, and another in Asia. To demonstrate the Geolocation routing policy behavior, you will create the server VMs only in two of those location - in the United States and in Europe. The archirtecture will look similar to what is shown in the graphic. (Note that the actual regions and zones within the United States and Europe may differ from those shown in the graphic.)

    The default VPC diagram

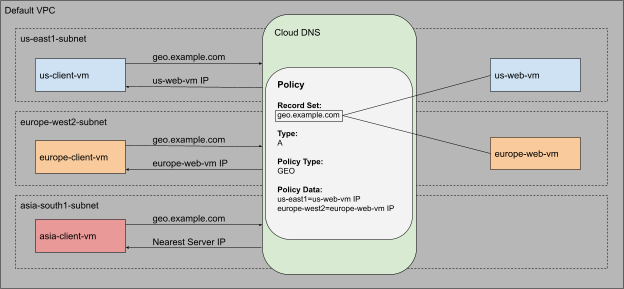
    You will use Cloud DNS routing policies and create ResourceRecordSets for geo.example.com and configure the Geolocation policy to help ensure that a client request is routed to a server in the client's closest region.

    The Cloud DNS routing policies diagram

    Setup and requirements

    Before you click the Start Lab button

    Note: Read these instructions.

    Labs are timed and you cannot pause them. The timer, which starts when you click Start Lab, shows how long Google Cloud resources will be made available to you.

    This Qwiklabs hands-on lab lets you do the lab activities yourself in a real cloud environment, not in a simulation or demo environment. It does so by giving you new, temporary credentials that you use to sign in and access Google Cloud for the duration of the lab.

    What you need

    To complete this lab, you need:

    • Access to a standard internet browser (Chrome browser recommended).
    • Time to complete the lab.
    Note: If you already have your own personal Google Cloud account or project, do not use it for this lab. Note: If you are using a Pixelbook, open an Incognito window to run this lab.

    How to start your lab and sign in to the Console

    1. Click the Start Lab button. If you need to pay for the lab, a pop-up opens for you to select your payment method. On the left is a panel populated with the temporary credentials that you must use for this lab.

      Credentials panel

    2. Copy the username, and then click Open Google Console. The lab spins up resources, and then opens another tab that shows the Choose an account page.

      Note: Open the tabs in separate windows, side-by-side.
    3. On the Choose an account page, click Use Another Account. The Sign in page opens.

      Choose an account dialog box with Use Another Account option highlighted

    4. Paste the username that you copied from the Connection Details panel. Then copy and paste the password.

    Note: You must use the credentials from the Connection Details panel. Do not use your Google Cloud Skills Boost credentials. If you have your own Google Cloud account, do not use it for this lab (avoids incurring charges).
    1. Click through the subsequent pages:
    • Accept the terms and conditions.
    • Do not add recovery options or two-factor authentication (because this is a temporary account).
    • Do not sign up for free trials.

    After a few moments, the Cloud console opens in this tab.

    Note: You can view the menu with a list of Google Cloud Products and Services by clicking the Navigation menu at the top-left. Cloud Console Menu

    Activate Google Cloud Shell

    Google Cloud Shell is a virtual machine that is loaded with development tools. It offers a persistent 5GB home directory and runs on the Google Cloud.

    Google Cloud Shell provides command-line access to your Google Cloud resources.

    1. In Cloud console, on the top right toolbar, click the Open Cloud Shell button.

      Highlighted Cloud Shell icon

    2. Click Continue.

    It takes a few moments to provision and connect to the environment. When you are connected, you are already authenticated, and the project is set to your PROJECT_ID. For example:

    Project ID highlighted in the Cloud Shell Terminal

    gcloud is the command-line tool for Google Cloud. It comes pre-installed on Cloud Shell and supports tab-completion.

    • You can list the active account name with this command:
    gcloud auth list

    Output:

    Credentialed accounts: - @.com (active)

    Example output:

    Credentialed accounts: - google1623327_student@qwiklabs.net
    • You can list the project ID with this command:
    gcloud config list project

    Output:

    [core] project =

    Example output:

    [core] project = qwiklabs-gcp-44776a13dea667a6 Note: Full documentation of gcloud is available in the gcloud CLI overview guide .

    Task 1. Enable APIs

    Ensure that the Compute and the Cloud DNS APIs are enabled. In this section, you will enable the APIs manually, using gcloud commands.

    Enable Compute Engine API

    • Run the gcloud services enable command to enable the Compute Engine API:
    gcloud services enable compute.googleapis.com

    This command can take a few minutes to complete.

    Enable Cloud DNS API

    • Run the gcloud services enable command to enable the Cloud DNS API:
    gcloud services enable dns.googleapis.com

    This command can take a few minutes to complete.

    Verify that the APIs are enabled

    • Run the gcloud services list command to list all the enabled APIs. We should see compute.googleapis.com and dns.googleapis.com in the listed output.
    gcloud services list | grep -E 'compute|dns'

    Output:

    NAME: compute.googleapis.com NAME: dns.googleapis.com

    Task 2. Configure the firewall

    Before you create the client VMs and the web servers, you need to create two firewall rules.

    Note: The firewall-rules create command can take a few minutes to complete. Please wait for the "Creating firewall...done" message before proceeding to the next step.
    1. To be able to SSH into the client VMs, run the following to create a firewall rule to allow SSH traffic from Identity Aware Proxies (IAP):
    gcloud compute firewall-rules create fw-default-iapproxy \ --direction=INGRESS \ --priority=1000 \ --network=default \ --action=ALLOW \ --rules=tcp:22,icmp \ --source-ranges=35.235.240.0/20

    Output:

    Creating firewall...working..Created [https://www.googleapis.com/compute/v1/projects/qwiklabs-gcp-01-c5d669dffb06/global/firewalls/fw-default-iapproxy]. Creating firewall...done. NAME: fw-default-iapproxy NETWORK: default DIRECTION: INGRESS PRIORITY: 1000 ALLOW: tcp:22,icmp DENY: DISABLED: False
    1. To allow HTTP traffic on the web servers, each web server will have a "http-server" tag associated with it. You will use this tag to apply the firewall rule only to your web servers:
    gcloud compute firewall-rules create allow-http-traffic --direction=INGRESS --priority=1000 --network=default --action=ALLOW --rules=tcp:80 --source-ranges=0.0.0.0/0 --target-tags=http-server

    Output:

    Creating firewall...working..Created [https://www.googleapis.com/compute/v1/projects/routing-policy-lab/global/firewalls/allow-http-traffic]. Creating firewall...done. NAME: allow-http-traffic NETWORK: default DIRECTION: INGRESS PRIORITY: 1000 ALLOW: tcp:80 DENY: DISABLED: False

    Click Check my progress to verify the objective. Configure the Firewall

    Task 3. Launch client VMs

    Now that the APIs are enabled, and the firewall rules are in place, the next step is to set up the environment. In this section, you will create 3 client VMs, one in each region.

    Launch a client in the United States

    • Run the gcloud compute instances create command to create the client VMs:
    gcloud compute instances create us-client-vm --machine-type=e2-micro --zone {{{project_0.default_zone|"Zone 1"}}}

    This command can take a few minutes to complete. Please wait for a "Created" message before moving to the next step. Note that you may see a different zone in gcloud than in the sample output shown below.

    Output:

    Created [https://www.googleapis.com/compute/v1/projects/routing-policy-lab/zones/us-east1-b/instances/us-client-vm]. NAME: us-client-vm ZONE: {{{project_0.default_zone|"Zone 1"}}} MACHINE_TYPE: e2-micro PREEMPTIBLE: INTERNAL_IP: 10.142.0.2 EXTERNAL_IP: 34.138.90.216 STATUS: RUNNING

    Launch a client in Europe

    • Run the following to create the client VMs:
    gcloud compute instances create europe-client-vm --machine-type=e2-micro --zone "{{{project_0.default_zone_2|"Zone 2"}}}"

    Note that you may see a different zone in gcloud than in the sample output shown below.

    Output:

    Created [https://www.googleapis.com/compute/v1/projects/routing-policy-lab/zones/europe-west2-a/instances/europe-client-vm]. NAME: europe-client-vm ZONE: {{{project_0.default_zone_2|"Zone 2"}}} MACHINE_TYPE: e2-micro PREEMPTIBLE: INTERNAL_IP: 10.154.0.2 EXTERNAL_IP: 35.242.164.177 STATUS: RUNNING

    Launch a client in Asia

    1. Run the following to create the client VMs:
    gcloud compute instances create asia-client-vm --machine-type=e2-micro --zone "{{{project_0.default_zone_3|"Zone 3"}}}"

    Note that you may see a different zone in gcloud than in the sample output shown below.

    Output:

    Created [https://www.googleapis.com/compute/v1/projects/routing-policy-lab/zones/asia-south1-a/instances/asia-client-vm]. NAME: asia-client-vm ZONE: {{{project_0.default_zone_3|"Zone 3"}}} MACHINE_TYPE: e2-micro PREEMPTIBLE: INTERNAL_IP: 10.160.0.2 EXTERNAL_IP: 34.93.179.212 STATUS: RUNNING

    Click Check my progress to verify the objective. Launch client VMs

    Task 4. Launch Server VMs

    Now that the client VM's are up and running, the next step is to create the server VMs. You will use a startup script to configure and set up the web servers. As mentioned earlier, you will create the server VMs only in 2 regions: us-east1 and europe-west2.

    • Run the gcloud compute instances create command to create the server VMs. The compute instance create command can take a few minutes to complete. Please wait for a "Created" message before moving to the next step.

    Launch server in the United States

    • Run the following command:
    gcloud compute instances create us-web-vm \ --machine-type=e2-micro \ --zone={{{project_0.default_zone|"Zone 1"}}} \ --network=default \ --subnet=default \ --tags=http-server \ --metadata=startup-script='#! /bin/bash apt-get update apt-get install apache2 -y echo "Page served from: {{{project_0.default_region|"Region 1"}}}" | \ tee /var/www/html/index.html systemctl restart apache2'

    Note that you may see a different zone in gcloud than in the sample output shown below.

    Output:

    Created [https://www.googleapis.com/compute/v1/projects/routing-policy-lab/zones/us-east1-b/instances/us-web-vm]. NAME: us-web-vm ZONE: {{{project_0.default_zone|"Zone 1"}}} MACHINE_TYPE: e2-micro PREEMPTIBLE: INTERNAL_IP: 10.142.0.3 EXTERNAL_IP: 34.73.110.151 STATUS: RUNNING

    Launch server in Europe

    • Run the following to command:
    gcloud compute instances create europe-web-vm \ --machine-type=e2-micro \ --zone={{{project_0.default_zone_2|"Zone 2"}}} \ --network=default \ --subnet=default \ --tags=http-server \ --metadata=startup-script='#! /bin/bash apt-get update apt-get install apache2 -y echo "Page served from: {{{project_0.default_zone_2|"Zone 2"}}}" | \ tee /var/www/html/index.html systemctl restart apache2'

    Note that you may see a different zone in gcloud than in the sample output shown below.

    Output:

    Created [https://www.googleapis.com/compute/v1/projects/routing-policy-lab/zones/europe-west2-a/instances/europe-web-vm]. NAME: europe-web-vm ZONE: {{{project_0.default_zone_2|"Zone 2"}}} MACHINE_TYPE: e2-micro PREEMPTIBLE: INTERNAL_IP: 10.154.0.3 EXTERNAL_IP: 35.234.156.62 STATUS: RUNNING

    Click Check my progress to verify the objective. Launch Server VMs

    Task 5. Setting up environment variables

    Before you configure Cloud DNS, note the Internal IP addresses of the web servers. You need these IPs to create the routing policy. In this section, you will use the gcloud compute instances describe command to save the internal IP addresses as environment variables.

    1. Command to save IP address for the VM in the United States
    export US_WEB_IP=$(gcloud compute instances describe us-web-vm --zone={{{ project_0.default_zone | "Zone 1" }}} --format="value(networkInterfaces.networkIP)")
    1. Command to save the IP address for the VM in Europe:
    export EUROPE_WEB_IP=$(gcloud compute instances describe europe-web-vm --zone={{{project_0.default_zone_2|"Zone 2"}}} --format="value(networkInterfaces.networkIP)")

    Task 6. Create the private zone

    Now that your client and server VMs are running, it's time to configure the DNS settings. Before creating the A records for the web servers, you need to create the Cloud DNS Private Zone.

    For this lab, use the example.com domain name for the Cloud DNS zone.

    • Use the gcloud dns managed-zones create command to create the zone:
    gcloud dns managed-zones create example --description=test --dns-name=example.com --networks=default --visibility=private

    Output:

    Created [https://dns.googleapis.com/dns/v1/projects/routing-policy-lab/managedZones/example].

    Task 7. Create Cloud DNS Routing Policy

    In this section, configure the Cloud DNS Geolocation Routing Policy. You will create a record set in the example.com zone that you created in the previous section.

    Create

    • Use the gcloud dns record-sets create command to create the geo.example.com recordset:
    gcloud dns record-sets create geo.example.com \ --ttl=5 --type=A --zone=example \ --routing-policy-type=GEO \ --routing-policy-data="{{{ project_0.default_region | "Region 1" }}}=$US_WEB_IP;{{{project_0.default_region_2|"Region 2"}}}=$EUROPE_WEB_IP"

    You are creating an A record with a Time to Live (TTL) of 5 seconds. The policy type is GEO, and the routing_policy_data field accepts a semicolon-delimited list of the format ${region}:${rrdata},${rrdata}.

    Output:

    NAME: geo.example.com. TYPE: A TTL: 5 DATA: {{{ project_0.default_region | "filled at lab start" }}}: 10.142.0.3; {{{project_0.default_region_2|"Region 2"}}}: 10.154.0.3

    Verify

    • Use the dns record-sets list command to verify that the geo.example.com DNS record is configured as expected:
    gcloud dns record-sets list --zone=example

    The output shows that an A record with a TTL of 5 is created for geo.example.com, and the data matches our server set up in each region.

    Note that in gcloud, the DATA value under geo.example.com may include United States and Europe regions that differ from the sample output below.

    Output:

    NAME: example.com. TYPE: NS TTL: 21600 DATA: ns-gcp-private.googledomains.com. NAME: example.com. TYPE: SOA TTL: 21600 DATA: ns-gcp-private.googledomains.com. cloud-dns-hostmaster.google.com. 1 21600 3600 259200 300 NAME: geo.example.com. TYPE: A TTL: 5 DATA: {{{ project_0.default_region | "REGION" }}}: 10.142.0.3; {{{project_0.default_region_2|"Region 2"}}}: 10.154.0.3

    Click Check my progress to verify the objective. Create the Private Zone

    Task 8. Testing

    It's time to test the configuration. In this section, you will SSH into all the client VMs. Since all of the web server VMs are behind the geo.example.com domain, you will use CURL command to access this endpoint.

    Since you are using a Geolocation policy, the expected result is that:

    • The client in the US should always get a response from the region.
    • The client in Europe should always get a response from the region.

    Testing from the client VM in Europe

    1. Use the gcloud compute ssh command to log into the client VM:
    gcloud compute ssh europe-client-vm --zone {{{project_0.default_zone_2|"Zone 2"}}} --tunnel-through-iap
    1. Follow prompts to SSH into the machine. When asked to enter the passphrase, leave the field blank and press the Enter key twice.

    Once complete, the command line should change to "user_name@europe-client-vm:~$"

    Output:

    Warning: Permanently added 'compute.4621780534809863836' (ECDSA) to the list of known hosts. Linux europe-client-vm 4.19.0-18-cloud-amd64 #1 SMP Debian 4.19.208-1 (2021-09-29) x86_64 The programs included with the Debian GNU/Linux system are free software; the exact distribution terms for each program are described in the individual files in /usr/share/doc/*/copyright. Debian GNU/Linux comes with ABSOLUTELY NO WARRANTY, to the extent permitted by applicable law. user_name@europe-client-vm:~$

    Use curl to access the web server

    1. Now that you are in the client VM, use the CURL command to access the geo.example.com endpoint. The loop is configured to run the command ten times with a sleep timer of 6 seconds:
    for i in {1..10}; do echo $i; curl geo.example.com; sleep 6; done

    Since the TTL on the DNS record is set to 5 seconds, a sleep timer of 6 seconds has been added. The sleep timer will make sure that you get an uncached DNS response for each cURL request. This command will take approximately one minute to complete.

    The expected output is "Page served from:

    1 Page served from: {{{project_0.default_zone_2|"Zone 2"}}} 2 Page served from: {{{project_0.default_zone_2|"Zone 2"}}} 3 Page served from: {{{project_0.default_zone_2|"Zone 2"}}} 4 Page served from: {{{project_0.default_zone_2|"Zone 2"}}} 5 Page served from: {{{project_0.default_zone_2|"Zone 2"}}} 6 Page served from: {{{project_0.default_zone_2|"Zone 2"}}} 7 Page served from: {{{project_0.default_zone_2|"Zone 2"}}} 8 Page served from: {{{project_0.default_zone_2|"Zone 2"}}} 9 Page served from: {{{project_0.default_zone_2|"Zone 2"}}} 10 Page served from: {{{project_0.default_zone_2|"Zone 2"}}}
    1. Run this test multiple times and analyze the output to see which server is responding to the request. The client should always receive a response from a server in the client's region.

    Getting back to Cloud Shell

    • Once you have run the test multiple times, exit the client VM in Europe by typing "exit" in the VM's command prompt. This will bring you back to the Cloud Shell console.

    Testing from the client VM in us-east1

    Now perform the same test from the client VM in the US.

    1. Use the gcloud command below to SSH into the us-client-vm:
    gcloud compute ssh us-client-vm --zone {{{ project_0.default_zone | "Zone 1" }}} --tunnel-through-iap
    1. Use the curl command to access geo.example.com:
    for i in {1..10}; do echo $i; curl geo.example.com; sleep 6; done
    1. Now analyze the output to see which server is responding to the request. The client should always receive a response from a server in the client's region. The expected output is "Page served from: ".

    2. Once you have run the test multiple times, exit the client VM in the US by typing "exit" in the VM's command prompt.

    Testing from the client VM in Asia

    So far you have tested the setup from the United States and Europe. You have servers running in both the regions and have matching record sets for both the regions in Cloud DNS routing policy. There is no matching policy item for the region within Asia (selected earlier) in the Cloud DNS routing policy.

    The Geolocation policy will apply a "nearest" match for source location when the source of the traffic doesn't match any policy items exactly. This means that the Asia client should be directed to the nearest web server.

    In this section, you will resolve the geo.example.com domain from the client VM in Asia and will analyze the response.

    1. SSH into the asia-client-vm. For <SELECTED-ZONE>, use the zone that you used to create the Asia client.
    gcloud compute ssh asia-client-vm --zone <SELECTED-ZONE> --tunnel-through-iap
    1. Then access geo.example.com:
    for i in {1..10}; do echo $i; curl geo.example.com; sleep 6; done
    1. Analyze the output to see which server is responding to the request. Since there is no policy item for any of the Asia regions, Cloud DNS will direct the client to the nearest server.

    2. Once you have run the test multiple times, exit the client VM in Asia by typing "exit" in the VM's command prompt.

    Task 9. Delete lab resources

    Although all resources you used in this lab will be deleted when you finish, it is good practice to remove resources you no longer need to avoid unnecessary charges.

    • The following gcloud commands will delete all the resources that were created in the lab. (Note that SELECTED-ZONE is the Asia zone that you wrote down earlier.)
    #delete VMS gcloud compute instances delete -q us-client-vm --zone {{{ project_0.default_zone | "ZONE" }}} gcloud compute instances delete -q us-web-vm --zone {{{ project_0.default_zone | "ZONE" }}} gcloud compute instances delete -q europe-client-vm --zone {{{project_0.default_zone_2|"Zone 2"}}} gcloud compute instances delete -q europe-web-vm --zone {{{project_0.default_zone_2|"Zone 2"}}} gcloud compute instances delete -q asia-client-vm --zone SELECTED-ZONE #delete FW rules gcloud compute firewall-rules delete -q allow-http-traffic gcloud compute firewall-rules delete fw-default-iapproxy #delete record set gcloud dns record-sets delete geo.example.com --type=A --zone=example #delete private zone gcloud dns managed-zones delete example

    Congratulations

    In this lab, you configured and used Cloud DNS routing policies with Geolocation routing policy. You also verified the configuration and behavior of the Cloud DNS routing policy by observing the HTTP response when accessing the web servers.

    Next steps / Learn more

    You can read more about Cloud DNS routing policies.

    End your lab

    When you have completed your lab, click End Lab. Google Cloud Skills Boost removes the resources you’ve used and cleans the account for you.

    You will be given an opportunity to rate the lab experience. Select the applicable number of stars, type a comment, and then click Submit.

    The number of stars indicates the following:

    • 1 star = Very dissatisfied
    • 2 stars = Dissatisfied
    • 3 stars = Neutral
    • 4 stars = Satisfied
    • 5 stars = Very satisfied

    You can close the dialog box if you don't want to provide feedback.

    For feedback, suggestions, or corrections, please use the Support tab.

    Copyright 2022 Google LLC All rights reserved. Google and the Google logo are trademarks of Google LLC. All other company and product names may be trademarks of the respective companies with which they are associated.

    上一步 下一步

    Before you begin

    1. Labs create a Google Cloud project and resources for a fixed time
    2. Labs have a time limit and no pause feature. If you end the lab, you'll have to restart from the beginning.
    3. On the top left of your screen, click Start lab to begin

    此内容目前不可用

    一旦可用,我们会通过电子邮件告知您

    太好了!

    一旦可用,我们会通过电子邮件告知您

    One lab at a time

    Confirm to end all existing labs and start this one

    Use private browsing to run the lab

    Use an Incognito or private browser window to run this lab. This prevents any conflicts between your personal account and the Student account, which may cause extra charges incurred to your personal account.
    预览