Exploring APIs
Checkpoints
Create a Pub/Sub Topic
/ 5
Create a Pub/Sub Subscription
/ 5
Create an IoT Registry (region: us-central1)
/ 5
Create a Device
/ 5
[DEPRECATED] APIs Explorer: PubSub and IoT
- GSP284
- Overview
- Setup and Requirements
- Download the Sample Code
- Create a Pub/Sub Topic
- Create a Pub/Sub Subscription
- View the topic and subscription in the Console
- Create an IoT Registry
- Generate RSA keys and create a device
- Start the Virtual Server
- Start the Virtual Device and Observe
- Test your Understanding
- Congratulations!
GSP284
Overview
The Google APIs Explorer is a tool that helps you explore various Google APIs interactively. With the APIs Explorer, you can:
- Browse quickly through available APIs and versions.
- See methods available for each API and what parameters they support along with inline documentation.
- Execute requests for any method and see responses in real time.
- Make authenticated and authorized API calls.
- Search across all services, methods, and your recent requests to quickly find what you are looking for.
Cloud IoT Core is a fully managed service that allows you to easily and securely connect, manage, and ingest data from millions of globally dispersed devices. In this lab you'll build a simple but complete IoT system using Cloud IoT Core and Pub/Sub.
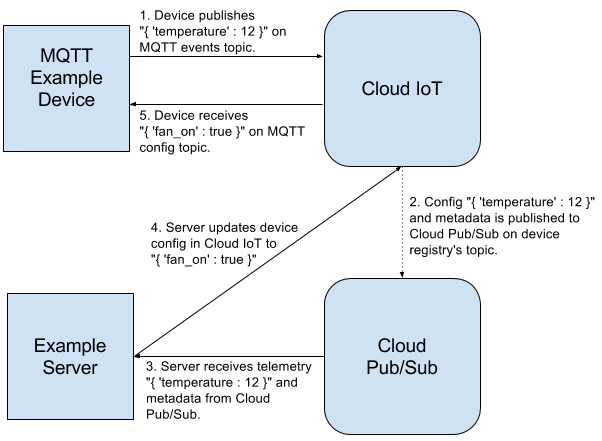
The devices in this system publish temperature data to their telemetry feeds, and a server consumes the telemetry data from a Cloud Pub/Sub topic. The server then decides whether to turn on or off the individual devices' fans, via a Cloud IoT Core configuration update. The device will respond to configuration changes from a server based on real-time data.
To accomplish this, you will create Pub/Sub topics and subscriptions as well as IoT registries and devices. You will configure and deploy these services with the Google APIs Explorer. The following model illustrates how the system's components are interconnected:
Objectives
In this lab, you will:
- Create a Pub/Sub topic and subscription with the APIs Explorer.
- Create an IoT registry and add a device to it.
- Provision a device and transmit telemetry data from it.
- Control a device using a server based on a telemetry stream.
Prerequisites
This is an advanced level lab. You should be familiar with the basic functioning and architecture of APIs. Experience with Cloud Shell and command line interface tools is recommended.
Familiarity with the the APIs Explorer tool, Cloud IoT, and Cloud Pub/Sub is recommended, so please at a minimum take the following labs before attempting this one:
Once you're ready, scroll down and follow the steps below to get your lab environment set up.
Setup and Requirements
Before you click the Start Lab button
Read these instructions. Labs are timed and you cannot pause them. The timer, which starts when you click Start Lab, shows how long Google Cloud resources will be made available to you.
This hands-on lab lets you do the lab activities yourself in a real cloud environment, not in a simulation or demo environment. It does so by giving you new, temporary credentials that you use to sign in and access Google Cloud for the duration of the lab.
To complete this lab, you need:
- Access to a standard internet browser (Chrome browser recommended).
- Time to complete the lab---remember, once you start, you cannot pause a lab.
How to start your lab and sign in to the Google Cloud Console
-
Click the Start Lab button. If you need to pay for the lab, a pop-up opens for you to select your payment method. On the left is the Lab Details panel with the following:
- The Open Google Console button
- Time remaining
- The temporary credentials that you must use for this lab
- Other information, if needed, to step through this lab
-
Click Open Google Console. The lab spins up resources, and then opens another tab that shows the Sign in page.
Tip: Arrange the tabs in separate windows, side-by-side.
Note: If you see the Choose an account dialog, click Use Another Account. -
If necessary, copy the Username from the Lab Details panel and paste it into the Sign in dialog. Click Next.
-
Copy the Password from the Lab Details panel and paste it into the Welcome dialog. Click Next.
Important: You must use the credentials from the left panel. Do not use your Google Cloud Skills Boost credentials. Note: Using your own Google Cloud account for this lab may incur extra charges. -
Click through the subsequent pages:
- Accept the terms and conditions.
- Do not add recovery options or two-factor authentication (because this is a temporary account).
- Do not sign up for free trials.
After a few moments, the Cloud Console opens in this tab.

Activate Cloud Shell
Cloud Shell is a virtual machine that is loaded with development tools. It offers a persistent 5GB home directory and runs on the Google Cloud. Cloud Shell provides command-line access to your Google Cloud resources.
-
Click Activate Cloud Shell
at the top of the Google Cloud console.
-
Click Continue.
It takes a few moments to provision and connect to the environment. When you are connected, you are already authenticated, and the project is set to your PROJECT_ID. The output contains a line that declares the PROJECT_ID for this session:
gcloud is the command-line tool for Google Cloud. It comes pre-installed on Cloud Shell and supports tab-completion.
-
(Optional) You can list the active account name with this command:
Output:
-
(Optional) You can list the project ID with this command:
Output:
Example output:
gcloud, in Google Cloud, refer to the gcloud CLI overview guide.
Download the Sample Code
In Cloud Shell run the following command to clone the codebase that contains the telemetry server:
Enter the following command to cd into the sample folder:
Python virtual environments are used to isolate package installation from the system.
Y and then Enter. If you get Permission denied error, then run the command sudo
apt-get install -y virtualenv.Activate the virtual environment.
Install the sample dependencies:
Check that you have installed the Python dependencies correctly by running all the Python scripts without passing any parameters:
If the dependencies installed successfully, the programs will print their respective usage messages. This is an example of a successful installation:
You can safely ignore any errors that resemble cloudiot_pubsub_example_mqtt_device.py: error: argument --project_id is required
Create a Pub/Sub Topic
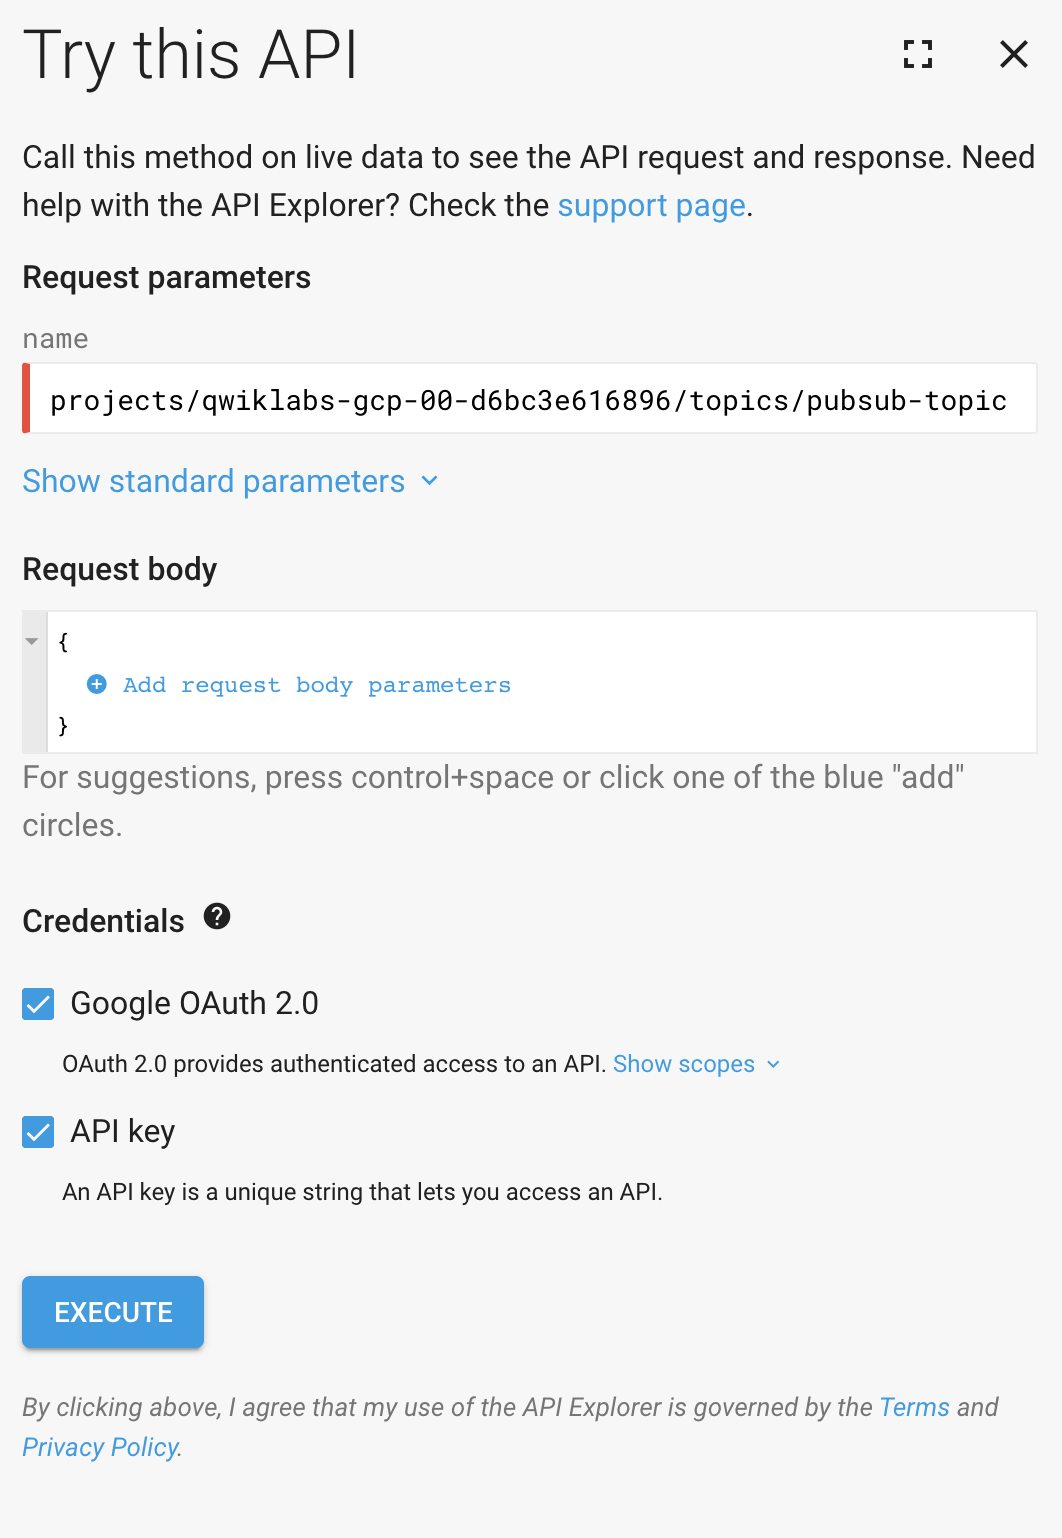
To access the Pub/Sub APIs Explorer tool to use the projects.topics.create method, open this link in a new tab.
You will see a "Try this API" panel on the right of the screen.
Now fill out the method so that the name field matches the following, replacing <YOUR-QWIKLABS-PROJECT> with your Project ID for this lab:
Your method should now resemble the following:
Make sure that there are no trailing spaces in the name field. Click the Execute button, choose your Qwiklabs student account and click Allow.
Your response should resemble the following:
The devices in this system publish temperature data to their telemetry feeds, and the server will consume telemetry data from the Cloud Pub/Sub topic you just created.
Test Completed Task
Click Check my progress to verify your performed task. If you have completed the task successfully you will granted with an assessment score.
Close this browser tab once you have verified the above output.
Create a Pub/Sub Subscription
To access the Pub/Sub APIs Explorer tool to use the projects.subscriptions.create method, open this link in a new tab.
You will see a "Try this API" panel on the right side of the screen.
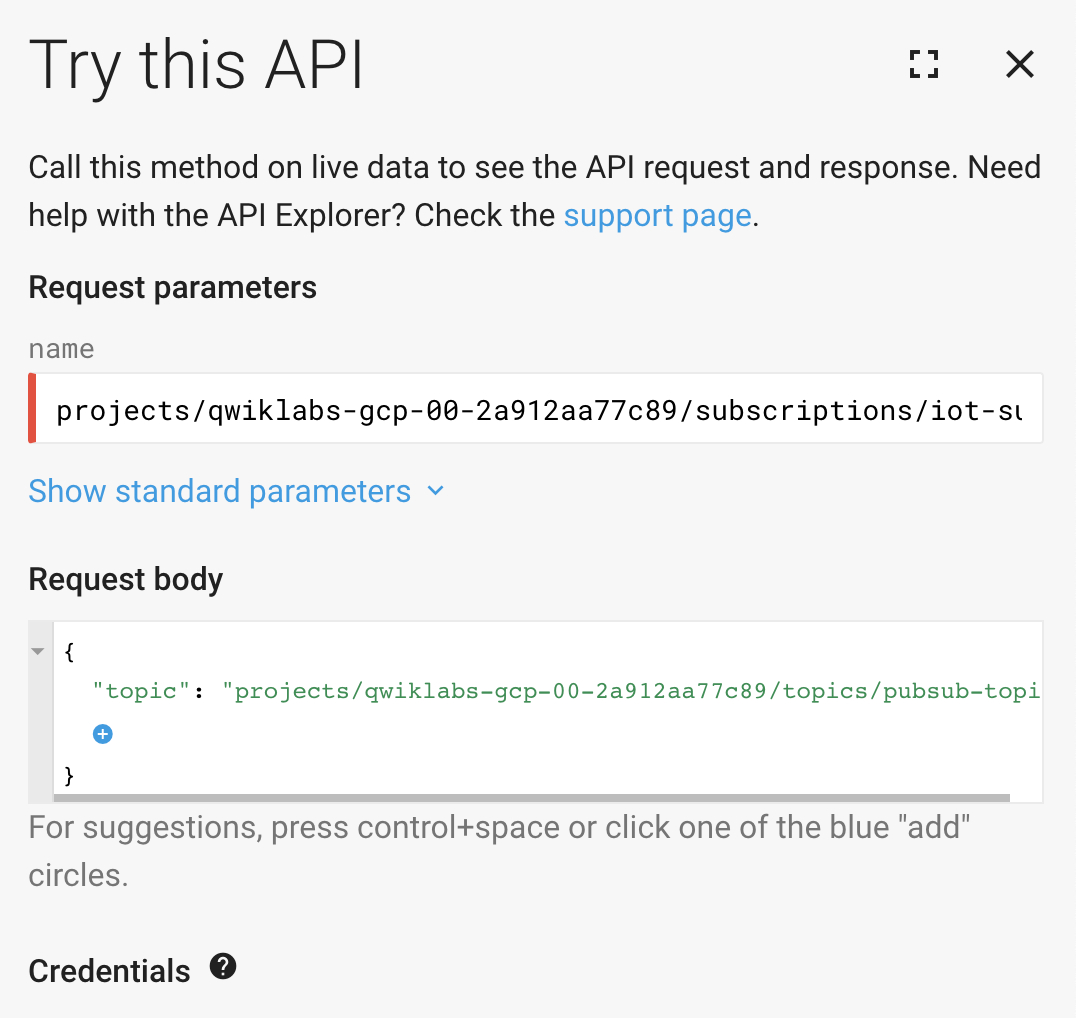
Now fill out the method so that the name field matches the following, replacing <YOUR-QWIKLABS-PROJECT> with your Qwiklabs project ID:
Click inside the curly braces of the request body and select topic from the dropdown menu. Then click inside the quotations for topic and add the following, replacing <YOUR-PROJECT-ID> with your Google Cloud project ID:
Your method should now resemble the following:
Make sure that there are no trailing spaces in the name field. Click the Execute button. Your response should resemble the following:
This subscription is a direct channel to the Pub/Sub topic where the telemetry data is published and it allows your device to pull messages directly from pubsub-topic.
Test Completed Task
Click Check my progress to verify your performed task. If you have completed the task successfully you will granted with an assessment score.
You can now close the Pub/Sub APIs Explorer tab.
View the topic and subscription in the Console
Return to the Cloud Console and from the Navigation menu under the Big Data header click Pub/Sub > Topics. You should see the pubsub-topic you created:
From the left-hand menu, select Subscriptions. You should see the iot-sub subscription that you created:
Now that you have your Pub/Sub topic and subscription created, you will build a registry to contain your IoT device.
Create an IoT Registry
In your Cloud Shell session, run the following command to create an IoT registry named iot-registry:
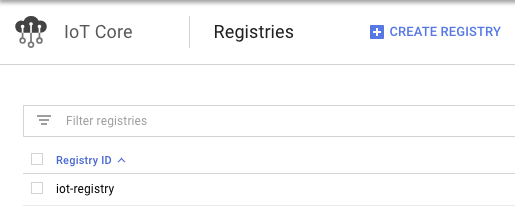
From the Navigation menu under the Big Data header click IoT Core. This should take you to the registries page, and you should see the iot-registry you just created:
Test Completed Task
Click Check my progress to verify your performed task. If you have completed the task successfully you will granted with an assessment score.
Generate RSA keys and create a device
Now generate RSA public and private keys that will be used for authenticating your virtual device when it connects.
In Cloud Shell, verify that you are still in the /python-docs-samples/iot/api-client/end_to_end_example directory.
Run the following command to generate RSA keys:
Run the following command to view the contents of the key:
You should get a similar output:
Then exit the nano editor by holding CTRL + X.
Now run the following command to create a device called my-device:
Alternatively you can create my-device using below steps. Skip this step, if you have already created my-device
-
Now in the Console click on
iot-registry. In the left panel click Devices then click Create a Device. -
Device ID =
my-device -
Click Create.
Click on iot-registry and then click Devices in the left panel and you should see your newly created device my-device.
Test Completed Task
Click Check my progress to verify your performed task. If you have completed the task successfully you will granted with an assessment score.
Start the Virtual Server
Now that you have created all of the Cloud resources, connect your device and communicate with it via Pub/Sub, simulating a device and server.
Run the following command to open the cloudiot_pubsub_example_server.py file with the nano text editor:
Scroll down and replace the code used to generate service account credentials from a provided JSON file to instead use the built-in credentials for Compute Engine, which is running under the hood of the Cloud Shell.
Replace the following code:
With this:
Then press CTRL+X → Y → ENTER to save the file and exit the text editor.
Now that you have changed the server to use the Compute Engine credentials, start the server by running the following command, replacing <YOUR-PROJECT-ID> with your Project ID:
When the server starts, you will see the message Listening for messages on projects/your-project-id/subscriptions/iot-sub, which indicates the server is running.
Start the Virtual Device and Observe
Add a new tab to your Cloud Shell by clicking the + icon on the Cloud Shell ribbon.
In the new Cloud Shell tab, run the following to navigate to the device sample folder and initialize your virtual environment:
Retrieve the latest root certificate from Google:
Now, connect the virtual device using the private key, registry ID, device ID, and so on by running the following command, replacing <YOUR-PROJECT-ID> with your Project ID:
When you connect the device, it will show and report its temperature, which increases when the fan is turned off. If the fan is enabled, the virtual device's temperature will decrease. Because the device is controlled from the server, which is analyzing the stream of incoming sensor data and making this decision for it, the device does not need to be aware of the conditions for enabling or disabling its fan.
The following section shows the output of the server that is subscribed to the telemetry events from the device:
Test your Understanding
Below are a multiple choice questions to reinforce your understanding of this lab's concepts. Answer them to the best of your abilities.
Congratulations!
You have now set up a virtual device and are successfully transmitting telemetry data and receiving configuration changes. At this point you have a solid understanding of Google Cloud IoT Core, Pub/Sub, and how you can provision their services through the APIs Explorer.
Finish Your Quest
This self-paced lab is part of the Qwiklabs IoT in the Google Cloud and Exploring APIs Quests. A Quest is a series of related labs that form a learning path. Completing a Quest earns you the badge above, to recognize your achievement. You can make your badge (or badges) public and link to them in your online resume or social media account. Enroll in a Quest and get immediate completion credit if you've taken this lab. See other available Qwiklabs Quests.
Next Steps / Learn More
Be sure to check out the following labs for more practice with APIs:
Google Cloud training and certification
...helps you make the most of Google Cloud technologies. Our classes include technical skills and best practices to help you get up to speed quickly and continue your learning journey. We offer fundamental to advanced level training, with on-demand, live, and virtual options to suit your busy schedule. Certifications help you validate and prove your skill and expertise in Google Cloud technologies.
Manual Last Updated May 6, 2022
Lab Last Tested May 6, 2022
Copyright 2022 Google LLC All rights reserved. Google and the Google logo are trademarks of Google LLC. All other company and product names may be trademarks of the respective companies with which they are associated.

