检查点
Enable relevant APIs and set IAM roles.
/ 10
Create and start a Cloud Workstation.
/ 10
Copy code and run a Python Flask app.
/ 20
Create unit tests for the convert function.
/ 20
Update calendar.py to fix issues in the original code.
/ 20
Use Gemini Code Assist to improve the visual design of your app.
/ 20
Build Apps with Gemini Code Assist
- Overview
- Objectives
- Setup
- Task 1. Configure your environment and account
- Task 2. Create a Cloud Workstation
- Task 3. Update the Cloud Code extension to enable Gemini
- Task 4. Download, examine, and run a Python Flask app
- Task 5. Add unit tests
- Task 6. Fix the code and make it more readable
- Task 7. Enhance code readability for non-native English speakers
- Task 8. Improve how the app looks
- End your lab
- Congratulations!
Overview
In this lab, you'll use Gemini Code Assist, an AI-powered app development collaborator for Google Cloud, to explain, test, document, and improve an app.
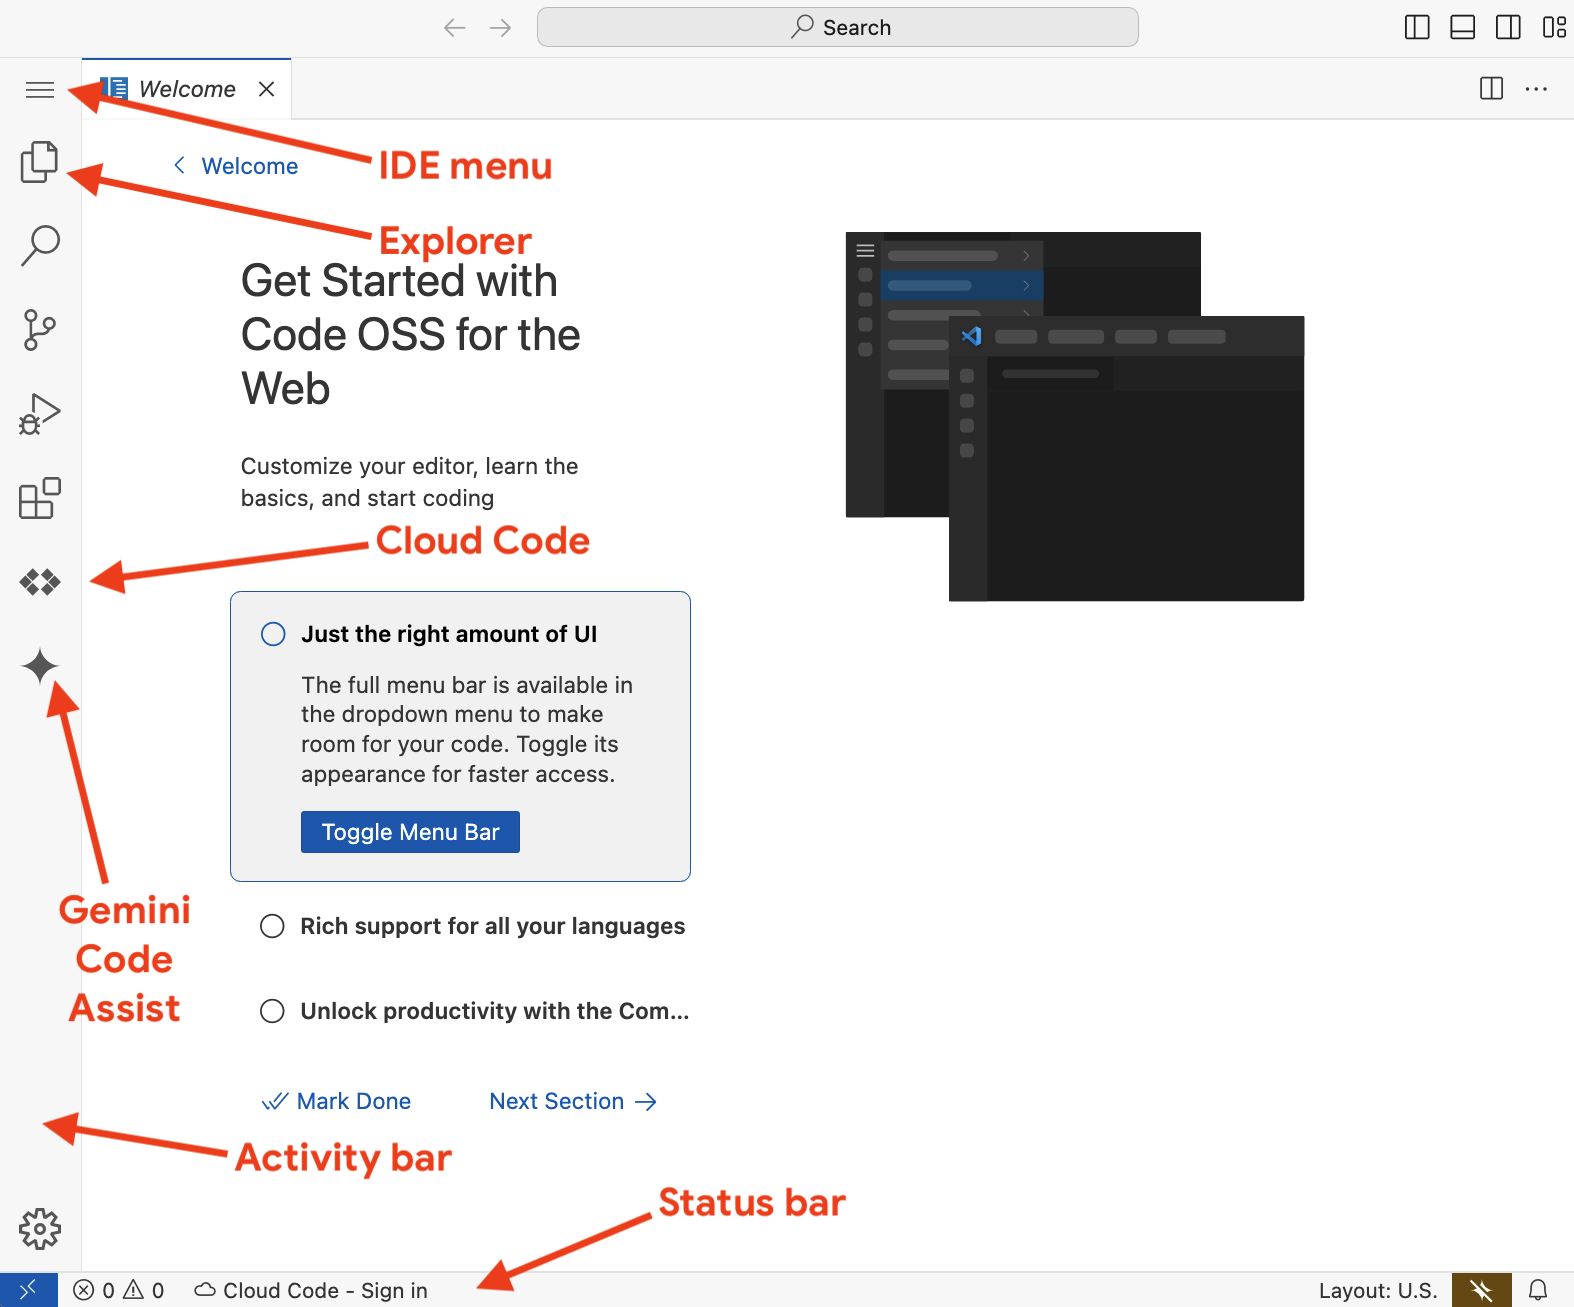
You'll use Cloud Workstations to create a development environment that uses Code OSS as the integrated development environment (IDE).
This lab is intended for developers of any experience level who build apps. You do not need to be familiar with cloud app development.
Objectives
In this lab, you'll learn how to perform the following tasks:
- Create a cloud-based app development environment using Cloud Workstations.
- Use Gemini Code Assist to explain code.
- Generate unit tests with Gemini Code Assist.
- Prompt Gemini to improve how an app looks.
- Use Gemini Code Assist to make code more readable.
- Use Gemini Code Assist to add comments to code, in English or another language.
Setup
For each lab, you get a new Google Cloud project and set of resources for a fixed time at no cost.
-
Sign in to Qwiklabs using an incognito window.
-
Note the lab's access time (for example,
1:15:00), and make sure you can finish within that time.
There is no pause feature. You can restart if needed, but you have to start at the beginning. -
When ready, click Start lab.
-
Note your lab credentials (Username and Password). You will use them to sign in to the Google Cloud Console.
-
Click Open Google Console.
-
Click Use another account and copy/paste credentials for this lab into the prompts.
If you use other credentials, you'll receive errors or incur charges. -
Accept the terms and skip the recovery resource page.
Activate Cloud Shell
Cloud Shell is a virtual machine that contains development tools. It offers a persistent 5-GB home directory and runs on Google Cloud. Cloud Shell provides command-line access to your Google Cloud resources. gcloud is the command-line tool for Google Cloud. It comes pre-installed on Cloud Shell and supports tab completion.
-
Click the Activate Cloud Shell button (
) at the top right of the console.
-
Click Continue.
It takes a few moments to provision and connect to the environment. When you are connected, you are also authenticated, and the project is set to your PROJECT_ID.
Sample commands
- List the active account name:
(Output)
(Example output)
- List the project ID:
(Output)
(Example output)
Task 1. Configure your environment and account
In this task, you enable the Cloud AI Companion API for Gemini and grant necessary roles to a user account.
Configure APIs and roles
-
Sign in to the Google Cloud console with your lab credentials, and open the Cloud Shell terminal window.
-
To set your project ID, user, and region environment variables, in Cloud Shell, run the following commands:
export PROJECT_ID=$(gcloud config list project --format="value(core.project)") export USER=$(gcloud config list account --format "value(core.account)") export REGION={{{project_0.default_region|set at lab start}}} echo "PROJECT_ID=${PROJECT_ID}" echo "USER=${USER}" echo "REGION=${REGION}" -
To enable the Cloud AI Companion API for Gemini and grant necessary roles to your user account, run the following commands:
gcloud services enable cloudaicompanion.googleapis.com --project ${PROJECT_ID} gcloud projects add-iam-policy-binding ${PROJECT_ID} --member user:${USER} --role=roles/cloudaicompanion.user gcloud projects add-iam-policy-binding ${PROJECT_ID} --member user:${USER} --role=roles/serviceusage.serviceUsageViewer
To verify the objective, click Check my progress.
Task 2. Create a Cloud Workstation
This lab uses Gemini assistance to develop an app with the Cloud Code plugin for Cloud Workstations IDE. Cloud Workstations is a fully managed integrated development environment that includes native integration with Gemini.
In this task, you configure and provision your Cloud Workstation environment and enable the Cloud Code plugin for Gemini.
View the workstation cluster
A workstation cluster named my-cluster has been pre-created for this lab. This cluster is used to configure and create a workstation.
- To open the Workstations page, type
/to start a search, then typeWorkstations, and then click Cloud Workstations. - If Cloud Workstations is not pinned (
), in the Navigation menu (
), click Pin (
).
- In the Navigation pane, click Cluster management.
- Check the Status of the cluster. If the status of the cluster is
ReconcilingorUpdating, periodically refresh and wait until it becomesReadybefore moving to the next step.
Create a configuration and workstation
-
To create the workstation configuration and workstation, in Cloud Shell, run the following commands:
export CLUSTER_NAME=my-cluster export CONFIG_NAME=my-config export WS_NAME=my-workstation export REGION={{{project_0.default_region|set at lab start}}} gcloud workstations configs create ${CONFIG_NAME} --cluster=${CLUSTER_NAME} --region=${REGION} --machine-type="e2-standard-4" --pd-disk-size=200 --pd-disk-type="pd-standard" --pool-size=1 gcloud workstations create ${WS_NAME} --cluster=${CLUSTER_NAME} --config=${CONFIG_NAME} --region=${REGION} Wait for the commands to finish.
-
In the Navigation pane, click Workstations.
Once the workstation is created, it is listed under My workstations with a status of
Stopped. -
To start the workstation, click Start.
As the workstation starts up, the status changes to
Starting. Wait for the status to change toRunningindicating that it is ready to be used.
Launch the IDE
To function properly, some extensions need third-party cookies to be enabled in your browser.
-
To enable third-party cookies in Chrome, in the Chrome menu, click Settings.
-
In the search bar, type Third-party cookies.
-
Click the Third-party cookies setting, and select Allow third-party cookies.
Note: If you want to restore your browser to its current settings after the lab, note the original setting for third-party cookies. -
To launch the Code OSS IDE on the workstation, from the Workstations page in the Google Cloud console, click Launch.
The IDE opens in another browser tab.
To verify the objective, click Check my progress.
Task 3. Update the Cloud Code extension to enable Gemini
In this task, you enable Gemini in Cloud Code for your Workstation IDE.
Connect to Google Cloud
To connect to Google Cloud in your workstation, perform these steps:
-
On the status bar at the bottom of the window, click Cloud Code - Sign In.
A link is displayed in the terminal.
-
To launch the Cloud Code sign-in flow, hold Control (for Windows and Linux) or Command (for MacOS) and then click the link in the terminal.
-
If you are asked to confirm the opening of the external website, click Open.
-
Click the student email address, and then click Sign in.
Your verification code is displayed in the browser tab.
Note: You may see a warning that you ran a gcloud auth login command. This process is normal. The IDE ran this command for you. -
Click Copy.
-
Back in the IDE, in the terminal, where it says Enter authorization code, paste the code.
-
If asked to approve copying from the clipboard, click Allow.
-
Click Enter, and then wait for the status bar to show Cloud Code - No Project.
You're now connected to Google Cloud.
Enable Gemini in Cloud Code
To enable Gemini in Cloud Code for your workstation IDE, perform these steps:
-
In your workstation IDE, click the menu (
), and then navigate to File > Preferences > Settings.
-
In Search settings, enter
Gemini. -
On the User tab of the Settings dialog, select Extensions > Gemini Code Assist.
-
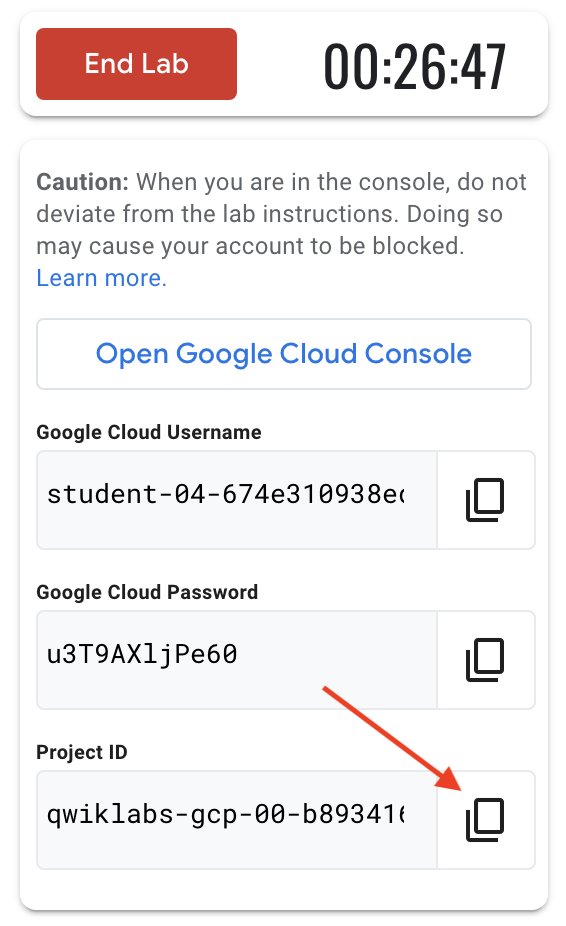
On the Qwiklabs lab credentials panel, to copy the Project ID, click Copy.
-
On the Cloud Code settings page, for Cloudcode > Duet AI: Project, paste the Google Cloud project ID.
Note: Duet AI was the previous name for Gemini. This setting may be specified as Cloudcode > Gemini: Project. -
Confirm that Cloudcode > Duet AI: Enable is enabled.
Note: This setting may be specified as Cloudcode > Gemini: Enable. -
In the IDE status bar, click Cloud Code - No Project.
-
Click Select a Google Cloud Project, and then click your project ID.
The project ID is now shown in the status bar. Gemini is now ready to use.
Task 4. Download, examine, and run a Python Flask app
Code for a Python Flask app has been saved for you in a Cloud Storage bucket.
In this task, you download, examine, and run a Python Flask app in the IDE. Gemini Code Assist explains the code.
Log in to the terminal
-
From the IDE menu (
), select Terminal > New Terminal.
-
In the terminal, run the following command:
gcloud auth login A link is displayed in the terminal.
-
To launch the sign-in flow for the terminal, press Control (for Windows and Linux) or Command (for MacOS) and click the link in the terminal.
-
If you are asked to confirm the opening of the external website, click Open.
-
Click the student email address, and then click Continue.
-
Click Allow.
-
Click Copy.
-
Back in the IDE, in the terminal, where it says Enter authorization code, paste the code, and then click Enter.
Your terminal session is now logged in to Google Cloud.
Install python virtual environment
-
To install Python locally in a virtual environment, run the following commands:
sudo apt update sudo apt -y upgrade sudo apt install -y python3-venv python3 -m venv ~/env source ~/env/bin/activate -
To check the python location that will be used, run the following commands:
which python3
Copy the code
-
To copy the app code, in the terminal, run the following command:
export PROJECT_ID={{{project_0.project_id | Project ID}}} export BUCKET_NAME=$PROJECT_ID-code gcloud storage cp -r gs://$BUCKET_NAME/* . The code has been copied into a subdirectory named
codeassist-demo. -
In the IDE activity bar, click Explorer (
), and then click Open Folder.
-
In the Open Folder dialog, click codeassist-demo, and then click OK.
The directory structure is displayed.
Examine the code
-
Select main.py.
The Python file opens in an editor window.
-
In the IDE activity bar, click Gemini Code Assist (
).
Gemini Code Assist is an AI-powered collaborator to help with app development tasks.
-
In the Gemini Code Assist chat pane, type the following prompt, and then click Send (
):
Explain this Prompts are questions or statements describing the help you need. Prompts can include context from existing code that Google Cloud analyzes to provide more useful or complete responses. For more information on writing prompts to generate good responses, see Write better prompts for Gemini for Google Cloud.
Gemini will explain the code in
main.py. The response might explain these sections:- Dependencies
- Application setup
- Routes
- Application execution
When you select code, the same prompt will cause Gemini Code Assist to explain only the selected code.
Note: Chat history state is kept in memory only, and doesn't persist when you switch to another workspace or when you close your IDE. Gemini doesn't use your prompts or its responses as data to train its model. For more information, see How Gemini for Google Cloud uses your data. -
In the editor, select the
app.routeand function definition for thePOST /convertroute, click the bulb (), and then click Gemini: Explain this.
Gemini will explain the selected code in detail.
Run the app
-
If the terminal has closed, from the IDE menu (
), select Terminal > New Terminal.
-
In the terminal, run the following commands:
cd ~/codeassist-demo source ~/env/bin/activate python3 main.py The command returns an error saying there is no module named
flask. You can use Gemini Code Assist to help you understand the issue. -
In the Gemini Code Assist chat pane, type the following prompt:
How do you install Python requirements? Gemini Code Assist will likely mention that you can use the pip package installer and a
requirements.txtfile to install Python requirements. -
In the IDE activity bar, click Explorer (
), and then click requirements.txt.
Flask and its required version are listed in the
requirements.txtfile. -
In the terminal, run the following command:
pip install -r requirements.txt Flask is now installed.
-
In the terminal, run the following command:
python3 main.py A dialog indicates that the service listening on port 8080 is now available for web preview.
-
Click Open Preview, and then click Open.
The Roman Numerals web app opens in a new tab.
-
In the number box, enter
123, and then click Convert.The number returned is
CXXIII.Cis 100,Xis 10, andIis 1. This looks correct. -
Click Return to home page, then enter
45, and then click Convert.The number returned is
XXXXV. Technically this is correct mathematically (4 times 10, plus 5), but the normal representation of 40 isXL(10 less than 50), and therefore the more traditional Roman numeral representation isXLV.More on this later.
-
In the IDE activity bar, click Explorer (
), and then click calendar.py.
The
number_to_romanfunction converts a number to a Roman numeral.
To verify the objective, click Check my progress.
Task 5. Add unit tests
In this task, you use Gemini Code Assist to generate unit tests for your code.
-
In the IDE activity bar, click Gemini Code Assist (
), then enter the following prompt:
Create unit tests for a fixed version of number_to_roman Gemini Code Assist recognizes the code in the open tab for
calendar.py. It should provide example code that is similar to this:import unittest import calendar class TestNumberToRoman(unittest.TestCase): def test_basic_conversions(self): self.assertEqual(calendar.number_to_roman(1), "I") self.assertEqual(calendar.number_to_roman(5), "V") self.assertEqual(calendar.number_to_roman(10), "X") self.assertEqual(calendar.number_to_roman(50), "L") self.assertEqual(calendar.number_to_roman(100), "C") self.assertEqual(calendar.number_to_roman(500), "D") self.assertEqual(calendar.number_to_roman(1000), "M") def test_combinations(self): self.assertEqual(calendar.number_to_roman(4), "IV") self.assertEqual(calendar.number_to_roman(9), "IX") self.assertEqual(calendar.number_to_roman(14), "XIV") self.assertEqual(calendar.number_to_roman(40), "XL") self.assertEqual(calendar.number_to_roman(90), "XC") self.assertEqual(calendar.number_to_roman(400), "CD") self.assertEqual(calendar.number_to_roman(900), "CM") self.assertEqual(calendar.number_to_roman(1994), "MCMXCIV") self.assertEqual(calendar.number_to_roman(3888), "MMMDCCCLXXXVIII") def test_edge_cases(self): self.assertEqual(calendar.number_to_roman(0), "") # Should handle zero self.assertRaises(TypeError, calendar.number_to_roman, "abc") # Should handle invalid input def test_large_numbers(self): self.assertEqual(calendar.number_to_roman(3000), "MMM") self.assertEqual(calendar.number_to_roman(3999), "MMMCMXCIX") if __name__ == '__main__': unittest.main() Note: Gemini may create unit tests that pass for your code as it as currently implemented, instead of creating tests that pass when the code correctly follows the standard implementation of roman numerals. For the purposes of this lab, you will use a correct version of the unit tests. -
To stop the running app, in the terminal, press CTRL-C.
-
To create unit tests for the convert function, in the terminal, run the following commands:
cat > ~/codeassist-demo/test_calendar.py <<EOF import unittest import calendar class TestNumberToRoman(unittest.TestCase): def test_basic_conversions(self): self.assertEqual(calendar.number_to_roman(1), "I") self.assertEqual(calendar.number_to_roman(5), "V") self.assertEqual(calendar.number_to_roman(10), "X") self.assertEqual(calendar.number_to_roman(50), "L") self.assertEqual(calendar.number_to_roman(100), "C") self.assertEqual(calendar.number_to_roman(500), "D") self.assertEqual(calendar.number_to_roman(1000), "M") def test_combinations(self): self.assertEqual(calendar.number_to_roman(4), "IV") self.assertEqual(calendar.number_to_roman(9), "IX") self.assertEqual(calendar.number_to_roman(14), "XIV") self.assertEqual(calendar.number_to_roman(40), "XL") self.assertEqual(calendar.number_to_roman(90), "XC") self.assertEqual(calendar.number_to_roman(400), "CD") self.assertEqual(calendar.number_to_roman(900), "CM") self.assertEqual(calendar.number_to_roman(1994), "MCMXCIV") self.assertEqual(calendar.number_to_roman(3888), "MMMDCCCLXXXVIII") def test_edge_cases(self): self.assertEqual(calendar.number_to_roman(0), "") # Should handle zero self.assertRaises(TypeError, calendar.number_to_roman, "abc") # Should handle invalid input def test_large_numbers(self): self.assertEqual(calendar.number_to_roman(3000), "MMM") self.assertEqual(calendar.number_to_roman(3999), "MMMCMXCIX") if __name__ == '__main__': unittest.main() EOF -
To run the tests, in the terminal, run the following commands:
cd ~/codeassist-demo python3 test_calendar.py The tests will fail:
====================================================================== ERROR: test_edge_cases (__main__.TestNumberToRoman.test_edge_cases) ---------------------------------------------------------------------- Traceback (most recent call last): File "/home/user/codeassist-demo/test_calendar.py", line 28, in test_edge_cases self.assertRaises(TypeError, calendar.number_to_roman, "abc") # Should handle invalid input ^^^^^^^^^^^^^^^^^^^^^^^^^^^^^^^^^^^^^^^^^^^^^^^^^^^^^^^^^^^^^ File "/usr/lib/python3.12/unittest/case.py", line 778, in assertRaises return context.handle('assertRaises', args, kwargs) ^^^^^^^^^^^^^^^^^^^^^^^^^^^^^^^^^^^^^^^^^^^^ File "/usr/lib/python3.12/unittest/case.py", line 238, in handle callable_obj(*args, **kwargs) File "/home/user/codeassist-demo/calendar.py", line 16, in number_to_roman number = int(number) ^^^^^^^^^^^ ValueError: invalid literal for int() with base 10: 'abc' ====================================================================== FAIL: test_combinations (__main__.TestNumberToRoman.test_combinations) ---------------------------------------------------------------------- Traceback (most recent call last): File "/home/user/codeassist-demo/test_calendar.py", line 16, in test_combinations self.assertEqual(calendar.number_to_roman(4), "IV") AssertionError: 'IIII' != 'IV' - IIII + IV ====================================================================== FAIL: test_large_numbers (__main__.TestNumberToRoman.test_large_numbers) ---------------------------------------------------------------------- Traceback (most recent call last): File "/home/user/codeassist-demo/test_calendar.py", line 33, in test_large_numbers self.assertEqual(calendar.number_to_roman(3999), "MMMCMXCIX") AssertionError: 'MMMDCCCCLXXXXVIIII' != 'MMMCMXCIX' - MMMDCCCCLXXXXVIIII + MMMCMXCIX ---------------------------------------------------------------------- Ran 4 tests in 0.004s FAILED (failures=2, errors=1) The failures were:
-
abcwas not handled correctly. - 4 returned
IIIIinstead ofIV. - 3999 returned
MMMDCCCCLXXXXVIIIIinstead ofMMMCMXCIX.
In each test function, the first error encountered causes the function to end.
Note: Your results may be different if your test code is different. -
To verify the objective, click Check my progress.
Task 6. Fix the code and make it more readable
In this task, you use Gemini Code Assist to fix the code and make it more readable.
-
In the IDE activity bar, click Explorer (
), and then click calendar.py.
-
In the IDE activity bar, click Gemini Code Assist (
), then enter the following prompt:
Make my code more readable and fix any errors Gemini Code Assist will provide code with readability enhancements, and likely fix the issue. Here is an example:
def number_to_roman(number): """Converts an integer to its Roman numeral equivalent. Args: number: An integer between 0 and 3999. Returns: A string representing the Roman numeral equivalent of the number. Returns an empty string if the input is 0. Raises TypeError if the input is not an integer or is out of range. """ try: number = int(number) except ValueError: raise TypeError("Input must be an integer.") if not 0 <= number <= 3999: raise TypeError("Input must be between 0 and 3999.") if number == 0: return "" roman_map = { 1000: 'M', 900: 'CM', 500: 'D', 400: 'CD', 100: 'C', 90: 'XC', 50: 'L', 40: 'XL', 10: 'X', 9: 'IX', 5: 'V', 4: 'IV', 1: 'I'} result = "" for value, numeral in roman_map.items(): while number >= value: result += numeral number -= value return result Gemini Code Assist also explains the changes that have been made:
Key improvements: 1. Error Handling: Added TypeError for non-integer input and values outside the range 0-3999. This makes the function more robust. 2. Docstring: A clear docstring explains the function's purpose, arguments, return value, and error handling. This significantly improves readability and maintainability. 3. Efficiency and Correctness: Uses a roman_map dictionary and a more efficient algorithm to construct the Roman numeral. This handles subtractive notation (like "IV" for 4, "IX" for 9, etc.) correctly. The previous version had issues with these cases and was less efficient. 4. Zero Handling: Explicitly handles the case where the input number is 0, returning an empty string as expected. 5. Clarity: The code is now more concise and easier to understand. The logic is clearer and the variable names are more descriptive. This revised version addresses the limitations and errors of the original implementation and adheres to best practices for Python code. It's more robust, readable, and efficient. In this example, Gemini Code Assist provided an algorithm that made the code more readable, and also fixed issues in the original code.
-
To compare the code in a new file, in the code pane inside Gemini Code Assist, click Diff with Open File (
).
-
To accept the changes, click Accept.
The updated code is accepted.
-
Click the menu (
), and then navigate to File > Save.
-
In the terminal, run the following commands:
cd ~/codeassist-demo python3 test_calendar.py If the tests do not pass, try running them a few times to make sure the tests are not using a cached version of the calendar module.
If Gemini has not fixed the roman numeral issue, some tests will fail. If this happens, you may fix the code yourself until the test passes, or you can replace
calendar.pywith a known working version. -
If some tests fail, to fix the code and re-run the unit tests, run the following commands:
cat > ~/codeassist-demo/calendar.py <<EOF def number_to_roman(number): """Converts an integer to its Roman numeral equivalent. Args: number: An integer between 0 and 3999. Returns: A string representing the Roman numeral equivalent of the number. Returns an empty string if the input is 0. Raises TypeError if the input is not an integer or is out of range. """ try: number = int(number) except ValueError: raise TypeError("Input must be an integer.") if not 0 <= number <= 3999: raise TypeError("Input must be between 0 and 3999.") if number == 0: return "" roman_map = { 1000: 'M', 900: 'CM', 500: 'D', 400: 'CD', 100: 'C', 90: 'XC', 50: 'L', 40: 'XL', 10: 'X', 9: 'IX', 5: 'V', 4: 'IV', 1: 'I'} result = "" for value, numeral in roman_map.items(): while number >= value: result += numeral number -= value return result EOF cd ~/codeassist-demo python3 test_calendar.py The tests should now pass.
To verify the objective, click Check my progress.
Task 7. Enhance code readability for non-native English speakers
If you're a non-native English speaker who relies on translation app, you can use Gemini Code Assist to generate comments in other languages.
In this task, you use Gemini Code Assist to add comments to code, including in a different language.
-
In the IDE activity bar, click Explorer (
), and then click main.py.
-
In the IDE activity bar, click Gemini Code Assist (
), then enter the following prompt:
Add comments to main.py Gemini Code Assist will add comments that help explain the code:
import os # Import the os module for environment variables from flask import Flask, render_template, request # Import Flask framework components import calendar # Import the calendar module for Roman numeral conversion # Create a Flask app instance app = Flask(__name__) # Define a route for the home page @app.route("/", methods=["GET"]) def home_page(): # Render the index.html template return render_template("index.html") # Define a route for the conversion endpoint @app.route("/convert", methods=["POST"]) def convert(): # Get the number from the form data number = request.form["number"] # Convert the number to Roman numerals using the calendar module roman = calendar.number_to_roman(number) # Render the convert.html template with the number and its Roman numeral equivalent return render_template("convert.html", number=number, roman=roman) # Run the Flask app if this script is executed directly if __name__ == "__main__": # Run the app in debug mode, listening on all interfaces (0.0.0.0) # and using the port specified in the environment variable PORT or defaulting to 8080 app.run(debug=True, host="0.0.0.0", port=int(os.environ.get("PORT", 8080))) But what if English is not your first language?
-
In the Gemini Code Assist pane, enter the following prompt:
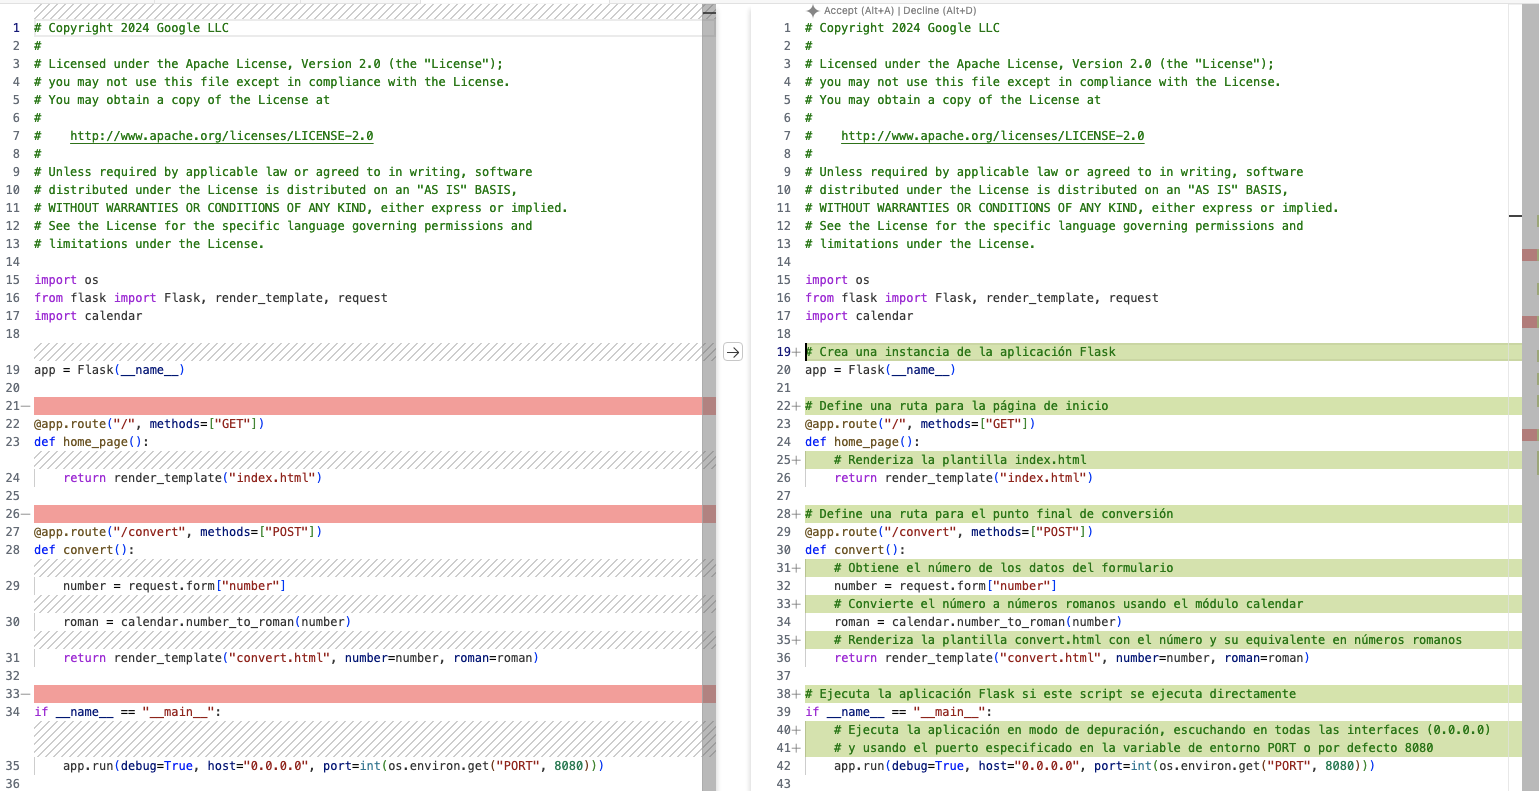
Add Spanish comments to main.py Gemini Code Assist can provide comments in different languages to help with code readability.
-
To verify that only comments were added, in the code pane inside Gemini Code Assist, click Diff with Open File (
).
The updates are compared to the existing code:
-
To reject the changes, click Decline.
Task 8. Improve how the app looks
Gemini Code Assist can also help you make your app look nicer.
In this task, you use Gemini Code Assist to improve the visual design of your app.
-
In the terminal, run the following command:
cd ~/codeassist-demo python3 main.py A dialog indicates that the service listening on port 8080 is now available for web preview.
-
Click Open Preview, and then click Open.
The Roman Numerals web app opens in a new tab.
-
In the IDE activity bar, click Explorer (
), and then select templates/index.html.
The HTML template for this app is extremely simple.
-
In the IDE activity bar, click Gemini Code Assist (
), then enter the following prompt:
Make this HTML template look better Gemini Code Assist will update the code to improve how the app's entry page looks.
-
To accept the changes, in the code pane inside Gemini Code Assist, click Diff with Open File (
), and then click Accept.
-
Return to the Roman Numerals app browser tab, and click Refresh.
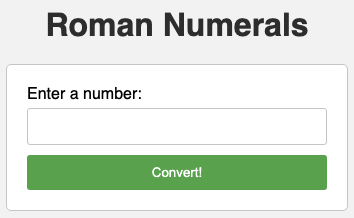
The app should look nicer. In this example, the dialog is centered on the page and colors have been added.
Note: The changes made by Gemini Code Assist may look different for you. -
In the IDE activity bar, click Explorer (
), and then click templates/convert.html.
-
In the IDE activity bar, click Gemini Code Assist (
), then enter the following prompt:
Make the convert.html template look similar to the index.html template Gemini Code Assist will update the results template to match the index template.
-
To accept the changes, in the code pane inside Gemini Code Assist, click Diff with Open File (
), and then click Accept.
-
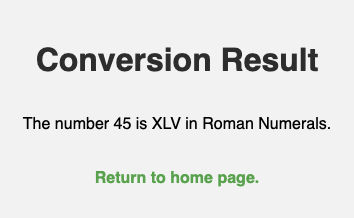
Return to the Roman Numerals app browser tab, enter
45, and then click Enter.The new results page should match the style of the index page:
To verify the objective, click Check my progress.
End your lab
When you have completed your lab, click End Lab. Qwiklabs removes the resources you’ve used and cleans the account for you.
You will be given an opportunity to rate the lab experience. Select the applicable number of stars, type a comment, and then click Submit.
The number of stars indicates the following:
- 1 star = Very dissatisfied
- 2 stars = Dissatisfied
- 3 stars = Neutral
- 4 stars = Satisfied
- 5 stars = Very satisfied
You can close the dialog box if you don't want to provide feedback.
For feedback, suggestions, or corrections, please use the Support tab.
Congratulations!
In this lab you learned how to:
- Create a cloud-based app development environment using Cloud Workstations.
- Use Gemini Code Assist to explain code.
- Generate unit tests with Gemini Code Assist.
- Prompt Gemini to improve how an app looks.
- Use Gemini Code Assist to make code more readable.
- Use Gemini Code Assist to add comments to code, in English or another language.
Next steps/learn more
Copyright 2024 Google LLC All rights reserved. Google and the Google logo are trademarks of Google LLC. All other company and product names may be trademarks of the respective companies with which they are associated.
