Punkty kontrolne
Create a bucket, VM instance with necessary firewall rule and an IAM service account
/ 25
Create a second bucket, VM instance and an IAM service account
/ 25
Work with Cloud Storage in Cloud Shell
/ 25
Install the nginx Web server and customize the welcome page
/ 25
Accessing the Google Cloud Console and Cloud Shell
Overview
In this lab, you become familiar with Google Cloud's web-based interface. Two integrated environments are available:
- A GUI environment called the Google Cloud console
- A command-line interface called Cloud Shell, which has the commands from the Cloud SDK pre-installed
In this course, you use both environments.
You need to know a few things about the Google Cloud console:
- The Google Cloud console is under continuous development, so the graphical layout occasionally changes. These changes are often made to accommodate new Google Cloud features or changes in the technology, resulting in a slightly different workflow.
- You can perform most common Google Cloud actions in the Google Cloud console. Sometimes new features are implemented in the Cloud SDK before they are made available in the Google Cloud console.
- The Google Cloud console is extremely fast for some activities. The Google Cloud console can perform multiple actions on your behalf that might require many command-line actions.
- The commands in the Cloud SDK are valuable tools for automation.
Objectives
In this lab, you learn how to perform the following tasks:
- Learn how to access the Google Cloud console and Cloud Shell
- Become familiar with the Google Cloud console
- Become familiar with Cloud Shell features, including the Cloud Shell Editor
- Use the Google Cloud console and Cloud Shell to create buckets and VMs and service accounts
- Perform other commands in Cloud Shell
Lab Setup
Access Qwiklabs
For each lab, you get a new Google Cloud project and set of resources for a fixed time at no cost.
-
Sign in to Qwiklabs using an incognito window.
-
Note the lab's access time (for example,
1:15:00), and make sure you can finish within that time.
There is no pause feature. You can restart if needed, but you have to start at the beginning. -
When ready, click Start lab.
-
Note your lab credentials (Username and Password). You will use them to sign in to the Google Cloud Console.
-
Click Open Google Console.
-
Click Use another account and copy/paste credentials for this lab into the prompts.
If you use other credentials, you'll receive errors or incur charges. -
Accept the terms and skip the recovery resource page.
After you complete the initial sign-in steps, the project dashboard appears.
Task 1. Explore the Google Cloud console
In this task, you explore the Google Cloud console and create resources.
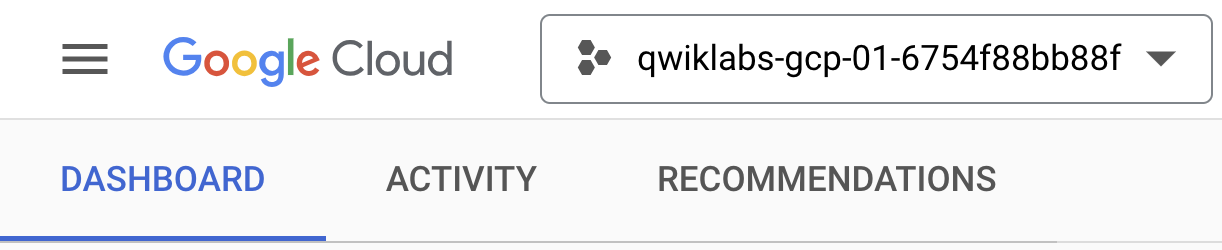
Verify that your project is selected
-
In the Google Cloud console title bar, click the Select a project drop-down list and select the project ID that Qwiklabs provided with your authentication credentials.
-
The project ID will take a form like [qwiklabs-gcp-] followed by a long hexadecimal number.
-
Click Cancel to close the dialog.
Your title bar should indicate the project ID as shown in the following screenshot. Each lab in the Qwiklabs environment has a unique project ID, as well as unique authentication credentials.
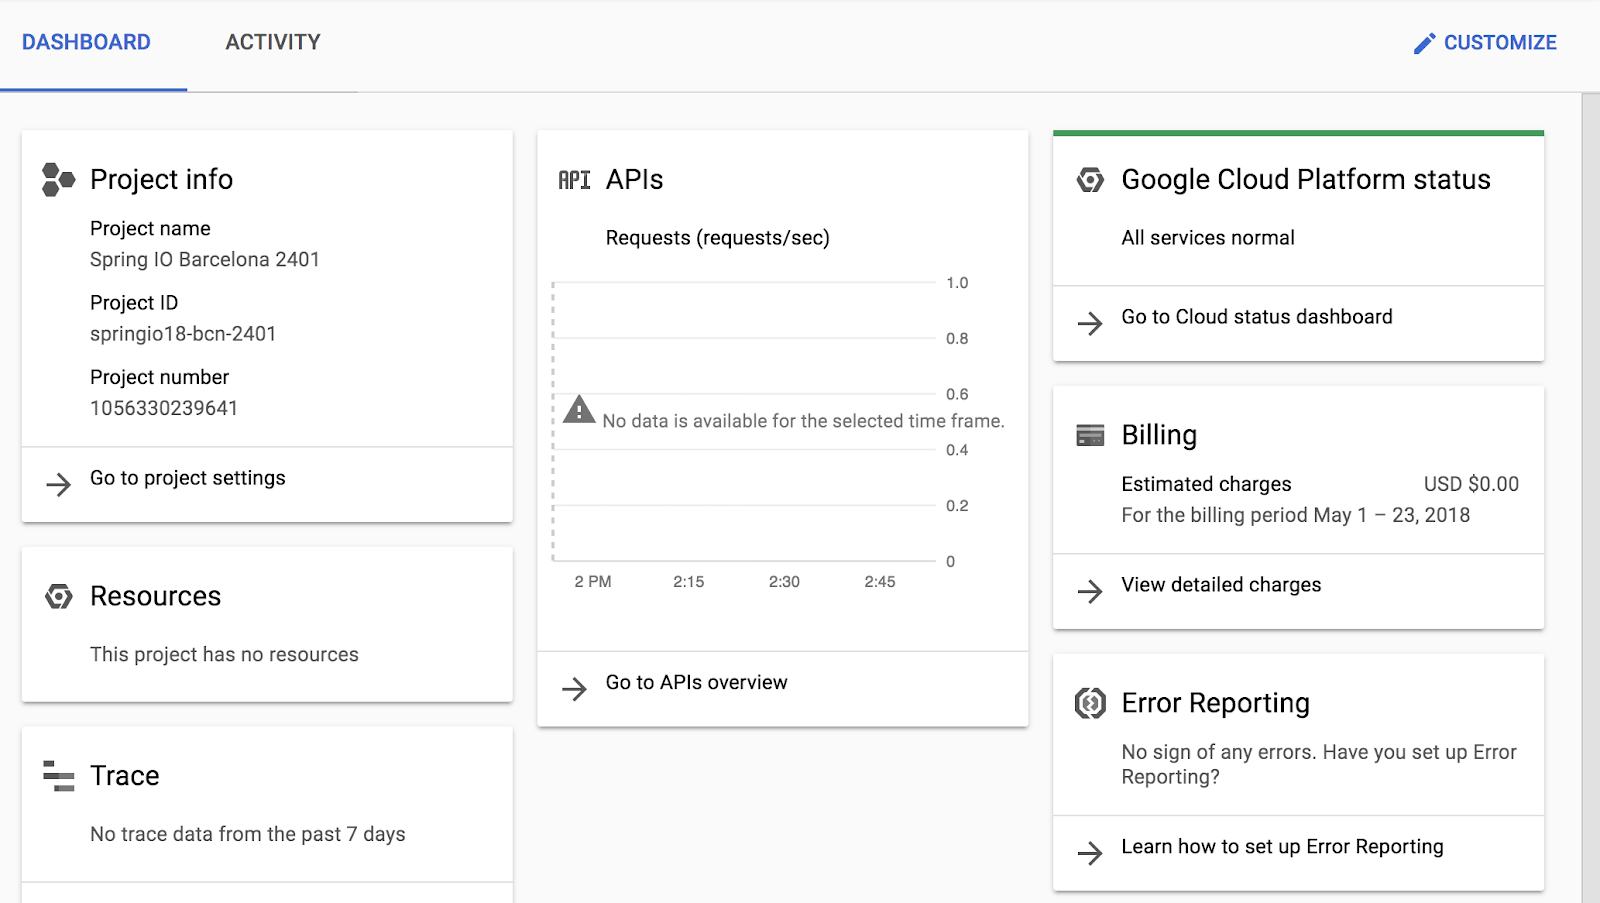
Navigate to Google Cloud Storage and create a bucket
Cloud Storage allows worldwide storage and retrieval of any amount of data at any time. You can use Cloud Storage for a range of scenarios including serving website content, storing data for archival and disaster recovery, or distributing large data objects to users via direct download.
A Cloud Storage bucket must have a globally unique name. In your organization, you should follow Google Cloud's Best practices for Cloud Storage Guide. For this lab, we can easily get a unique name for our bucket by using the ID of the Google Cloud project that Qwiklabs created for us, because Google Cloud project IDs are also globally unique.
-
In the Google Cloud console, on the Navigation menu (
), click Cloud overview > Dashboard .
-
In the Dashboard tab of the resulting screen, the Project info section shows your Google Cloud project ID.
-
Select and copy the project ID. Because this project ID was created for you by Qwiklabs, it will take the form of [qwiklabs-gcp-] followed by a long hexadecimal number.
-
In the Google Cloud console, on the Navigation menu (
-
Click Create bucket.
-
For Name, paste in the Google Cloud project ID string you copied in an earlier step. These lab instructions will later refer to the name that you typed as
[BUCKET_NAME]. -
Click Continue.
-
For Location Type, select Region and select
from the dropdown. -
Click Continue.
-
Click on Choose how to control access to objects and uncheck Enforce public access prevention on this bucket, then select Fine-grained.
-
Click Continue.
-
Leave all other values as their defaults.
-
Click Create.
 ) icon. Feedback from the underlying commands is sometimes provided there. You can click the icon to check the notifications for additional information and history.
Create a virtual machine (VM) instance
Google Compute Engine offers virtual machines running in Google's datacenters and on its network as a service. Google Kubernetes Engine makes use of Compute Engine as a component of its architecture. For this reason, it's helpful to learn a bit about Compute Engine before learning about Google Kubernetes Engine.
- On the Navigation menu (
- Click Create instance.
- For Name, type first-vm as the name of your instance.
- For Region, select
. - For Zone, select
. - For Machine type, examine the options.
gcloud command to create a VM. To the right of the region, zone, and machine type is a per-month estimated cost.
- To see the breakdown of estimated costs, click View Pricing Details to the right of the Machine type list underneath the estimated costs.
- For Machine type, click Standard > e2-standard-2.
How did the cost change?
- For Machine type, click Shared-core > e2-micro.
The micro type is a shared-core VM that is inexpensive.
- For Firewall, click Allow HTTP traffic.
- Leave the remaining settings as their defaults, and click Create.
Wait until the new VM is created.
Explore the VM details
- On the VM instances page, click the name of your VM: first-vm.
- In Machine configuration, notice the value of CPU platform, notice the value, and click Edit.
- Click on the pencil icon on the top to edit the
first-vminstance.
- Scroll down to the Management section and examine Availability policies.
- Click Cancel.
Create an IAM service account
An IAM service account is a special type of Google account that belongs to an application or a virtual machine, instead of to an individual end user.
- On the Navigation menu, click IAM & admin > Service accounts.
- Click + Create service account.
- On the Service account details page, specify the Service account name as
test-service-account. - Click Create and Continue.
- On the Grant this service account access to project page, specify the role as Basic > Editor.
- Click Continue.
- Click Done.
- On the Service accounts page, move to the extreme right of the
test-service-accountand click on the three dots. - Click Manage keys.
- Click ADD KEY
- Select Create new key
- Select JSON as the key type.
- Click Create.
A JSON key file is downloaded. In a later step, you find this key file and upload it to the VM.
- Click Close.
Click Check my progress to verify the objective.
Task 2. Explore Cloud Shell
Cloud Shell provides you with command-line access to your cloud resources directly from your browser. With Cloud Shell, Cloud SDK command-line tools such as gcloud are always available, up to date, and fully authenticated.
Cloud Shell provides the following features and capabilities:
- Temporary Compute Engine VM
- Command-line access to the instance through a browser
- 5 GB of persistent disk storage (
$HOME dir) - Preinstalled Cloud SDK and other tools
-
gcloud: for working with Compute Engine, Google Kubernetes Engine (GKE), and many Google Cloud services -
gcloud storageandgsutil: for working with Cloud Storage -
kubectl: for working with GKE and Kubernetes -
bq: for working with BigQuery - Language support for Java, Go, Python, Node.js, PHP, and Ruby
- Web preview functionality
- Built-in authorization for access to resources and instances
After one hour of inactivity, the Cloud Shell instance is recycled. Only the /home directory persists. Any changes made to the system configuration, including environment variables, are lost between sessions.
In this task, you use Cloud Shell to create and examine some resources.
Open Cloud Shell and explore its features
- On the Google Cloud console title bar, click Activate Cloud Shell (
).
- When prompted, click Continue.
Cloud Shell opens at the bottom of the Google Cloud console window.
The following icons are on the far right of Cloud Shell toolbar:
- Hide/Restore: This icon hides and restores the window, giving you full access to the Google cloud Console without closing Cloud Shell.
- Open in new window: Having Cloud Shell at the bottom of the Google Cloud console is useful when you are issuing individual commands. But when you edit files or want to see the full output of a command, clicking this icon displays Cloud Shell in a full-sized terminal window.
- Close all tabs: This icon closes Cloud Shell. Every time you close Cloud Shell, the virtual machine is recycled and all machine context is lost. However, data that you stored in your home directory is still available to you the next time you start Cloud Shell.
Use Cloud Shell to set up the environment variables for this task
In Cloud Shell, use the following commands to define the environment variables used in this task.
- Replace [BUCKET_NAME] with the name of the first bucket from task 1.
- Replace [BUCKET_NAME_2] with a globally unique name of your choice.
- In Cloud Shell, execute the following command to create environment variables:
[BUCKET_NAME]with the unique name that you choose, for example MY_BUCKET_NAME_1=unique_bucket_name.
Move the credentials file you created earlier into Cloud Shell
You downloaded a JSON-encoded credentials file in an earlier task when you created your first IAM service account.
- On your local workstation, locate the JSON key that you just downloaded and rename the file to
credentials.json - In Cloud Shell, click the three-dot menu icon (
) in the Cloud Shell toolbar to display further options.
- Click Upload and choose
credentials.jsonfile from your local machine. - Click Open.
- Click Upload to transfer
credentials.jsonto Cloud Shell VM. - Click the X icon to close the file upload pop-up window.
- In Cloud Shell, type ls and press ENTER to confirm that the file was uploaded.
Create a second Cloud Storage bucket and verify it in the Google Cloud console
The gcloud storage and gsutilcommands let you work with Cloud Storage from the command line.
In this task, you use the gcloud storage command in Cloud Shell.
- In Cloud Shell, use the
gcloud storagecommand to create a bucket:
Click Authorize if prompted.
- In the Google Cloud console, on the Navigation menu (
The second bucket should appear in the Buckets list.
Use the gcloud command line to create a second virtual machine
- In Cloud Shell, execute the following command to list all the zones in a given region:
- Select a zone from the first column of the list. Notice that a Google Cloud zone's name consists of its region name, followed by a hyphen and a letter.
You may choose a zone that is the same as or different from the zone that you used for the first VM in task 1.
- Execute the following command to store your chosen zone in an environment variable.
You replace [ZONE] with your selected zone:
- Set this zone to be your default zone by executing the following command:
- Execute the following command to store a name in an environment variable you will use to create a VM. You will call your second VM
second-vm:
- Create a VM in the default zone that you set earlier in this task using the new environment variable to assign the VM name:
- List the virtual machine instances in your project:
You will see both your newly created and your first virtual machine in the list.
-
In the Google Cloud console, on the Navigation menu (
gcloud compute instances list, you will see both of the virtual machines you created. -
Look at the External IP column. Notice that the external IP address of the first VM you created is shown as a link. (If necessary, click the Hide info panel button to reveal the External IP column.) The Google Cloud console offers the link because you configured this VM's firewall to allow HTTP traffic.
-
Click the link you found in your first VM's External IP column. Your browser will present a Connection refused message in a new browser tab. This message occurs because, although there is a firewall port open for HTTP traffic to your VM, no web server is running there. Close the browser tab you just created.
Use the gcloud command line to create a second service account
- In Cloud Shell, execute the following command to create a new service account:
- In the Google Cloud console, on the Navigation menu (
Click Check my progress to verify the objective.
- In Cloud Shell, execute the following command to grant the second service account the
viewerrole:
GOOGLE_CLOUD_PROJECT is an environment variable that is automatically populated in Cloud Shell and is set to the project ID of the current context.
-
In the Google Cloud console, on the Navigation menu (
-
You will see the new service account called
test-service-account2listed as a member of theviewerrole.
Task 3. Work with Cloud Storage in Cloud Shell
Download a file to Cloud Shell and copy it to Cloud Storage
- Copy a picture of a cat from a Google-provided Cloud Storage bucket to your Cloud Shell:
- Copy the file into the first bucket that you created earlier:
- Copy the file from the first bucket into the second bucket:
- In the Google Cloud console, on the Navigation menu(
cat.jpgfile.
Set the access control list for a Cloud Storage object
-
To get the default access list that's been assigned to
cat.jpg(when you uploaded it to your Cloud Storage bucket), execute the next two commands. -
First, execute the following command in Cloud Shell:
The output should look like the following example, but with different numbers. This output shows that anyone with an owner, editor, or viewer role for the project has access (OWNER access for owners and editors, and READER access for viewers).
- Then, to change the object to have private access, execute the following command:
- To verify the new ACL that's been assigned to
cat.jpg, execute the following two commands:
The output should look similar to the following example.
Now only the original creator of the object (your lab account) has OWNER access.
Authenticate as a service account in Cloud Shell
- In Cloud Shell, execute the following command to view the current configuration:
You should see output that looks like the following example. In your output, the zone should be equal to the zone that you set when you created your second VM in task 2. The account and project should match your Qwiklabs lab credentials.
- In Cloud Shell, execute the following command to change the authenticated user to the first service account (which you created in an earlier task) through the credentials that you downloaded to your local machine and then uploaded into Cloud Shell (
credentials.json):
Cloud Shell is now authenticated as test-service-account.
- To verify the active account, execute the following command:
You should see output that looks like the following example. The account is now set to the test-service-account service account.
- To verify the list of authorized accounts in Cloud Shell, execute the following command:
You should see output that looks like the following example.
- To verify that the current account (
test-service-account) cannot access thecat.jpgfile in the first bucket that you created, execute the following command:
Because you restricted access to this file to the owner earlier in this task, you should see output that looks like the following example.
Output
- Verify that the current account (
test-service-account) can access thecat.jpgfile in the second bucket that you created:
Because access has not been restricted to this file, you should see output that looks like the following example.
- To switch to the lab account, execute the following command, replacing [USERNAME] with the username provided in the Qwiklabs Connection Details pane on the left of the lab instructions page:
- To verify that you can access the
cat.jpgfile in the [BUCKET_NAME] bucket (the first bucket that you created), execute the following command:
You should see output that looks like the following example. The lab account created the bucket and object, and remained an owner when the object access control list (ACL) was converted to private, so the lab account can still access the object.
- Make the first Cloud Storage bucket readable by everyone, including unauthenticated users:
-
In the Cloud Console, on the Navigation menu (
-
Select the first storage bucket with the project ID that you created. Notice that the
cat.jpgfile hasPublic access. -
Click Copy URL to copy the link.
-
Open a new incognito browser tab and paste the link into its address bar. You will see a picture of a cat. Leave this browser tab open.
Click Check my progress to verify the objective.
Task 4. Explore the Cloud Shell Editor
In this task, you explore using the Cloud Shell code editor.
Open the Cloud Shell Editor
- In Cloud Shell, click the Open Editor icon (
) and then click on the Open in a new window link.
A new tab opens with the Cloud Shell Editor. The Google Cloud console and Cloud Shell remain on the original tab. You can switch between Cloud Shell and the code editor by clicking the tab.
- In Cloud Shell Editor, click the menu and select File > Open Folder.
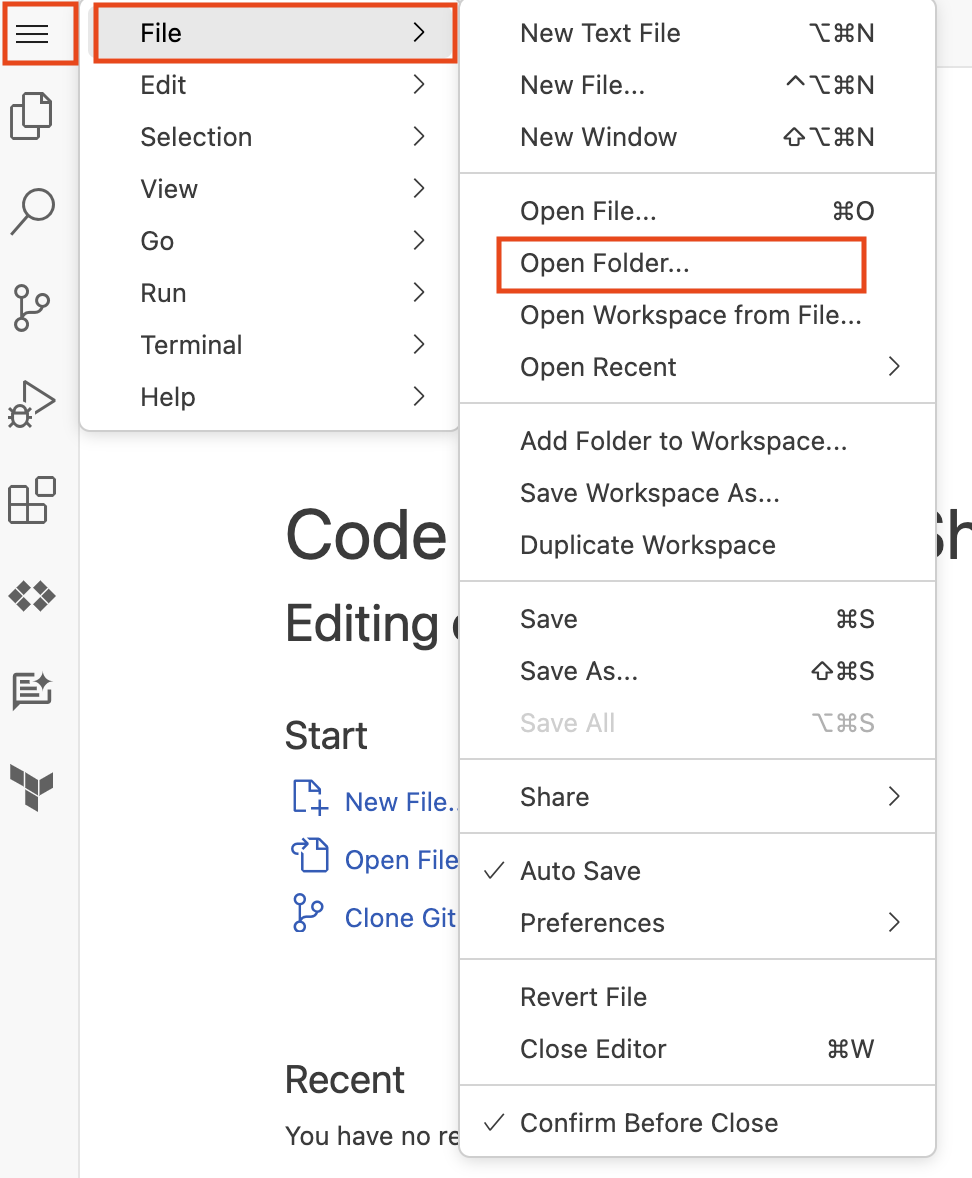
- Click Ok.
The folder opens and displays a list of files and directories in the left pane.
- On the Google Cloud console tab, click Open Terminal, and in Cloud Shell, execute the following command to clone a
gitrepository:
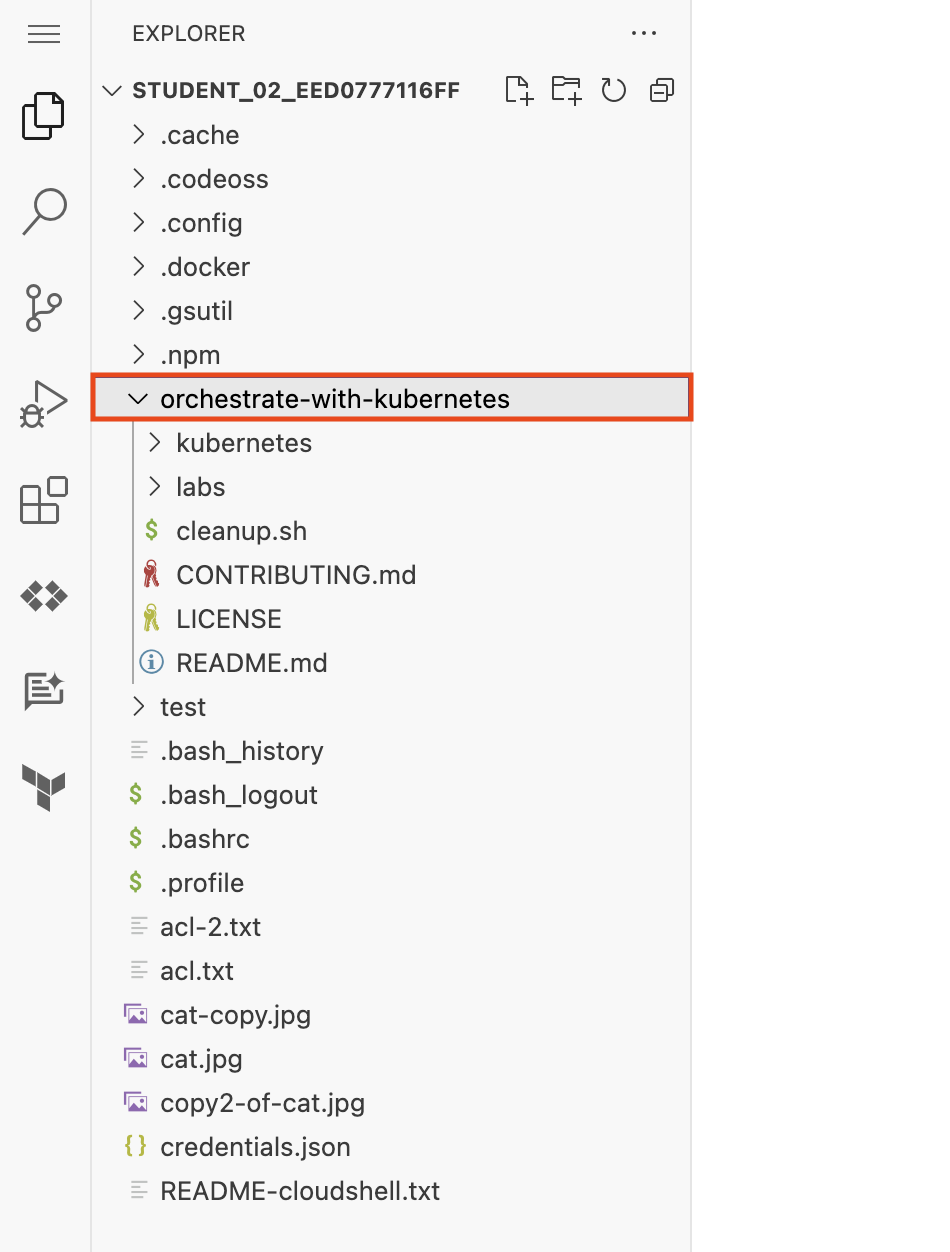
The orchestrate-with-kubernetes folder appears in the left pane of the Cloud Shell Editor window.
- In Cloud Shell, execute the following command to create a test directory:
The test folder now appears in the left pane of the Cloud Shell Editor window.
- In the Cloud Shell Editor, click the arrow to the left of
orchestrate-with-kubernetesto expand the folder.
-
In the left pane, click the
cleanup.shfile to open it in the right pane of the Cloud Shell Editor window. -
Add the following text as the last line of the
cleanup.shfile:
- In Cloud Shell, execute the following commands to change directory and display the contents of
cleanup.sh:
-
Verify that the output of
cat cleanup.shincludes the line of text that you added. -
In the Cloud Shell code editor, right click the
orchestrate-with-kubernetesfolder, and select New File. -
Name the file index.html.
-
Click Save.
-
In the right hand pane, paste in this HTML text:
- Replace the string
REPLACE_WITH_CAT_URLwith the URL of the cat image from an earlier task. The URL will look like this:
-
On the Navigation menu (
-
In the row for your first-vm, click the SSH button.
-
In the SSH login window that opens on your VM, install the
nginxWeb server:
Y to continue.- In your Cloud Shell window, copy the HTML file you created using the Cloud Shell Editor to your virtual machine:
- In the SSH login window for your VM, copy the HTML file from your home directory to the document root
of the
nginxweb server:
Click Check my progress to verify the objective.
-
On the Navigation menu (
-
Click the link in the External IP column for your first-vm. A new browser tab opens with a webpage that contains the cat image.
End your lab
When you have completed your lab, click End Lab. Google Cloud Skills Boost removes the resources you’ve used and cleans the account for you.
You will be given an opportunity to rate the lab experience. Select the applicable number of stars, type a comment, and then click Submit.
The number of stars indicates the following:
- 1 star = Very dissatisfied
- 2 stars = Dissatisfied
- 3 stars = Neutral
- 4 stars = Satisfied
- 5 stars = Very satisfied
You can close the dialog box if you don't want to provide feedback.
For feedback, suggestions, or corrections, please use the Support tab.
Copyright 2022 Google LLC All rights reserved. Google and the Google logo are trademarks of Google LLC. All other company and product names may be trademarks of the respective companies with which they are associated.

