Puntos de control
Set up the Striim server
/ 30
Set up Striim Access to SQL Server
/ 30
Create a Spanner access key
/ 40
Performing an Online Database Migration
Overview
This lab demonstrates how to perform an online migration of a SQL Server database to Spanner using Google Cloud's Data Migration Partner, Striim.
Striim is a comprehensive streaming ETL platform that enables online data migrations and continuous streaming replication from on-premises and cloud data sources to Google Cloud data services through a graphical drag and drop interface.
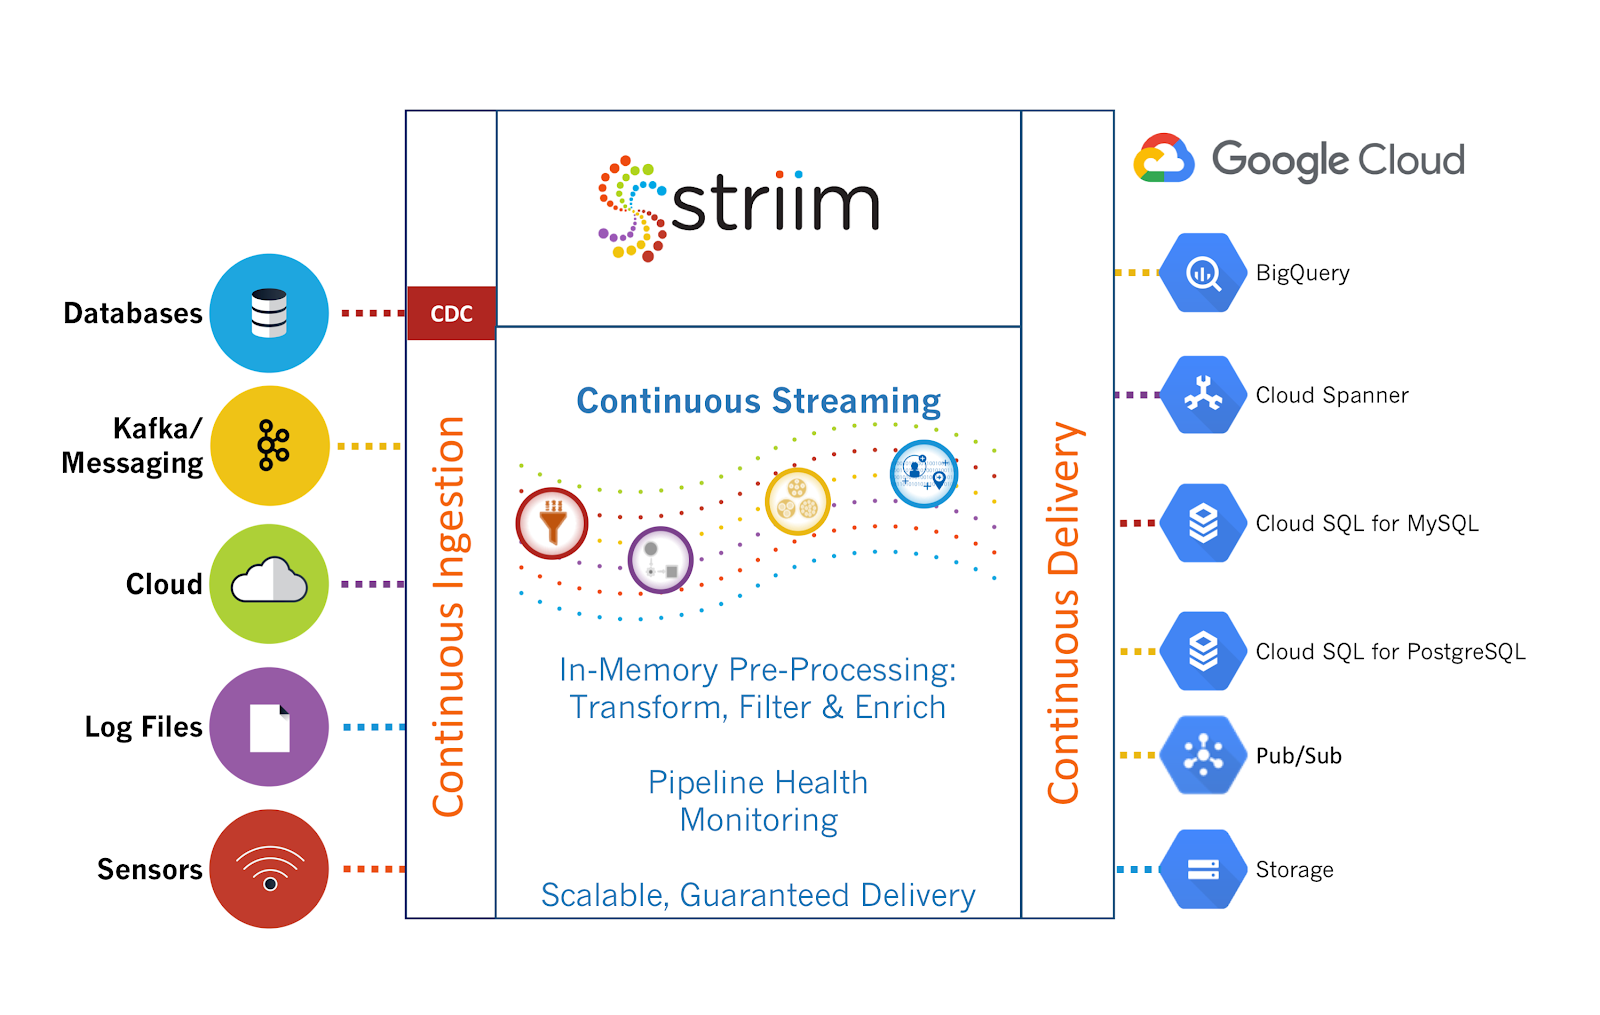
The following figure shows Striim's high level architecture.
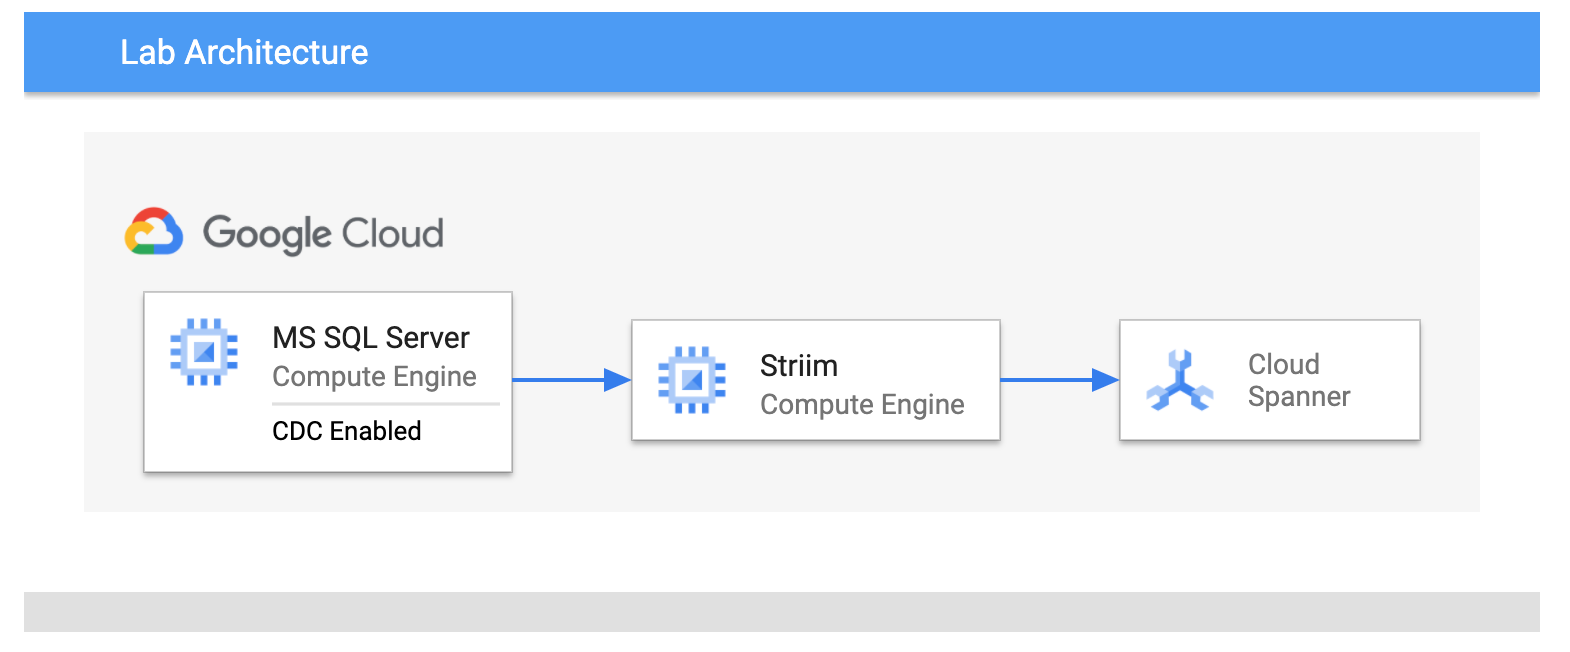
The figure below shows the architecture used for this lab.
What you will learn
In this lab you will learn to:
- Access and use an existing SQL Server database running on a Compute Engine virtual machine.
- Access and use an existing Spanner database.
- Deploy Striim through the Google Cloud Marketplace.
- Use Striim to read from a source SQL Server database.
- Use Striim to continuously replicate from SQL Server to Spanner.
Setup and requirements
What you'll need
For each lab, you get a new Google Cloud project and set of resources for a fixed time at no cost.
-
Sign in to Qwiklabs using an incognito window.
-
Note the lab's access time (for example,
1:15:00), and make sure you can finish within that time.
There is no pause feature. You can restart if needed, but you have to start at the beginning. -
When ready, click Start lab.
-
Note your lab credentials (Username and Password). You will use them to sign in to the Google Cloud Console.
-
Click Open Google Console.
-
Click Use another account and copy/paste credentials for this lab into the prompts.
If you use other credentials, you'll receive errors or incur charges. -
Accept the terms and skip the recovery resource page.
Activate Google Cloud Shell
Google Cloud Shell is a virtual machine that is loaded with development tools. It offers a persistent 5GB home directory and runs on the Google Cloud.
Google Cloud Shell provides command-line access to your Google Cloud resources.
-
In Cloud console, on the top right toolbar, click the Open Cloud Shell button.
-
Click Continue.

It takes a few moments to provision and connect to the environment. When you are connected, you are already authenticated, and the project is set to your PROJECT_ID. For example:

gcloud is the command-line tool for Google Cloud. It comes pre-installed on Cloud Shell and supports tab-completion.
- You can list the active account name with this command:
Output:
Example output:
- You can list the project ID with this command:
Output:
Example output:
Before you begin
In order to work on the database migration some initial configuration is required:
-
Open a new web browser window and navigate to the Google Cloud Console (console.cloud.google.com). Use the project selector to choose the project with a leading name of 'qwiklabs-gcp.'
-
In the Cloud Shell, install a SQL Server client to allow easy access to the SQL Server instance. Execute the following commands and accept prompts with either Y or yes:
- On the Navigation menu (
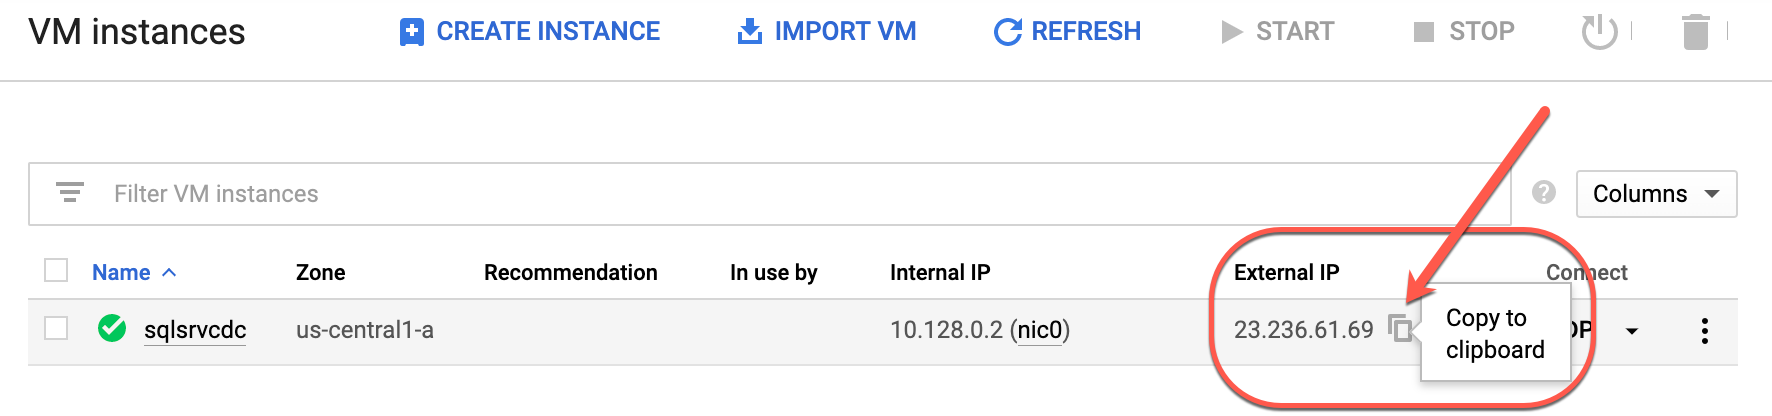
), click Compute Engine > VM instances. Copy the IP address for the SQL Server instance. The value appears in the External IP column. You can simply copy this value to your clipboard by hovering over the IP address, moving your mouse to the document's image, and then clicking Copy to clipboard.
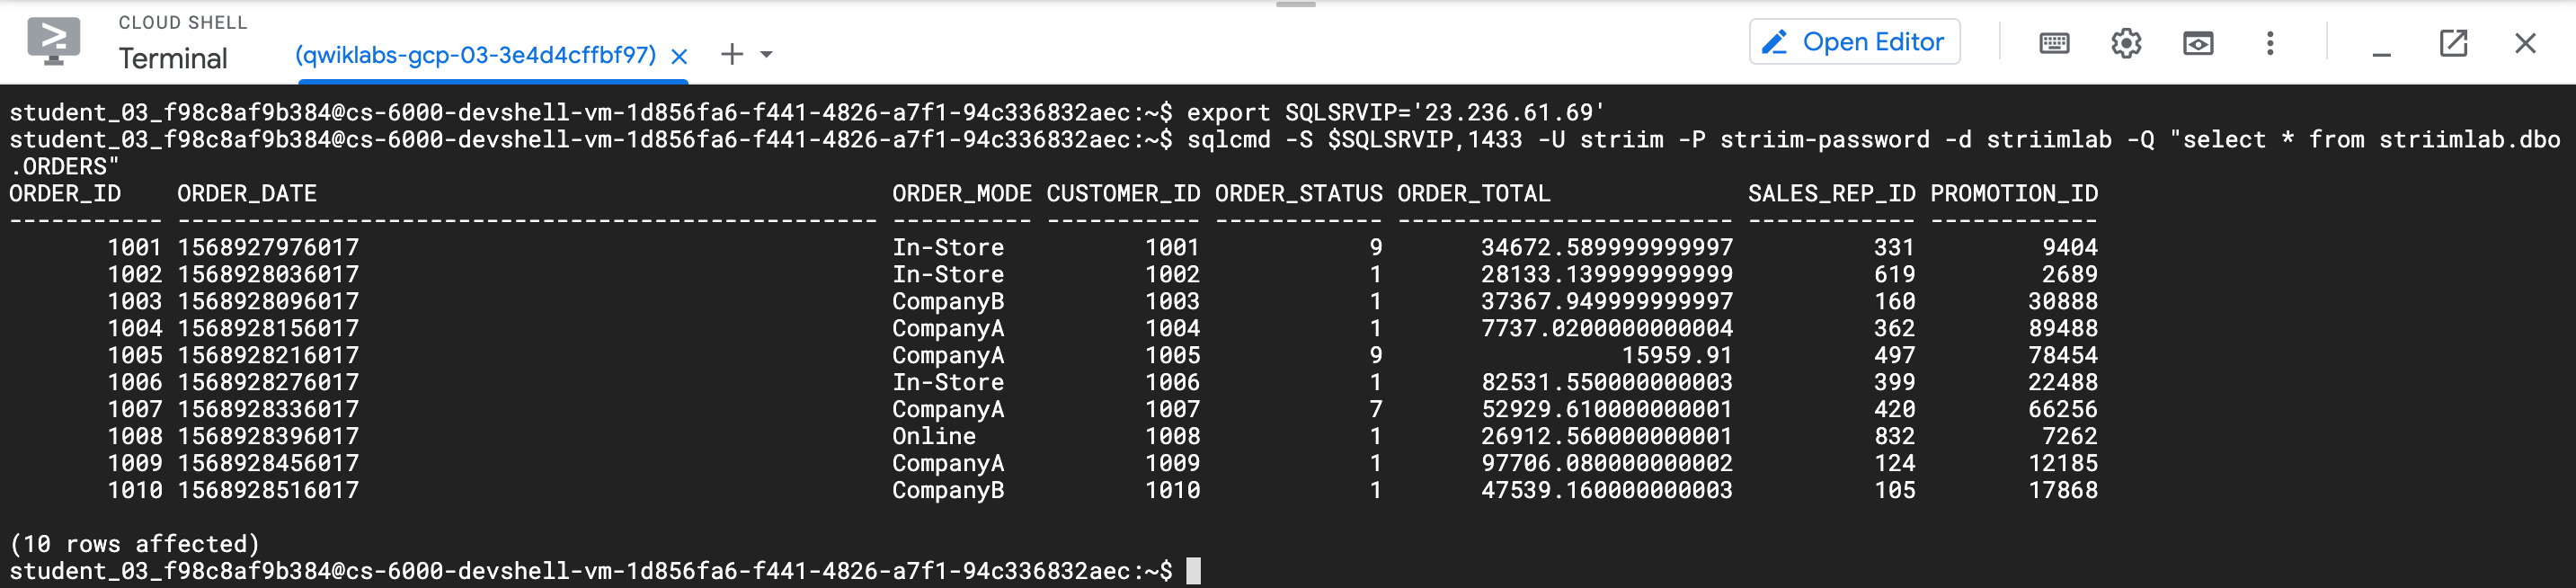
- Assign the SQL Server instance's IP address to the SQLSRVIP variable.
- Run the following command to view the existing data in the Orders table. The table currently contains 10 rows. Your results will appear as shown below.
- Type "cat" into the terminal window (without double quotes) and press Return/Enter. This will effectively pause the shell and preserve all of the configuration you have made while you perform steps outside the shell.

-
Verify that the Spanner instance has been set up with a database and table defined. In the Cloud Console, select Navigation menu > Spanner.
-
Click on the instance name striim-spanner-lab, and then click on the database name striimlab (under the Databases section). Confirm that the table orders is present.
-
Click on the table name orders in the bottom pane under Tables. Then click Data on the left pane. The table is empty.
Task 1. Set up the Striim server
You will set up an instance of the Striim server provisioned through the Google Cloud Marketplace.
-
Click on the Navigation menu > Marketplace. In the search box type Striim and hit Return or Enter. Select STRIIM ( metered ) from the list of options.
-
Click GET STARTED and Check the box for I accept the GCP Marketplace Terms of Service... and click on AGREE and Click DEPLOY.
-
On the New STRIIM ( metered ) deployment screen that appears, select the Zone set to
. -
Change the Machine Type to:
Series: E2
Machine type: e2-standard-4 (4 vCPU, 16 GB memory). -
Leave the other options at their default values.
-
Scroll down the page.
-
Click Deploy.
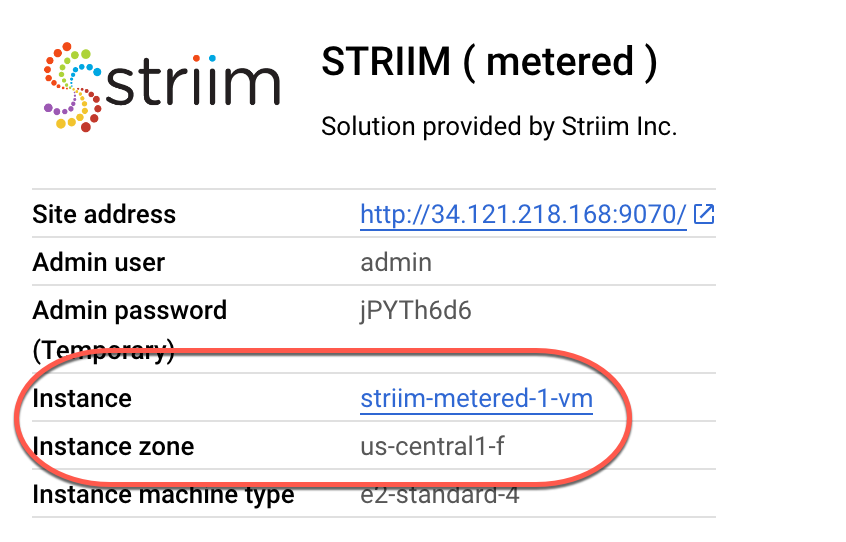
- You will be redirected to the Deployment Manager page and once the environment is provisioned the deployment details will appear. Take note of the name of the VM and deployment zone (Instance and Instance zone in the example screenshot below).
Click Check my progress to verify the objective.
- Return to the Cloud Shell. Press Ctrl+C to clear the paused "cat" command. Execute the following commands after replacing the placeholder INSTANCENAME with the Instance name and the placeholder ZONENAME with the Instance zone from the deployment details pane.
Based on the screenshot above, STRIIMVM_NAME would be set to striim-metered-1-vm and STRIIMVM_ZONE would be set to
-
Type "cat" into the terminal window (without double quotes) and press Return/Enter to pause the shell.
-
Return to the Deployment Manager tab, click the link for Site address. This will open up the Striim configuration wizard in a new browser tab. If there is a redirect notice, you can safely click the link provided.
-
If you receive a pop-up referring to the use of cookies, click I Agree. Click Accept Striim EULA and Continue at the bottom of the page.
-
Configure your Striim installation - use the values listed in the table below:
| Property | Value (type value or select option as specified) |
|---|---|
| Cluster name | my_cluster |
| Admin password | striim-password |
| Re-enter Admin password | striim-password |
| Sys user password | striim-password |
| Re-enter Sys user password | striim-password |
| Striim Key Store password | striim-password |
| Re-enter Striim Key Store password | striim-password |
-
Click Save and Continue.
-
Click Launch. Processing will occur in the background. Please wait a short while. Once all actions are complete, click the green Log In button.
-
Log in using the user admin and the password striim-password. This will take you to the Striim administration console.
You are now ready to configure a connection to the SQL Server instance.
Task 2. Set up Striim Access to SQL Server
You will now deploy the SQL Server JDBC driver to allow Striim to connect to your SQL Server instance.
-
On the Deployment Manager page for your Striim instance, click SSH located next to the blue Visit the site button. This will open up a new window and will automatically SSH into the virtual machine.
-
If prompted to allow SSH-in-browser to connect to VMs click Authorize.
- Run the following command to download the SQL Server JDBC driver:
- Copy the java archive file to the Striim library path, allow it to be executable, and change the ownership and group:
- Restart the Striim server to recognize the new JDBC driver:
- Close the Striim SSH window.
Click Check my progress to verify the objective.
- Go back to the browser tab for the Striim administration console, refresh the tab, and log in using the user admin and the password striim-password. The administration console will take a few minutes to refresh after the restart. If the administration console does not reload on the first attempt, keep refreshing until the administration console comes up.
If the administration console does not come up, use the site address, but with port 9080 instead of 9070, i.e. http://STRIIM_IP_ADDRESS:9080/.
Task 3. Create a Spanner access key
Striim requires an IAM access key so that it can securely connect to Spanner. Follow these steps to create the key:
- Return to the project Cloud Shell, press Ctrl+C to clear the paused "cat" command, and create a service account for Striim to connect to Spanner by running the commands below. These steps will create a key named striim-spanner-key.json in your Cloud Shell's home path:
-
On the Deployment Manager page for your Striim instance, click SSH located next to the blue Visit the site button. This will open up a new window and will automatically SSH into the virtual machine.
-
Run the following command to determine the Qwiklabs student user account. Copy the results to the clipboard:
Example output:
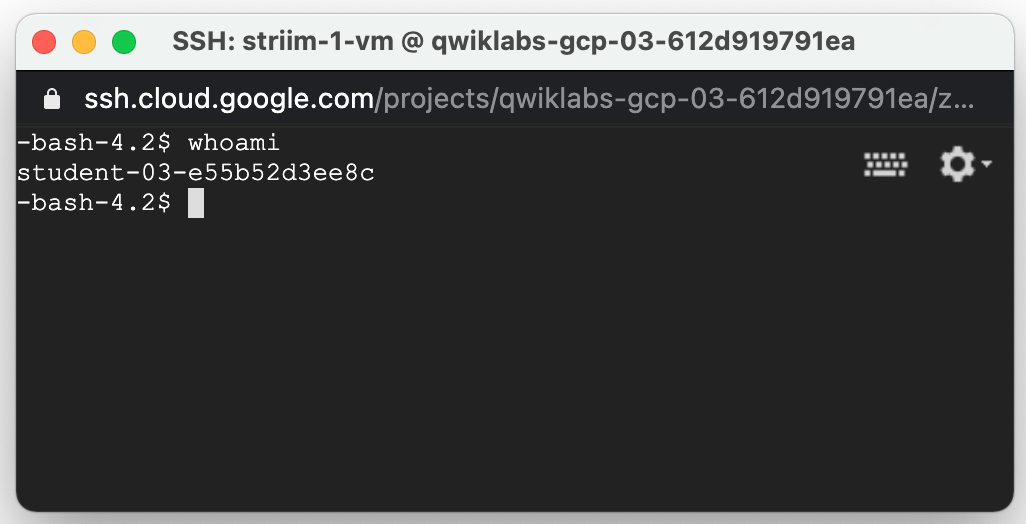
- Run the following command to set a variable equal to the user account within the Striim SSH terminal. Replace WHOAMI with the results from the last command. In the screenshot above this value is student-03-e55b52d3ee8c:
- Run the following commands to create a directory and change ownership of that directory to the Qwiklabs user:
-
You must close the Striim SSH window before proceeding to the next step.
-
Return to the project Cloud Shell and move the Spanner key you created to the Striim VM. The command below will copy the JSON file to the Striim server. Connecting by scp (secure copy) will cause an SSH key to be generated and you will be prompted to create a passphrase. When prompted to continue, confirm with "Y" and leave the passphrase field empty. Press Return or Enter to force the passphrase to be empty on each step:
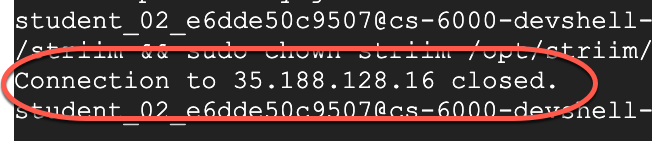
- Move the JSON file on the Striim VM to the /opt/striim directory using the command below. The terminal will report that the connection is closed to the remote server. This is not an error or warning. Proceed to the next step.
- Confirm that the JSON file is now on the Striim server by issuing the following command. The key and file details appear in the output.

- Type "cat" into the terminal window (without double quotes) and press Return/Enter to pause the shell.
You are now ready to create a Striim application.
Click Check my progress to verify the objective.
Task 4. Create an online database migration
An online database migration moves data from a source database (either on-premises or hosted on a cloud provider) to a target database in Google Cloud. The source database remains fully accessible to business applications with minimal performance impact on the source database with this type of configuration.
In an online migration, an initial bulk load is performed, and a continuous capture of changes is executed. You then synchronize the two databases to ensure that data isn't lost. Typically both databases will be retained for long periods of time to test and verify that the application and users are not impacted by switching to a new cloud database.
-
On the Striim administration console, click the Apps button in the middle of the page.
-
Click the Create App button on the upper right hand side of the page.
-
There are multiple ways to create applications in Striim. For this lab click Start From Scratch (the option on the left).
-
Name the application something that is easily remembered. For this lab use the name Batch.
-
Below the application name, you can choose a namespace. These are logical groupings that help you organize applications. Use the default admin namespace. Click Save on the bottom right corner of the page.
-
The Flow Designer page loads. All of the out of the box connectors needed to create streaming data applications are in the left side menu bar.
-
To do a one-time, bulk initial load of data, use the Database Reader. Drag and drop the Database tile from the Sources pane to the application canvas in the middle.
-
Enter the following connection properties in the New Source pane on the right of the page.
| Property | Value (type value or select option as specified) |
|---|---|
| Name | batch_source |
| Connection URL | jdbc:sqlserver://PRIMARY_ADDRESS:1433;DatabaseName=striimlab |
| Username | striim |
| Password | striim-password |
- Click the Show Advanced Settings link to add one additional configuration value.
| Property | Value (type value or select option as specified) |
|---|---|
| Tables | striimlab.dbo.ORDERS |
- For Output To provide the following value.
| Property | Value (type value or select option as specified) |
|---|---|
| New Output | batch_inprocess |
-
Click Save.
-
Next perform a quick test to see if the configuration settings are correct and that Striim can successfully connect to the SQL Server instance. On the top middle of the page, there will be a button marked Created with a drop down arrow next to it. Click the button, and select Deploy App.
-
Select the default option and click Deploy.
-
Click the wave button beneath your Database Reader component, and then click the eye icon next to it to preview your data as it flows through the Striim pipeline.

- Go back up to the top menu space, click Deployed, and then click Start App.
You should now see the Striim application running and data flowing through the pipeline. If there are any errors, it means that there is an issue connecting to the source database since there is only a source component in the pipeline. If you see your application successfully run but no data flows through, typically that means that you don't have any existing data in your database.
You've successfully connected to your source database and tested that it can read data.
-
Click Running on the top menu bar, and then select Stop App.
-
Click Stopped, and then select Undeploy App. We are now ready to connect to Spanner.
-
Click the wave button under the DatabaseReader. This time a "+" (plus) button will appear. Click the plus button and then select Connect next Target component.
-
Name this target object batch_target. In the Adapter field search for Spanner. Select SpannerWriter.
-
Enter the connection properties listed below.
| Property | Value (type value or select option as specified) |
|---|---|
| Service Account Key | /opt/striim/striim-spanner-key.json |
| InstanceID | striim-spanner-lab |
| Tables | striimlab.dbo.ORDERS,striimlab.orders |
-
Click Save.
-
Click the Created link in the middle of the designer page and then click Deploy App from the drop down.
-
Select the default option and click Deploy.
-
Click Deployed, and then click Start App.
-
Once the status of Running appears, navigate to another tab on the Navigation menu click Spanner. Click on the instance name striim-spanner-lab, and then click on the database name striimlab.
-
On the left pane, click Spanner Studio. then In the right side click NEW SQL EDITOR TAB, run the following query:
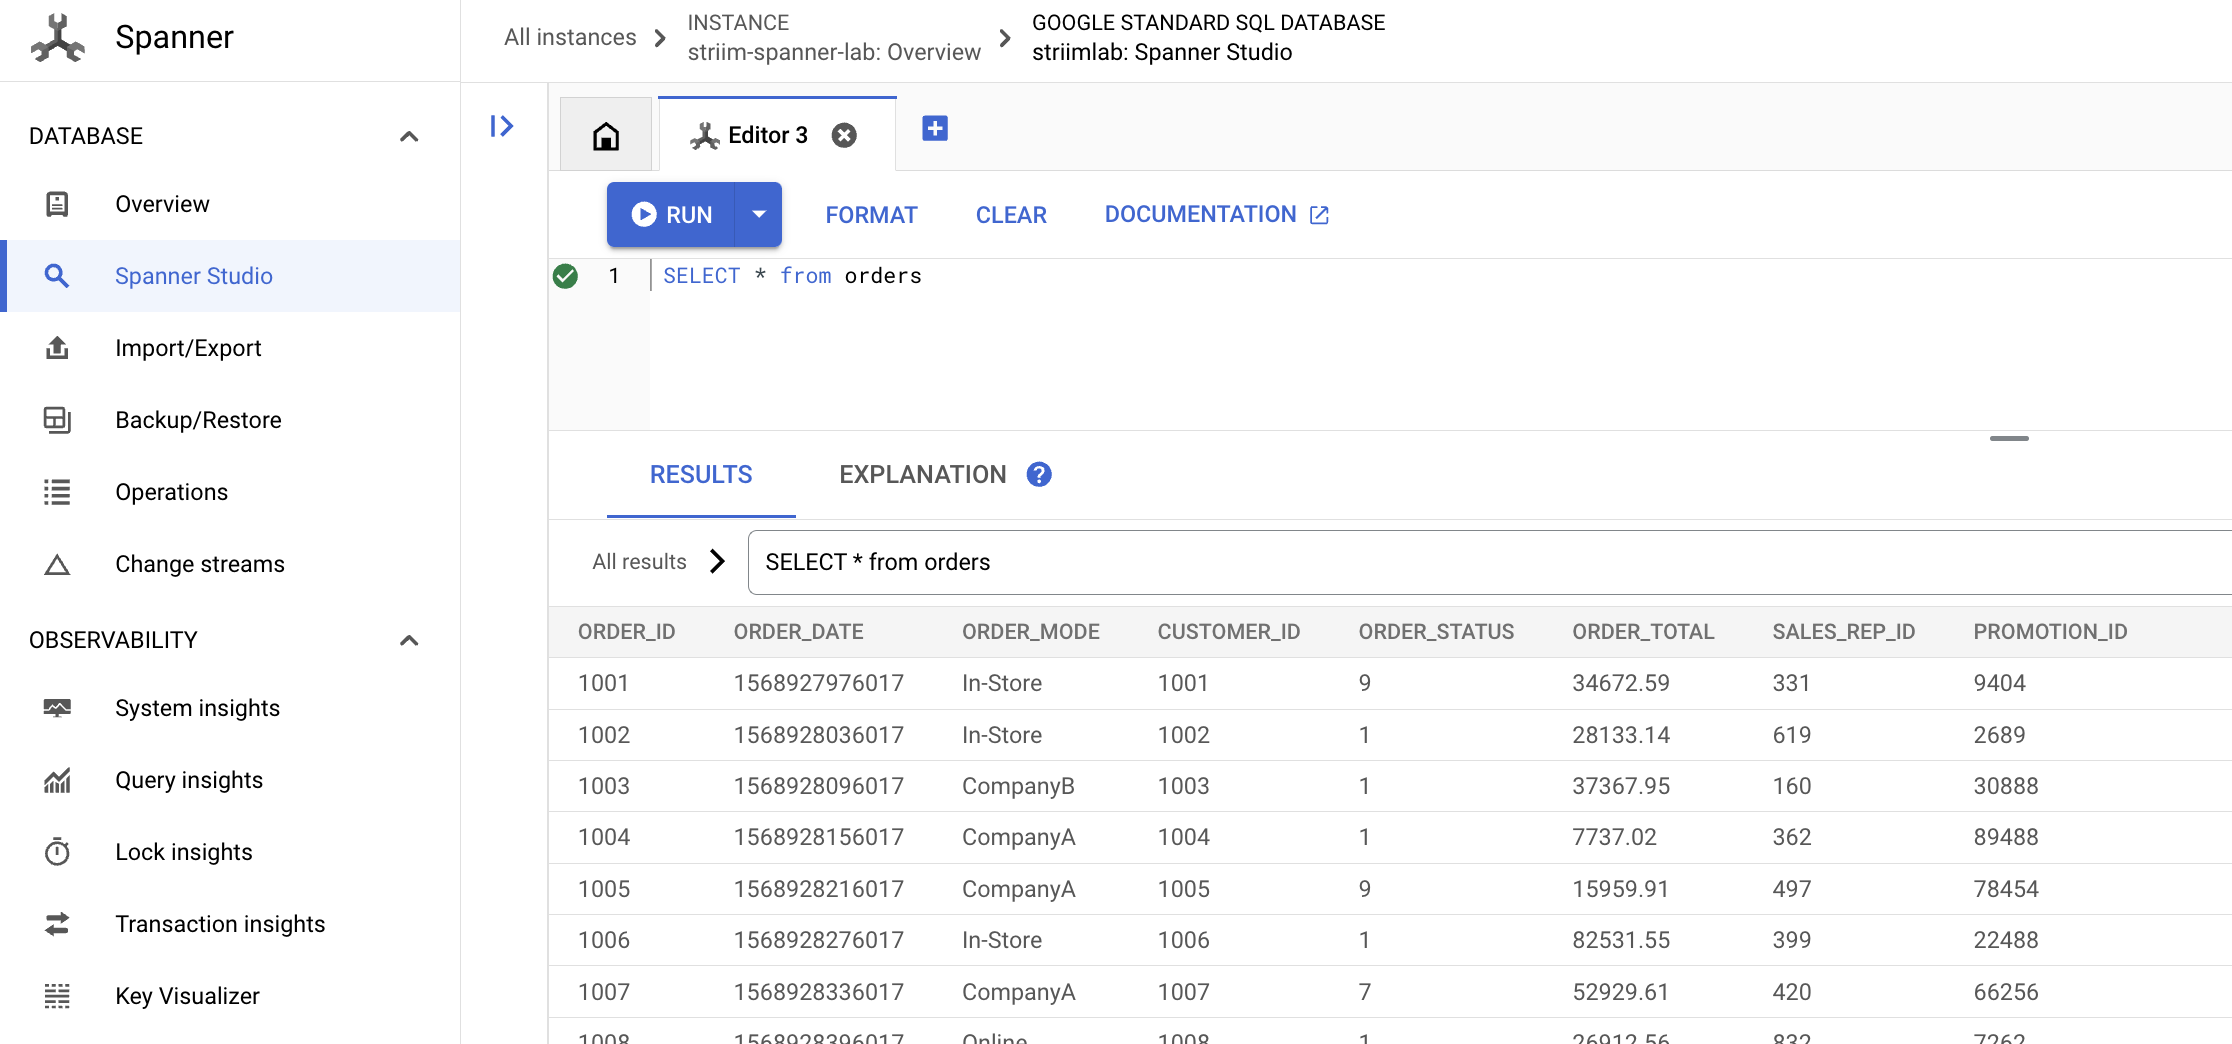
You have successfully set up your Striim environment and pipeline to perform a batch load.
-
Return to your Striim application. Click Running on the top menu bar, and then select Stop App.
-
Click Stopped, and then select Undeploy App.
Task 5. Create a continuous SQL Server to Spanner Data Pipeline
With an initial one time bulk load in place, you can set up a continuous replication pipeline. It will look very similar to the bulk pipeline that you just created, but with a different source object.
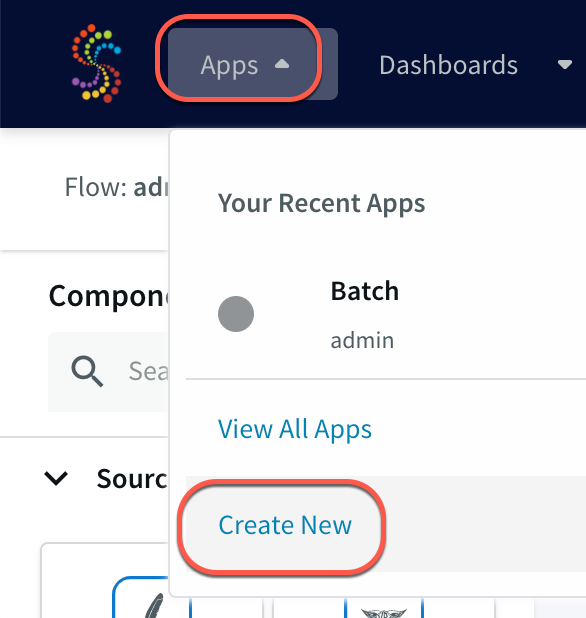
- Click the Apps menu and then click Create New.
-
Click Start from Scratch, and then name it CDC. Leave the namespace as the default option admin.
-
Click Save.
-
This time, instead of choosing a Database reader source, choose the SQL Server CDC source and drag it on the canvas.
-
Enter the following connection properties in the right pane of the New Source window.
| Property | Value (type value or select option as specified) |
|---|---|
| Name | cdc_source |
| Database Name | striimlab |
| Connection URL | jdbc:sqlserver://PRIMARY_ADDRESS:1433;DatabaseName=striimlab |
| Tables | dbo.ORDERS |
- Click the Show Advanced Settings link to input the Username and Password.
| Property | Value (type value or select option as specified) |
|---|---|
| Username | striim |
| Password | striim-password |
- For Output To provide the following value.
| Property | Value (type value or select option as specified) |
|---|---|
| New Output | cdc_inprocess |
-
Click Save.
-
Click the wave button under the cdc_Source. This time a "+" (plus) button will appear. Click the plus button and then select Connect next Target component.
-
Name the target object cdc_target and then search for Spanner under the Adapter field. Select SpannerWriter.
-
Enter the following connection properties.
| Property | Value (type value or select option as specified) |
|---|---|
| Service Account Key | /opt/striim/striim-spanner-key.json |
| InstanceID | striim-spanner-lab |
| Tables | dbo.ORDERS,striimlab.orders |
-
Click Save.
-
Click the Created link in the middle of the designer page and then click Deploy App from the drop down.
-
Select the default option and click Deploy.
-
Click Deployed, and then click Start App.
-
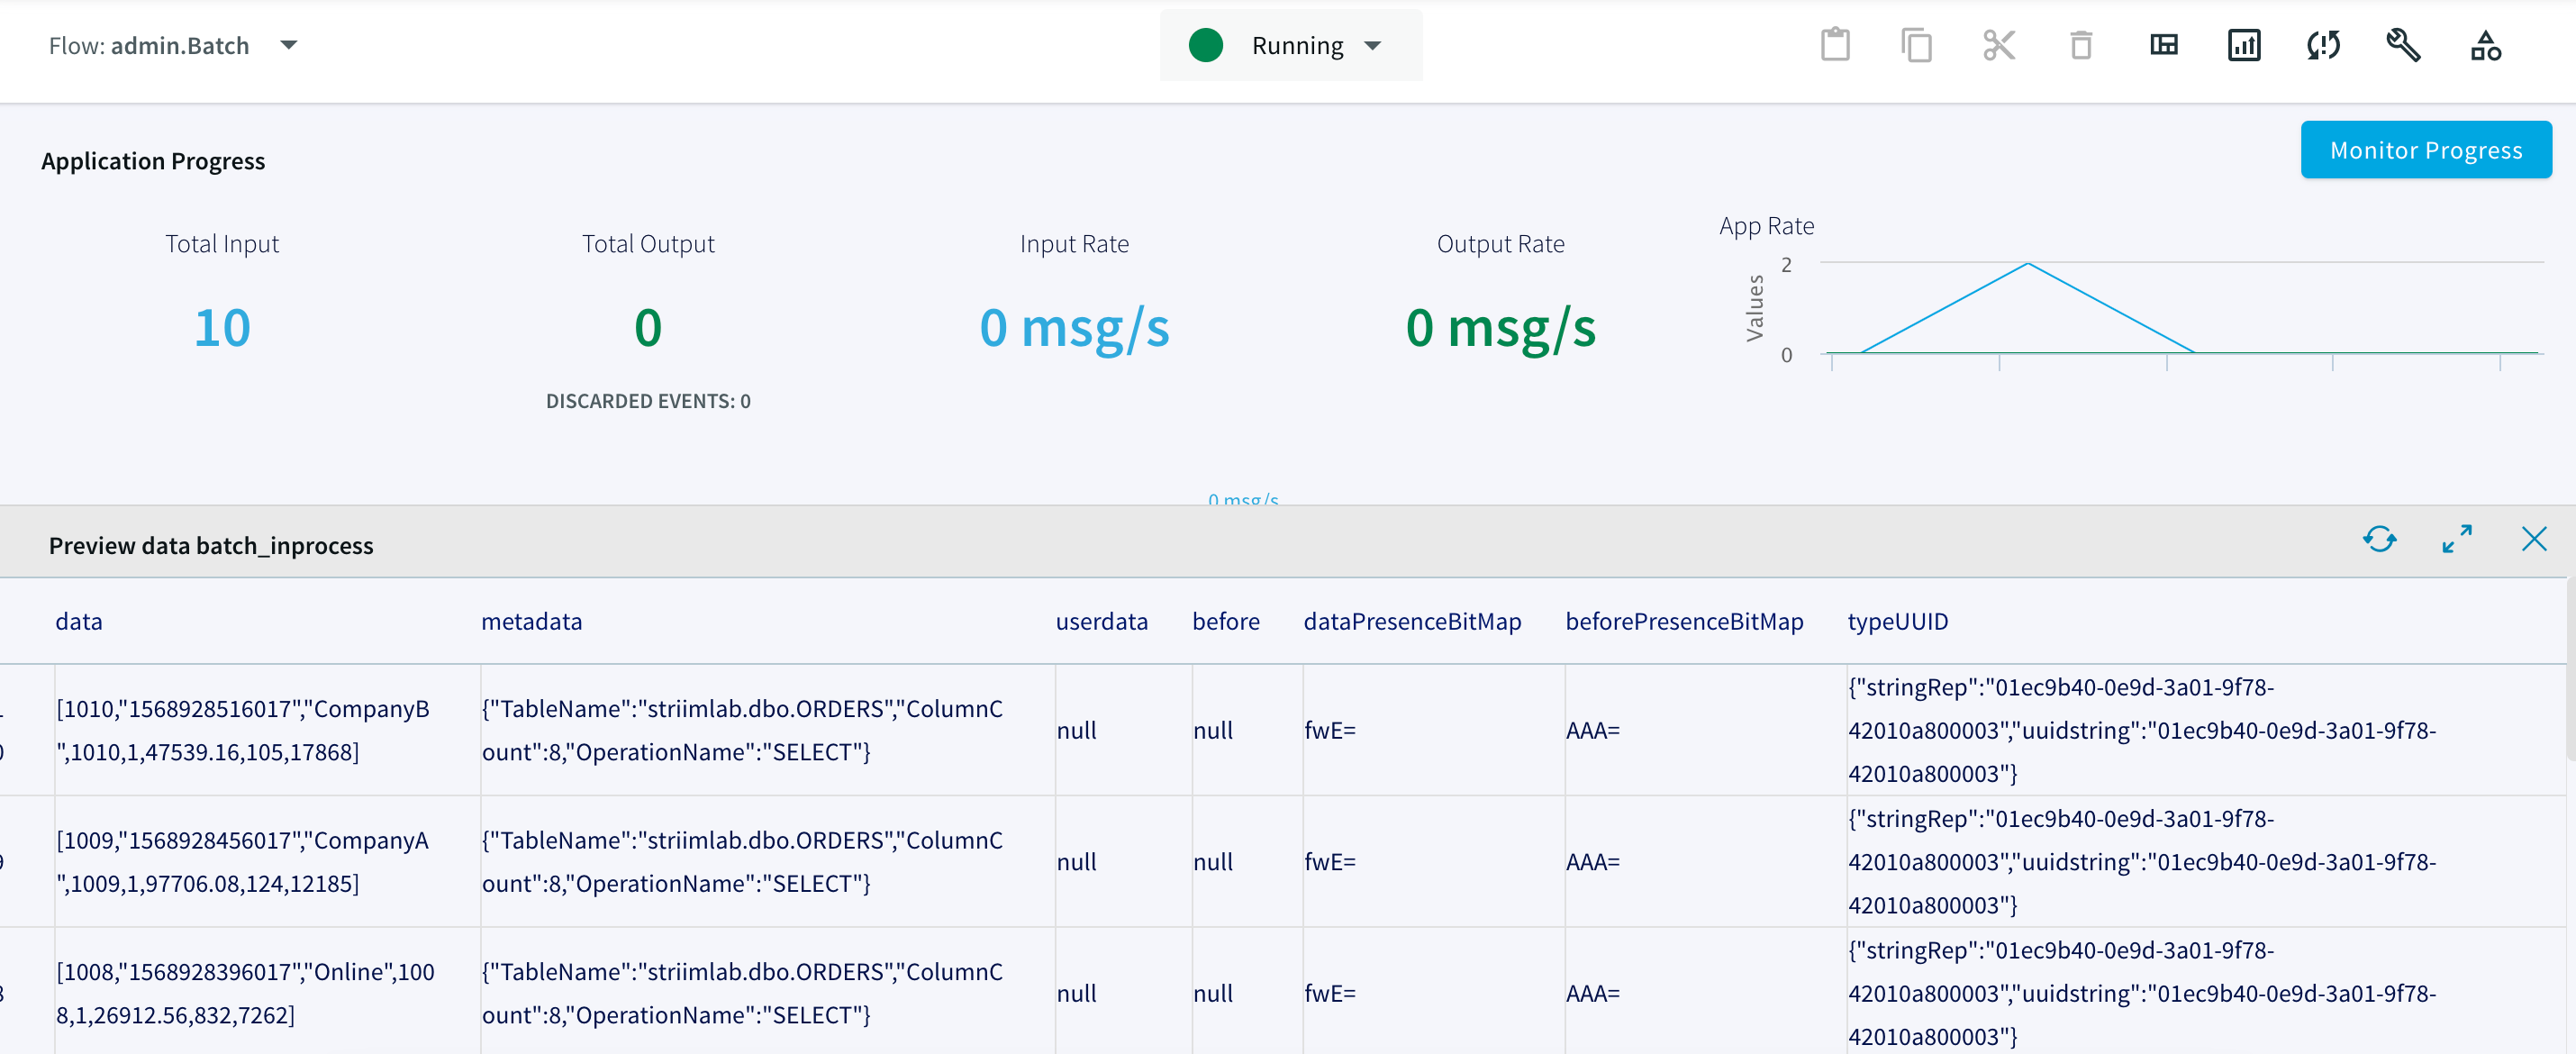
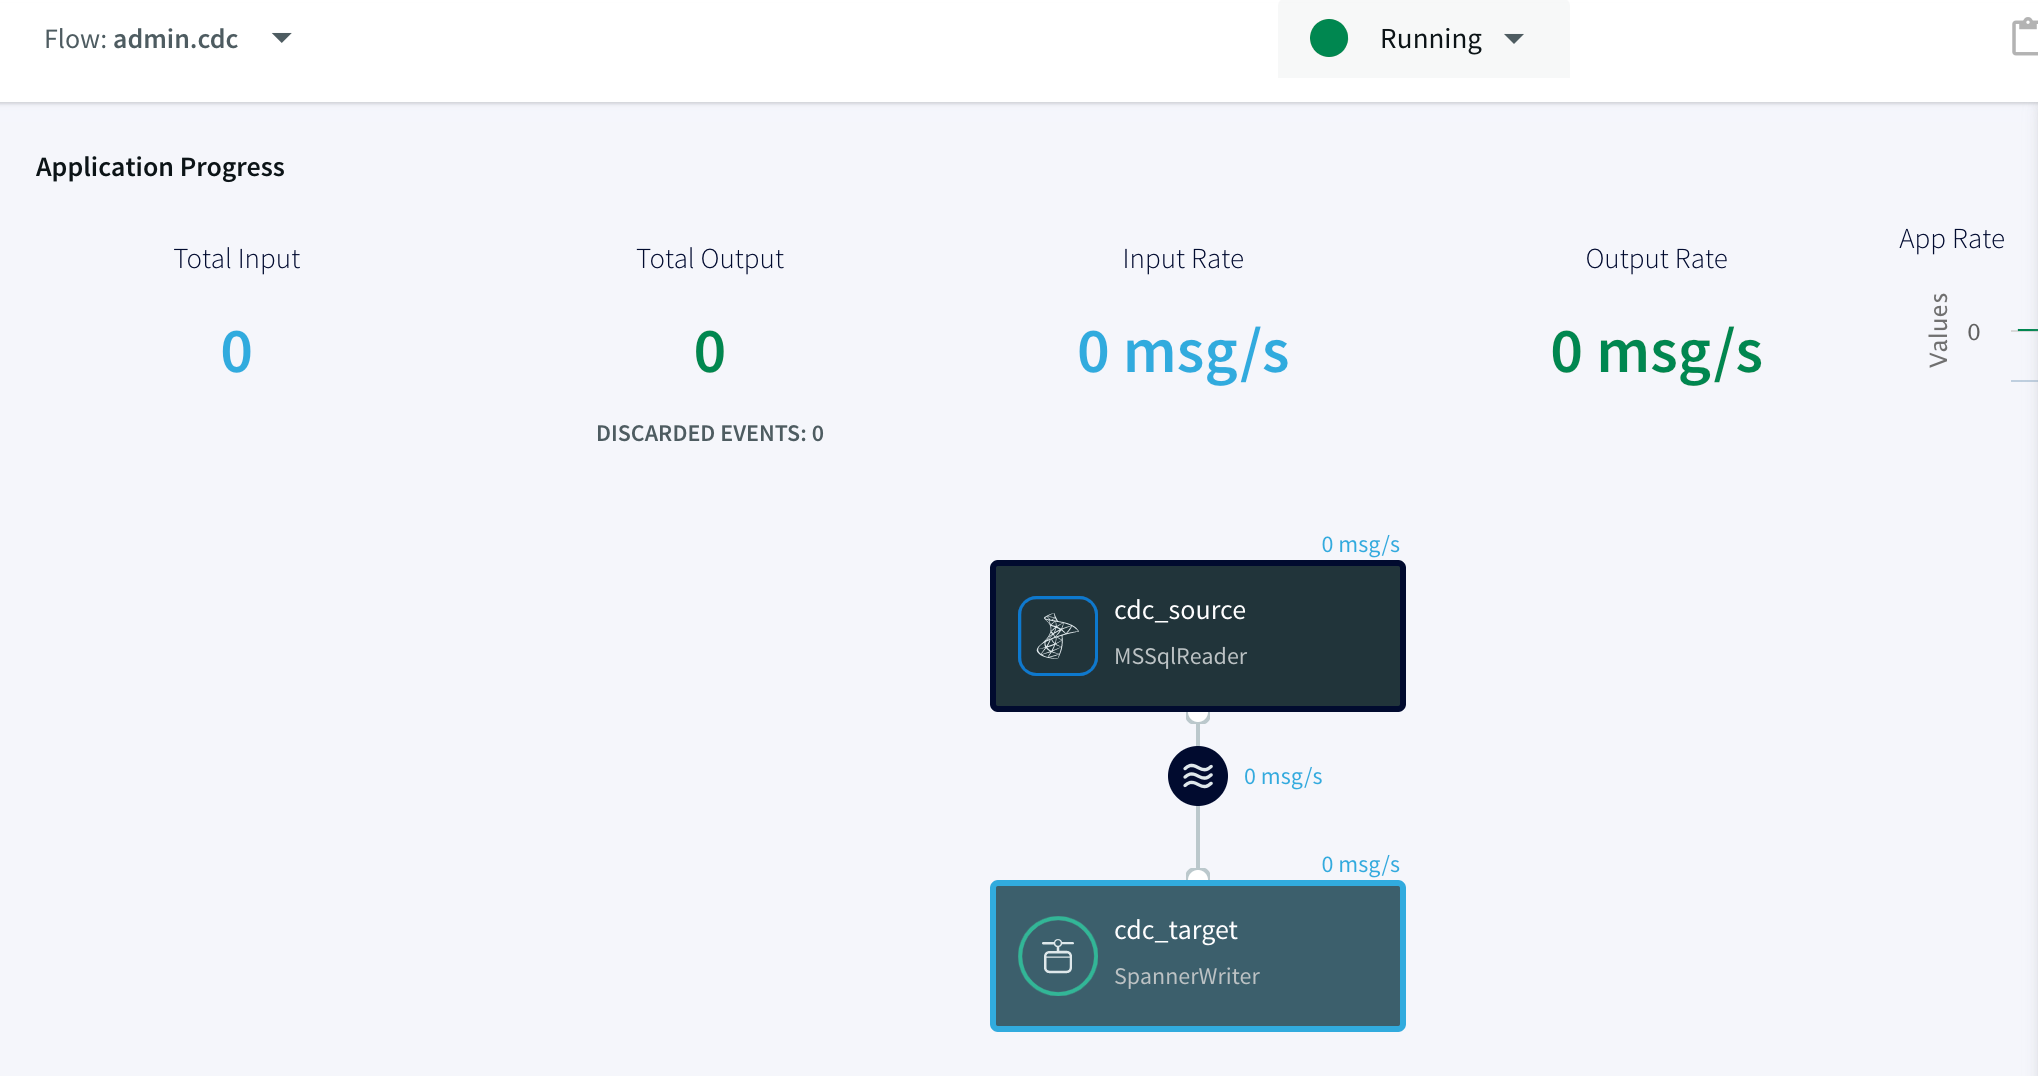
Wait for the CDC app to be fully running before moving to the next step. Your screen should appear like the image below before you proceed.
- Go back to the Cloud Shell. Press Ctrl+C to clear the paused "cat" command. Run the following command to add one row of data to the Orders table:
- In the Cloud Console, navigate to Spanner, then to the
striimlabdatabase . click Spanner Studio. then In the right side click New Editor tab. Run the following query:
The newly inserted row, Order ID 1011, will appear at the top of the list.

- Return to the Cloud Shell and run the following commands consecutively to add 4 more rows of data to the Orders table:
- Return to the Spanner Studio tab to verify that the additional rows have made it to the database by repeating the earlier query:

Congratulations!
You have successfully set up a streaming pipeline from SQL Server to Spanner and used Striim to achieve an online database migration.
Next steps / Learn more
Try out other Google Cloud Platform features for yourself. Have a look at our tutorials, and also be sure to take a look at the Google Cloud Data Migration content.
Copyright 2022 Google LLC All rights reserved. Google and the Google logo are trademarks of Google LLC. All other company and product names may be trademarks of the respective companies with which they are associated.

