Automating Response to Phishing with Cortex XSOAR
This lab was developed with our partner, Palo Alto Networks. Your personal information may be shared with Palo Alto Networks, the lab sponsor, if you have opted in to receive product updates, announcements, and offers in your Account Profile.
GSP951

Overview
In this lab, use Cortex XSOAR (XSOAR) to automate incident response to phishing attacks.
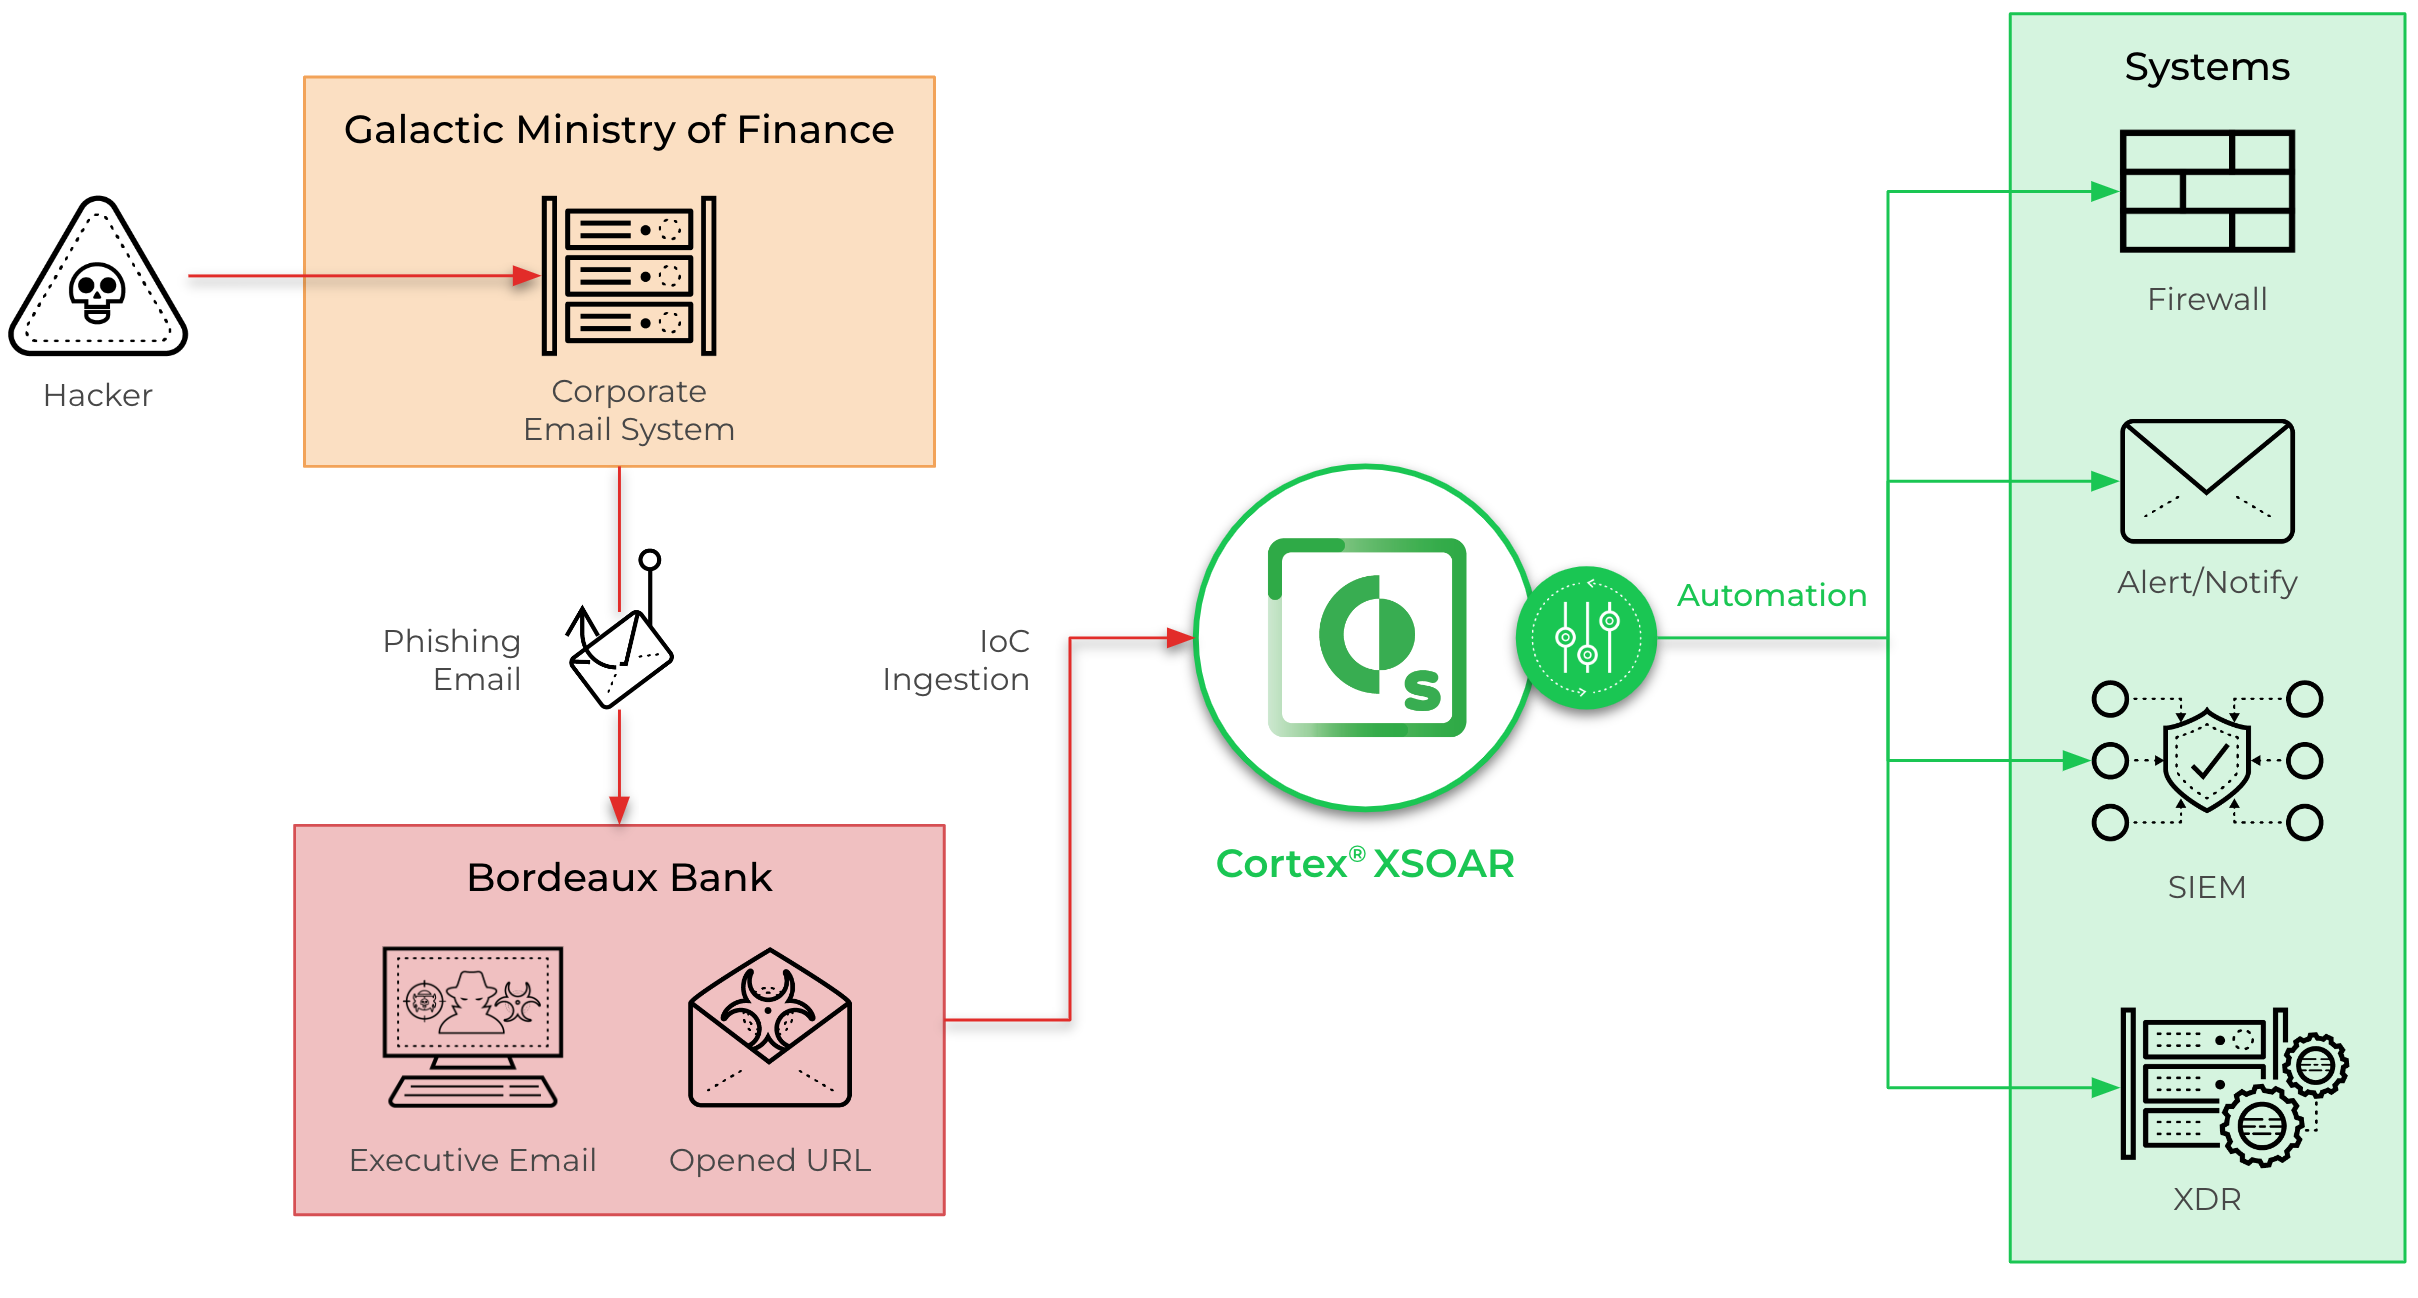
The lab uses a real spear phishing attack against a fictional bank, Galactic Ministry of Finance, by infiltrating the bank's e-mail server. After infiltration, the attacker sends phishing e-mails to executives at a partnering bank, Bordeaux Bank, during peak business hours.
What you'll learn
In this lab, you will perform the following tasks:
- Investigating incidents using Cortex XSOAR.
- Understanding Cortex XSOAR War Rooms.
- Creating an incident Response Plan with Cortex XSOAR.
Setup and requirements
Before you click the Start Lab button
Read these instructions. Labs are timed and you cannot pause them. The timer, which starts when you click Start Lab, shows how long Google Cloud resources will be made available to you.
This hands-on lab lets you do the lab activities yourself in a real cloud environment, not in a simulation or demo environment. It does so by giving you new, temporary credentials that you use to sign in and access Google Cloud for the duration of the lab.
To complete this lab, you need:
- Access to a standard internet browser (Chrome browser recommended).
- Time to complete the lab---remember, once you start, you cannot pause a lab.
How to start your lab and sign in to the Google Cloud console
-
Click the Start Lab button. If you need to pay for the lab, a pop-up opens for you to select your payment method. On the left is the Lab Details panel with the following:
- The Open Google Cloud console button
- Time remaining
- The temporary credentials that you must use for this lab
- Other information, if needed, to step through this lab
-
Click Open Google Cloud console (or right-click and select Open Link in Incognito Window if you are running the Chrome browser).
The lab spins up resources, and then opens another tab that shows the Sign in page.
Tip: Arrange the tabs in separate windows, side-by-side.
Note: If you see the Choose an account dialog, click Use Another Account. -
If necessary, copy the Username below and paste it into the Sign in dialog.
{{{user_0.username | "Username"}}} You can also find the Username in the Lab Details panel.
-
Click Next.
-
Copy the Password below and paste it into the Welcome dialog.
{{{user_0.password | "Password"}}} You can also find the Password in the Lab Details panel.
-
Click Next.
Important: You must use the credentials the lab provides you. Do not use your Google Cloud account credentials. Note: Using your own Google Cloud account for this lab may incur extra charges. -
Click through the subsequent pages:
- Accept the terms and conditions.
- Do not add recovery options or two-factor authentication (because this is a temporary account).
- Do not sign up for free trials.
After a few moments, the Google Cloud console opens in this tab.

Task 1. Introduction to XSOAR & Phishing
In this task, take a moment to review the limitations of current solutions in effectively addressing phishing attacks.
-
What is phishing?
Phishing is a type of social engineering that primarily occurs through email. Attackers create fraudulent emails that mimic legitimate communication in order to deceive recipients. -
What are some current limitations with today's systems in addressing phishing emails?
Responding to phishing emails can be a time-consuming and complex task. These tasks often require multiple tools and involve manual actions that are error prone. -
How does Cortex XSOAR address these limitations?
Cortex XSOAR effectively addresses challenges associated with phishing emails through its comprehensive automation and orchestration capabilities.
By combining automation, orchestration, and integrations, Cortex XSOAR significantly enhances the efficiency, accuracy, and speed of responding to phishing emails, effectively mitigating the associated challenges.
Task 2. Investigating Incidents
In this task, learn about incidents within the Cortex XSOAR platform. An incident refers to a security event or breach that requires investigation, analysis, and remediation. When an incident occurs, XSOAR provides a centralized platform for managing and coordinating the response efforts.
Step 1. Generate Phishing Incident
In this step, create an incident for the phishing attack. Creating incidents allows you to choose a scenario that best fits your specific use-case.
-
Access Cortex XSOAR using the URL and credentials below.
Key Value Console Username Password It may take several minutes for the XSOAR console to become accessible. -
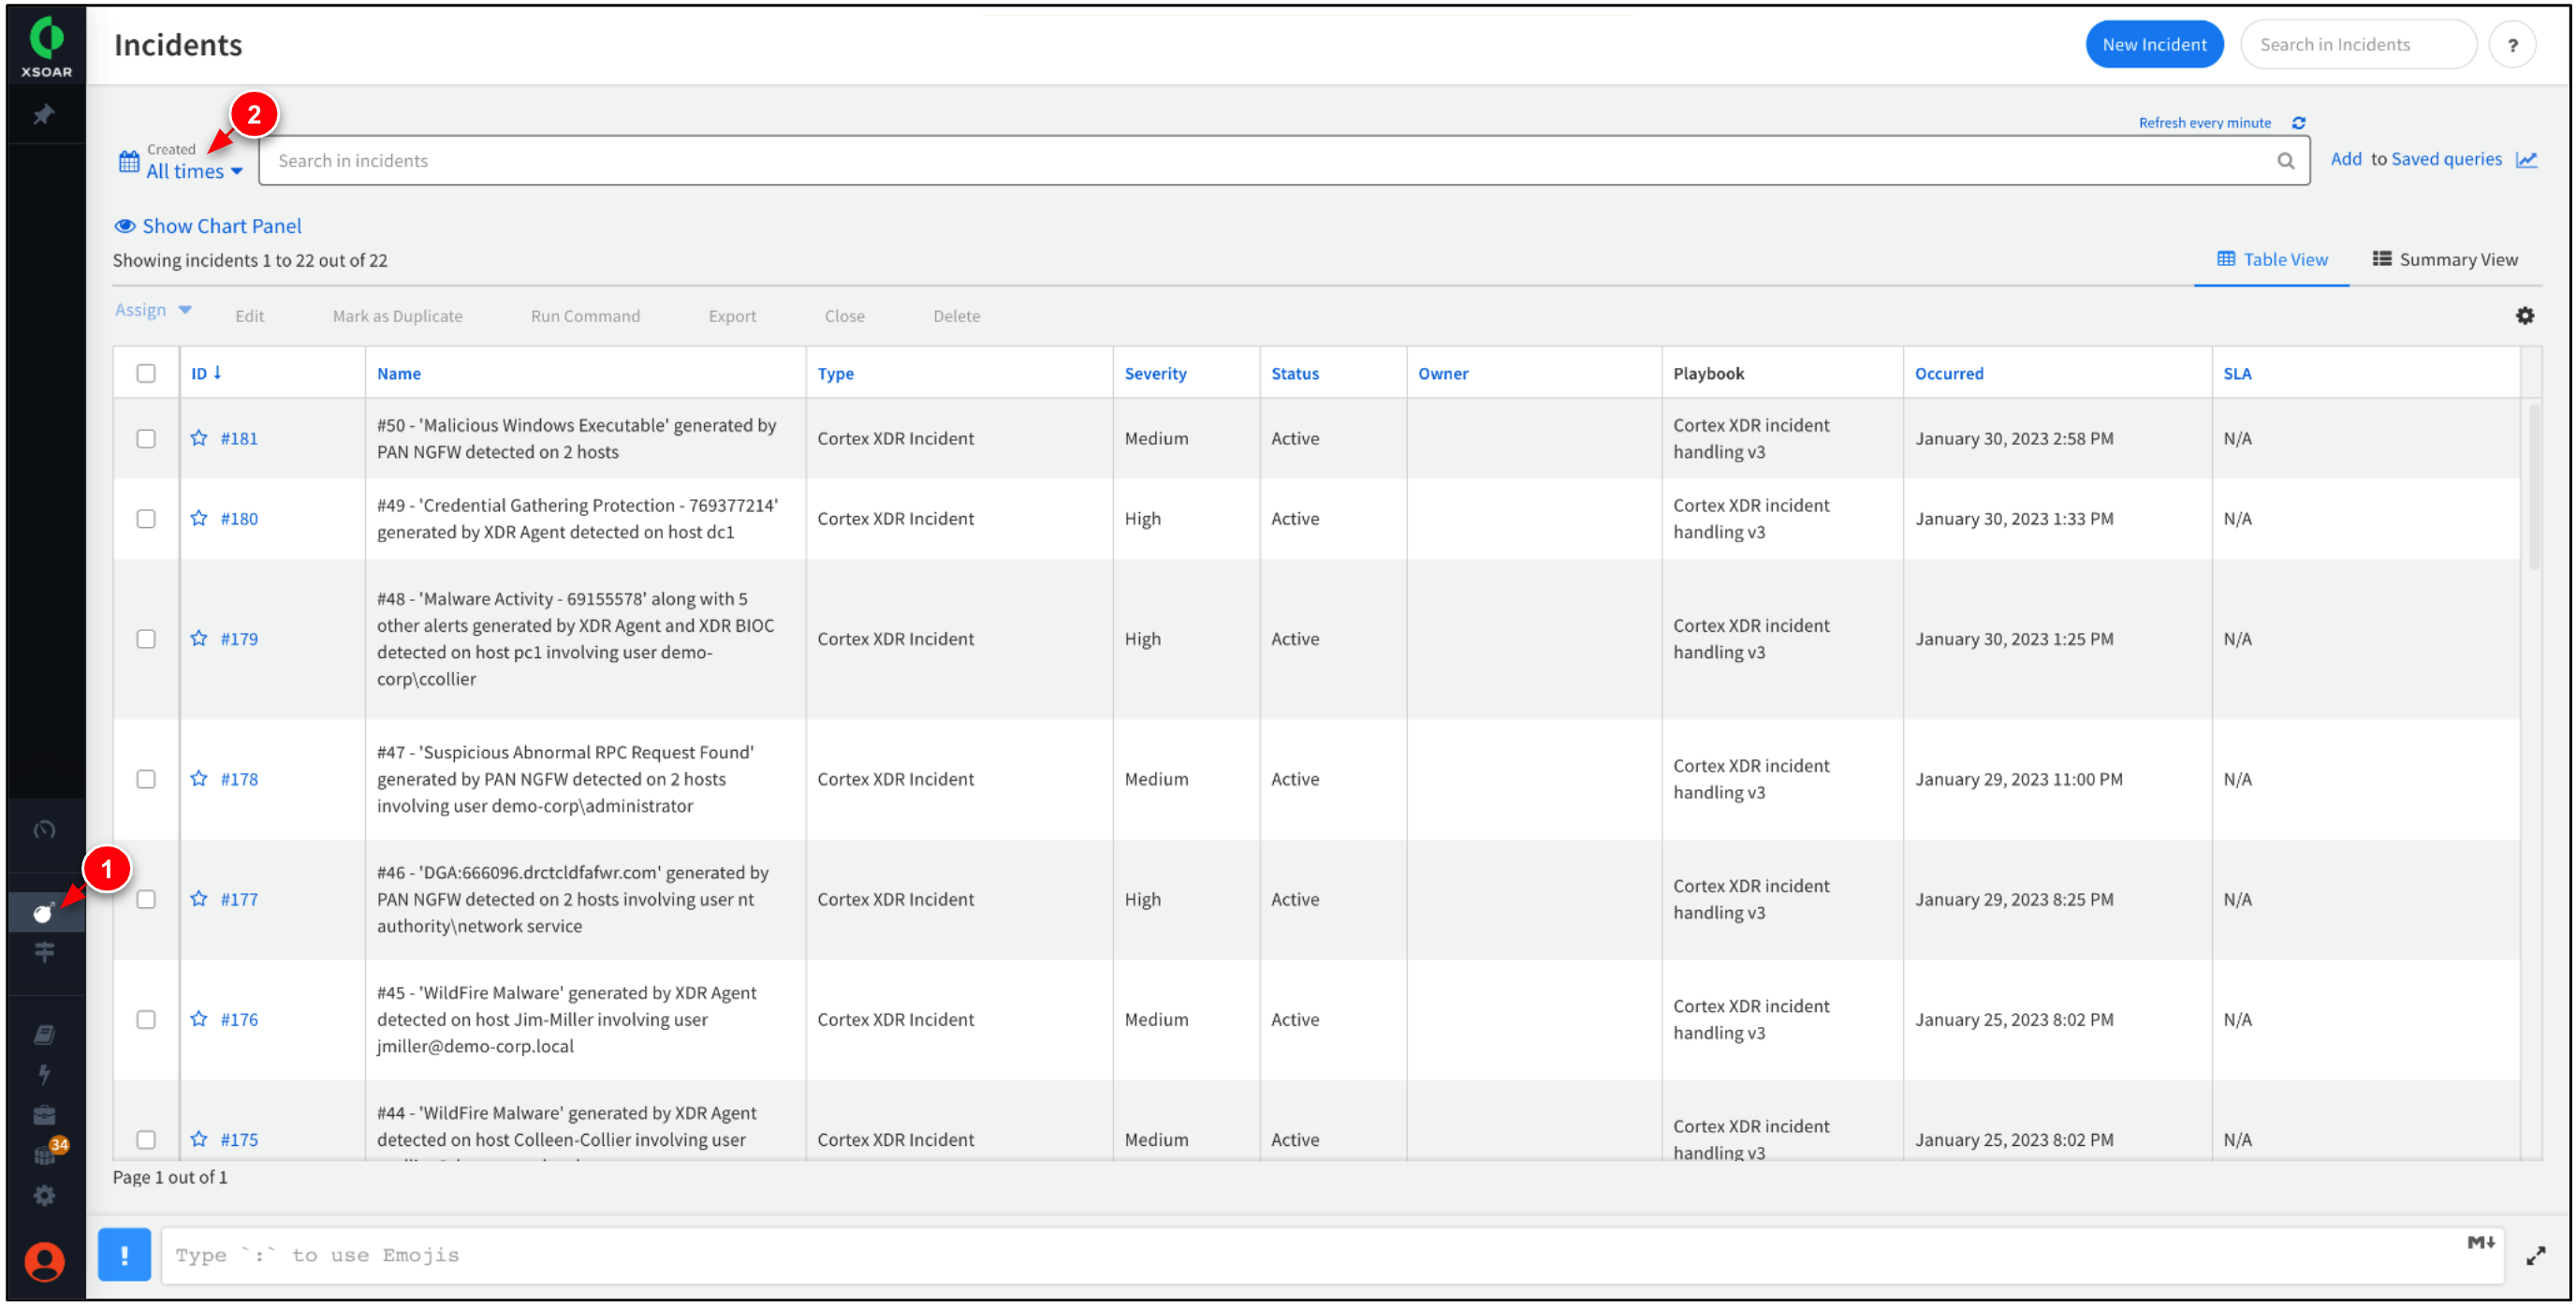
Go to Incidents. Set the Created range to
All times. -
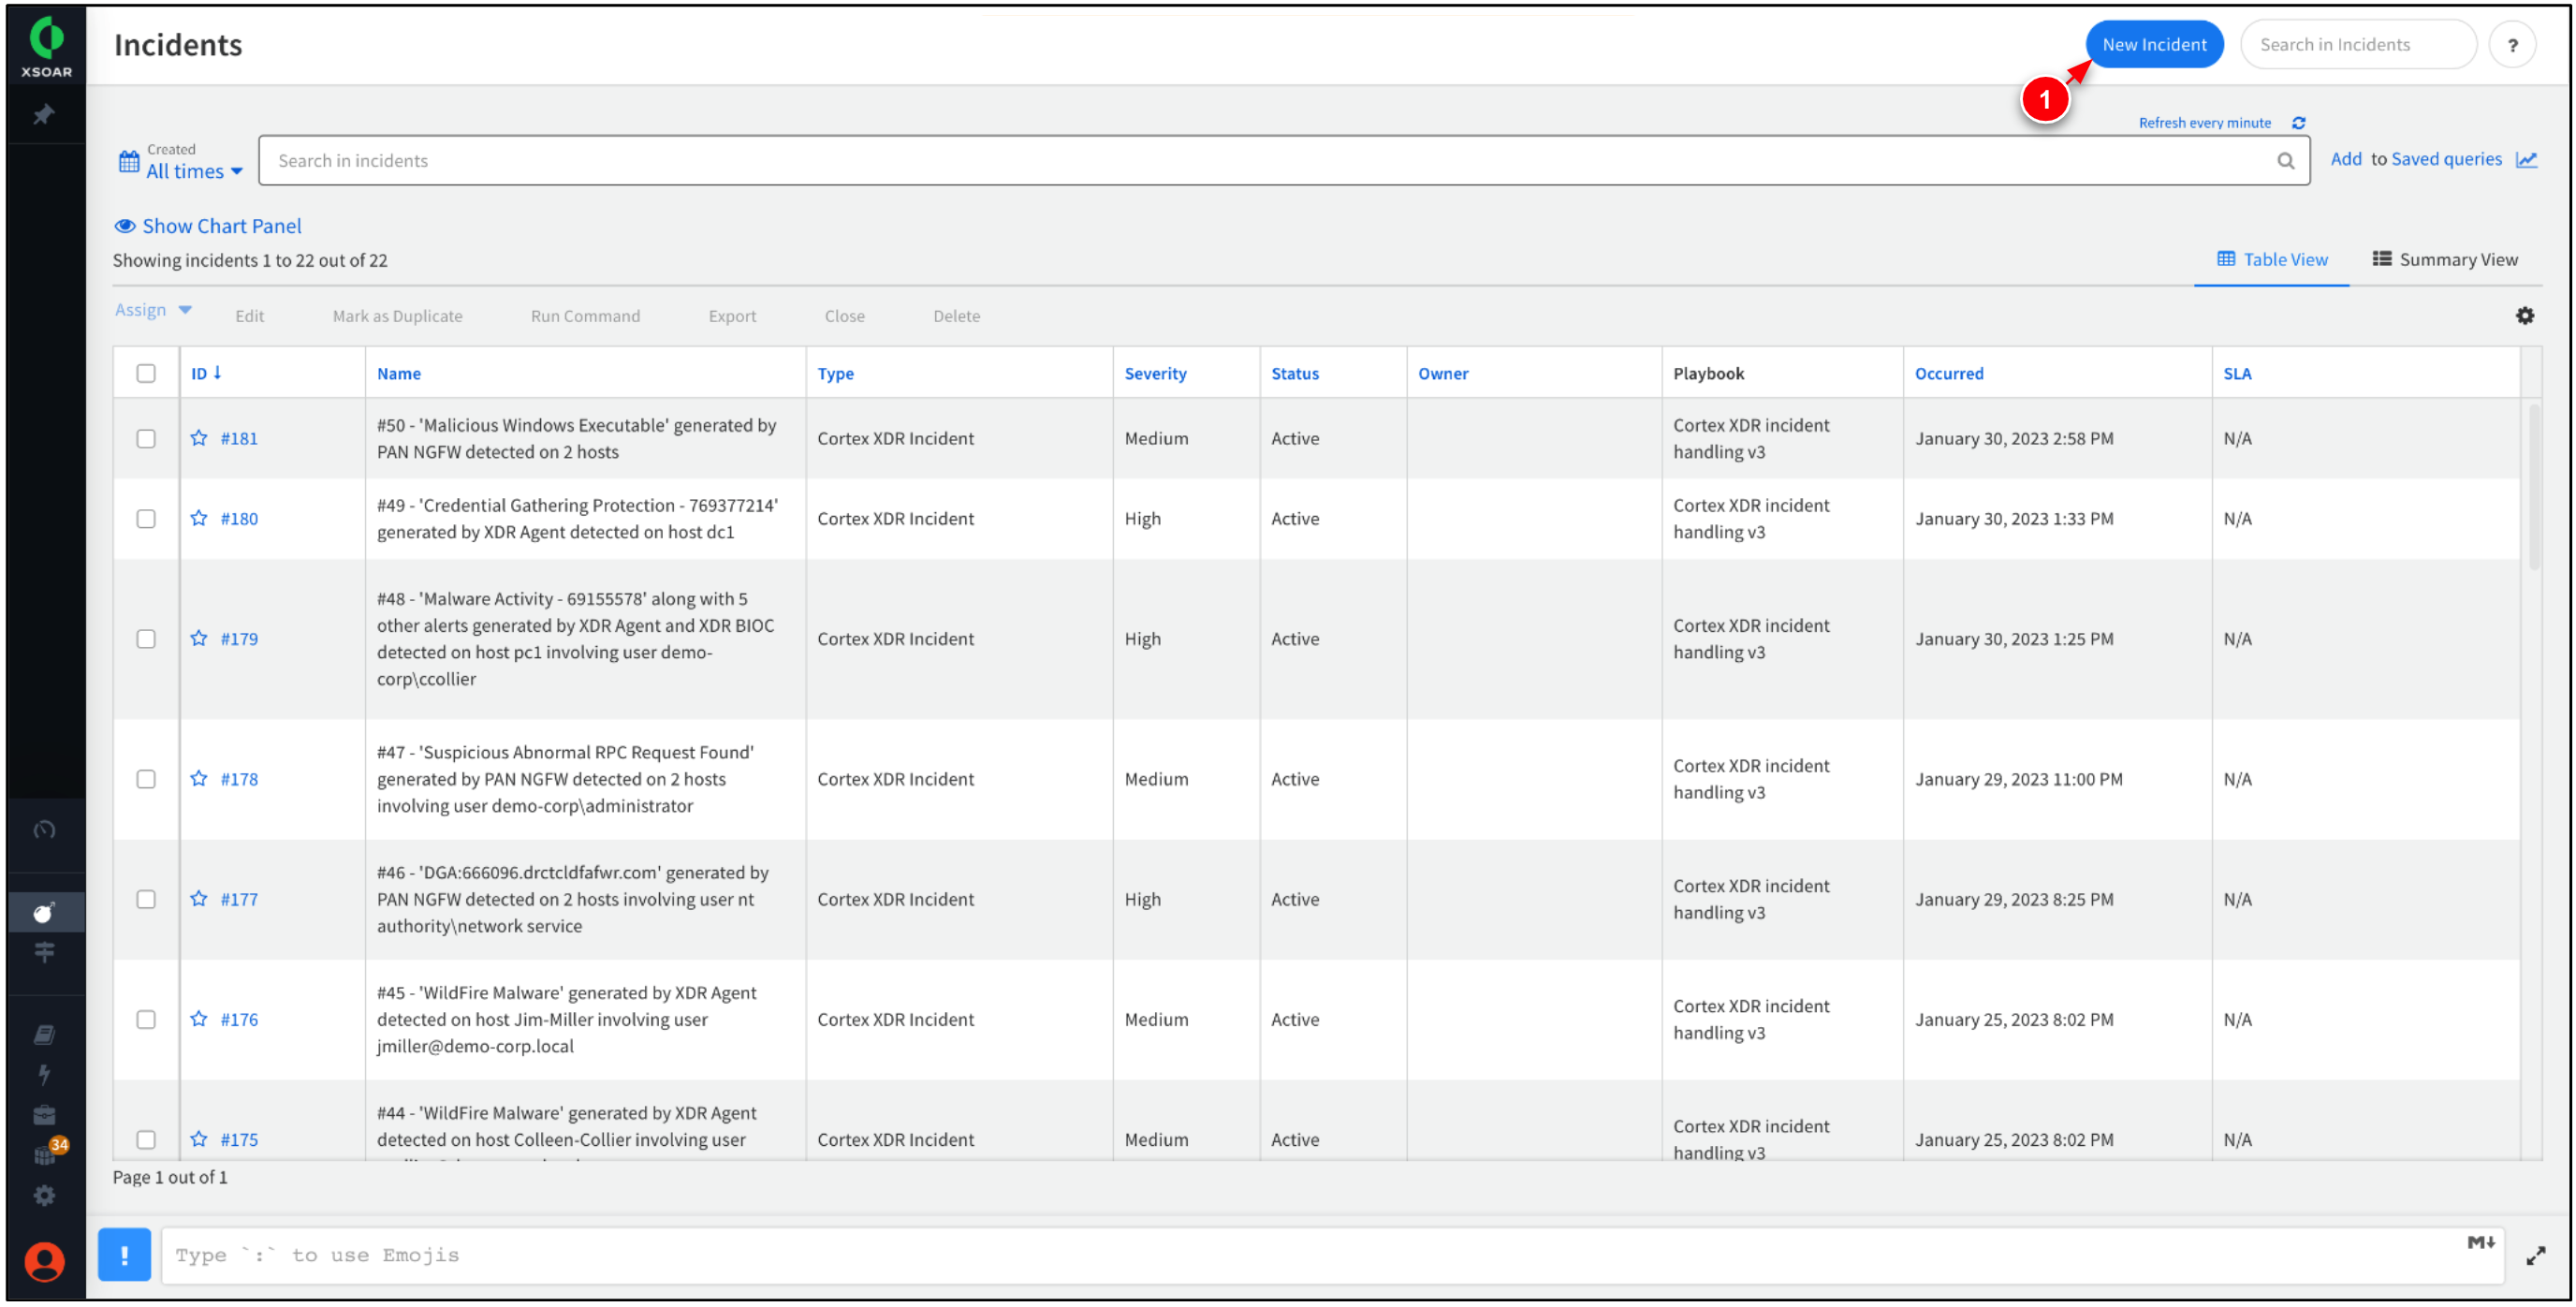
Click New Incident to create a new incident.
After creating an incident, the incident ID will be generated. You can view more details about incidents by selecting the incident's correlating ID number. -
Set the workshopscenario to
Phishing Campaignand Type toScenario. Then, click Create New Incident.It may take several minutes for the new incident to appear. This is because XSOAR is correlating and processing the data with associated Work Plan tasks. -
While waiting for the incident to generate, open any existing incident to view more information about it.
All of the incidents in this lab have been generated by Cortex XDR and are ingested by Cortex XSOAR.

Step 2. Investigate Phishing Incident
In this step, investigate the phishing incident that was created in the previous step, including the incident's timeline, status, and associated evidence.
-
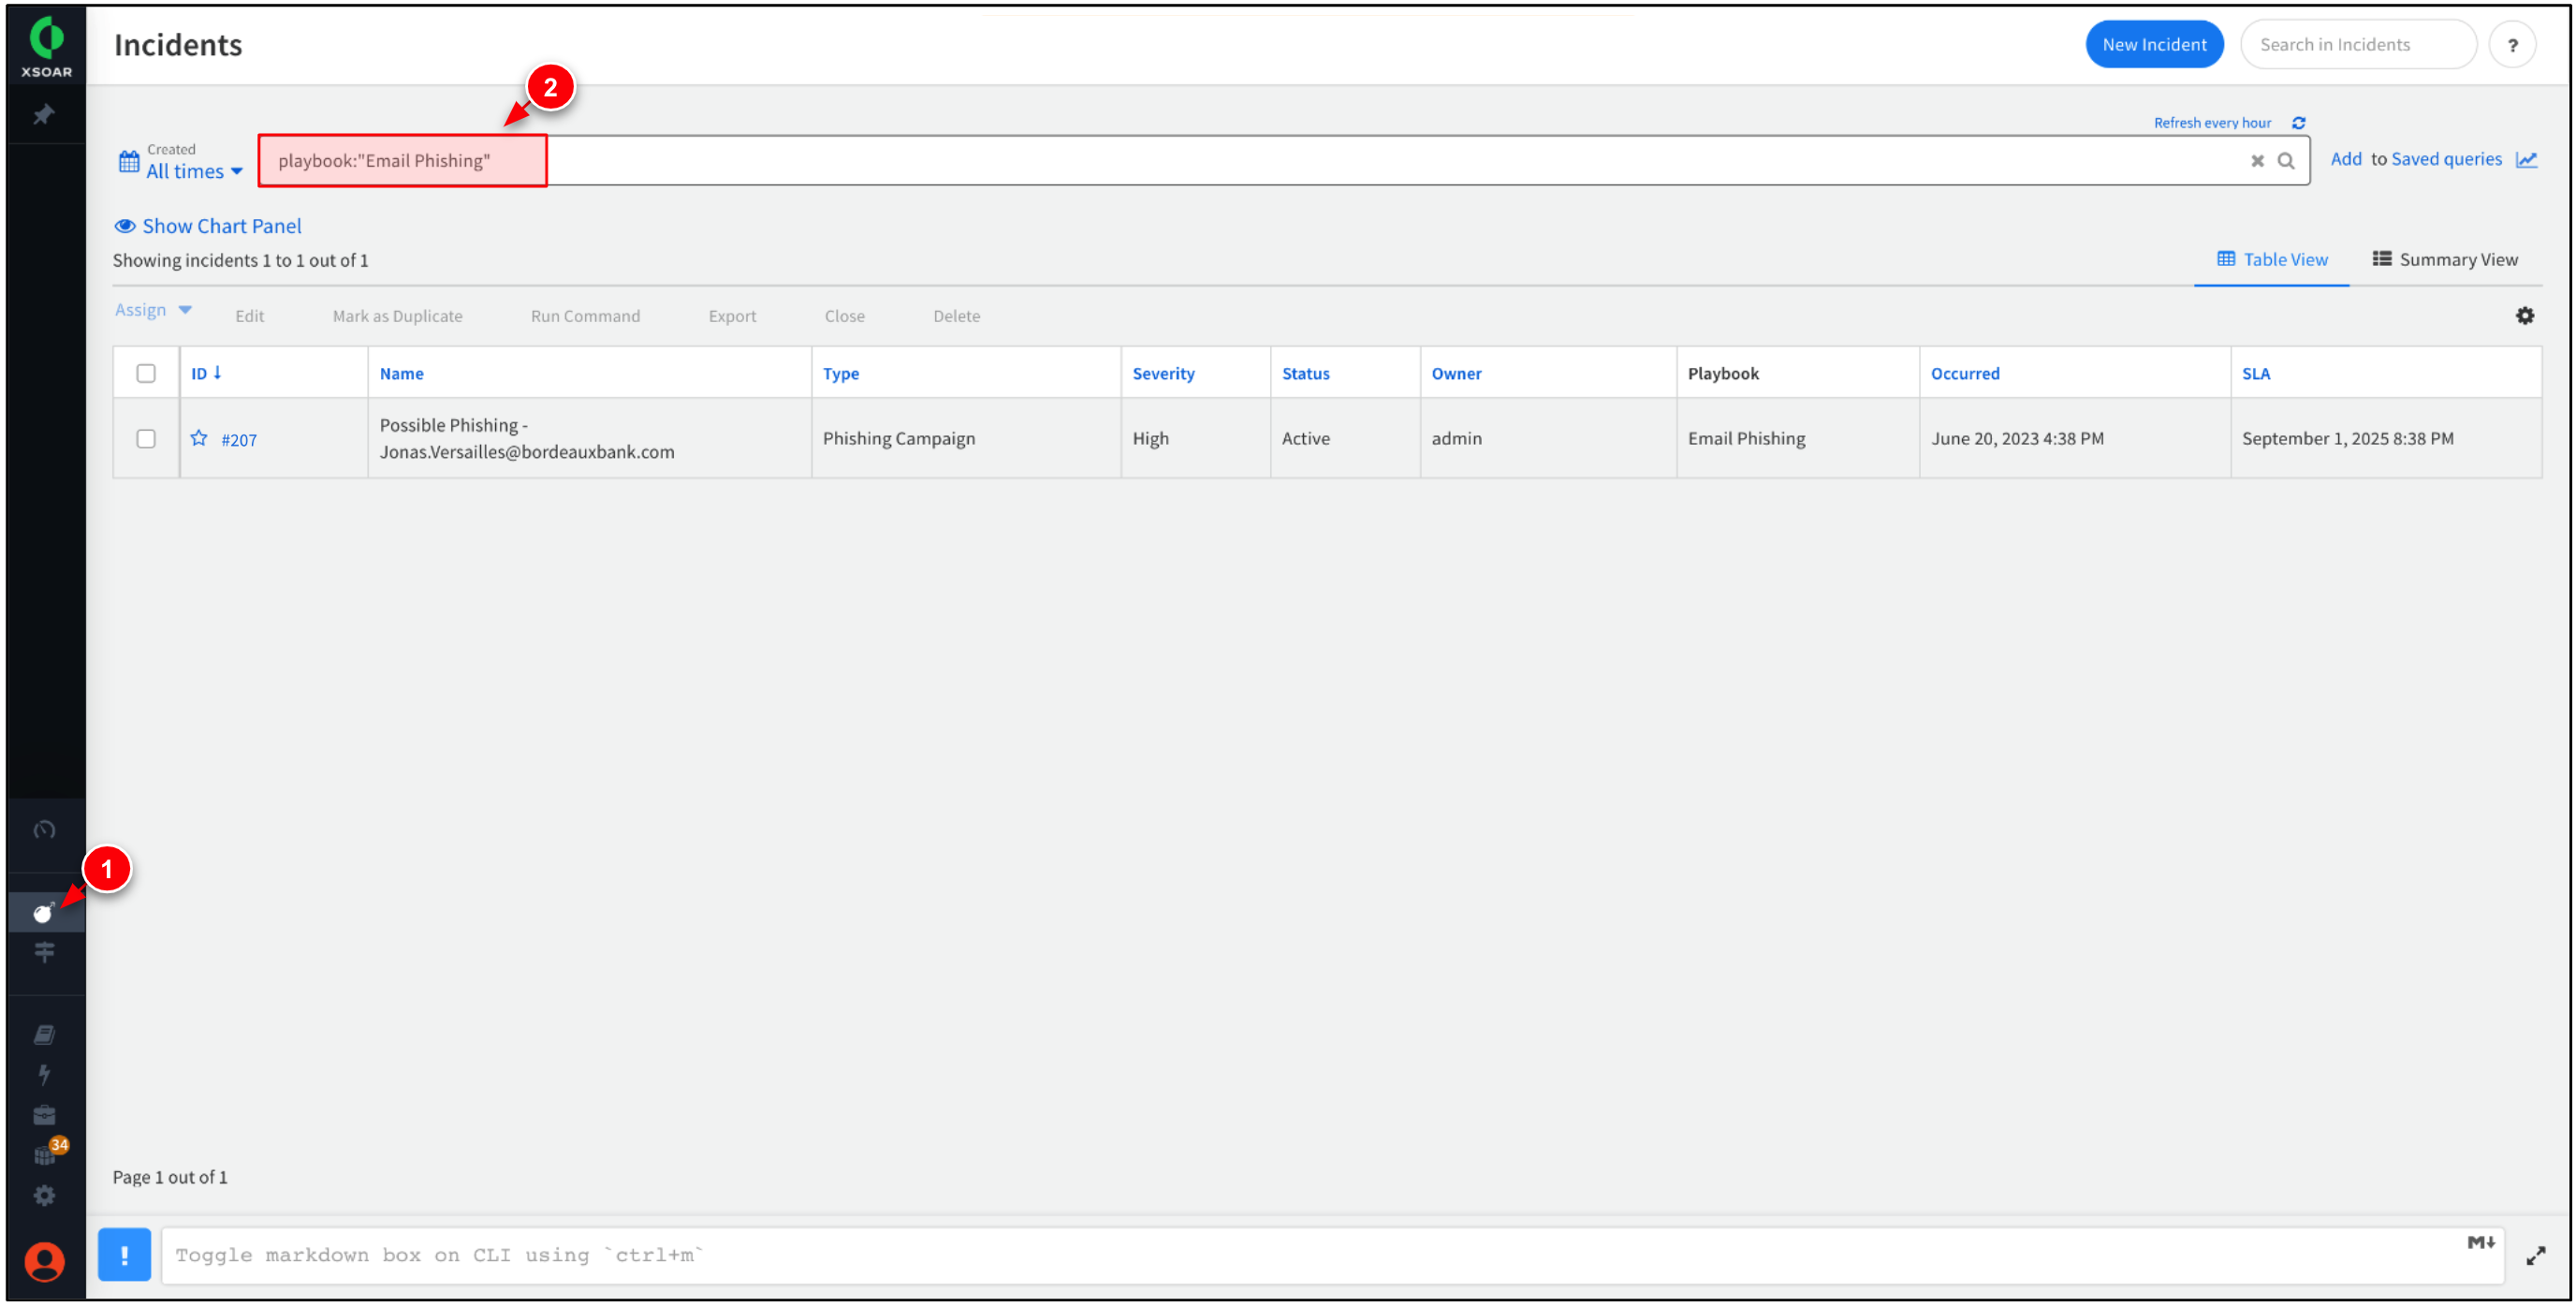
While within Incidents, enter the search below to filter for incidents that use the
Email Phishingplaybook.playbook:"Email Phishing" -
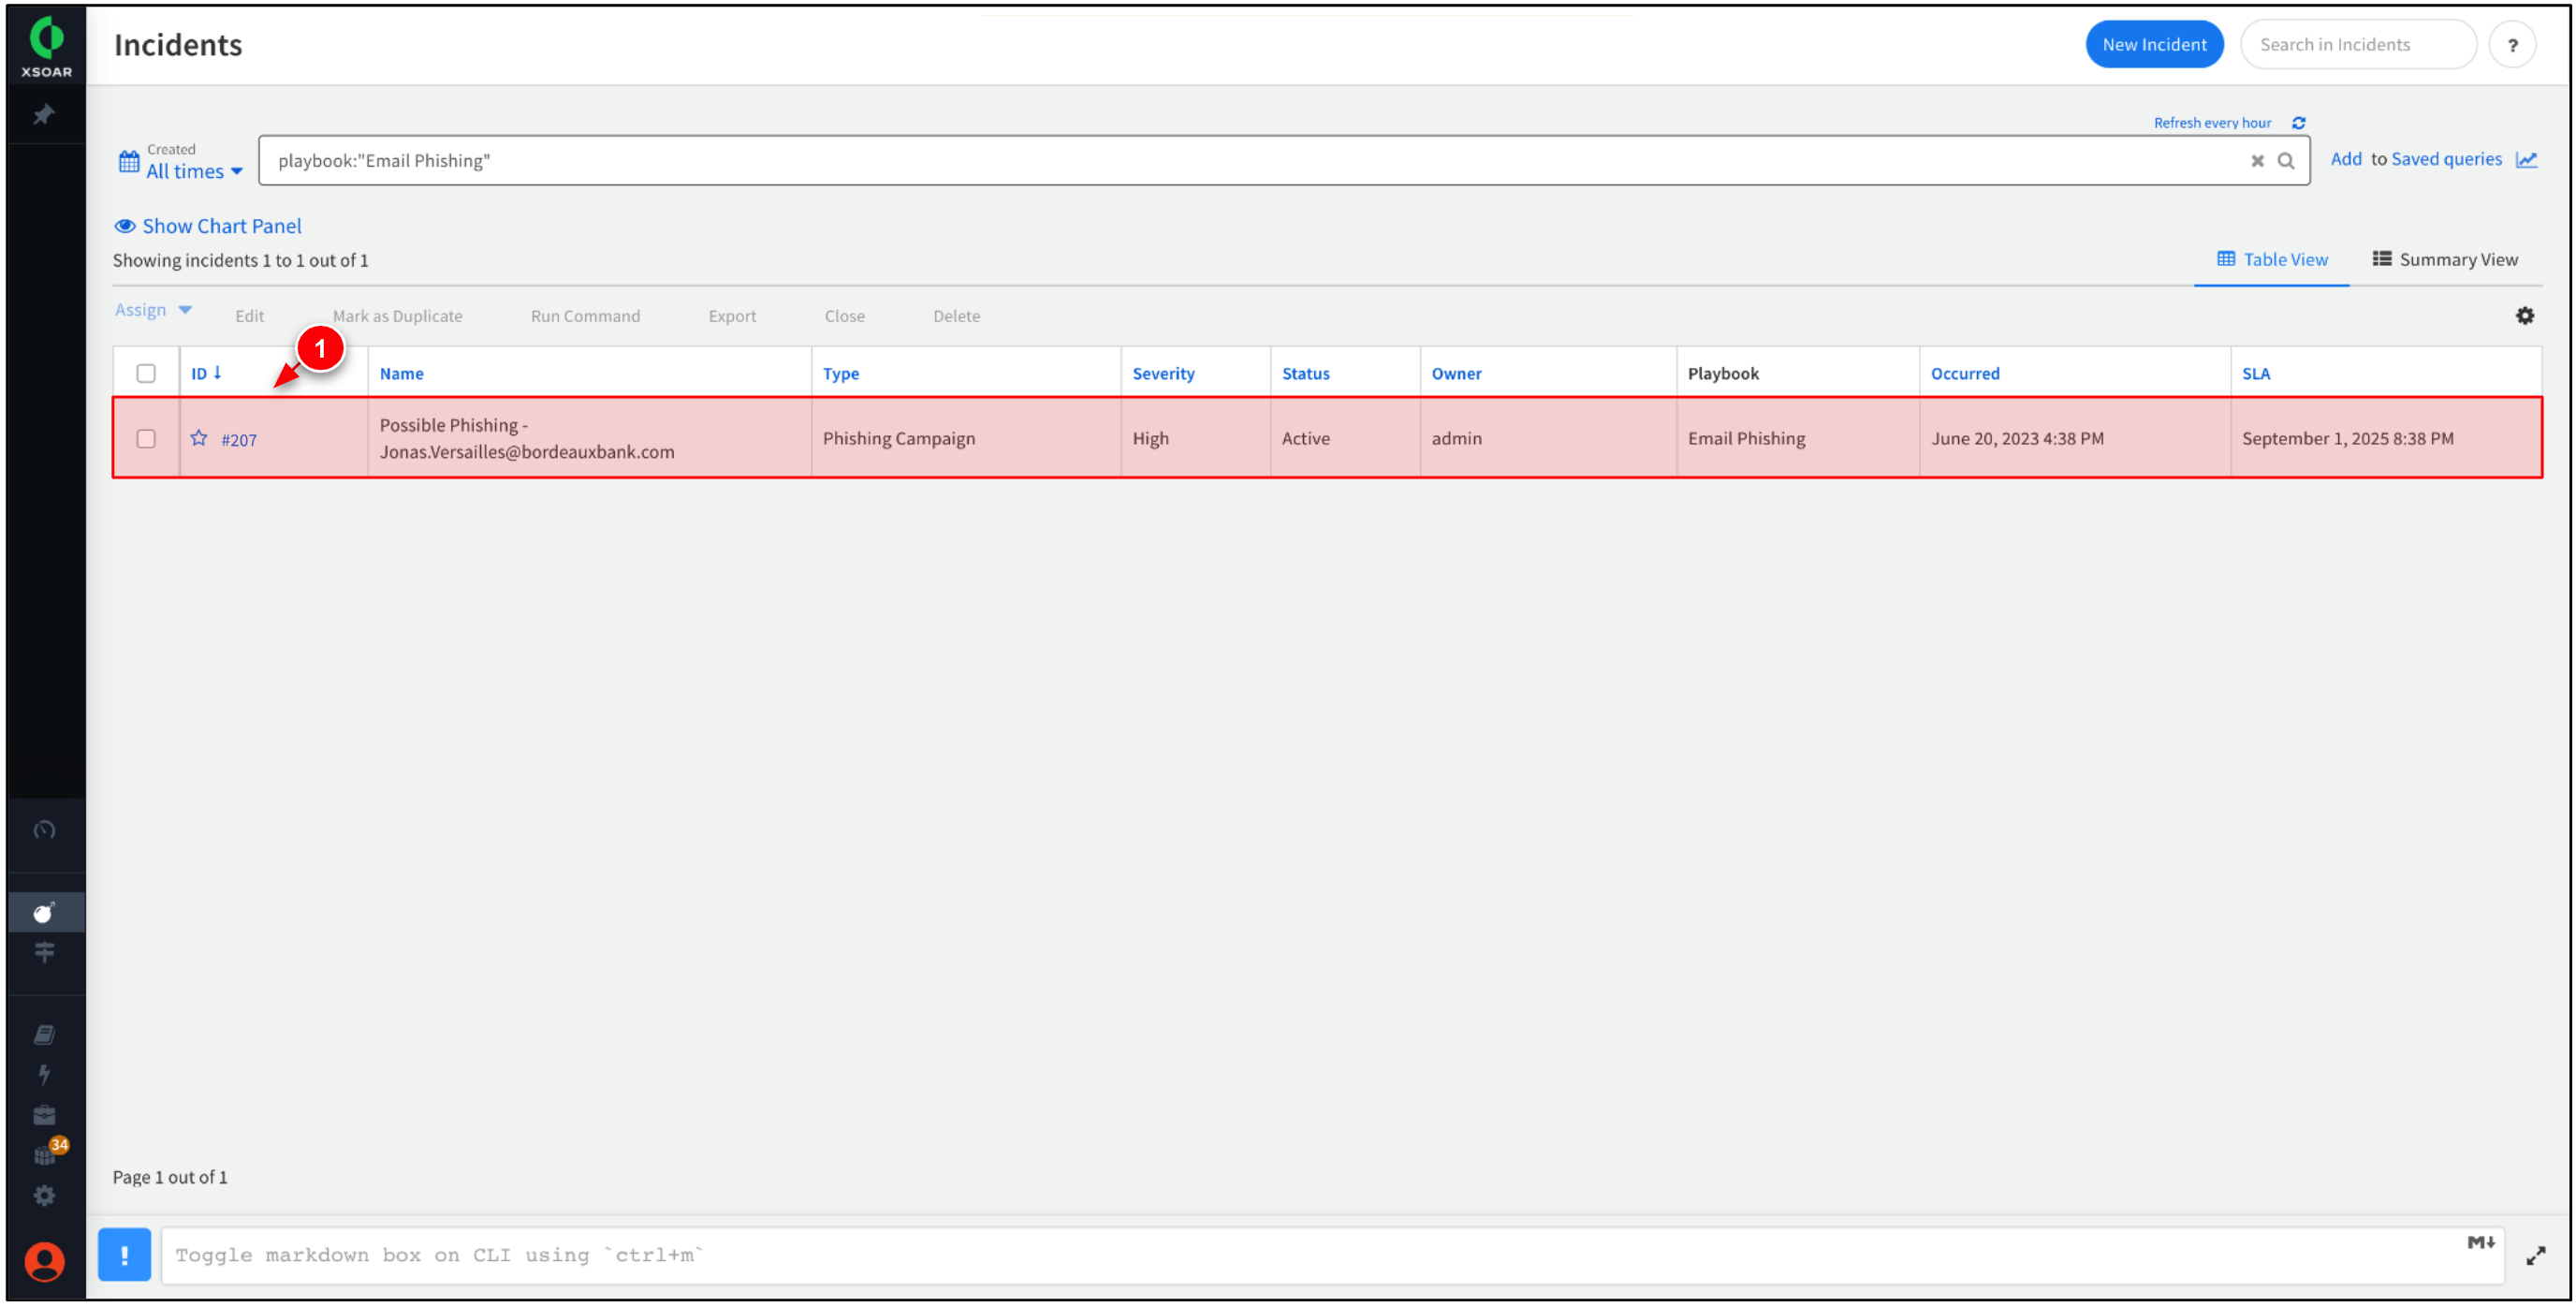
Select the most recent incident to view more information about it.
Notice the Status of the incident is listed as Active. This is because the Work Plan associated with this incident type has not been completed, or is waiting for manual intervention. -
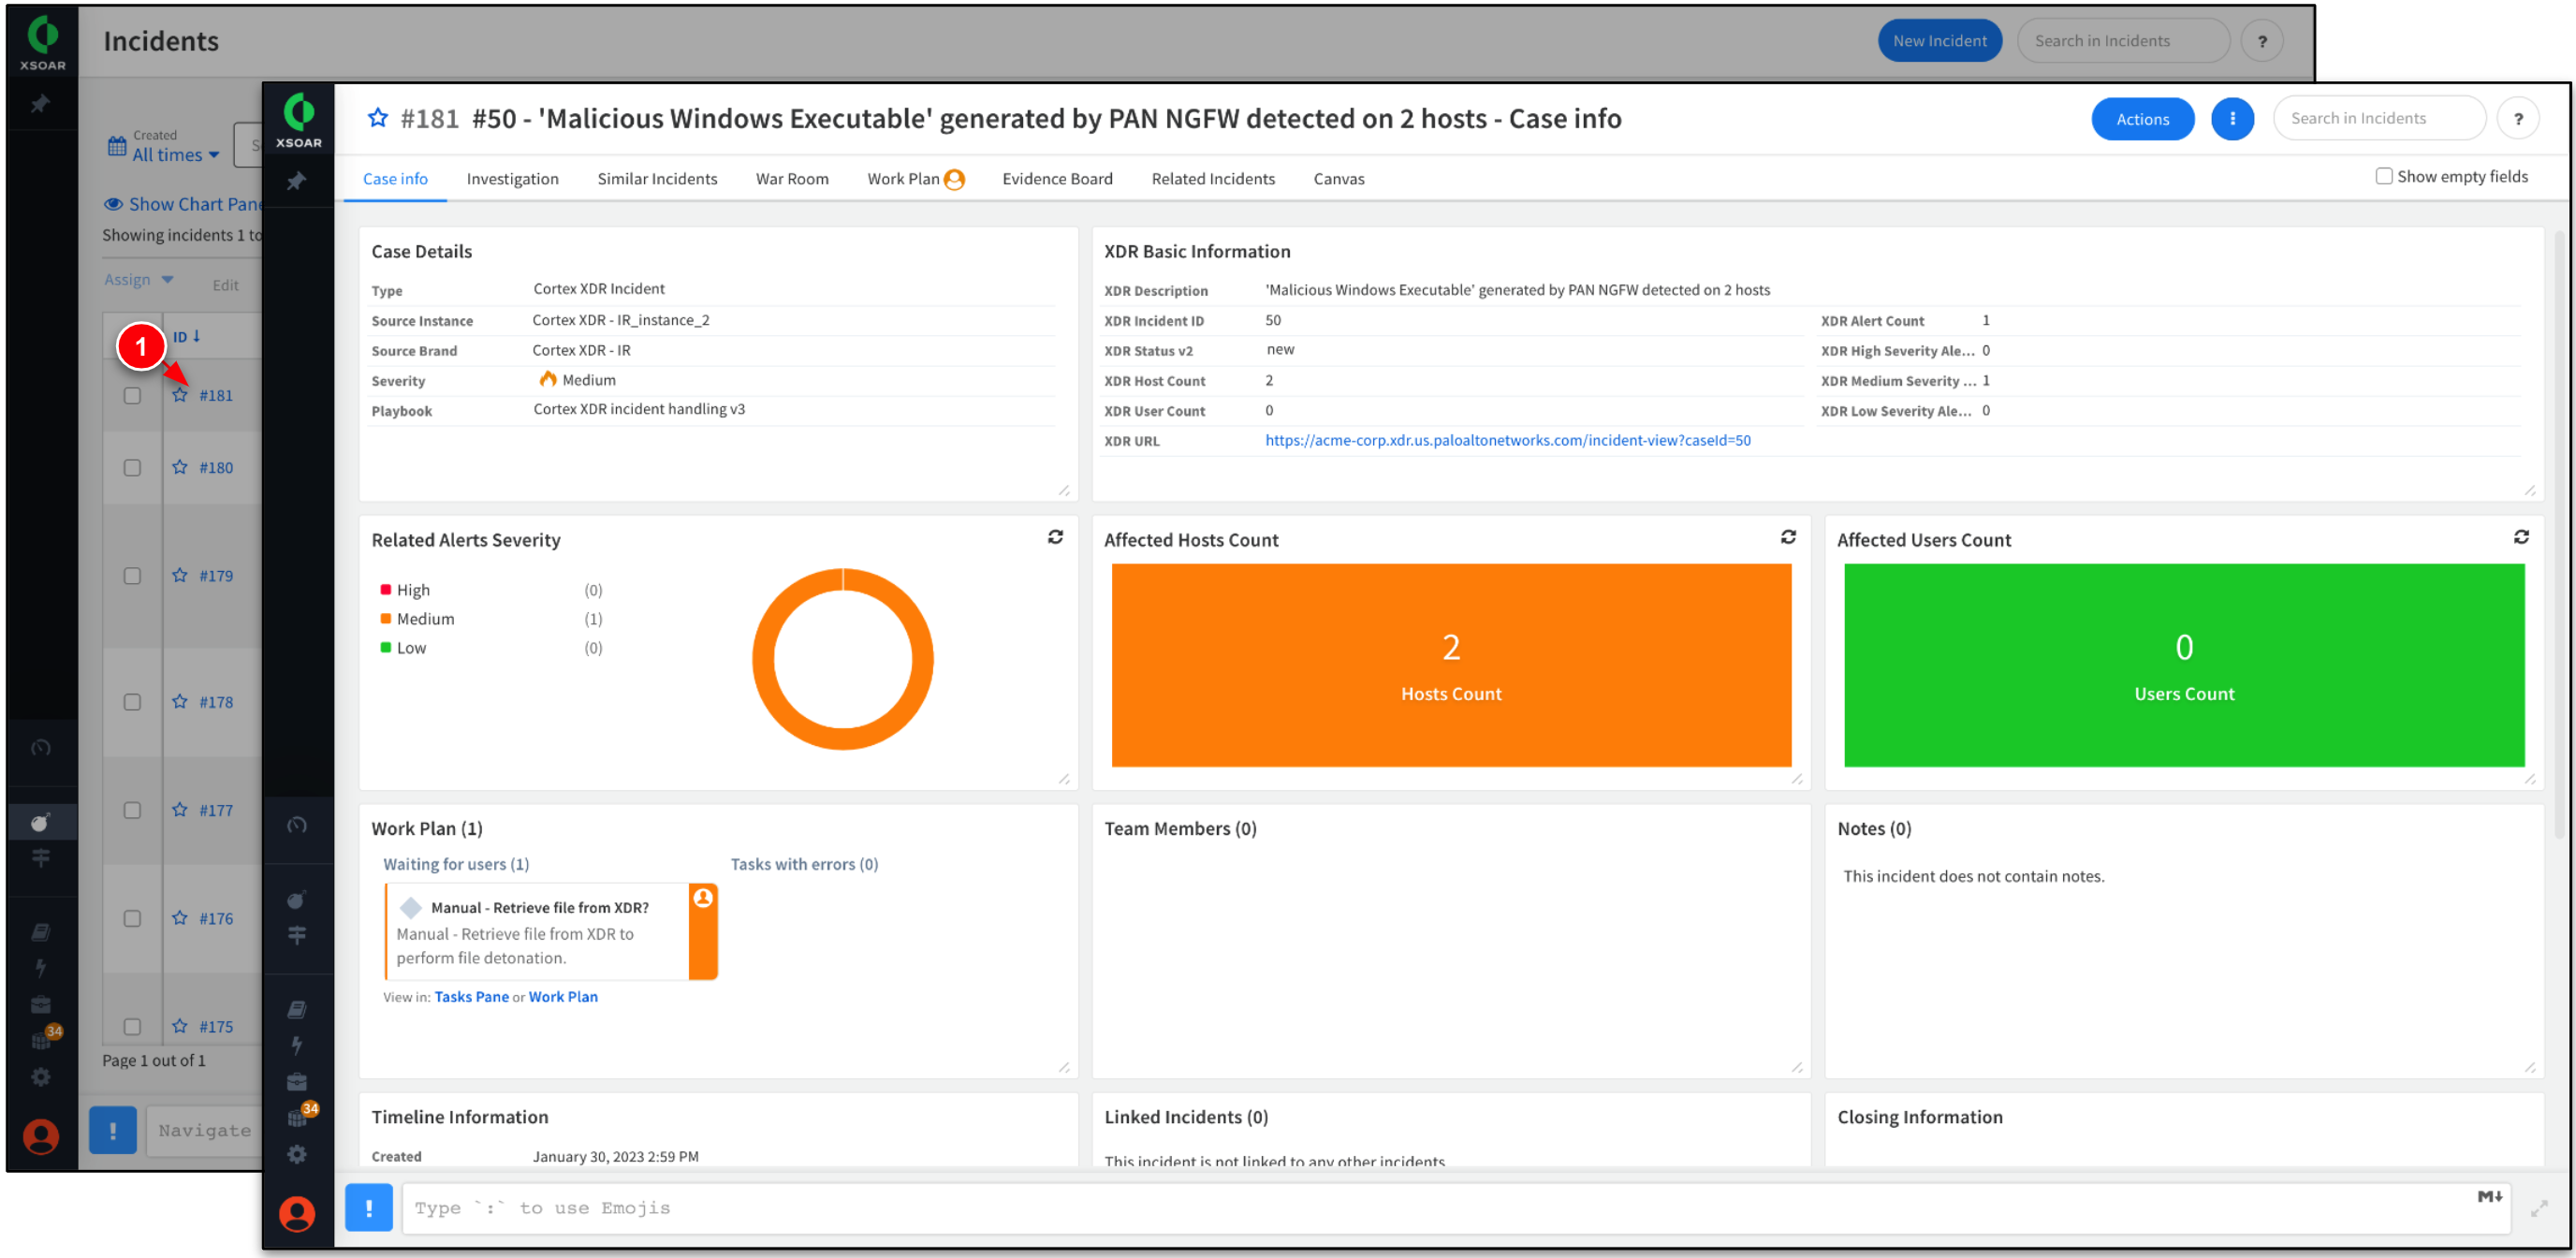
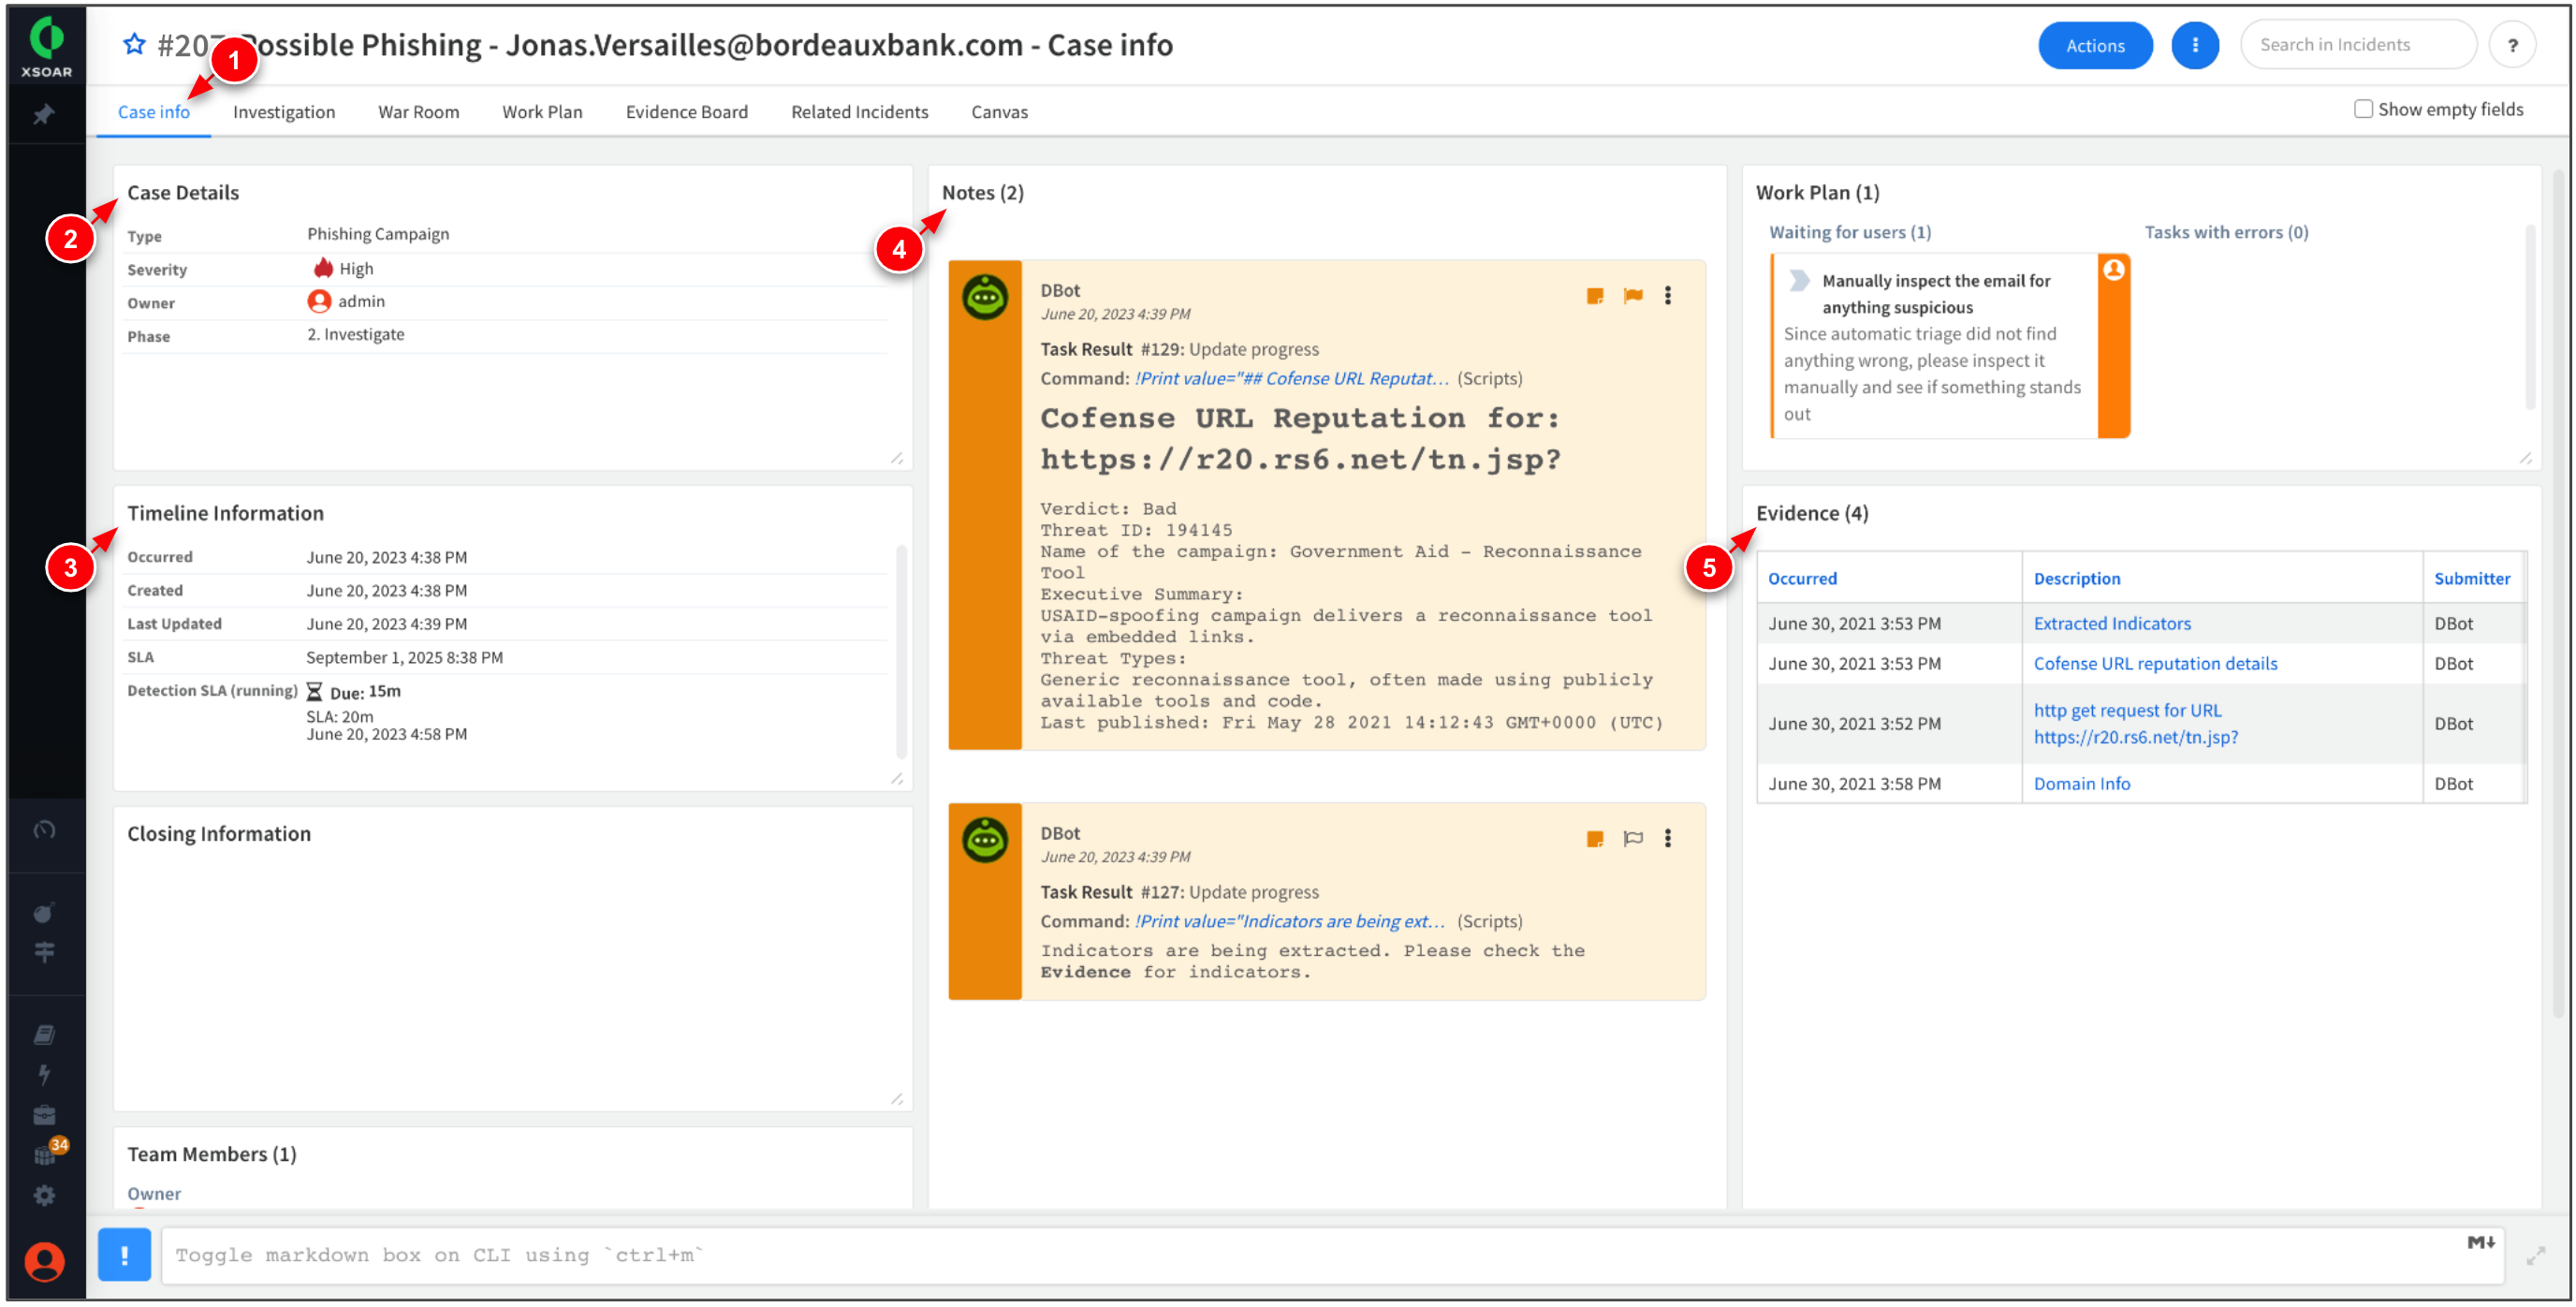
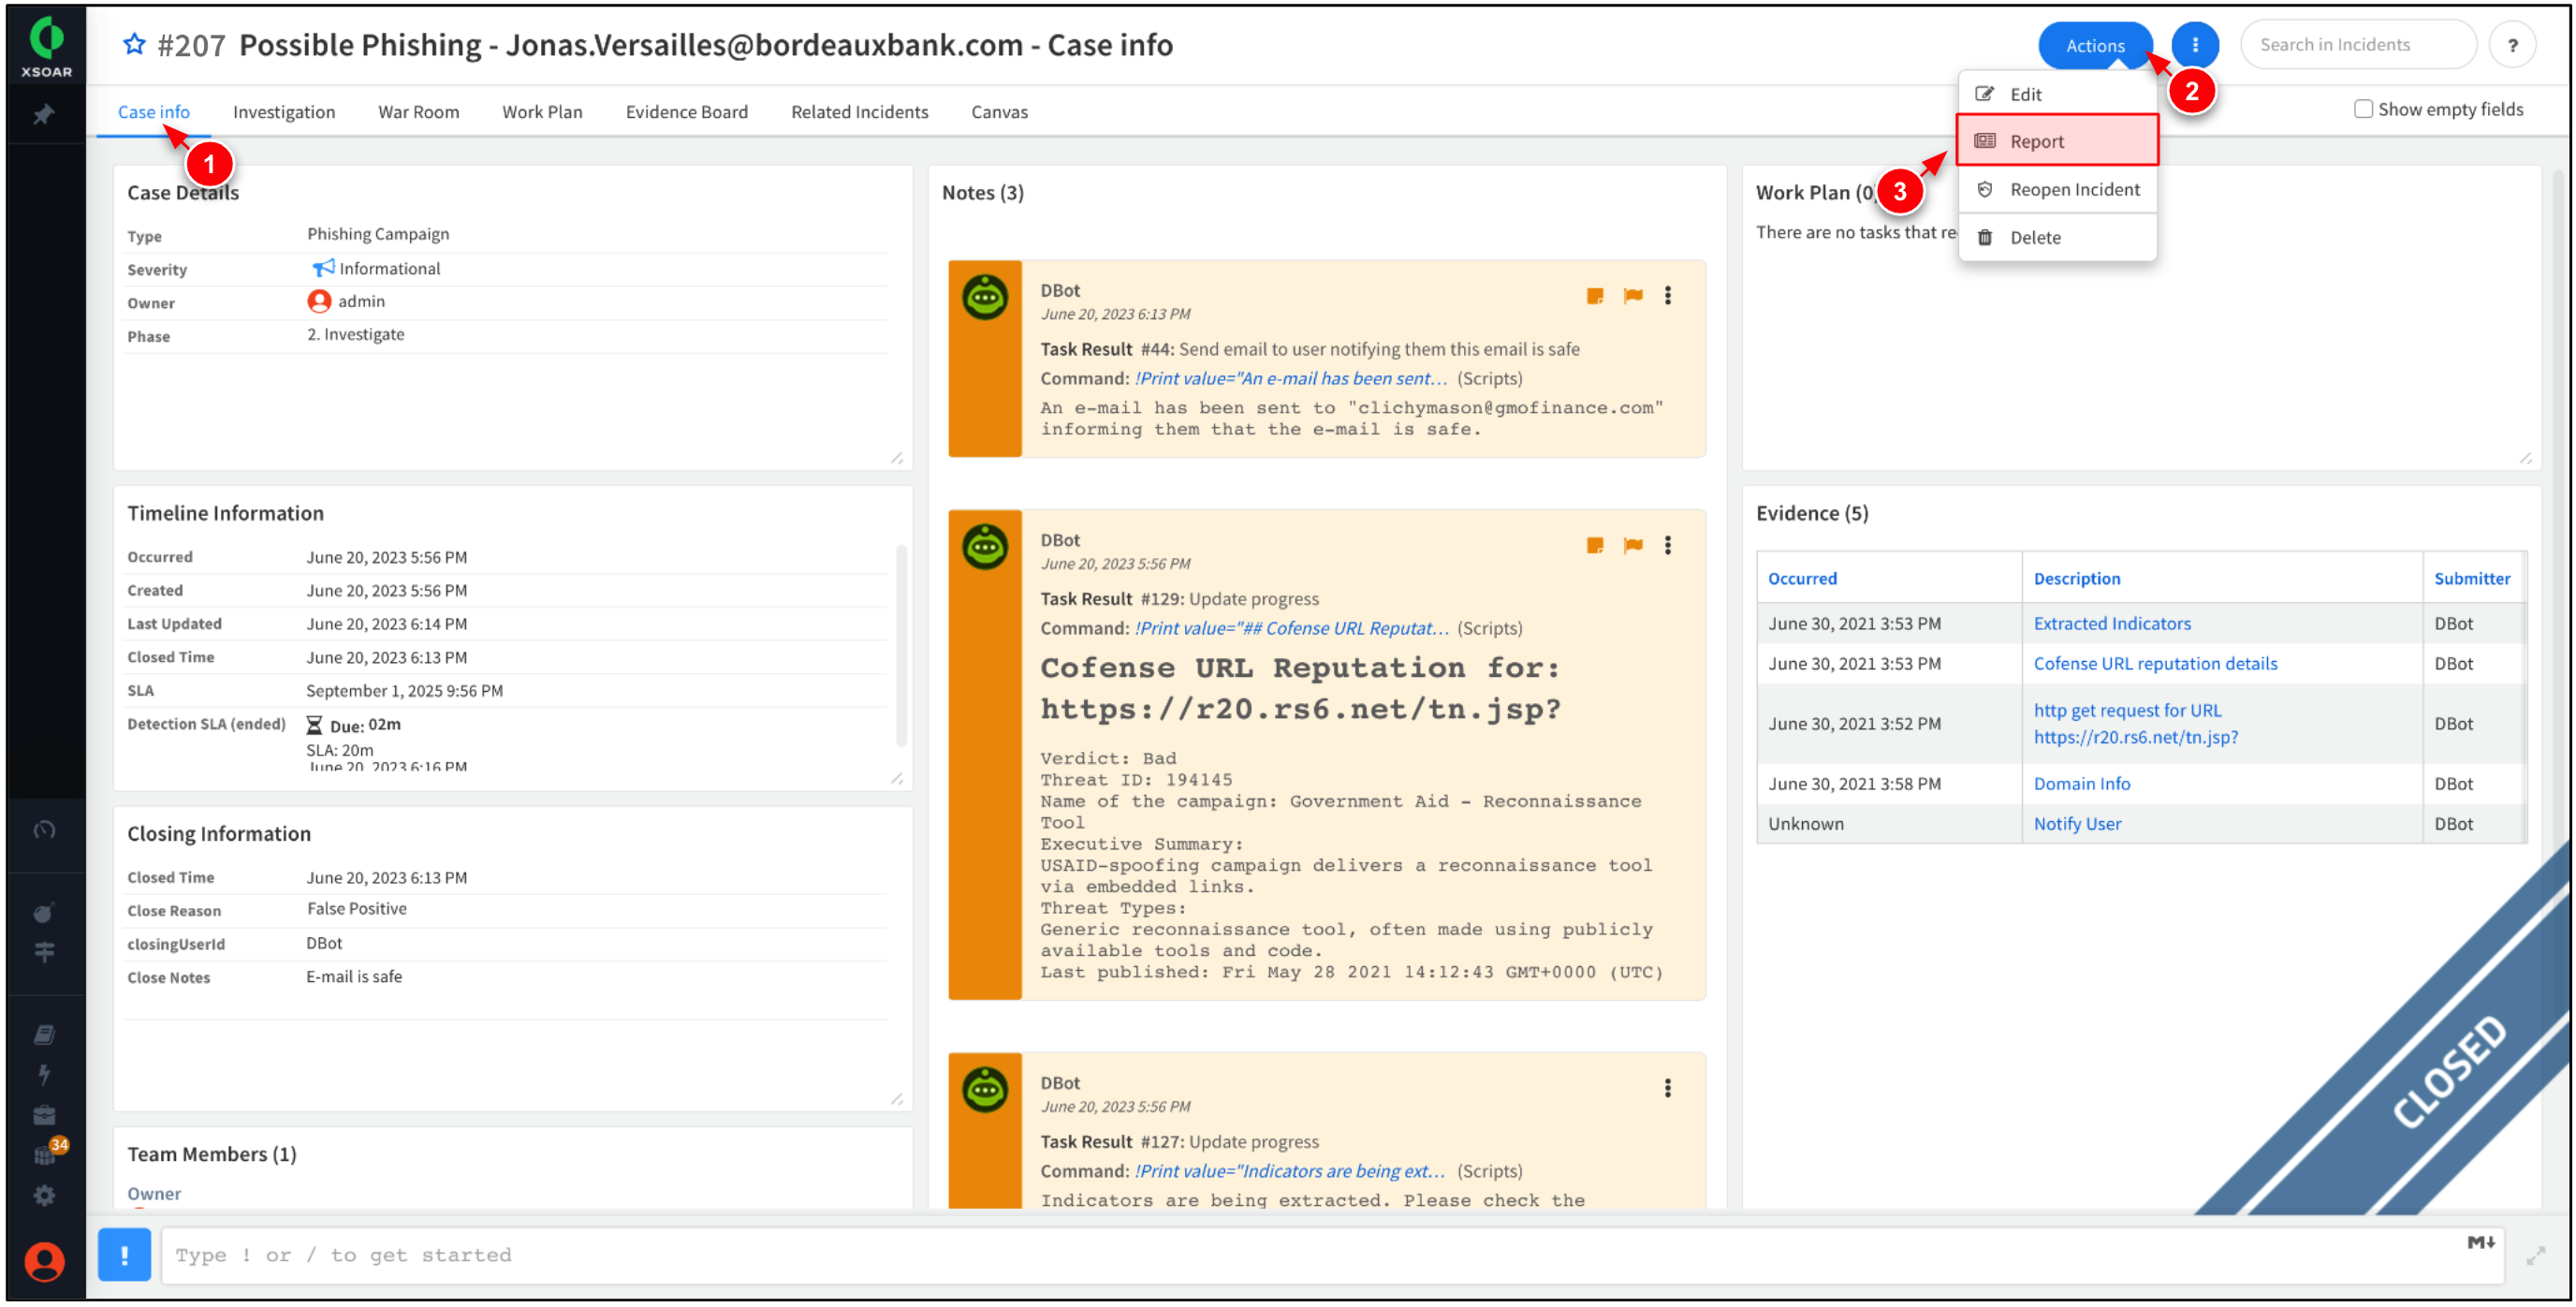
Click Case Info tab. Take time to review the case details, timeline, notes, and evidence.
The incident information panel provides a summary of the incident with available actions that you can take. -
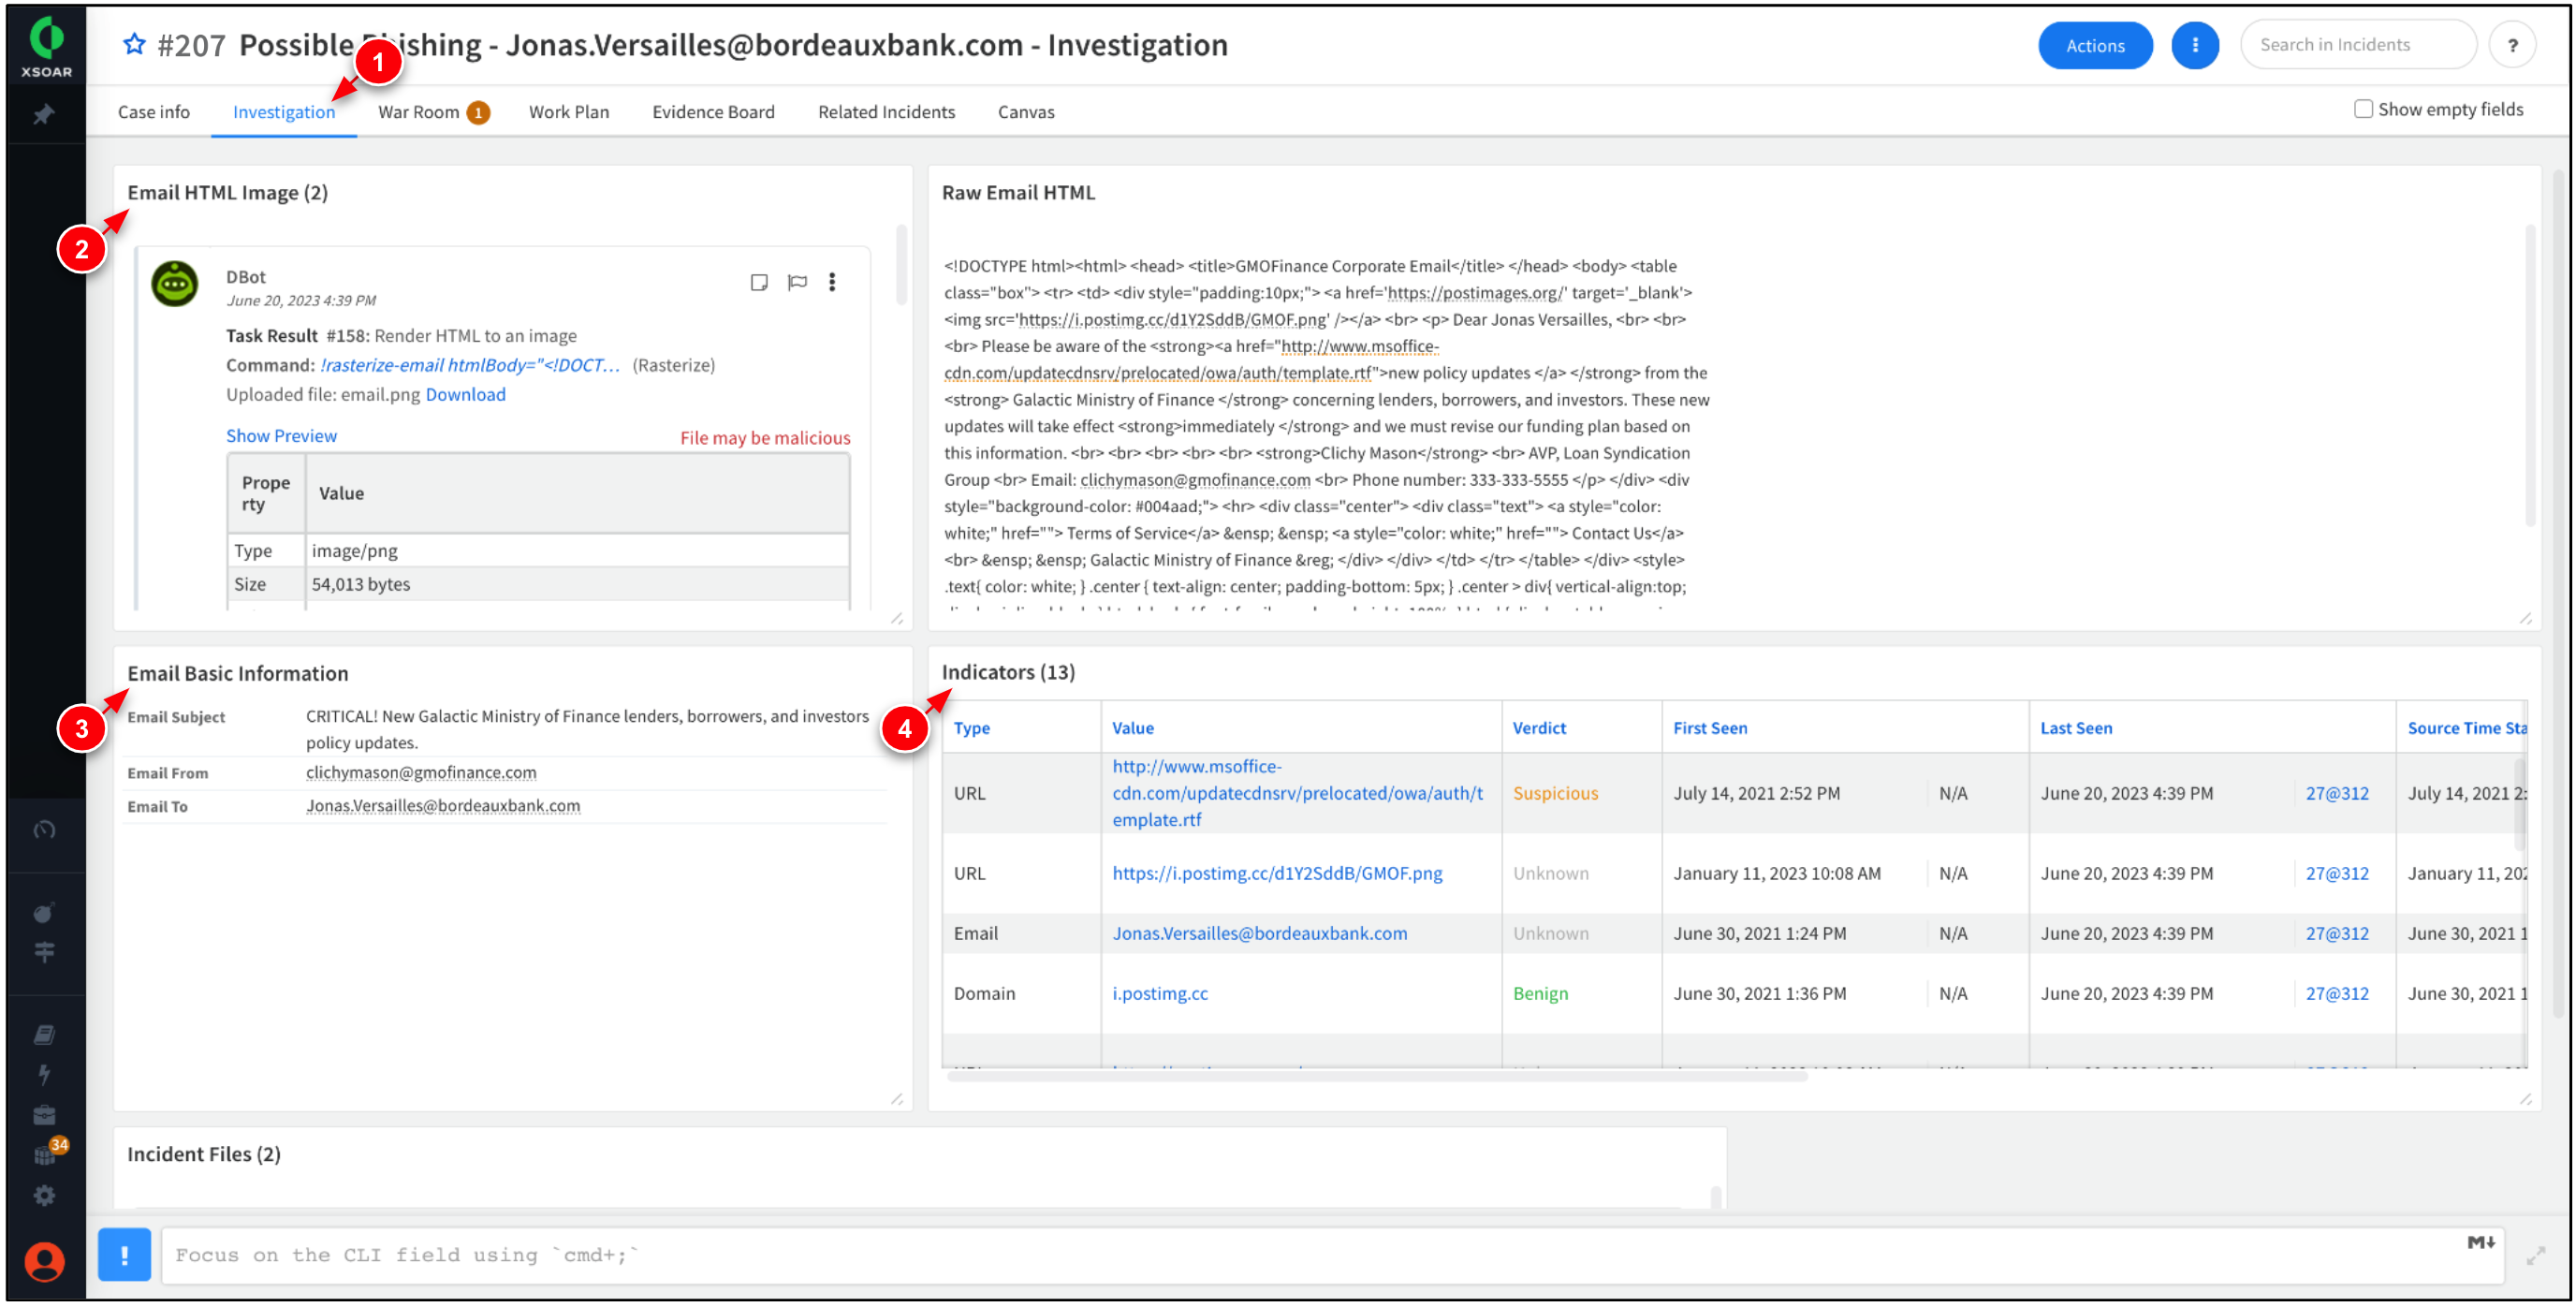
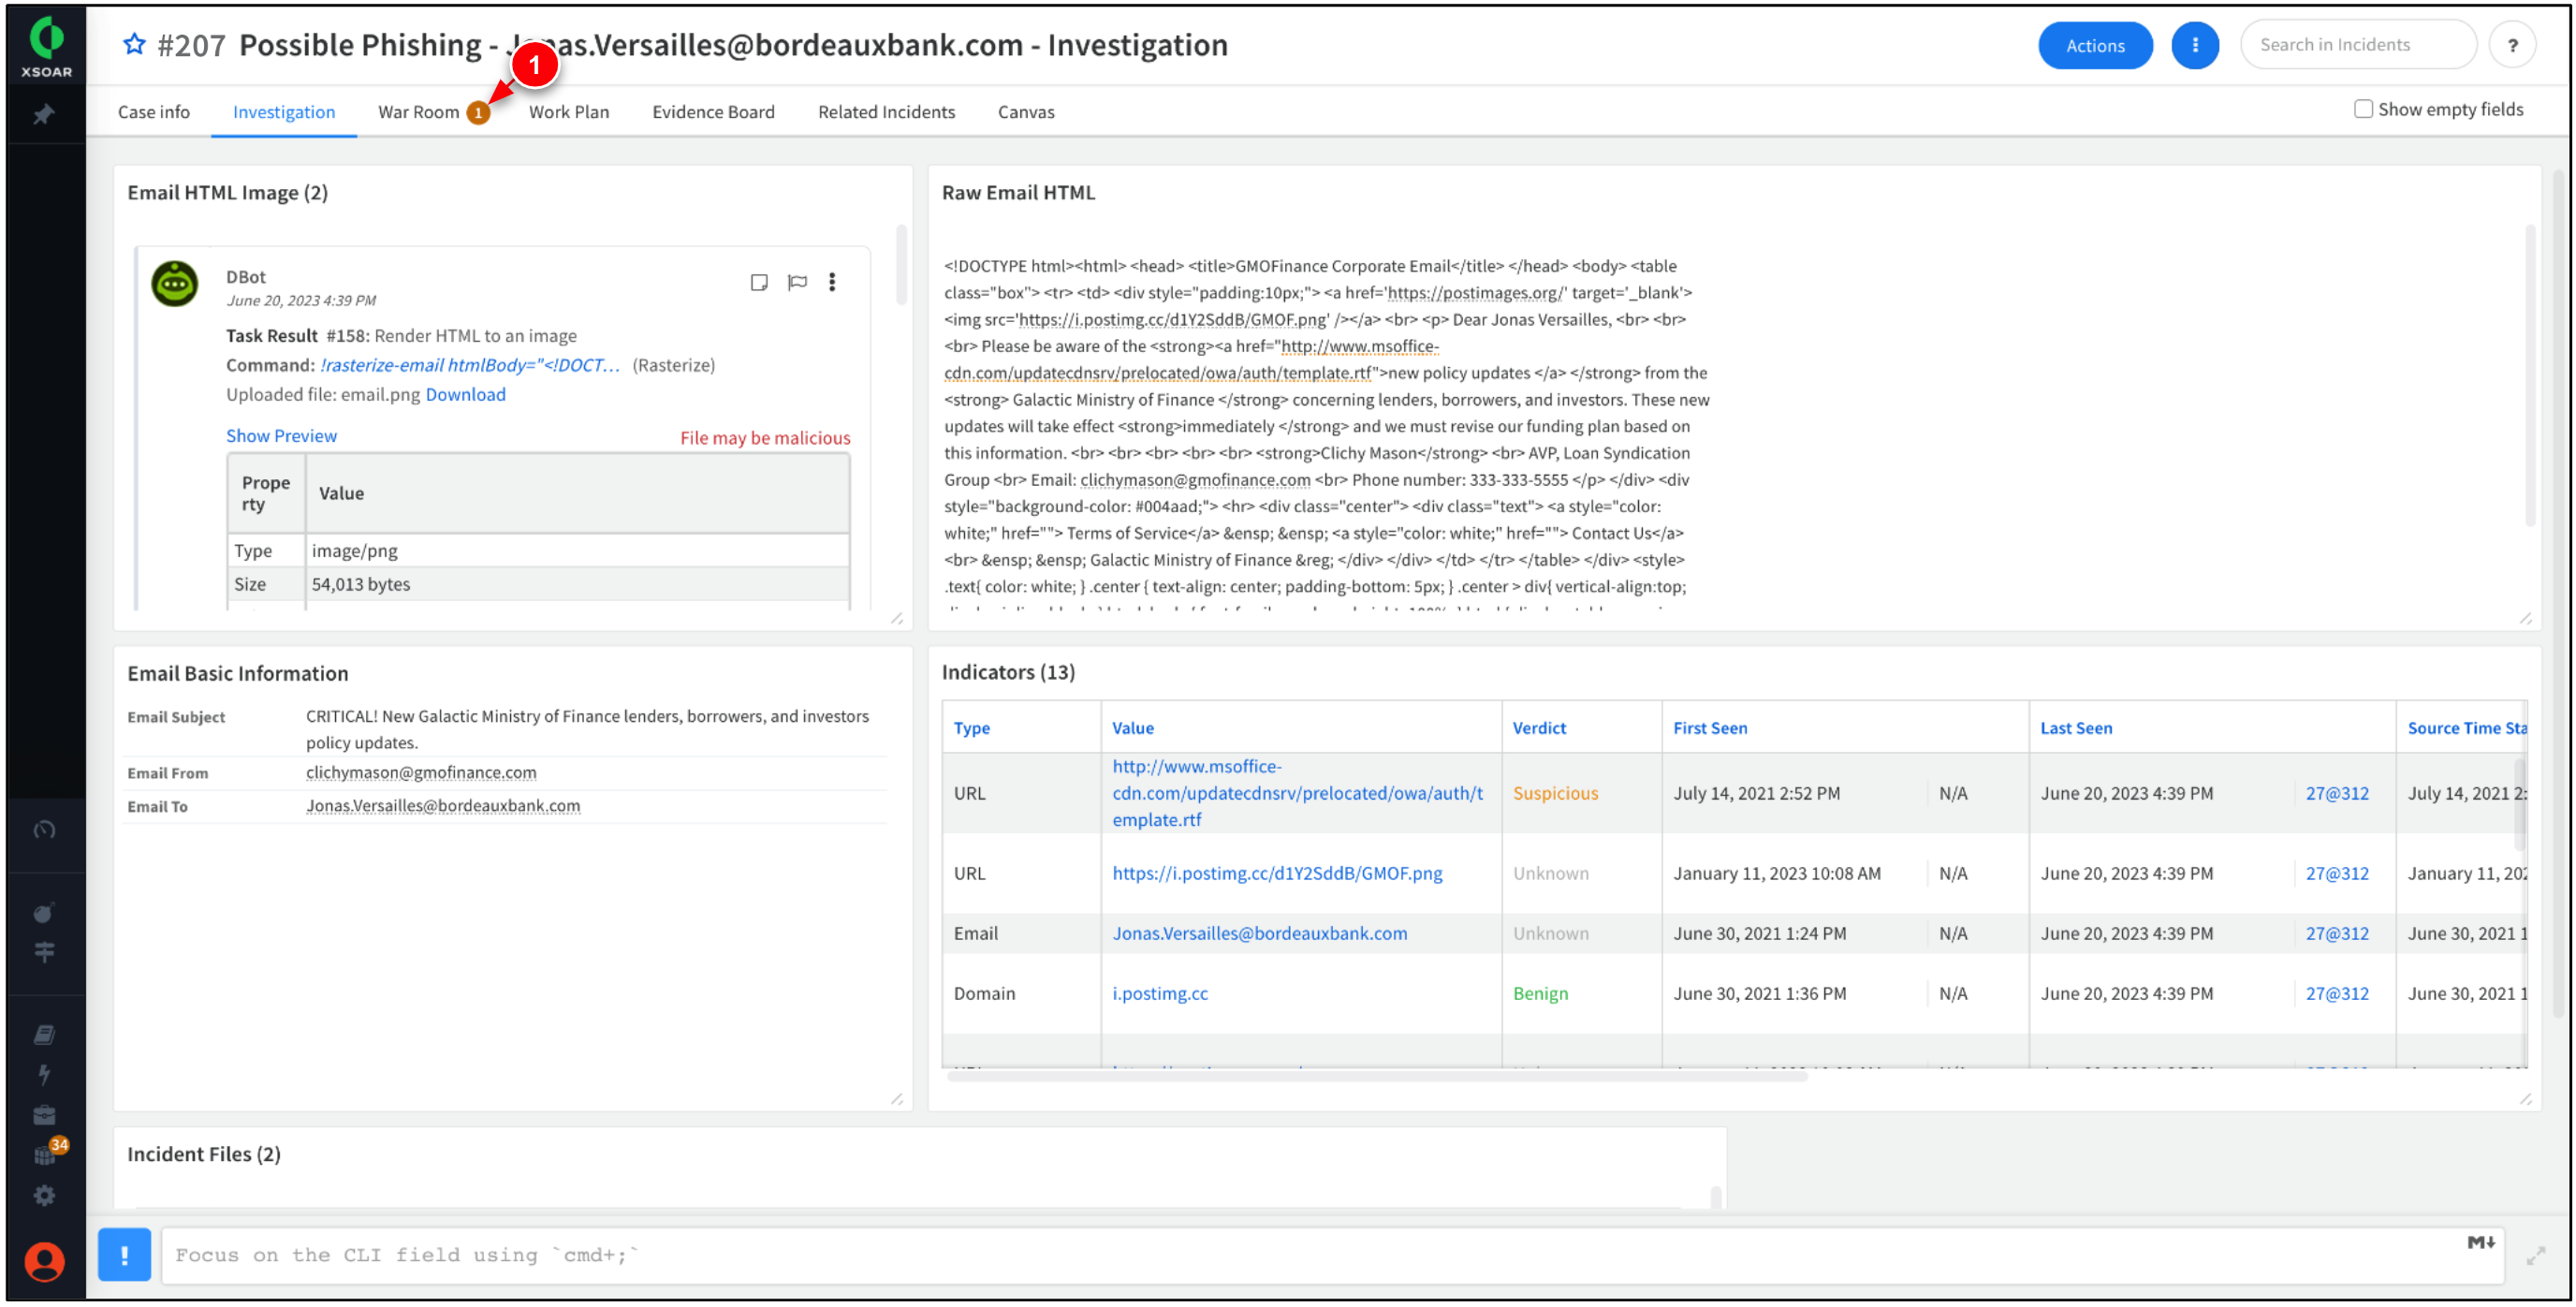
Click the Investigation tab. Review the contents of the e-mail, including any associated indicators, and incident files.
The Investigation tab displays a rasterized image of the phishing email, the email body, and information about the indicators.
Task 3. Incident War Room & Work Plan
In this task, work within XSOAR War Rooms and Work Plans to understand and remediate phishing incidents.
Step 1. Incident War Room
A War Room centralized workspace that facilitates collaboration, incident response, and threat intelligence among security teams. In this step, navigate to the incident's War Room to view a consolidated pane of all the events related to the phishing incident.
-
The War Room tab has a notification icon, indicating manual intervention is required for this particular incident. Click the War Room tab.
War Room provides a unified view of all ongoing security incidents, allowing teams to coordinate their efforts, track progress, and resolve incidents more efficiently. -
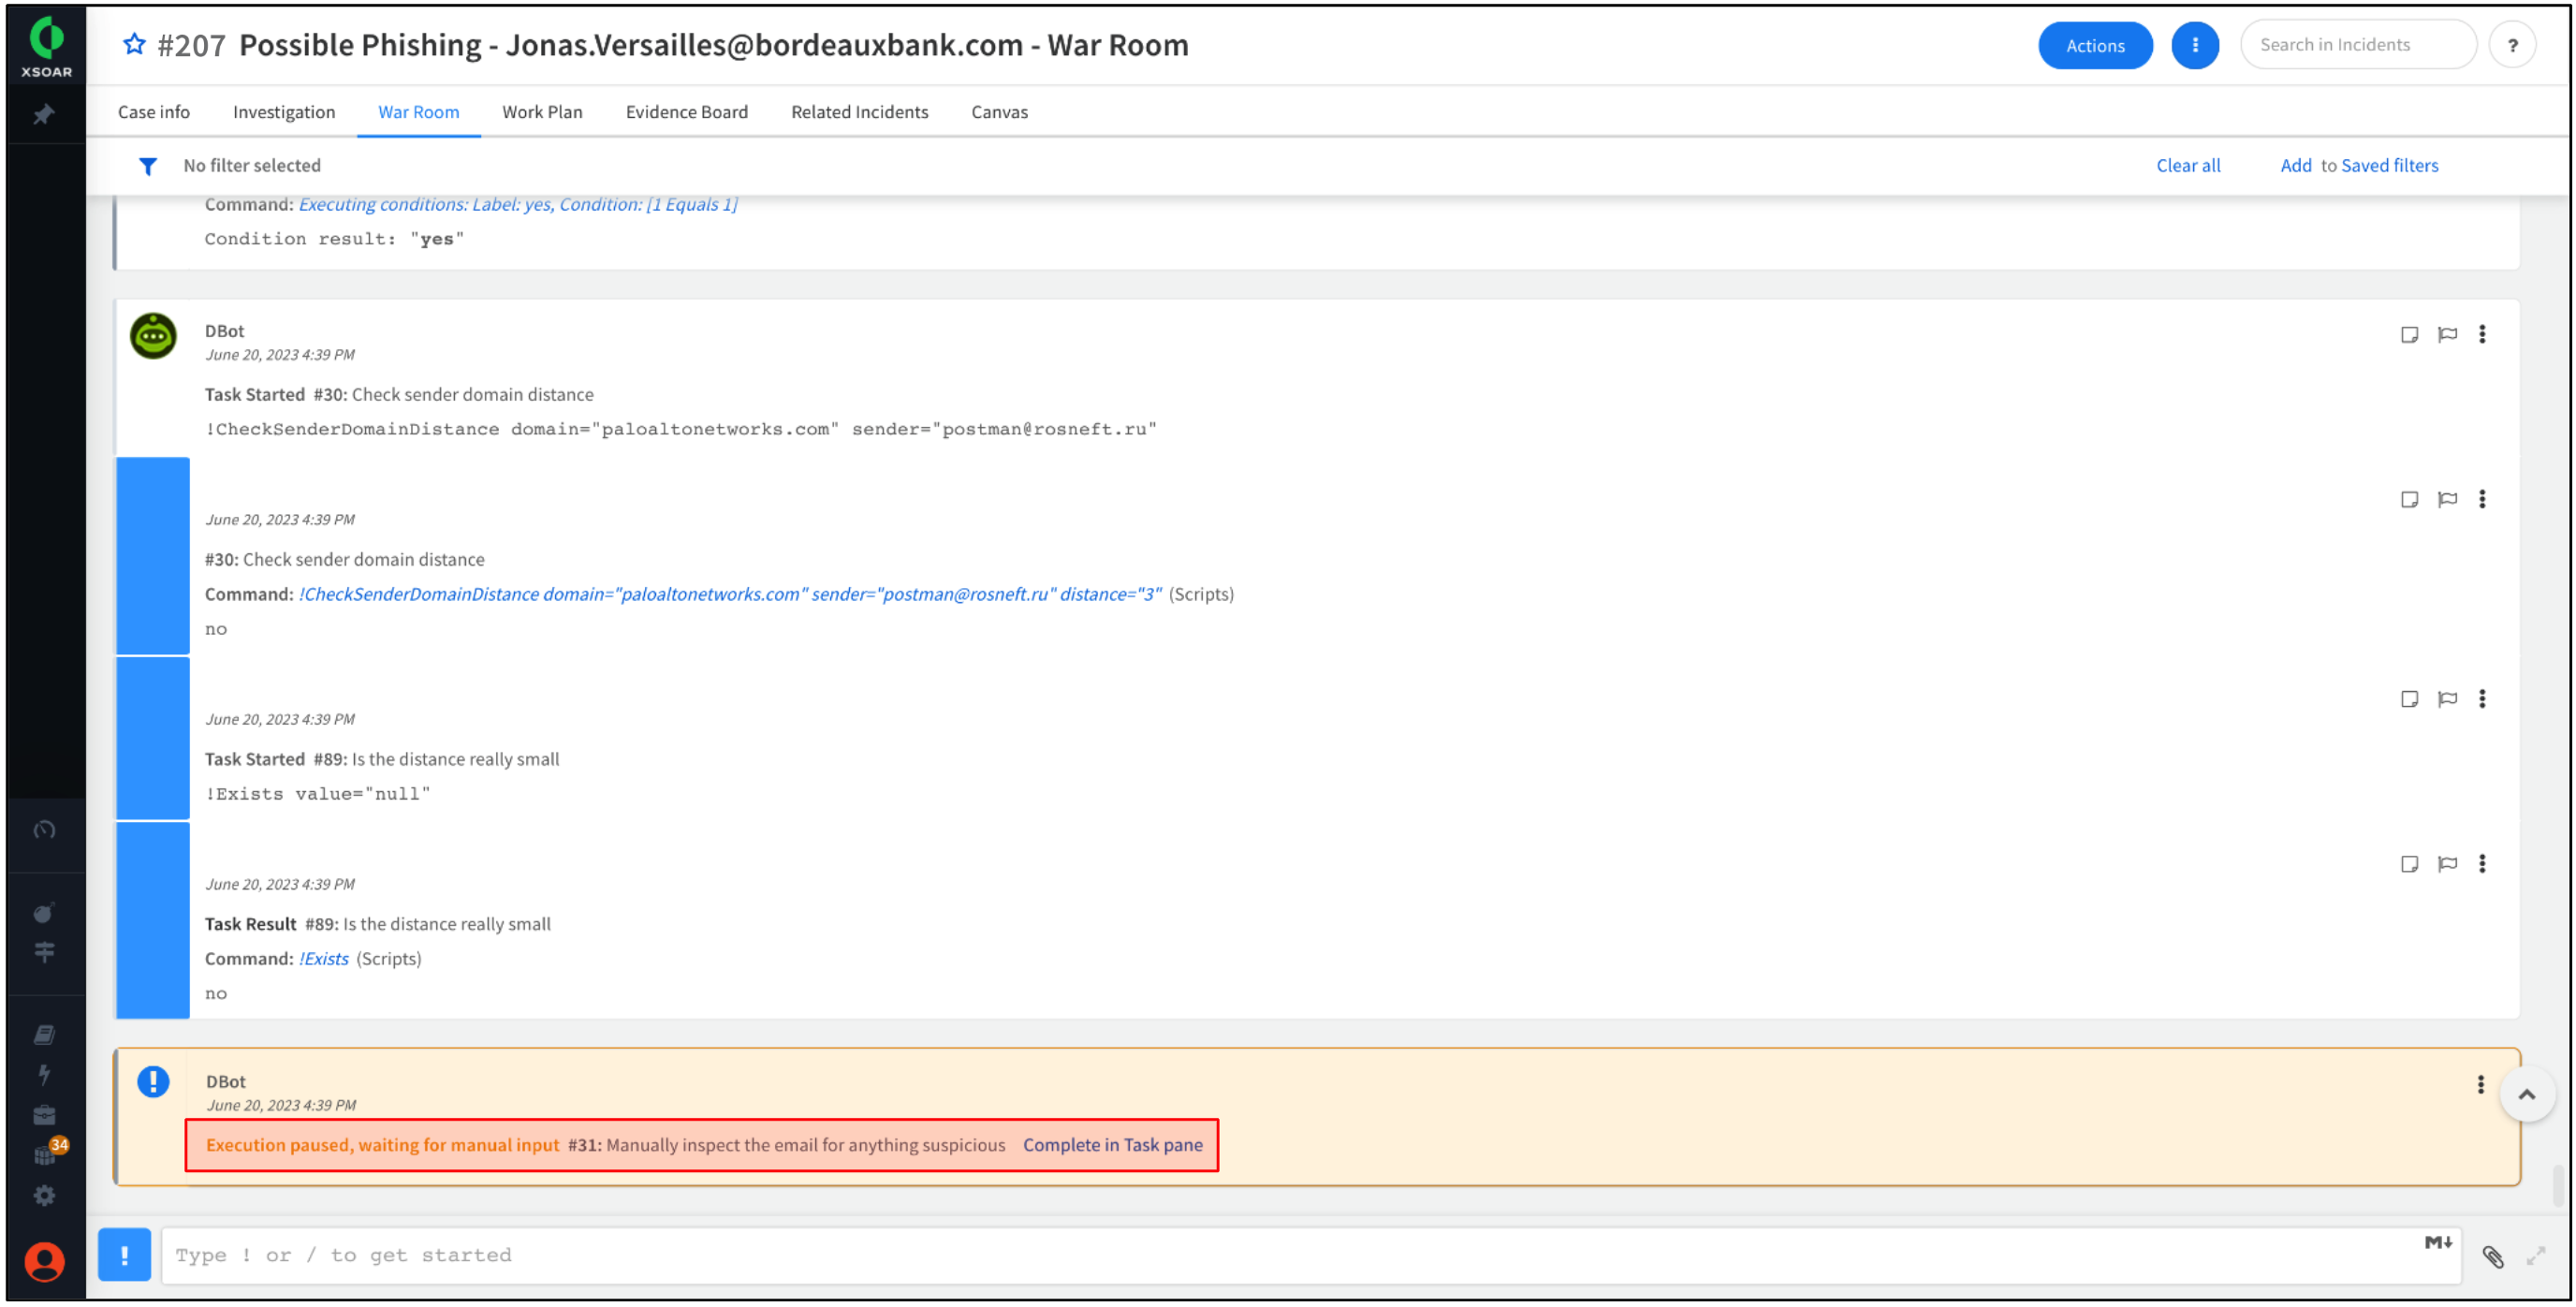
Take time to scroll through the events associated with the incident.
-
At the bottom, a message states the execution of the Work Plan has been paused.
There may be several reasons for pausing tasks in a Work Plan. For example, Work Plans may be paused intentionally until clear communication has been established across SOC teams. -
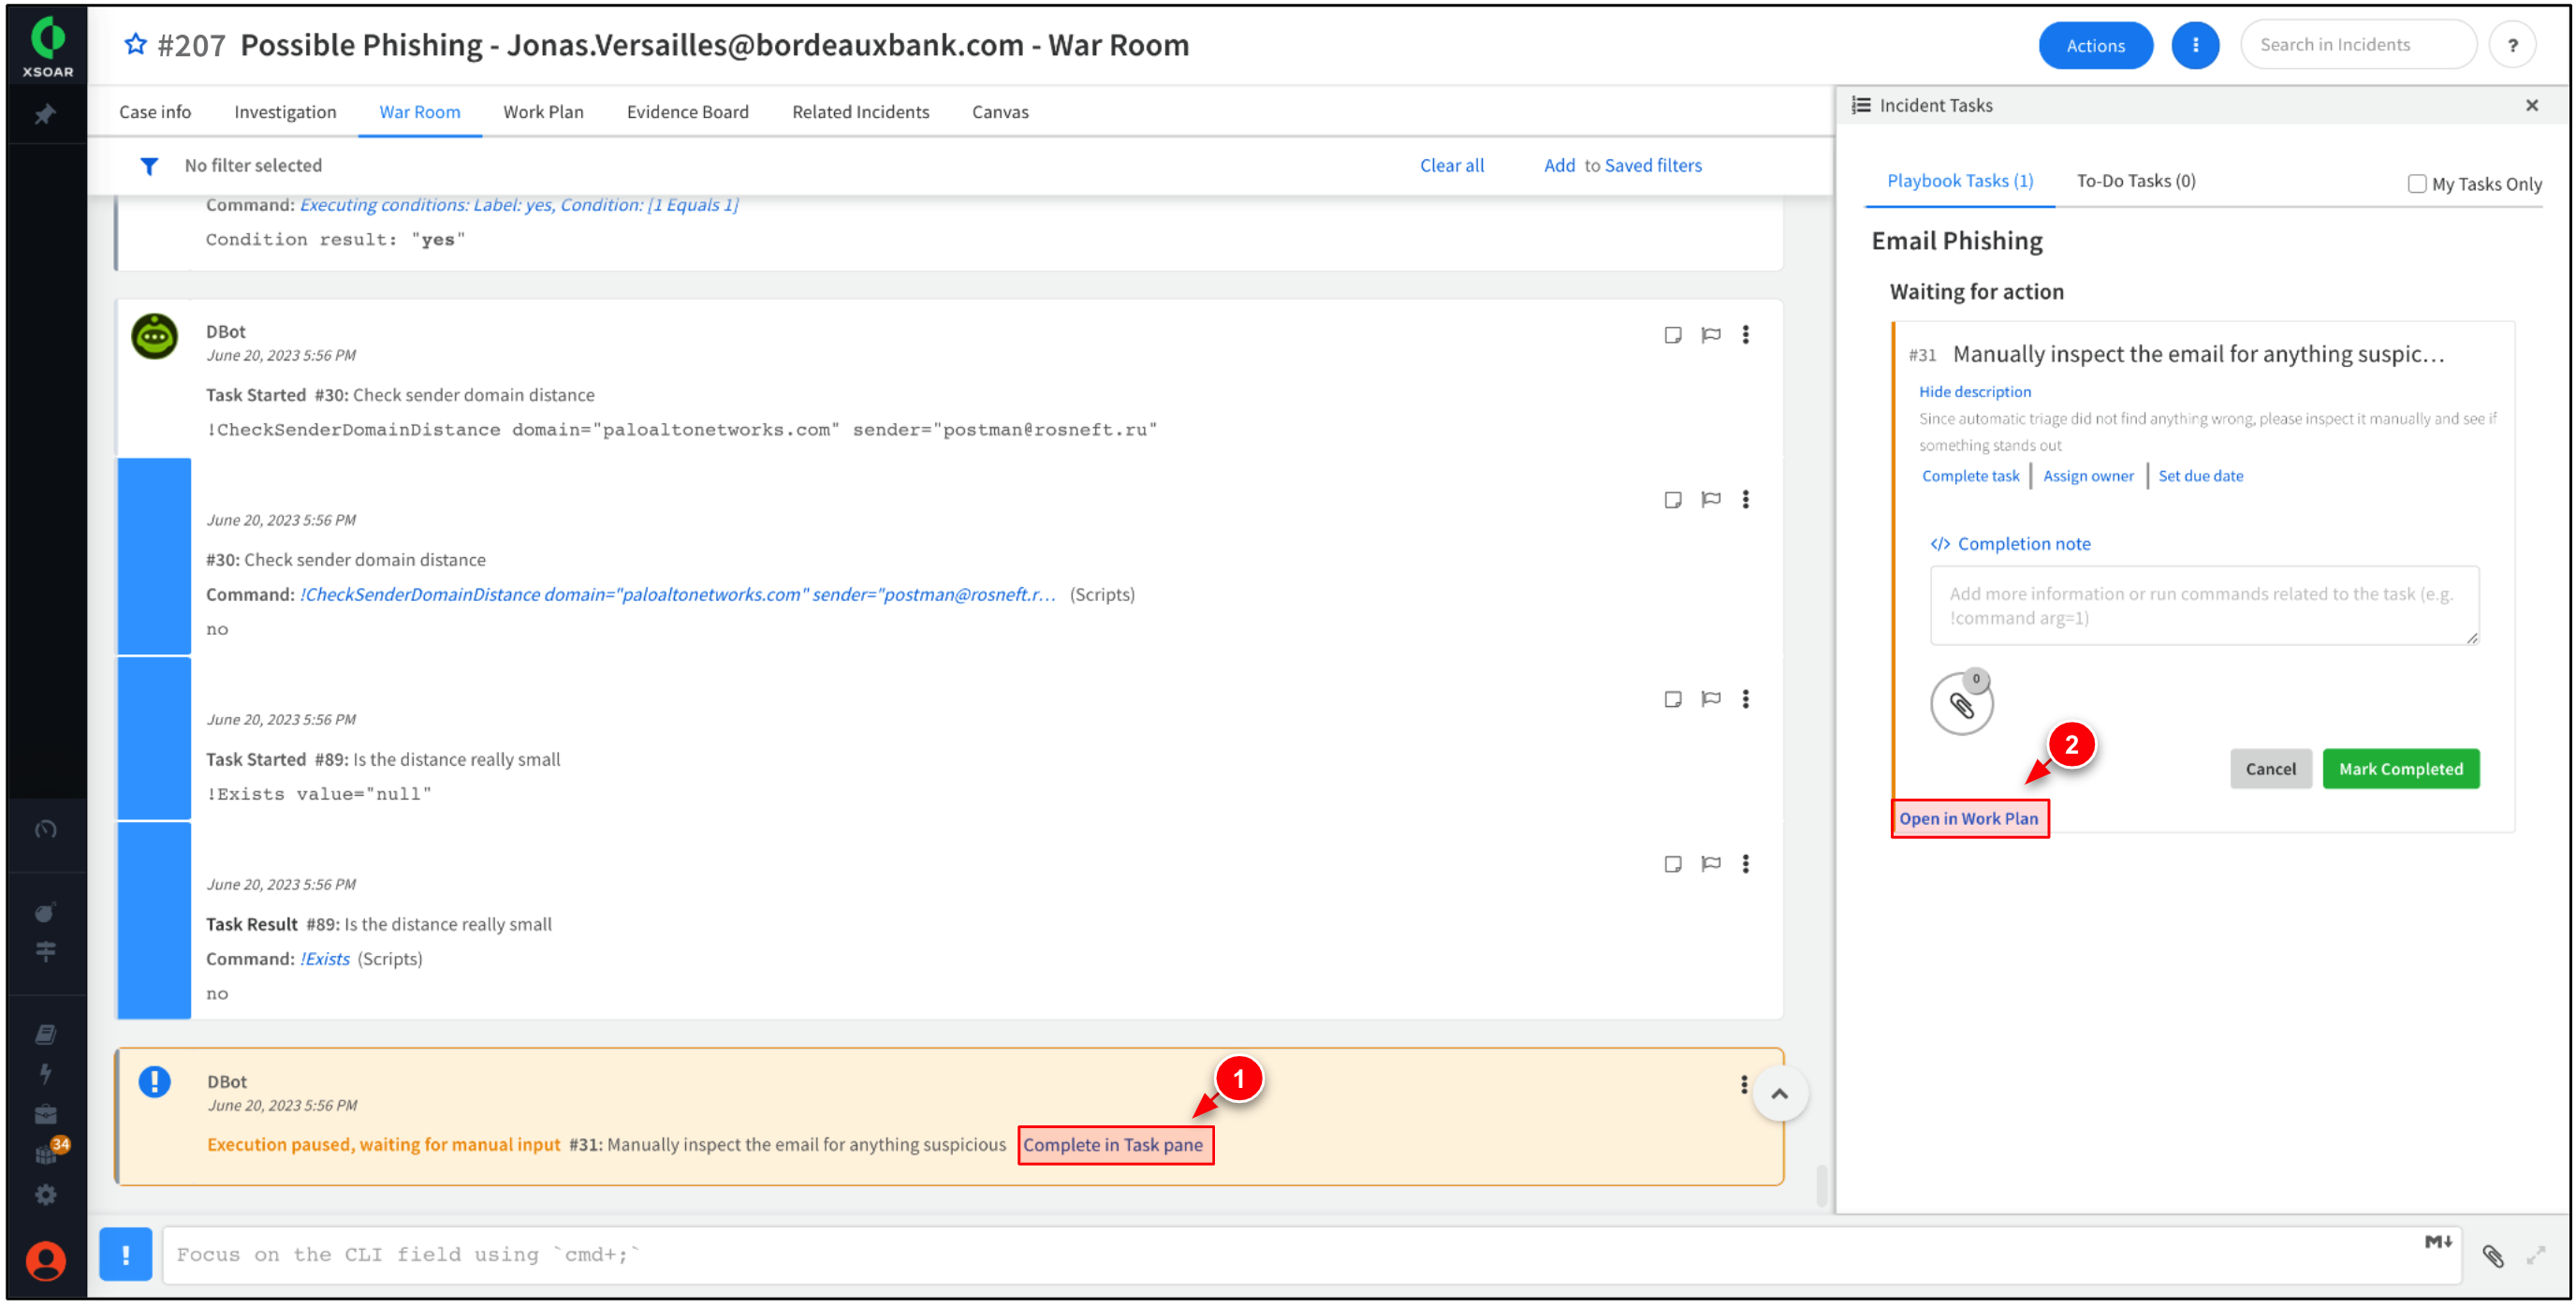
Click Complete in Task pane → Open in Work Plan.
Work Plans use playbooks with predefined workflows/instructions to automate and orchestrate SOC operations and incident response.
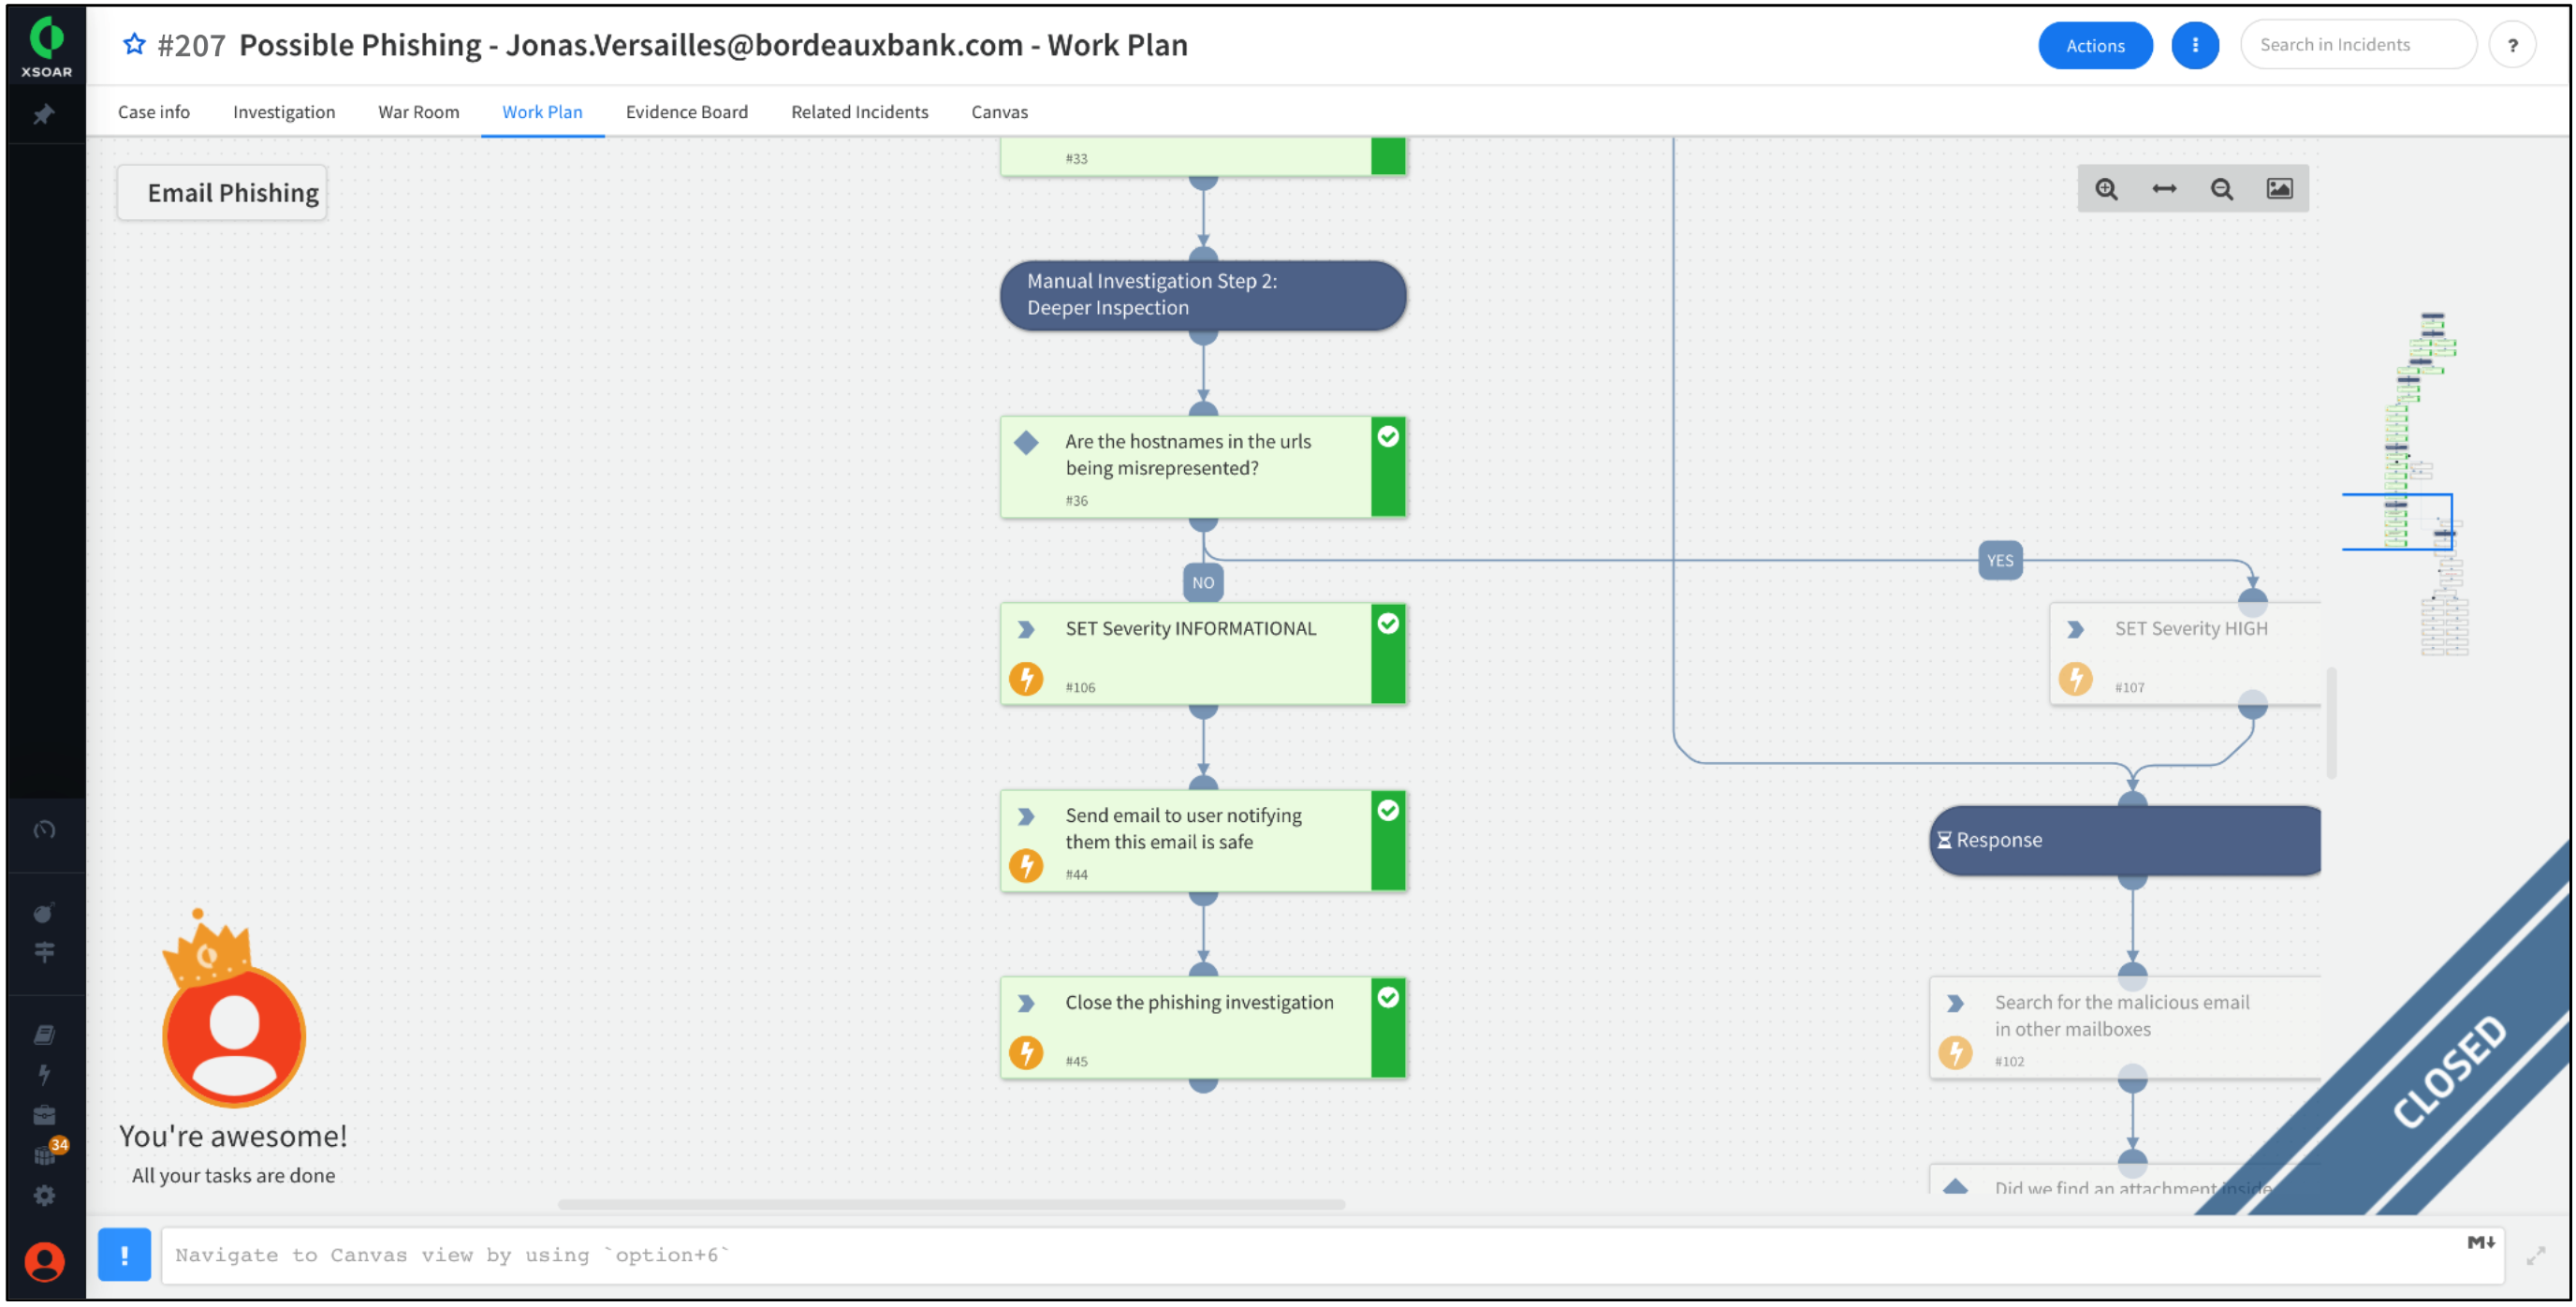
Step 2. Incident Work Plan
In this step, navigate to the incident's Work Plan to view the steps and actions taken to respond to the phishing incident. The Work Plan provides a visual representation of the steps and actions to be taken when responding to specific security incidents or events.
-
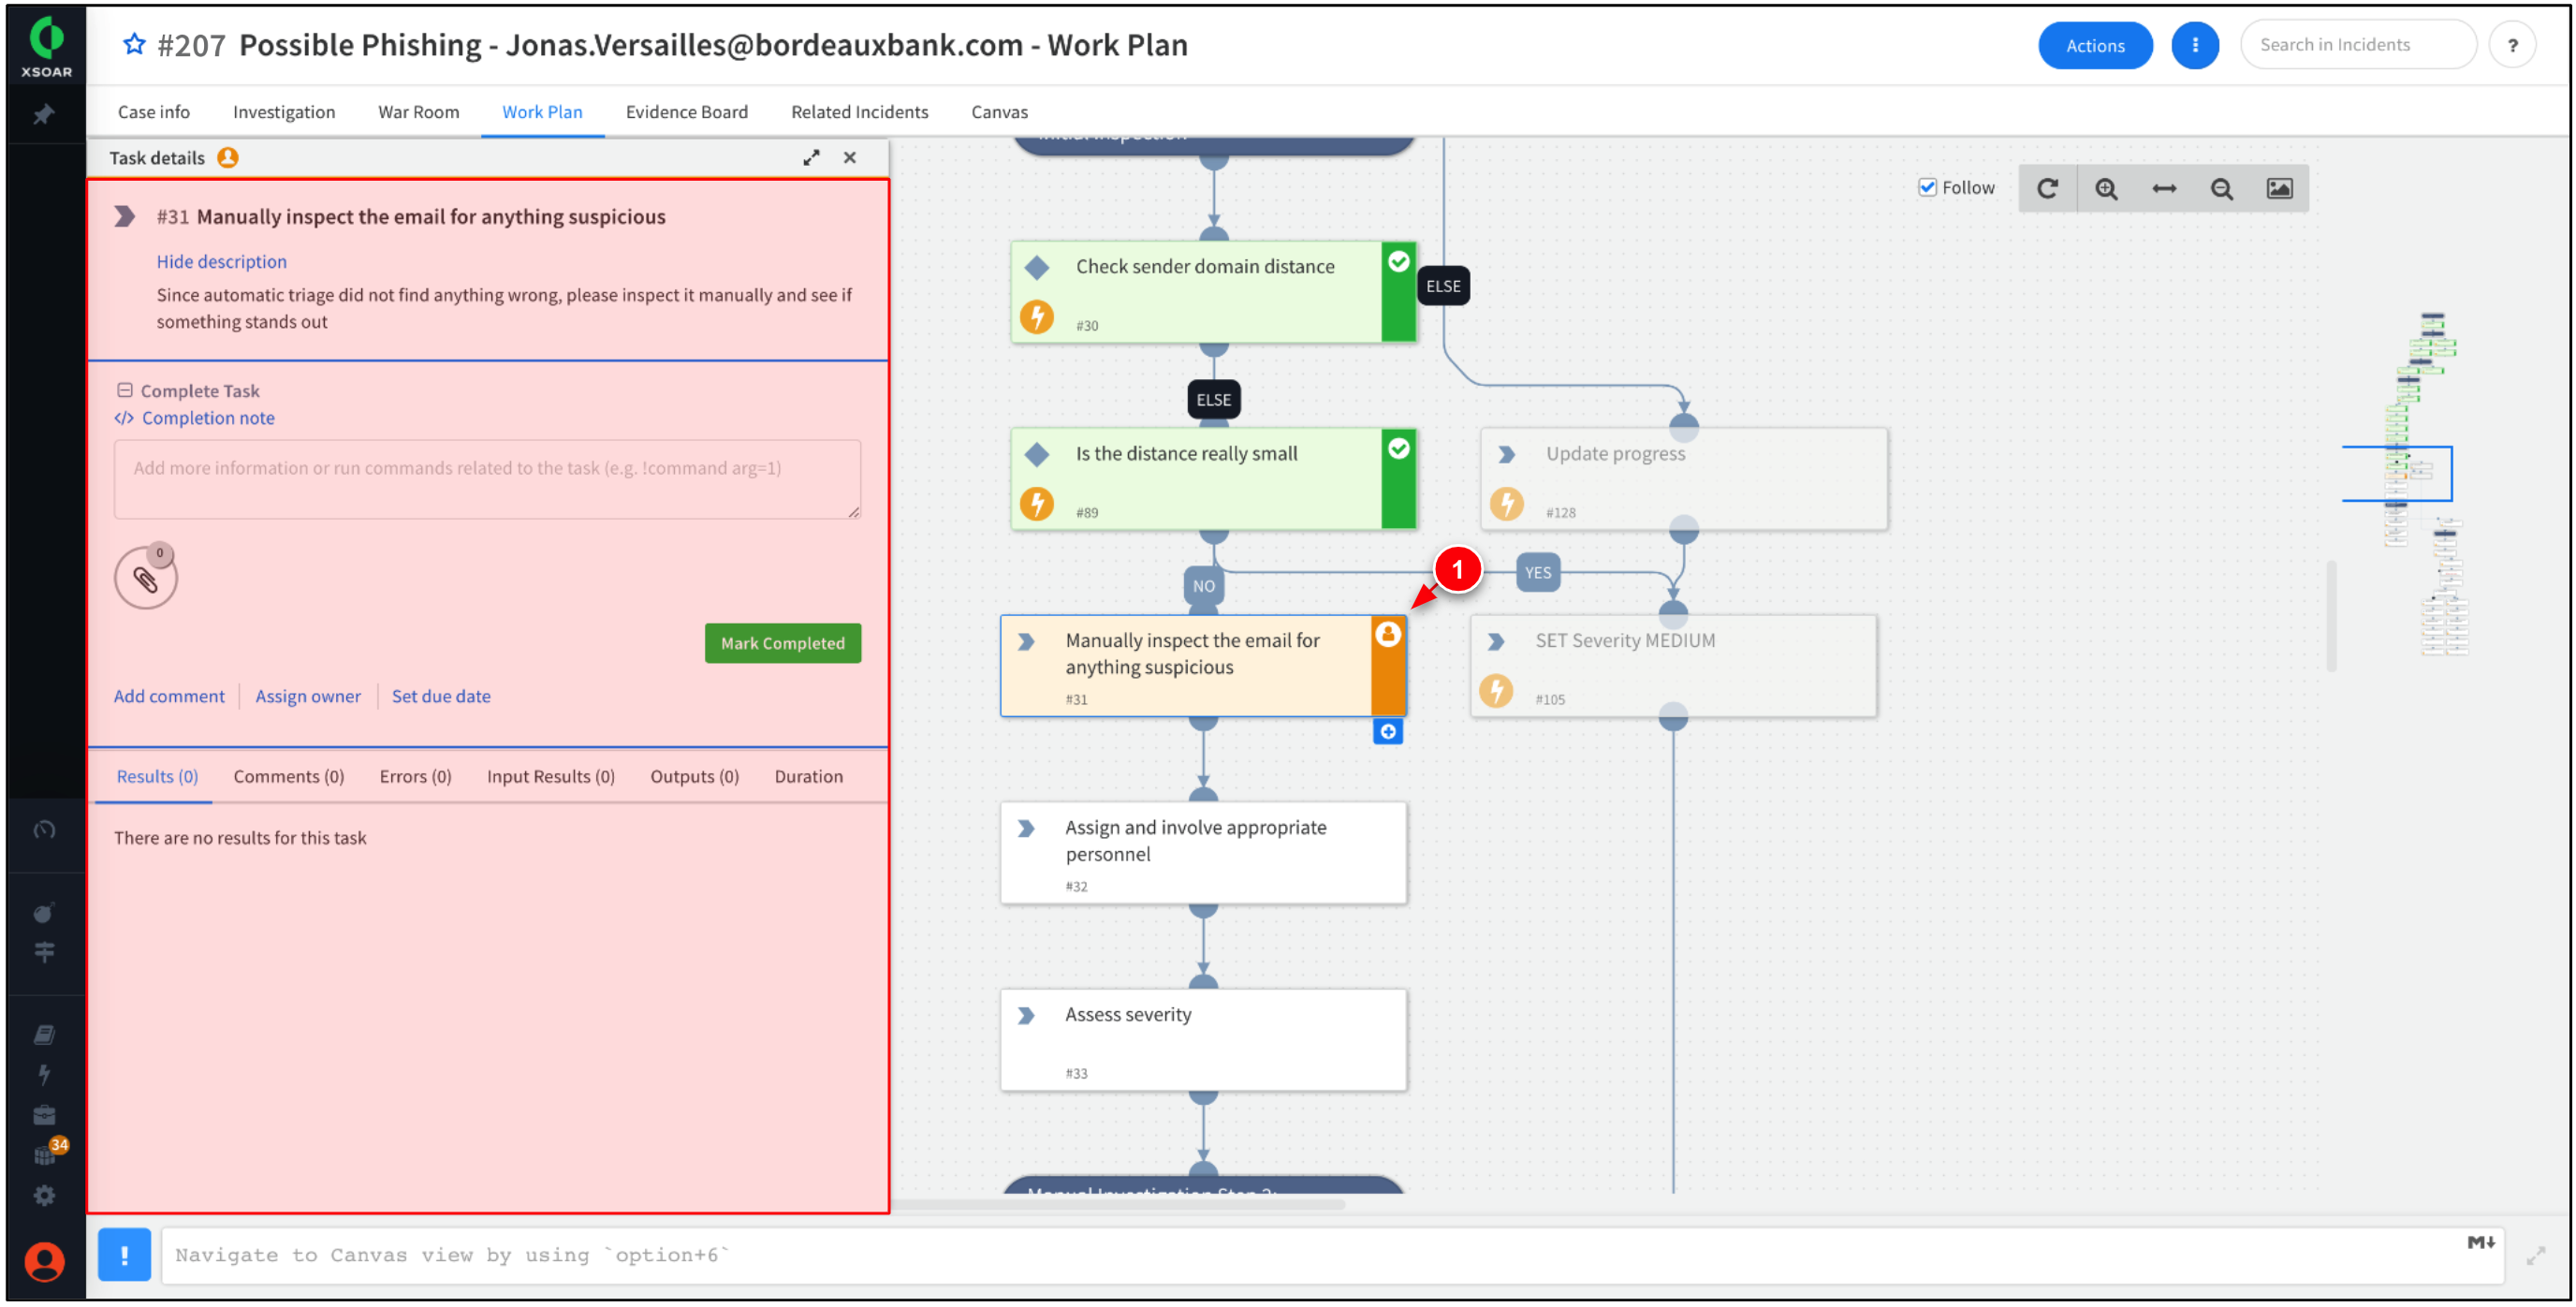
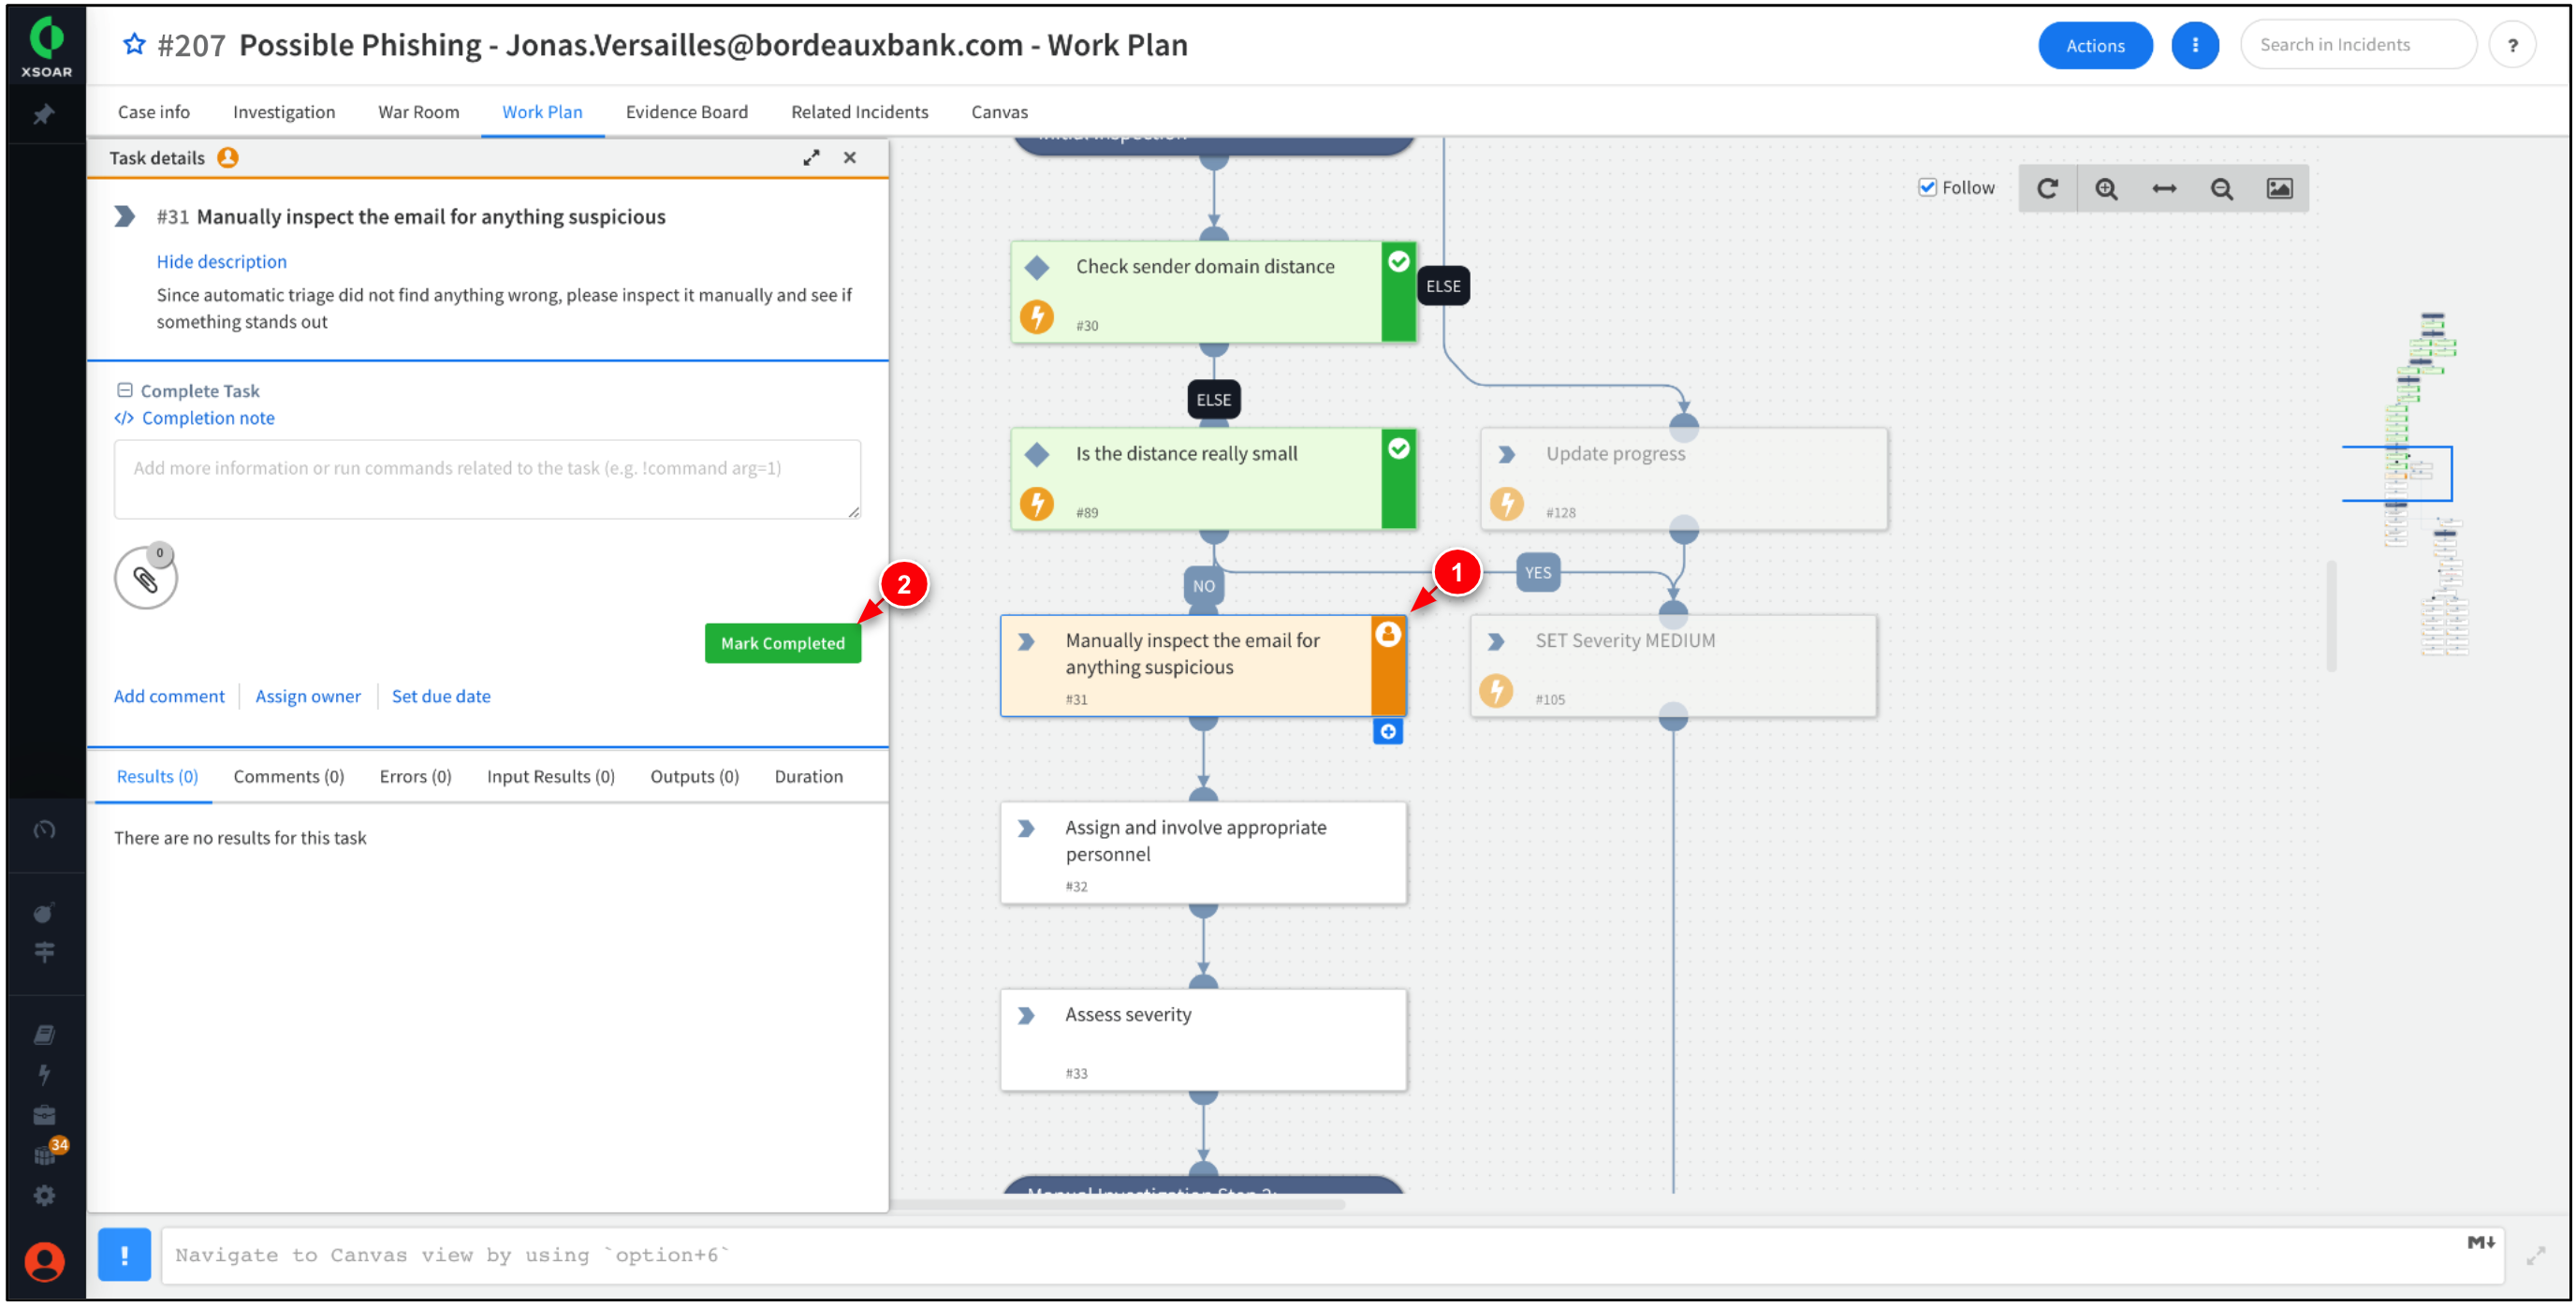
The previous step brings you to a incomplete task within the Work Plan tab. The tasks is requesting manual investigation into the email.
Work Plans outline the steps, tasks, and milestones required to successfully automate security operations and incident response. Completed tasks are marked green and incomplete tasks are marked yellow. -
Since we already have investigated the email, click Mark Completed.
Within Task Details, you can add notes about the task, assign the task to other users, or set a due date for the task. -
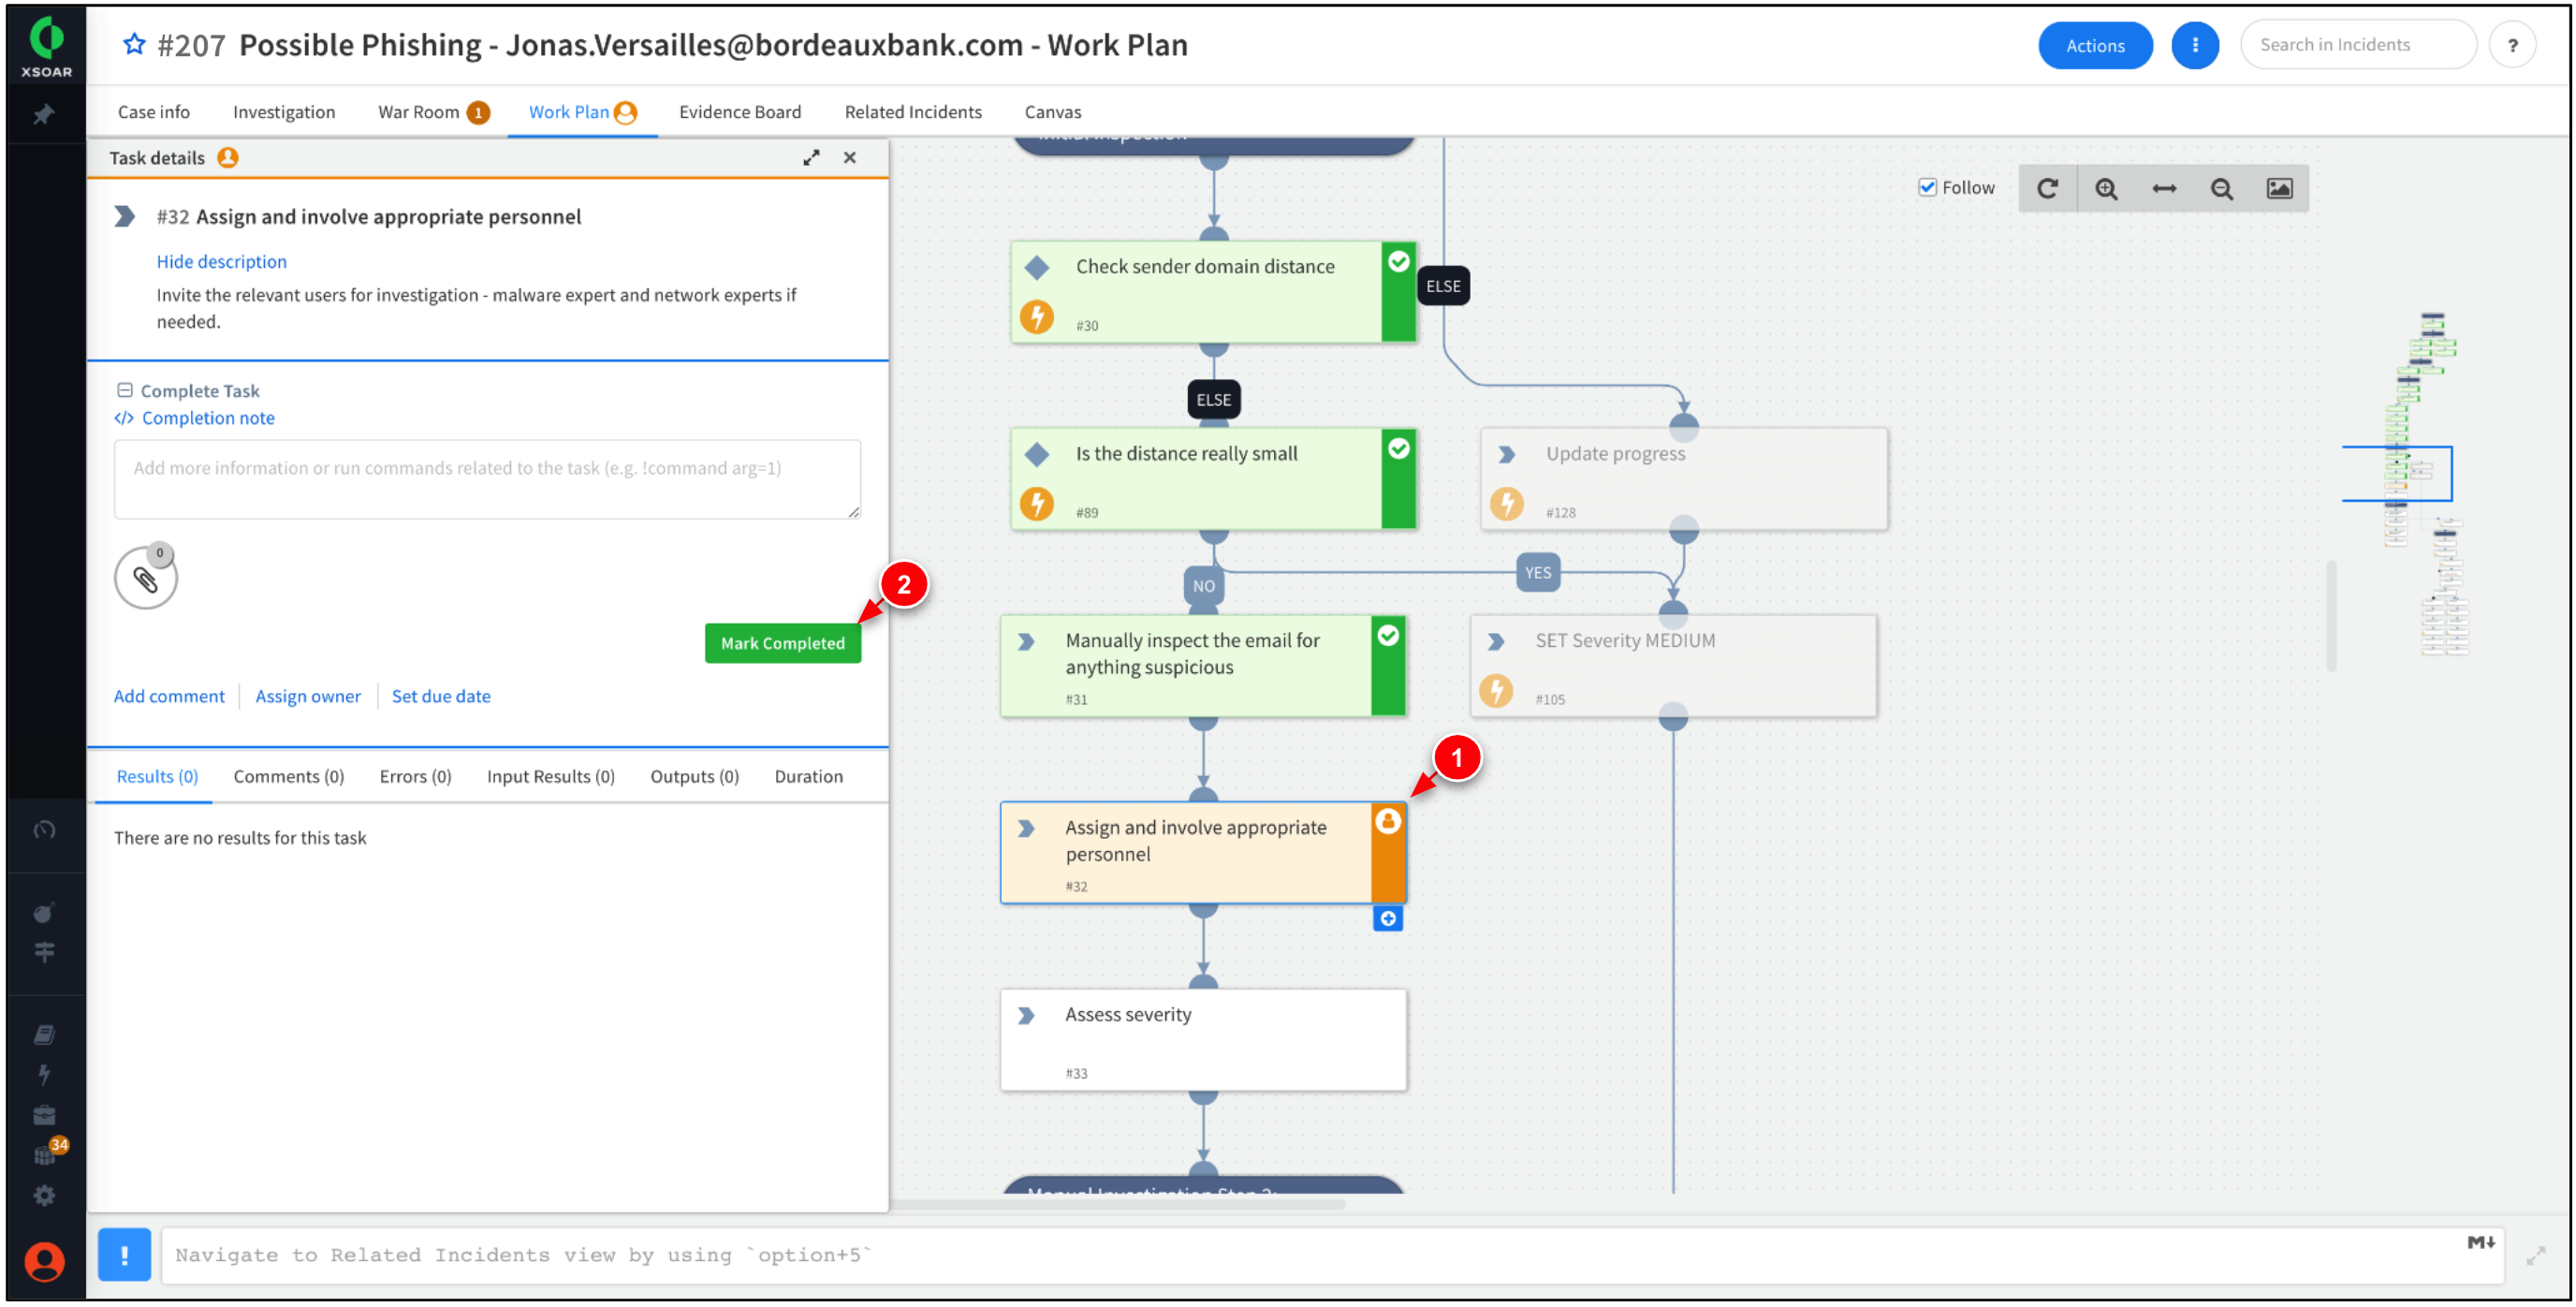
The Work Plan should progress the task, Assign and involve appropriate personnel. Click Mark Completed.
This task provides the option to invite additional team members to collaborate on the incident. -
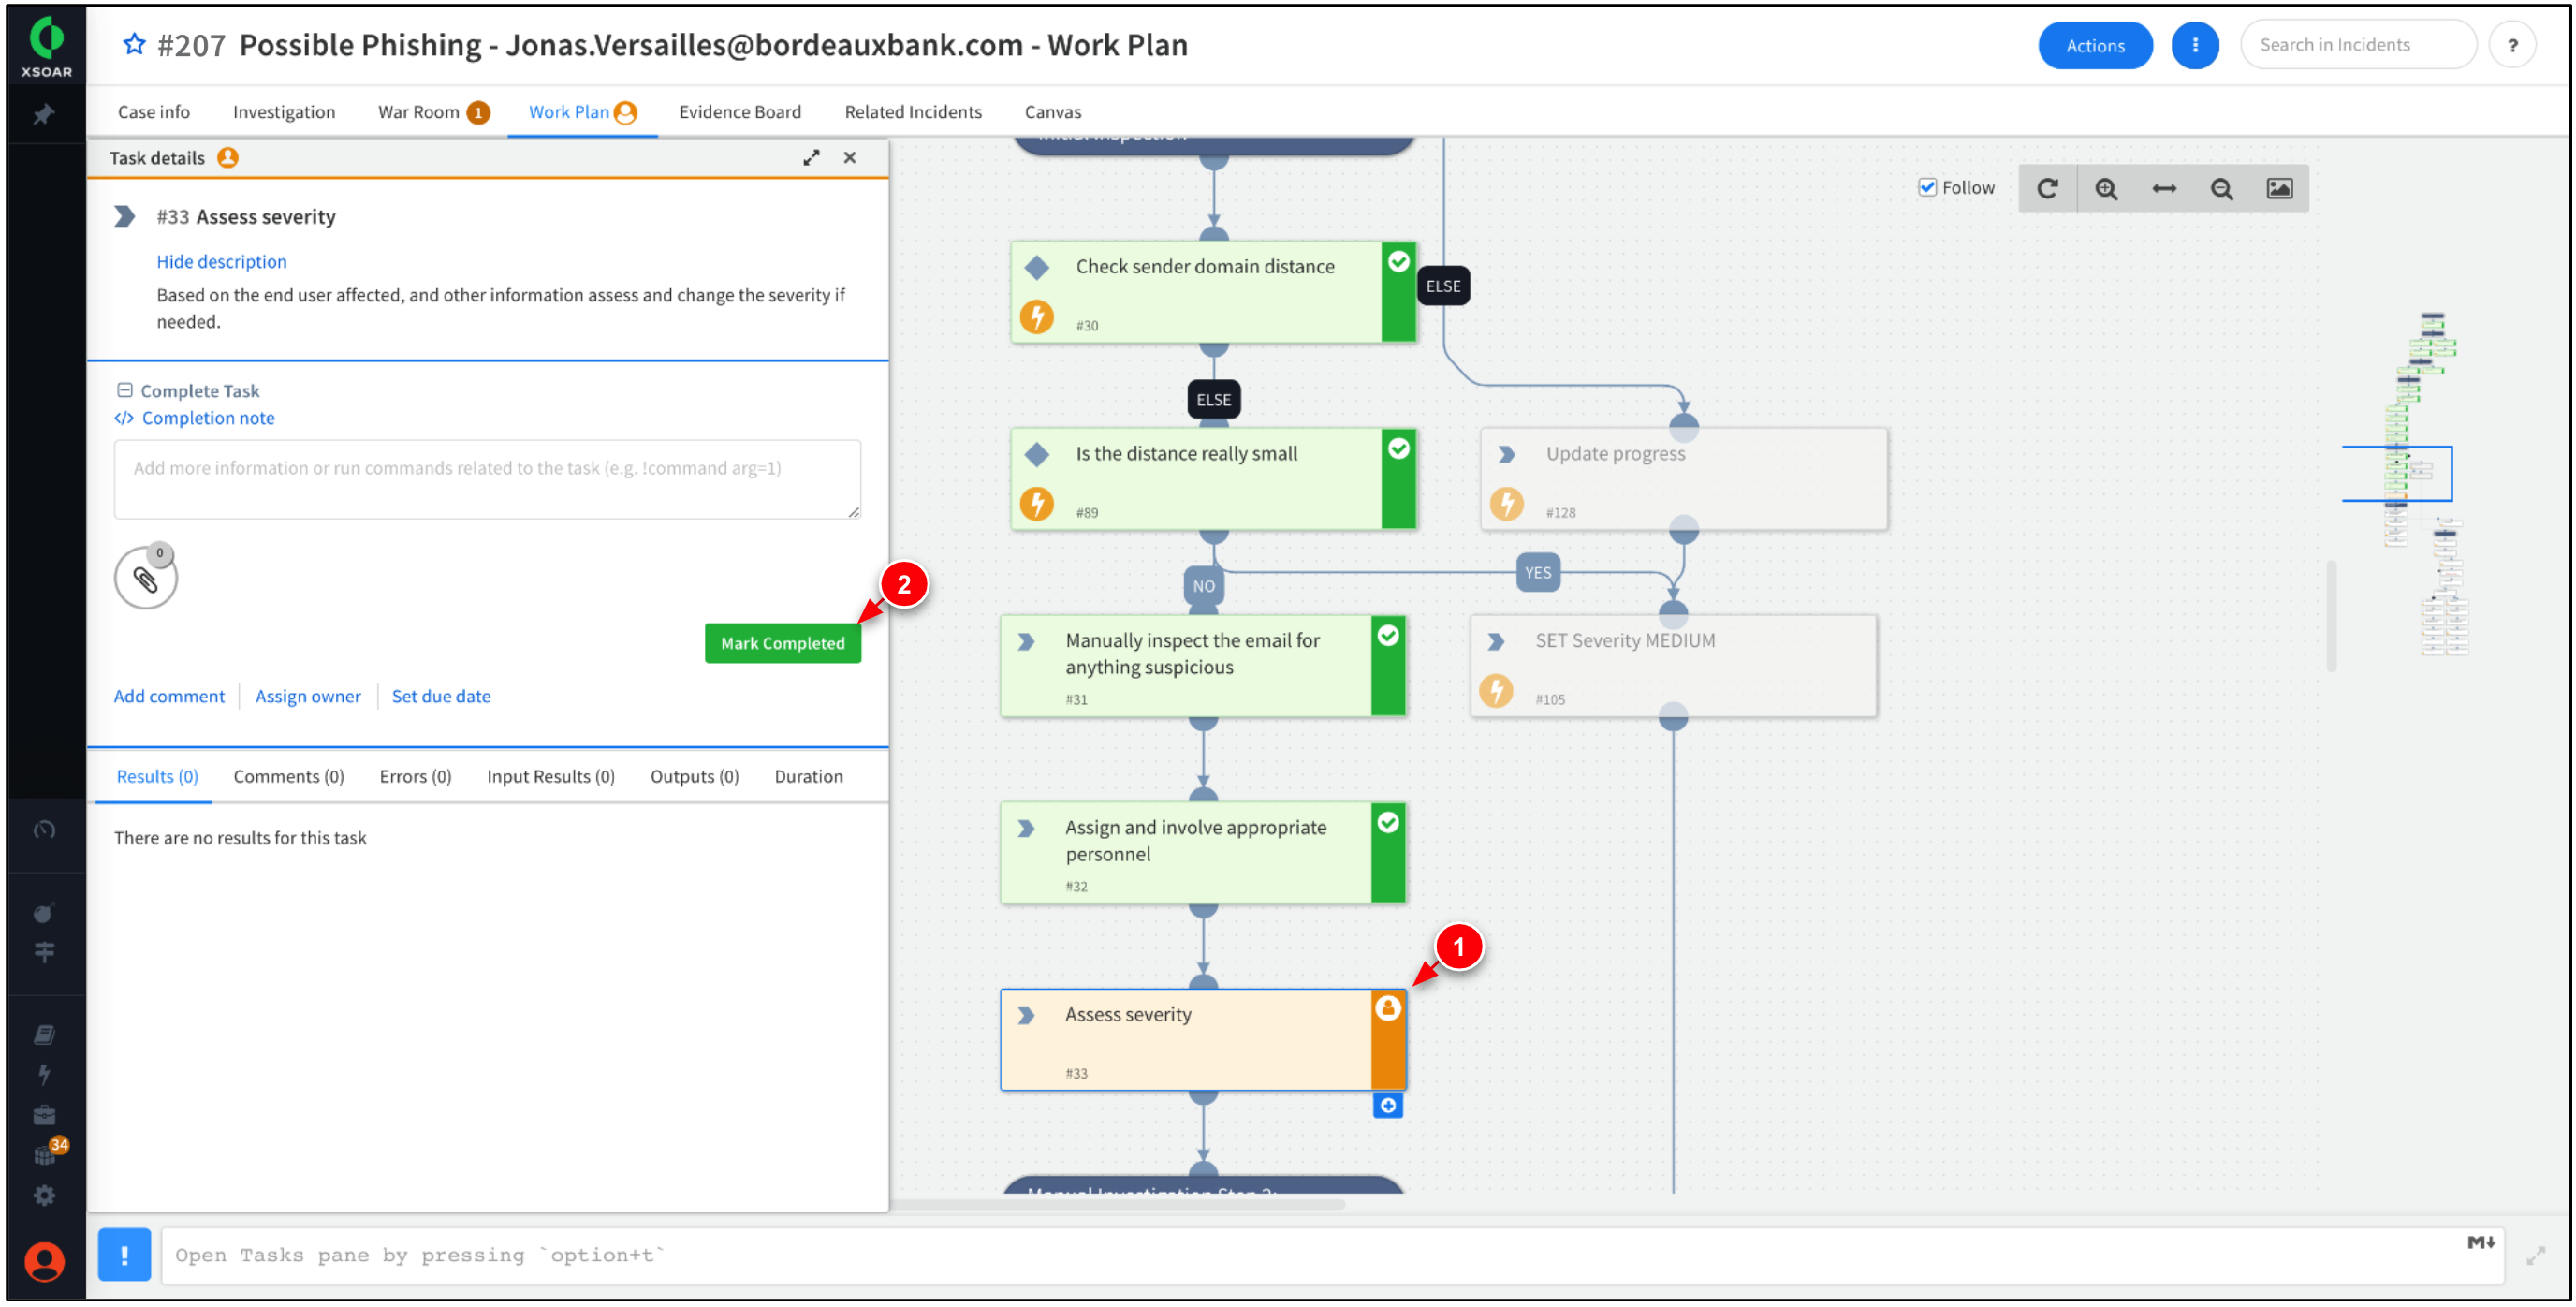
The Work Plan should progress the task, Assess severity. Click Mark Completed.
This task offers the choice to assign varying severity levels based on the gathered information about the incident. This capability allows you to establish distinct steps within the Work Plan, enabling different actions to be taken depending on the assigned severity level. -
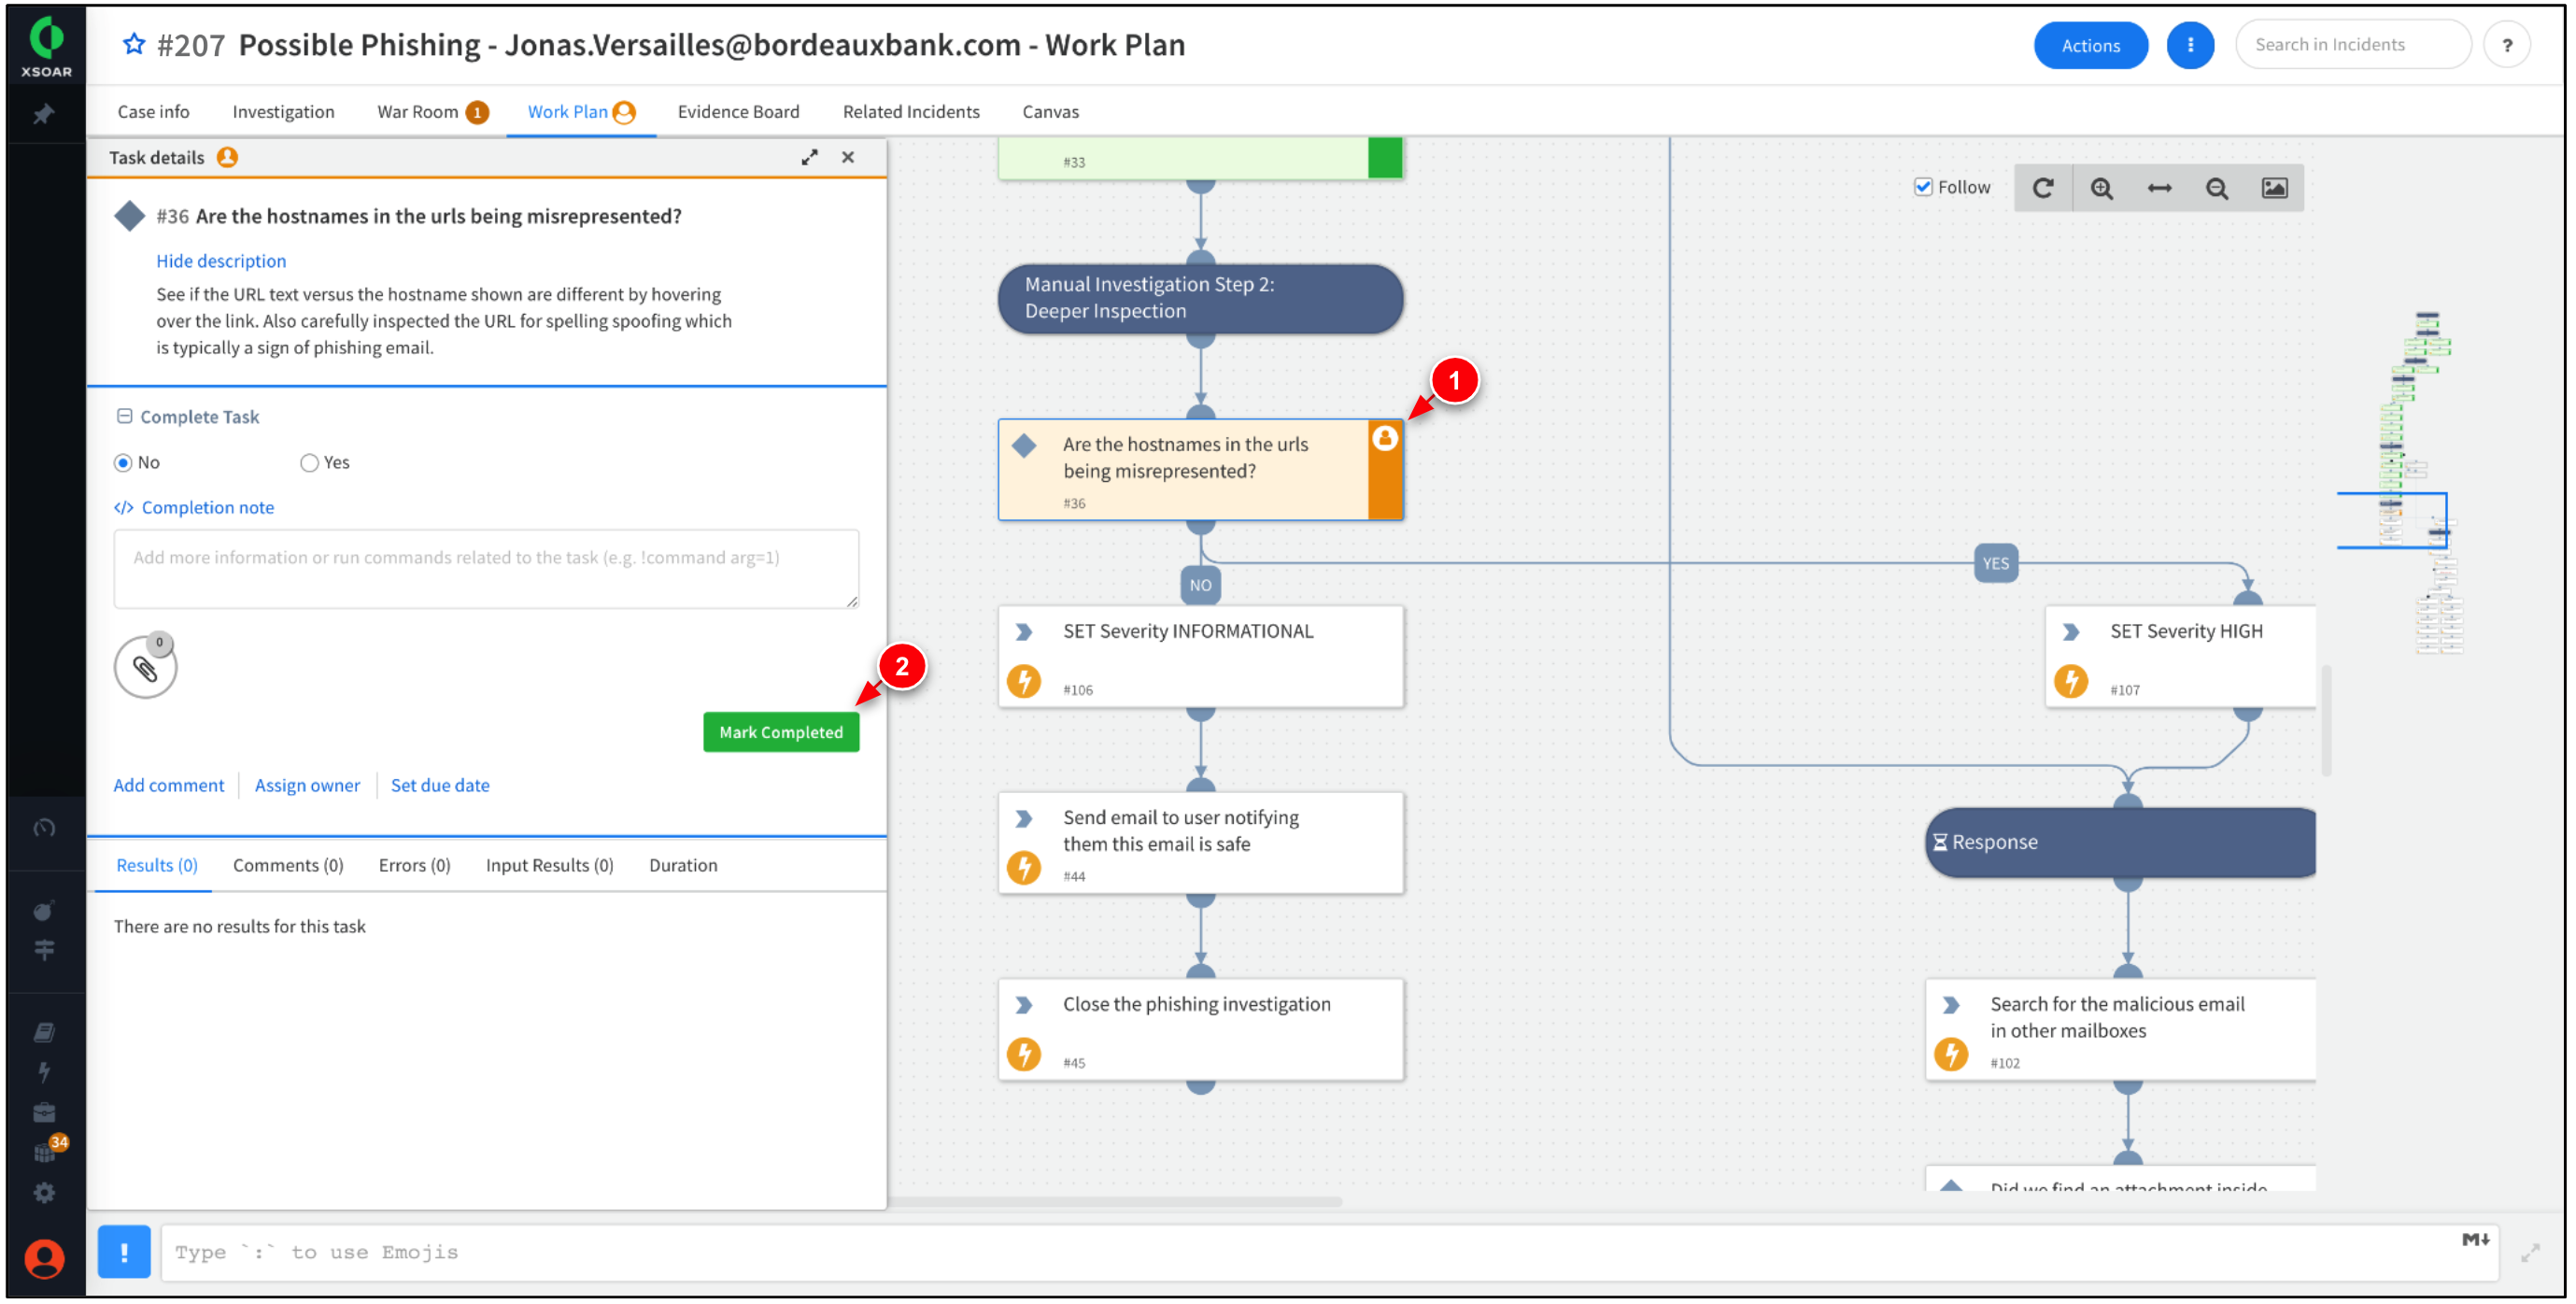
The Work Plan should progress the task, Are the hostnames in the urls being misrepresented? Click Mark Completed.
This task requires manual intervention to verify whether the URL text in the email differs from the actual hostname. This is a common tactic in phishing attacks, by tricking users into clicking the embedded URL. -
The Work Plan should now be marked as completed. Feel free to explore any of the tasks in the Work Plan for additional information and insights.
Step 3. (Optional) Generate Report
XSOAR offers extensive reporting capabilities out of the box, including pre-built reports and dashboards, it also allows you to create custom reports to suit your specific needs. In this step, create a report about the phishing incident.
-
While within the Incident, go to Case Info → Actions → Report.
-
Set Select a tab to generate report from to
Case info. Then, click Generate report.XSOAR offers a range of report types that can be generated. In addition, you have the option to directly generate reports within the Work Plan and conveniently email them to the relevant teams. -
Hover over the XSOAR logo on the top left, and click on Dashboards & Reports. Click the Reports tab to download the report to your machine.


Lab Finish!
In this lab you learned to use Cortex XSOAR to respond to phishing incidents. You also learned how to generate reports, navigate War Room, and complete Work Plans and playbooks.
To learn more, check out the following resources:
- Sign up to get access to Cortex XSOAR Community Edition.
- Cortex XSOAR Threat Intel Management.
- For issues with this lab, please email us at google-tech@paloaltonetworks.com.

