


Before you begin
- Labs create a Google Cloud project and resources for a fixed time
- Labs have a time limit and no pause feature. If you end the lab, you'll have to restart from the beginning.
- On the top left of your screen, click Start lab to begin
Public Cloud Run Service
/ 25
Create service account
/ 25
Minimum balance log entry of 500
/ 25
Minimum balance log entry of 700
/ 25
The principle of least privilege states that a resource should only have access to the exact set of resources it needs in order to function. For example, if a service is performing an automated database backup, the service should be restricted to read-only permissions on exactly one database. Similarly, if a service is only responsible for encrypting data, it should not have permissions for decrypting data.
In Cloud Run, if a service is deployed without specifying a service account, a default service account is used. The default service account used is the Compute Engine service account which has the broad Editor role on the project. Because of policy binding inheritance, this service account has read and write permissions on most resources in your project. While convenient, it's an inherent security risk as resources can be created, modified, or deleted with this service account.
To mitigate this risk and implement the principle of least privilege, you should create a service account that serves as the service's identity, and grant the minimum set of permissions to the account that are required for the service's functionality.
In this lab, you learn to:
These labs are based on intermediate knowledge of Google Cloud. While the steps required are covered in the content, it would be helpful to have familiarity with any of the following products:
This Qwiklabs hands-on lab lets you do the lab activities yourself in a real cloud environment, not in a simulation or demo environment. It does so by giving you new, temporary credentials that you use to sign in and access Google Cloud for the duration of the lab.
To complete this lab, you need:
Click the Start Lab button. If you need to pay for the lab, a pop-up opens for you to select your payment method. On the left is a panel populated with the temporary credentials that you must use for this lab.
Copy the username, and then click Open Google Console. The lab spins up resources, and then opens another tab that shows the Choose an account page.
On the Choose an account page, click Use Another Account. The Sign in page opens.
Paste the username that you copied from the Connection Details panel. Then copy and paste the password.
After a few moments, the Cloud console opens in this tab.

Google Cloud Shell is a virtual machine that is loaded with development tools. It offers a persistent 5GB home directory and runs on the Google Cloud.
Google Cloud Shell provides command-line access to your Google Cloud resources.
In Cloud console, on the top right toolbar, click the Open Cloud Shell button.
Click Continue.
It takes a few moments to provision and connect to the environment. When you are connected, you are already authenticated, and the project is set to your PROJECT_ID. For example:
gcloud is the command-line tool for Google Cloud. It comes pre-installed on Cloud Shell and supports tab-completion.
Output:
Example output:
Output:
Example output:
Set up environment variables in Cloud Shell to make the provisioning process more flexible.
Enable Cloud Run API:
Create a LOCATION environment variable:
Set the default Cloud Run region:
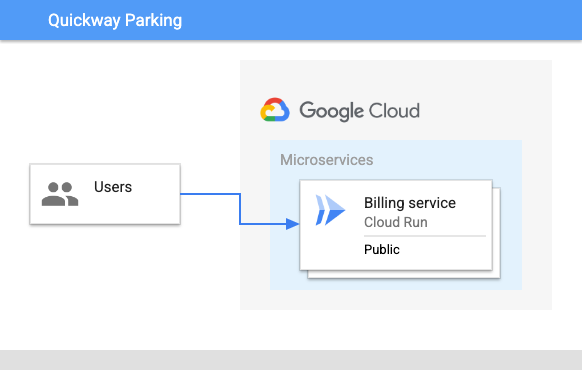
Quickway parking has a Cloud Run billing service that they would like to be made more secure. In this task, you:
The Quickway development team already has an image of the billing application available on Google Cloud.
Deploy the billing application image to Cloud Run:
Assign the URL of the new service to an environment variable:
Invoke the service without any authorization:
In the Google Cloud console Navigation menu (
Click the link to the billing-service.
To view the service logs, click Logs.
Add the log filter minBalance to view the minimum balance received in the request made to the service.
To go back to the service details page, click <- Service details.
Select the billing-service by checking the box to the left of the green check mark.
The Security team has spotted something in the security settings. Can you see what part of the above configuration has them so concerned?
When the Billing service was originally deployed, it used the --allow-unauthenticated permission, which means that the service is publicly accessible, and can be invoked without any authentication.
| Type | Permission | Description |
|---|---|---|
| URL Access | --allow-unauthenticated |
Make the service publicly accessible (Unauthenticated users can access it). |
| Invoking Principal | allUsers | Allow the service to be invoked/triggered by anyone. |
By removing the --allow-unauthenticated permission you can use the Cloud Run default permissions to secure the service, or you can explicitly specify the no-allow-unauthenticated permission.
| Type | Permission | Description |
|---|---|---|
| URL Access | --no-allow-unauthenticated |
Secure the service with authentication (Only authenticated users can access it). |
| Invoking Principal | none | Do not allow the service to be invoked/triggered by anyone. |
By making these changes, the Security team will be a lot happier with the overall design.
Click Check my progress to verify your performed task.
The team updates the application design to show how the changes will work:
The main changes are:
Now that you understand more about the permissions used with Cloud Run, correct the authentication permissions applied to the Billing service:
Delete the existing deployed service:
If prompted, type Y, and then press Enter.
Redeploy the billing service with the --no-allow-authenticated permission:
Redeploying the service means it no longer allows unauthenticated access at its service URL. In addition, the access permission to invoke the service has been removed.
Wait a few seconds, and then invoke the billing service again as before:
As expected, the output is a permissions error since the service now requires authentication.
To invoke the billing service you will need an identity or service account with appropriate permissions, and bind that identity to the service.
This can be done in the Google Cloud console, or with the gcloud command line interface. In this lab, you use the Google Cloud console to create the service account and set up the new policy binding for the billing service.
In the Google Cloud console Navigation menu (
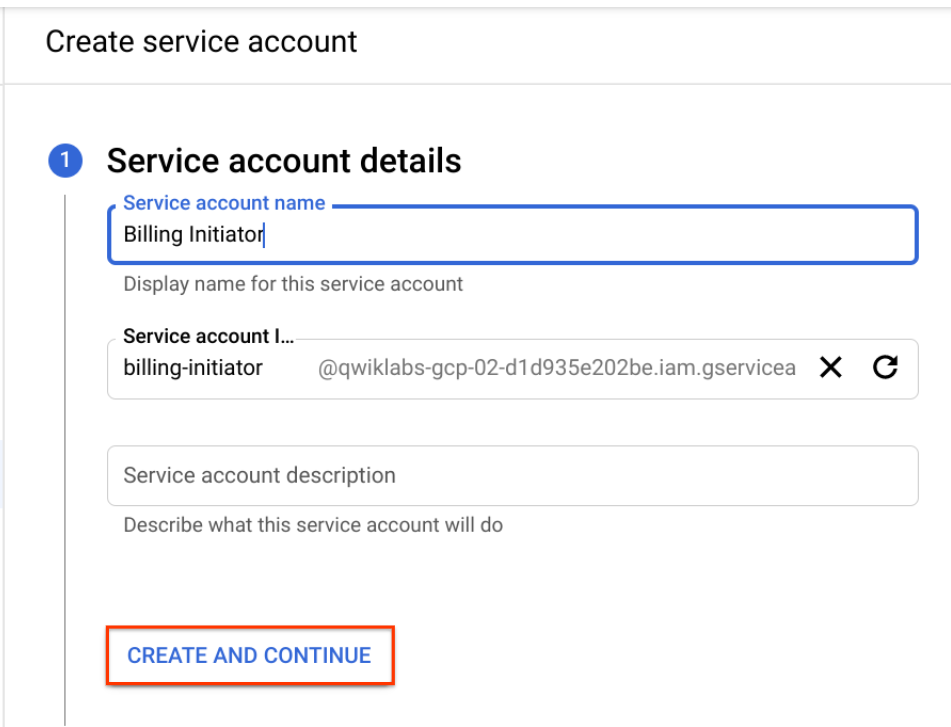
To create a new service account that will provide authenticated access, click Create Service Account near the top.
Name the service account: Billing Initiator.
To create the account, click Create and Continue, and then advance to the Grant Access step.
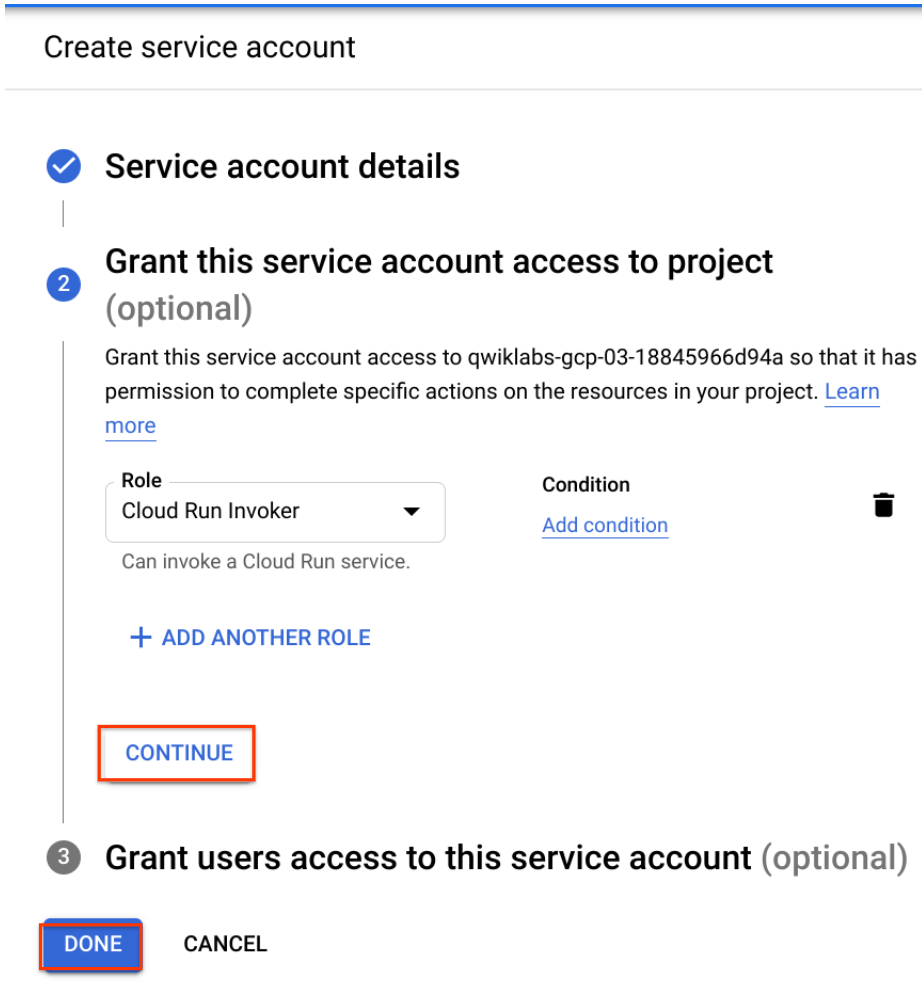
To give the Billing Initiator service account permissions to invoke the billing service, select the Role drop-down, scroll the left side to Cloud Run, and then select the role Cloud Run Invoker.
To complete the setup of the service account, click Continue, and then click Done.
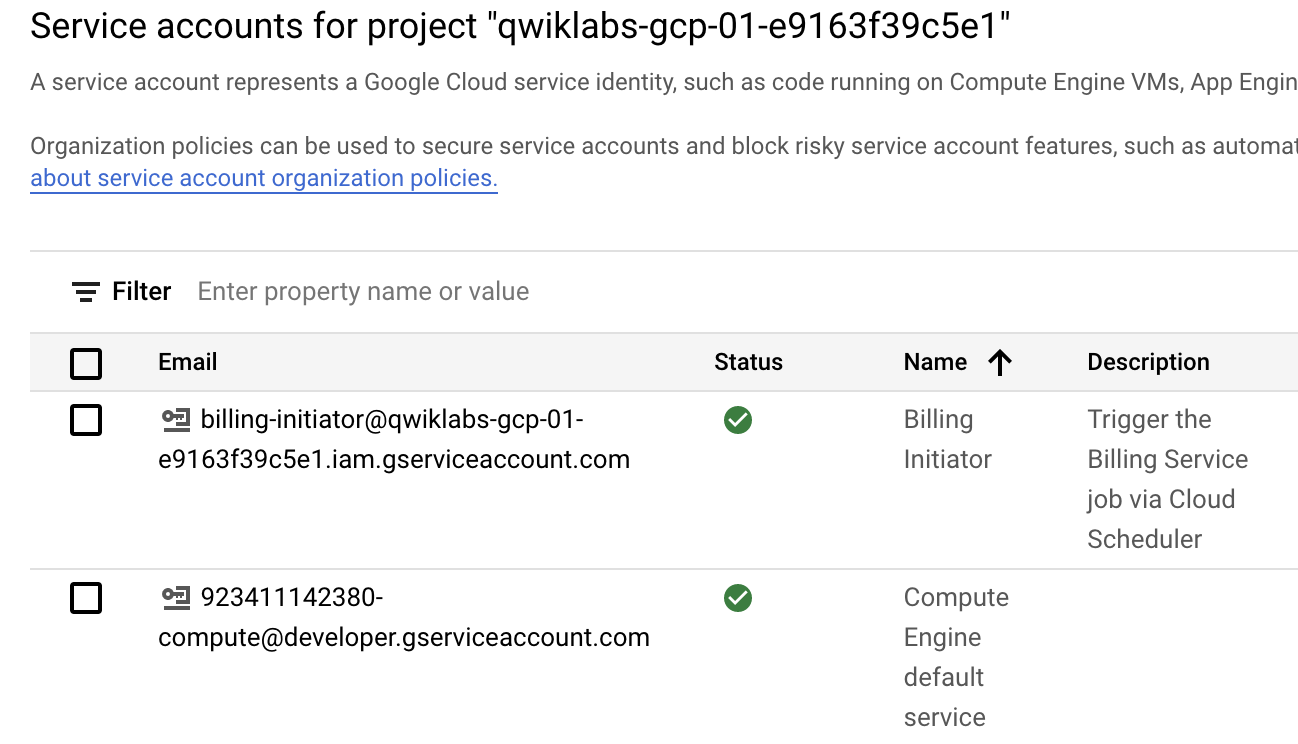
You will see the new service account at the top of the list of service accounts in the console.
The service account Billing Initiator has been created with the authorization to invoke a Cloud Run service, using an IAM policy binding on your project.
Click Check my progress to verify your performed task.
Now that you have a service account with the appropriate permission, you can use it to invoke your Cloud Run service.
The first step is to set the service account in gcloud so it can be used to authenticate with the service.
In the Cloud Shell terminal menu, open a new shell in a separate tab by clicking Add (
Execute the remaining commands of this task in this Cloud Shell window.
Get the service account identity email and save it in an environment variable:
In this Cloud Shell terminal, assign the URL of the billing service to an environment variable:
To authenticate gcloud using the service account, generate a key file:
Authorize access to Cloud Run with a service account:
Invoke the Cloud Run billing service with an identity token generated from the service account:
In the Google Cloud console Navigation menu (
Click the link to the billing-service.
To view the service logs, click Logs.
Add the log filter minBalance to view the updated minimum balance received in the request made to the service.
Click Check my progress to verify your performed task.
You've used a service account with the appropriate permissions to invoke a Cloud Run service that was previously accessible by anyone. But, have you used the absolute minimum privileges needed to call this specific service?
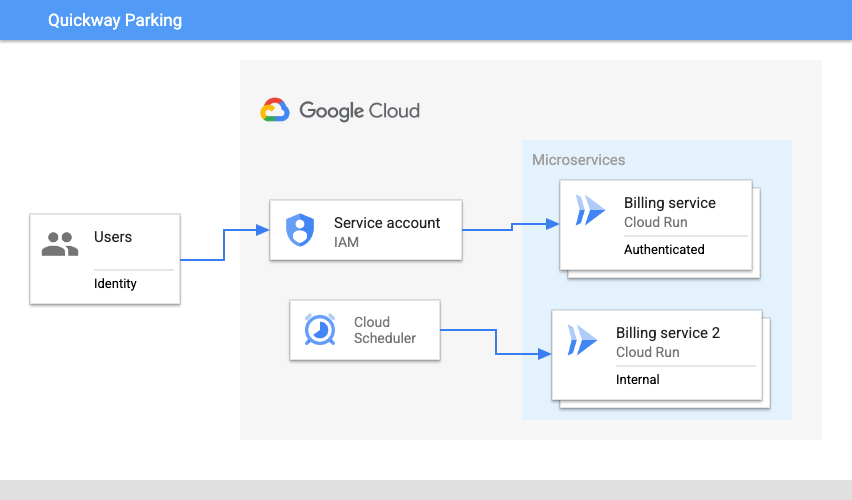
To determine if this is true, deploy a second billing service which we will assume should be accessible only by other internal private services, such as Cloud Scheduler.
Here's a diagram of this requirement:
Open a third Cloud Shell terminal window or tab.
Create a LOCATION environment variable:
To simulate a second service, deploy the billing application image to Cloud Run:
Assign the URL of the new service to an environment variable:
In this third Cloud Shell terminal, authorize access to Cloud Run with the same service account:
Invoke the second Cloud Run service with an identity token generated from the service account:
Why was this successful!? It's because when you created the service account, the Cloud Run Invoker permissions were granted to this account on the project. Because of inheritance, resources in the project such as the two Cloud Run services inherit those permissions, and as a result, the service account can be used to invoke the services.
To fully implement least privilege, the service account should only be granted permissions on the service that it needs.
In this subtask, you remove the permission previously granted to the service account on the project, and then add the appropriate permissions required to invoke the original billing service.
Switch to the first Cloud Shell terminal window.
In this Cloud Shell terminal, get the service account identity email and save it in an environment variable:
Remove the permission on the service account for the project:
Add the permission to the service account on the billing service:
Switch back to the second Cloud Shell terminal window or tab.
Wait a few seconds, and then invoke the first Cloud Run billing service with an identity token generated from the service account:
Switch to the third Cloud Shell terminal window.
Try to invoke the second Cloud Run service with an identity token generated from the same service account:
Click Check my progress to verify your performed task.
In this lab, you have seen how to reconfigure a deployed service to secure access to it, and implemented the principle of least privilege when granting permissions to access resources on Google Cloud. You:
Follow the Serverless Expeditions video series to learn more about how to use these products within your project.
When you have completed your lab, click End Lab. Google Cloud Skills Boost removes the resources you’ve used and cleans the account for you.
You will be given an opportunity to rate the lab experience. Select the applicable number of stars, type a comment, and then click Submit.
The number of stars indicates the following:
You can close the dialog box if you don't want to provide feedback.
For feedback, suggestions, or corrections, please use the Support tab.
Copyright 2022 Google LLC All rights reserved. Google and the Google logo are trademarks of Google LLC. All other company and product names may be trademarks of the respective companies with which they are associated.


Ta treść jest obecnie niedostępna
Kiedy dostępność się zmieni, wyślemy Ci e-maila z powiadomieniem

Świetnie
Kiedy dostępność się zmieni, skontaktujemy się z Tobą e-mailem

One lab at a time
Confirm to end all existing labs and start this one