


Before you begin
- Labs create a Google Cloud project and resources for a fixed time
- Labs have a time limit and no pause feature. If you end the lab, you'll have to restart from the beginning.
- On the top left of your screen, click Start lab to begin
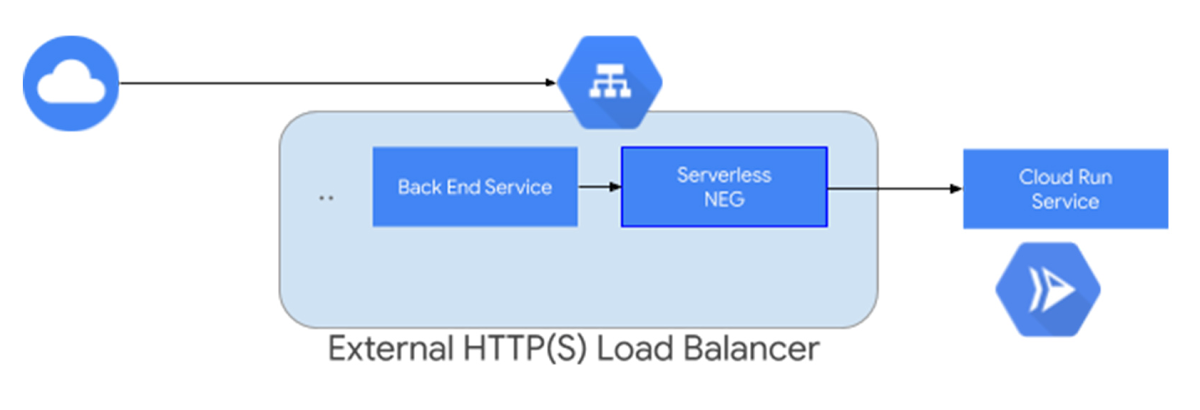
Serverless Network Endpoint Groups (NEGs) allow you to use Google Cloud serverless apps with external HTTP(S) Load Balancing. After you have configured a load balancer with the serverless NEG backend, requests to the load balancer are routed to the serverless app backend.
In this lab you will learn how to set up and use an HTTP global load balancer with Cloud Run.
In this lab, you learn to:
These labs are based on intermediate knowledge of Google Cloud. While the steps required are covered in the content, it would be helpful to have familiarity with any of the following products:
This Qwiklabs hands-on lab lets you do the lab activities yourself in a real cloud environment, not in a simulation or demo environment. It does so by giving you new, temporary credentials that you use to sign in and access Google Cloud for the duration of the lab.
To complete this lab, you need:
Click the Start Lab button. If you need to pay for the lab, a pop-up opens for you to select your payment method. On the left is a panel populated with the temporary credentials that you must use for this lab.
Copy the username, and then click Open Google Console. The lab spins up resources, and then opens another tab that shows the Choose an account page.
On the Choose an account page, click Use Another Account. The Sign in page opens.
Paste the username that you copied from the Connection Details panel. Then copy and paste the password.
After a few moments, the Cloud console opens in this tab.

Google Cloud Shell is a virtual machine that is loaded with development tools. It offers a persistent 5GB home directory and runs on the Google Cloud.
Google Cloud Shell provides command-line access to your Google Cloud resources.
In Cloud console, on the top right toolbar, click the Open Cloud Shell button.
Click Continue.
It takes a few moments to provision and connect to the environment. When you are connected, you are already authenticated, and the project is set to your PROJECT_ID. For example:
gcloud is the command-line tool for Google Cloud. It comes pre-installed on Cloud Shell and supports tab-completion.
Output:
Example output:
Output:
Example output:
Below you will find a reference list of a few very basic Linux commands which may be included in the instructions or code blocks for this lab.
| Command --> | Action | . | Command --> | Action |
|---|---|---|---|---|
| mkdir (make directory) | create a new folder | . | cd (change directory) | change location to another folder |
| ls (list ) | list files and folders in the directory | . | cat (concatenate) | read contents of a file without using an editor |
| apt-get update | update package manager library | . | ping | signal to test reachability of a host |
| mv (move ) | moves a file | . | cp (copy) | makes a file copy |
| pwd (present working directory ) | returns your current location | . | sudo (super user do) | gives higher administration privileges |
Cloud Run requires some environmental configuration before we begin. In this section, you enable the Cloud Run API and set the compute region.
If you are asked to authorize the use of your credentials, do so.
You should then see a successful message similar to this one:
This lab also requires the gcloud command line tool for Google Cloud Platform. However, the gcloud command line tool comes pre-installed on Cloud Shell so we will not need to configure it in this lab.
For this lab, we will create a simple Cloud Run Python "Hello, World" app and deploy it as a Cloud Run service in the
helloworld, then move your view into that directory:Next you'll be creating and editing files.
vi, emac, nano or the Cloud Shell Editor by clicking on the pencil icon in Cloud Shell ("Open Editor").When you open the Cloud Shell Editor, it will show your user's home directory, NOT the directory you are seeing in the terminal.
Be sure to click on the "helloworld" folder to be certain you are in the correct directory before you create the following two files.
Create a main.py file, then add the following content to it:
This code responds to requests on port 8080 with a "Hello World" greeting.
Your app is now finished and ready to be containerized and uploaded to Container Registry.
Dockerfile in the same directory as the main.py file, and add the following content:This Python Dockerfile starts a Gunicorn web server which listens on the port defined by the PORT environmental variable set in the main.py file (port 8080).
Upon success, you will see a SUCCESS message containing the image name (gcr.io/PROJECT-ID/helloworld). The image is now stored in Container Registry and can be deployed in the next task.
Now that we have our containerized image, we will need to use the gcloud command below to deploy it to Cloud Run.
gcloud config get-value project.
The API should already be enabled, but if you are prompted to enable the API, Reply y.
You will then be prompted for the service name: press Enter to accept the default name, helloworld.
If prompted for region: in this case, select
You will be prompted to allow unauthenticated invocations: respond y.
Wait a few moments until the deployment is complete. Upon success, the command line displays the service URL.
Now that your services are up and running, you need to set up a global static external IP address that your customers use to reach your load balancer.
A static external IP address provides a single address to point your serverless app to. Reserving an IP address would also be essential if you were using a custom domain for your serverless app.
Load balancers use a serverless Network Endpoint Group (NEG) backend to direct requests to a serverless Cloud Run service.
So, let's first create our serverless NEG for our serverless Python app created earlier in this lab.
If you had more than one backend service, you could use host rules to direct requests to different services based on the host name, or you could set up path matchers to direct requests to different services based on the request path. None of this is necessary here because we have only created one backend service for this lab.
http://IP_ADDRESS, where IP_ADDRESS is the load balancer's IP address you reserved earlier in this lab. When you open this URL, you should see the helloworld service homepage.Over this course of this lab, you have learned how to use an HTTP global load balancer with a Cloud Run application.
Follow the Serverless Expeditions video series to learn more about how to utilise these products within your project.
Manual Last Updated February 23, 2024
Lab Last Tested February 23, 2024
Copyright 2022 Google LLC All rights reserved. Google and the Google logo are trademarks of Google LLC. All other company and product names may be trademarks of the respective companies with which they are associated.


This content is not currently available
We will notify you via email when it becomes available

Great!
We will contact you via email if it becomes available

One lab at a time
Confirm to end all existing labs and start this one