

Before you begin
- Labs create a Google Cloud project and resources for a fixed time
- Labs have a time limit and no pause feature. If you end the lab, you'll have to restart from the beginning.
- On the top left of your screen, click Start lab to begin
Create Your First Secret
/ 30
Secrets Engines
/ 30
Use the Vault web UI
/ 40
This lab was developed with our partner, Hashicorp. Your personal information may be shared with Hashicorp, the lab sponsor, if you have opted in to receive product updates, announcements, and offers in your Account Profile.
In this hands-on lab you'll learn some of the fundamentals of Hashicorp Vault, an identity-based secrets and encryption management system. You will use the Vault development server to enable secret engines, manage authentication methods, encrypt/decrypt data, and create secrets using the CLI and web UI.
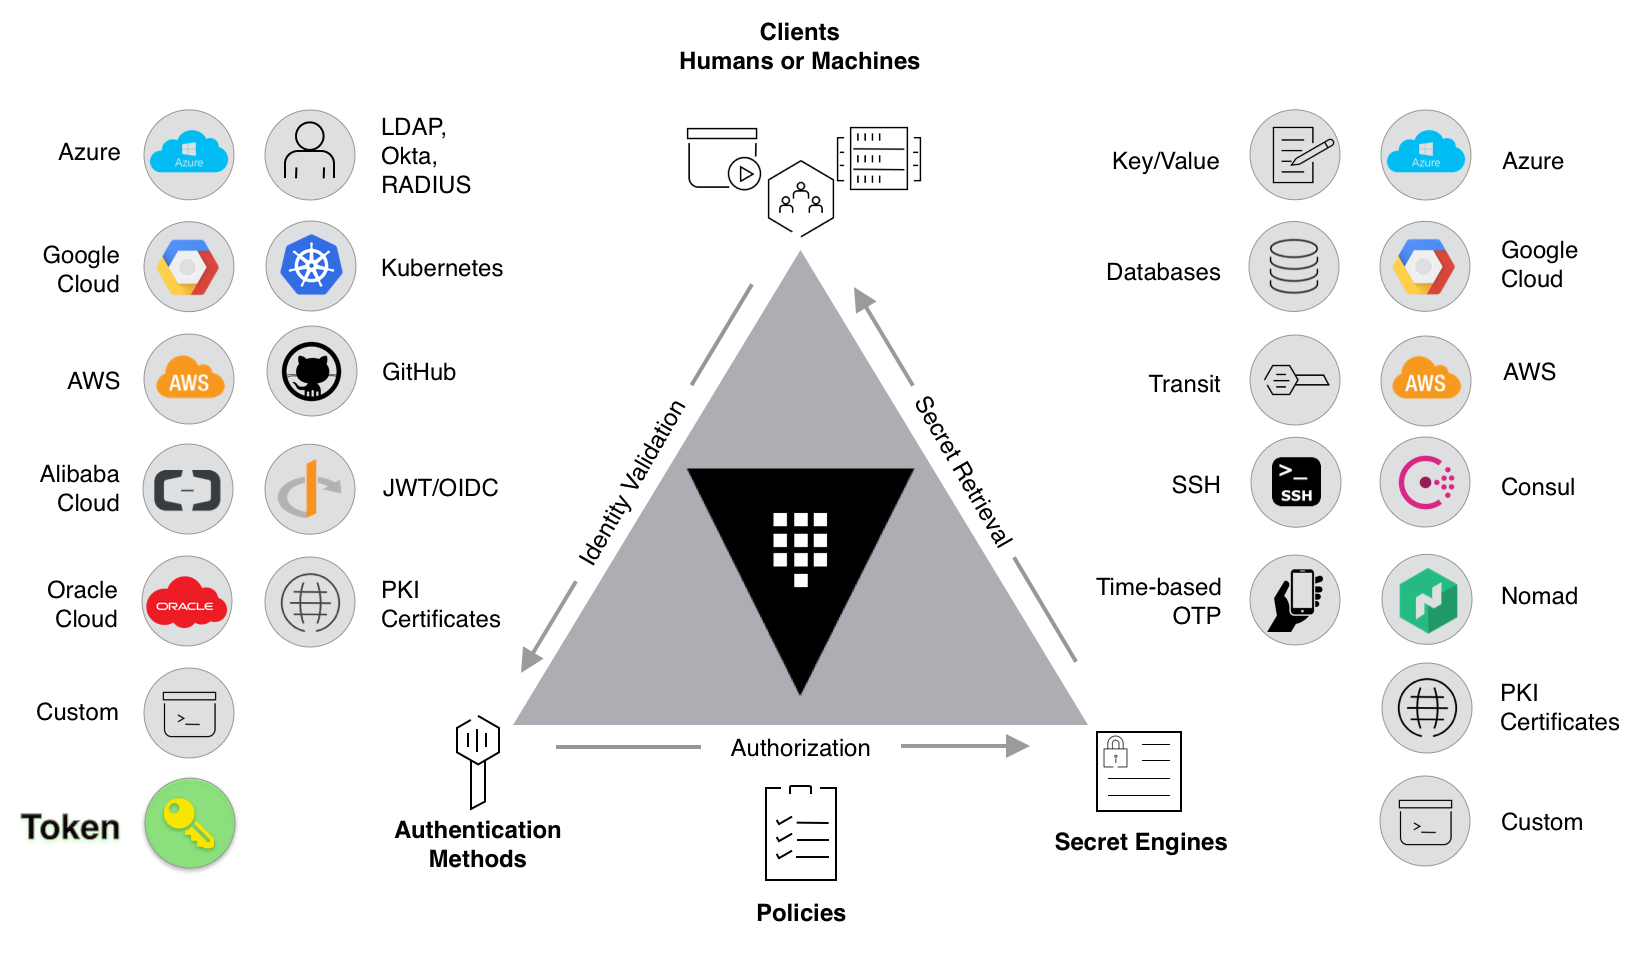
Vault is an identity-based secrets and encryption management system. A secret is anything that you want to tightly control access to, such as API encryption keys, passwords, or certificates. Vault provides encryption services that are gated by authentication and authorization methods. Using Vault’s UI, CLI, or HTTP API, access to secrets and other sensitive data can be securely stored and managed, tightly controlled (restricted), and auditable.
A modern system requires access to a multitude of secrets: database credentials, API keys for external services, credentials for service-oriented architecture communication, etc. Understanding who is accessing what secrets is already very difficult and platform-specific. Adding on key rolling, secure storage, and detailed audit logs is almost impossible without a custom solution. This is where Vault steps in.
Vault comes with various pluggable components called secrets engines and authentication methods allowing you to integrate with external systems. The purpose of those components is to manage and protect your secrets in dynamic infrastructure (e.g. database credentials, passwords, API keys).
The key features of Vault are:
In this lab, you will:
userpass auth methodRead these instructions. Labs are timed and you cannot pause them. The timer, which starts when you click Start Lab, shows how long Google Cloud resources are made available to you.
This hands-on lab lets you do the lab activities in a real cloud environment, not in a simulation or demo environment. It does so by giving you new, temporary credentials you use to sign in and access Google Cloud for the duration of the lab.
To complete this lab, you need:
Click the Start Lab button. If you need to pay for the lab, a dialog opens for you to select your payment method. On the left is the Lab Details pane with the following:
Click Open Google Cloud console (or right-click and select Open Link in Incognito Window if you are running the Chrome browser).
The lab spins up resources, and then opens another tab that shows the Sign in page.
Tip: Arrange the tabs in separate windows, side-by-side.
If necessary, copy the Username below and paste it into the Sign in dialog.
You can also find the Username in the Lab Details pane.
Click Next.
Copy the Password below and paste it into the Welcome dialog.
You can also find the Password in the Lab Details pane.
Click Next.
Click through the subsequent pages:
After a few moments, the Google Cloud console opens in this tab.

Cloud Shell is a virtual machine that is loaded with development tools. It offers a persistent 5GB home directory and runs on the Google Cloud. Cloud Shell provides command-line access to your Google Cloud resources.
Click Activate Cloud Shell 
Click through the following windows:
When you are connected, you are already authenticated, and the project is set to your Project_ID,
gcloud is the command-line tool for Google Cloud. It comes pre-installed on Cloud Shell and supports tab-completion.
Output:
Output:
gcloud, in Google Cloud, refer to the gcloud CLI overview guide.
After installing Vault, verify the installation worked by checking that the Vault binary is available.
vault command to verify the installation:You should see help output similar to the following:
With Vault installed, the next step is to start a Vault server.
Vault operates as a client/server application. The Vault server is the only piece of the Vault architecture that interacts with the data storage and backends. All operations done via the Vault CLI interact with the server over a TLS connection.
In this lab, you will start and interact with the Vault server running in development mode.
This dev-mode server requires no further setup, and your local vault CLI will be authenticated to talk to it. This makes it easy to experiment with Vault or start a Vault instance for development. Every feature of Vault is available in "dev" mode. The -dev flag just short-circuits a lot of setup to insecure defaults.
First, start a Vault dev server. The dev server is a built-in, pre-configured server that is not very secure but useful for playing with Vault locally.
You should see output relating to your Vault server configuration. Notice that Unseal Key and Root Token values are displayed.
localhost without TLS, and automatically unseals and shows you the unseal key and root access key.
Now that you have the Vault development server running, you can continue setting up access to it.
Open a new Cloud Shell tab.
Copy and run the export VAULT_ADDR .. command from the terminal output. This will configure the Vault client to talk to the dev server.
The Vault CLI determines which Vault servers to send requests using the VAULT_ADDR environment variable.
Save the unseal key somewhere. Don't worry about how to save this securely. For now, just save it anywhere.
Set the VAULT_TOKEN environment variable value to the generated Root Token value displayed in the terminal output:
To interact with Vault, you must provide a valid token. Setting this environment variable is a way to provide the token to Vault via CLI. In another lab you will learn to use the vault login <token_value> command to authenticate with Vault.
vault status command:If it ran successfully, the output should look like the following:
Great! You've started your first Vault development server. In the next section you will learn how to store secrets in Vault.
Now that the dev server is up and running, read and write your first secret.
When running Vault in dev mode, Key/Value v2 secrets engine is enabled at secret/ path. Key/Value secrets engine is a generic key-value store used to store arbitrary secrets within the configured physical storage for Vault. Secrets written to Vault are encrypted and then written to backend storage. Therefore, the backend storage mechanism never sees the unencrypted value and doesn't have the means necessary to decrypt it without Vault.
Key/Value secrets engine has version 1 and 2. The difference is that v2 provides versioning of secrets and v1 does not.
kv <subcommand> [options] [args] command to interact with K/V secrets engine.| Subcommand | kv v1 | kv v2 | Description |
|---|---|---|---|
| delete | x | x | Delete versions of secrets stored in K/V |
| destroy | x | Permanently remove one or more versions of secrets | |
| enable-versioning | x | Turns on versioning for an existing K/V v1 store | |
| get | x | x | Retrieve data |
| list | x | x | List data or secrets |
| metadata | x | Interact with Vault's Key-Value storage | |
| patch | x | Update secrets without overwriting existing secrets | |
| put | x | x | Sets or update secrets (this replaces existing secrets) |
| rollback | x | Rolls back to a previous version of secrets | |
| undelete | x | Restore the deleted version of secrets |
secret/hello:You should get the following output:
foo with value of world to the path secret/hello using the vault kv put command. This command creates a new version of the secrets and replaces any pre-existing data at the path if any.You should get the following output:
You will learn paths in more detail later, but for now it is important that the path is prefixed with secret/, otherwise this example won't work. The secret/ prefix is where arbitrary secrets can be read and written.
foo and excited with the values of world and yes, respectively, to the path secret/hello:You should get the following output:
Notice that the version is now 2.
= input to send secrets to Vault. However, sending data as a part of the CLI command often end up in the shell history unencrypted. To avoid this, refer to the Static Secrets: Key/Value Secrets Engine tutorial to learn different approaches.
As you might expect, secrets can be retrieved with the command vault kv get <path>.
secret/hello:Vault returns the latest version (in this case version 2) of the secrets at secret/hello.
-field=<key_name> flag:jq tool to extract the value of the excited secret:excited secret to a text file:Click Check my progress to verify the objective.
Now that you've learned how to read and write a secret, delete the secret using the vault kv delete command.
secret/hello:You should receive the following output:
In this section, you will learn how to read and delete specific versions, undelete them, and permanently delete them.
secret/example:What if you want to read a specific version of a secret? You can do so by using the -version flag.
2 from the secret/example path:Your output should resemble the following:
2 of the secret:vault kv get on that version of the secret, you can see that the data has been deleted. However, you can see that the destroyed value is still false.
2 of the secret:vault kv get on that version of the secret, you can see that the data now shows up again!
Lastly, if you want to permanently delete a version of a secret, you can use the destroy command.
2 of the secret:You should receive the following output. Notice the destroyed key has been set to true.
Great! You just learned how to interact with versioned secrets. For more information on this topic, check out the Versioned Key/Value Secrets Engine tutorial.
In the previous section, you used key/value v2 secrets engine to store data. Secrets engines are Vault components which store, generate or encrypt secrets. Secrets engines are incredibly flexible, so it is easiest to think about them in terms of their function. Secrets engines are provided some set of data, they take some action on that data, and they return a result.
Some secrets engines simply store and read data - like encrypted Redis/Memcached. Some secrets engines connect to other services and generate dynamic credentials on demand. Other secrets engines provide encryption as a service, totp generation, certificates, and much more.
Secrets engines are enabled at a "path" in Vault. When a request comes to Vault, the router automatically routes anything with the route prefix to the secrets engine. In this way, each secrets engine defines its own paths and properties. To the user, secrets engines behave similar to a virtual filesystem, supporting operations like read, write, and delete.
There are a number of secrets engines available. You can think of them as a plugin. Enable the secrets engine that meets your security needs.
Most secrets engines can be enabled, disabled, tuned, and moved via the CLI or API. Previous versions of Vault called these "mounts", but that term was overloaded.
Enable - This enables a secrets engine at a given path. With few exceptions, secrets engines can be enabled at multiple paths. Each secrets engine is isolated to its path. By default, they are enabled at their "type" (e.g. "gcp" enables at "gcp/").
Disable - This disables an existing secrets engine. When a secrets engine is disabled, all of its secrets are revoked (if they support it), and all of the data stored for that engine in the physical storage layer is deleted.
Move - This moves the path for an existing secrets engine. This process revokes all secrets, since secret leases are tied to the path they were created at. The configuration data stored for the engine persists through the move.
Tune - This tunes global configuration for the secrets engine such as the TTLs.
Once a secrets engine is enabled, you can interact with it directly at its path according to its own API. Use vault path-help to determine the paths it responds to.
foo/bar and foo/baz can peacefully coexist with each other whereas foo and foo/baz cannot.Secrets engines receive a barrier view to the configured Vault physical storage. This is a lot like a chroot.
When a secrets engine is enabled, a random UUID is generated. This becomes the data root for that engine. Whenever that engine writes to the physical storage layer, it is prefixed with that UUID folder. Since the Vault storage layer doesn't support relative access (such as ../), this makes it impossible for an enabled secrets engine to access other data.
This is an important security feature in Vault - even a malicious engine cannot access the data from any other engine.
In the previous section, all requests started with secret/.
You should receive the following error:
The path prefix tells Vault which secrets engine to which it should route traffic. When a request comes to Vault, it matches the initial path part using a longest prefix match and then passes the request to the corresponding secrets engine enabled at that path. Vault presents these secrets engines similar to a filesystem.
By default, Vault enables Key/Value version2 secrets engine (kv-v2) at the path secret/ when running in dev mode. The key/value secrets engine reads and writes raw data to the backend storage. Vault supports many other secrets engines, and this feature makes Vault flexible and unique.
kv (version 1) and kv-v2 (version 2). The kv-v2 is versioned kv secrets engine which can retain a number of secrets versions.
kv secrets engine. Each path is completely isolated and cannot talk to other paths. For example, a kv secrets engine enabled at foo has no ability to communicate with a kv secrets engine enabled at bar.The path where the secrets engine is enabled defaults to the name of the secrets engine. Thus, the following command is equivalent to executing the above command.
Executing the command will throw the following error:
vault secrets list command:You should receive the following output:
This shows there are five enabled secrets engines on this Vault server. You can see the type of the secrets engine, the corresponding path, and an optional description (or "n/a" if none was given).
sys/ path corresponds to the system backend. These paths interact with Vault's core system and are not required for beginners.
kv secrets engine enabled at kv/. To create secrets, use the kv put command:kv/hello path, use the kv get command:You should receive the following output:
kv/my-secret path:kv/my-secret:You should receive the following output:
excited secret to a text file:kv/my-secret:kv path:You should receive the following output:
Click Check my progress to verify the objective.
When a secrets engine is no longer needed, it can be disabled. When a secrets engine is disabled, all secrets are revoked and the corresponding Vault data and configuration is removed.
kv secrets engine:Note that this command takes a path to the secrets engine as an argument, not the type of the secrets engine.
Any requests to route data to the original path would result in an error, but another secrets engine could now be enabled at that path.
As mentioned earlier, Vault behaves similarly to a virtual filesystem. The read/write/delete/list operations are forwarded to the corresponding secrets engine, and the secrets engine decides how to react to those operations.
This abstraction is incredibly powerful. It enables Vault to interface directly with physical systems, databases, HSMs, etc. But in addition to these physical systems, Vault can interact with more unique environments like Google Cloud IAM, dynamic SQL user creation, etc. all while using the same read/write interface.
Authentication in Vault is the process by which user or machine supplied information is verified against an internal or external system. Vault supports multiple auth methods including GitHub, LDAP, AppRole, and more. Each auth method has a specific use case.
Before a client can interact with Vault, it must authenticate against an auth method. Upon authentication, a token is generated. This token is conceptually similar to a session ID on a website. The token may have attached policy, which is mapped at authentication time. This process is described in detail in the policies concepts documentation.
In this section, you'll learn about Authentication in Vault.
Token authentication is automatically enabled. When you started the dev server, the output displayed a root token. The Vault CLI read the root token from the $VAULT_TOKEN environment variable. This root token can perform any operation within Vault because it is assigned the root policy. One capability is to create new tokens.
You should see the following output:
The token is created and the output describes this token a table of keys and values. The created token is displayed here as s.iyNUhq8Ov4hIAx6snw5mB2nL.
This token is a child of the root token, and by default, it inherits the policies from its parent. Token is the core authentication method. You can use the generated token to login with Vault.
You should see the following output:
VAULT_TOKEN environment variable being set, you can safely ignore it for the purposes of this lab.
The token is created and displayed here as s.TsKT5ubouZ7TF26Eg7wNIl3k. Each token that Vault creates is unique.
When a token is no longer needed it can be revoked.
The token has been revoked.
Revoking a token will also revoke all tokens that were created by the token.
Auth methods are the components in Vault that perform authentication and are responsible for assigning identity and a set of policies to a user. In all cases, Vault will enforce authentication as part of the request processing. In most cases, Vault will delegate the authentication administration and decision to the relevant configured external auth method (e.g., Amazon Web Services, GitHub, Google Cloud Platform, Kubernetes, Microsoft Azure, Okta, etc.).
Having multiple auth methods enables you to use an auth method that makes the most sense for your use case of Vault and your organization.
For example, on developer machines, the GitHub auth method is easiest to use. But for servers the AppRole method is the recommended choice.
To learn more about authentication, see the authentication concepts page.
userpass auth method:When enabled, auth methods are similar to secrets engines: they are mounted within the Vault mount table and can be accessed and configured using the standard read/write API. All auth methods are mounted underneath the auth/ prefix.
By default, auth methods are mounted to auth/<type>. For example, if you enable "github", then you can interact with it at auth/github. However, this path is customizable, allowing users with advanced use cases to mount a single auth method multiple times.
For example:
userpass auth method:When using an external auth method (e.g., GitHub), Vault will call the external service at the time of authentication and for any subsequent token renewals. This means that issued tokens are valid for their entire duration, and are not invalidated until a renewal or user re-authentication occurs. Operators should ensure appropriate token TTLs are set when using these auth methods.
The userpass auth method allows users to authenticate with Vault using a username and password combination. The username/password combinations are configured directly to the auth method using the users/ path. This method cannot read usernames and passwords from an external source.
Mary and mary are the same entry.userpass auth method:This creates a new user admin with the password password! that will be associated with the admins policy. This is the only configuration necessary.
You should see the following output:
Great! You created a new user with the userpass auth method in Vault and successfully logged in. In the next section, you will use the Vault web UI to create secrets, add authentication methods, and use the Transit secrets engine.
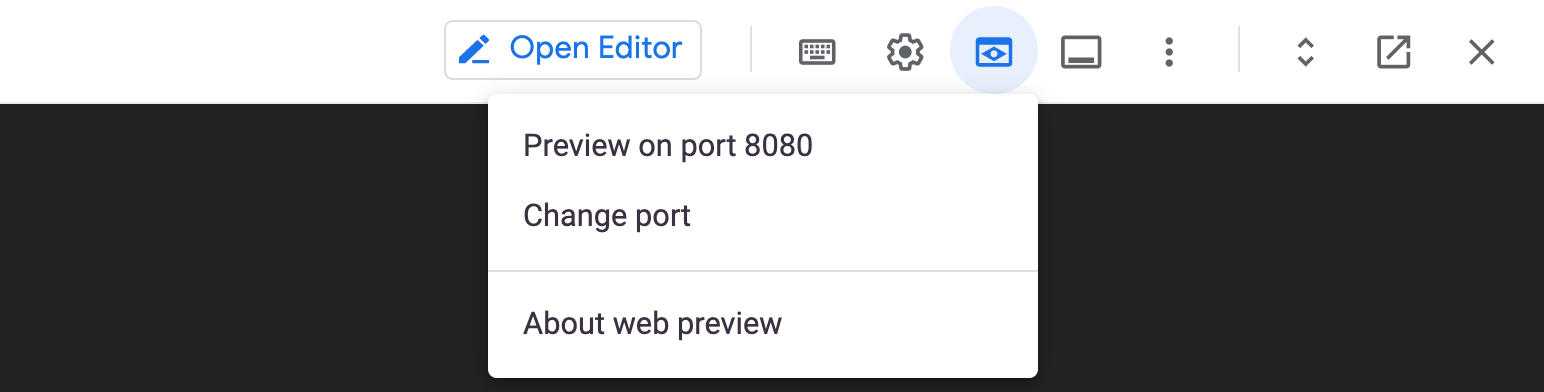
Click Change port.
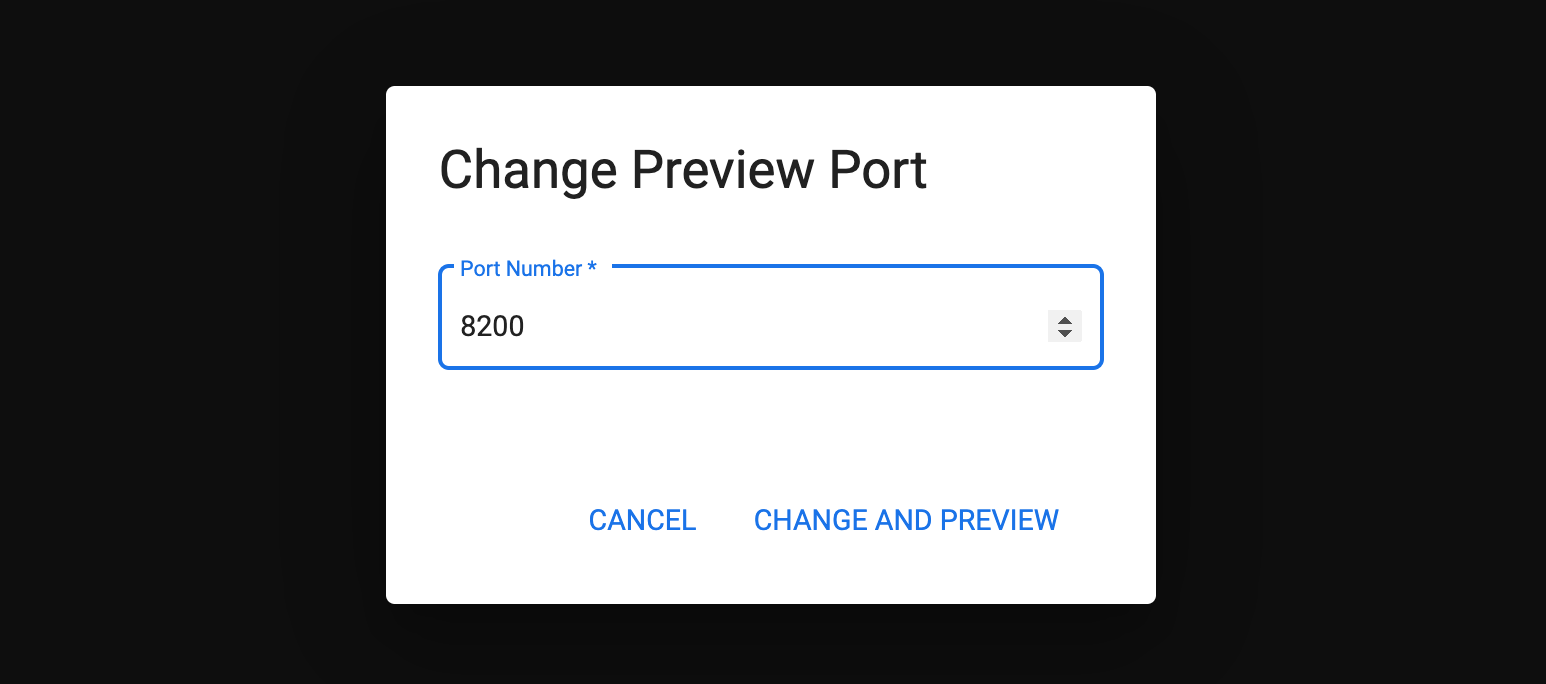
Change the Port Number to 8200 and click Change and Preview.
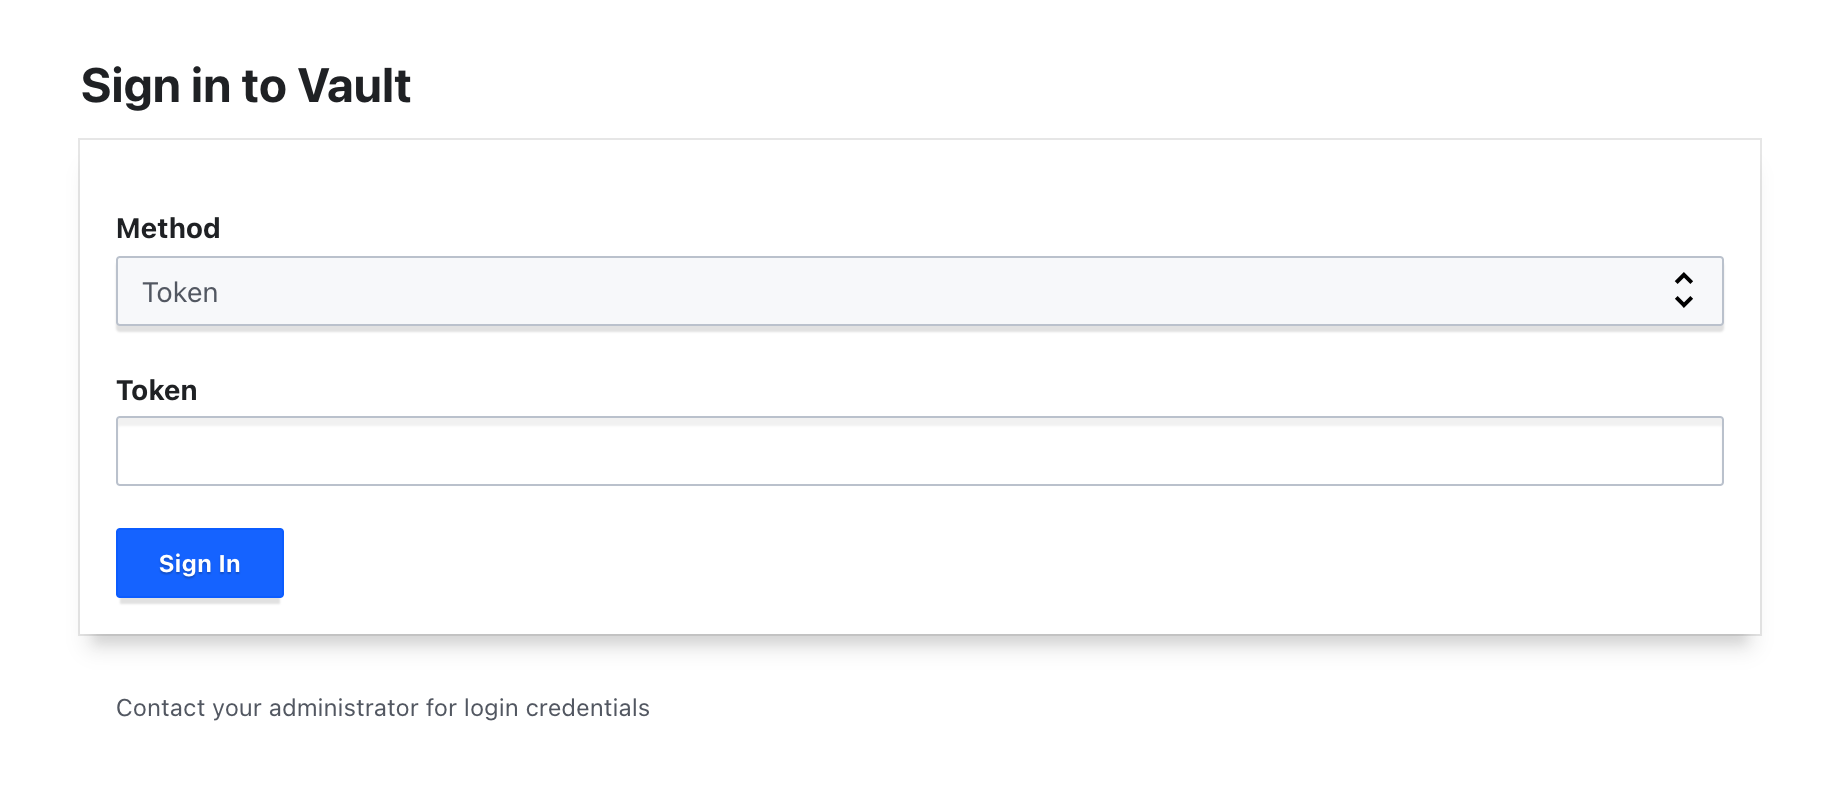
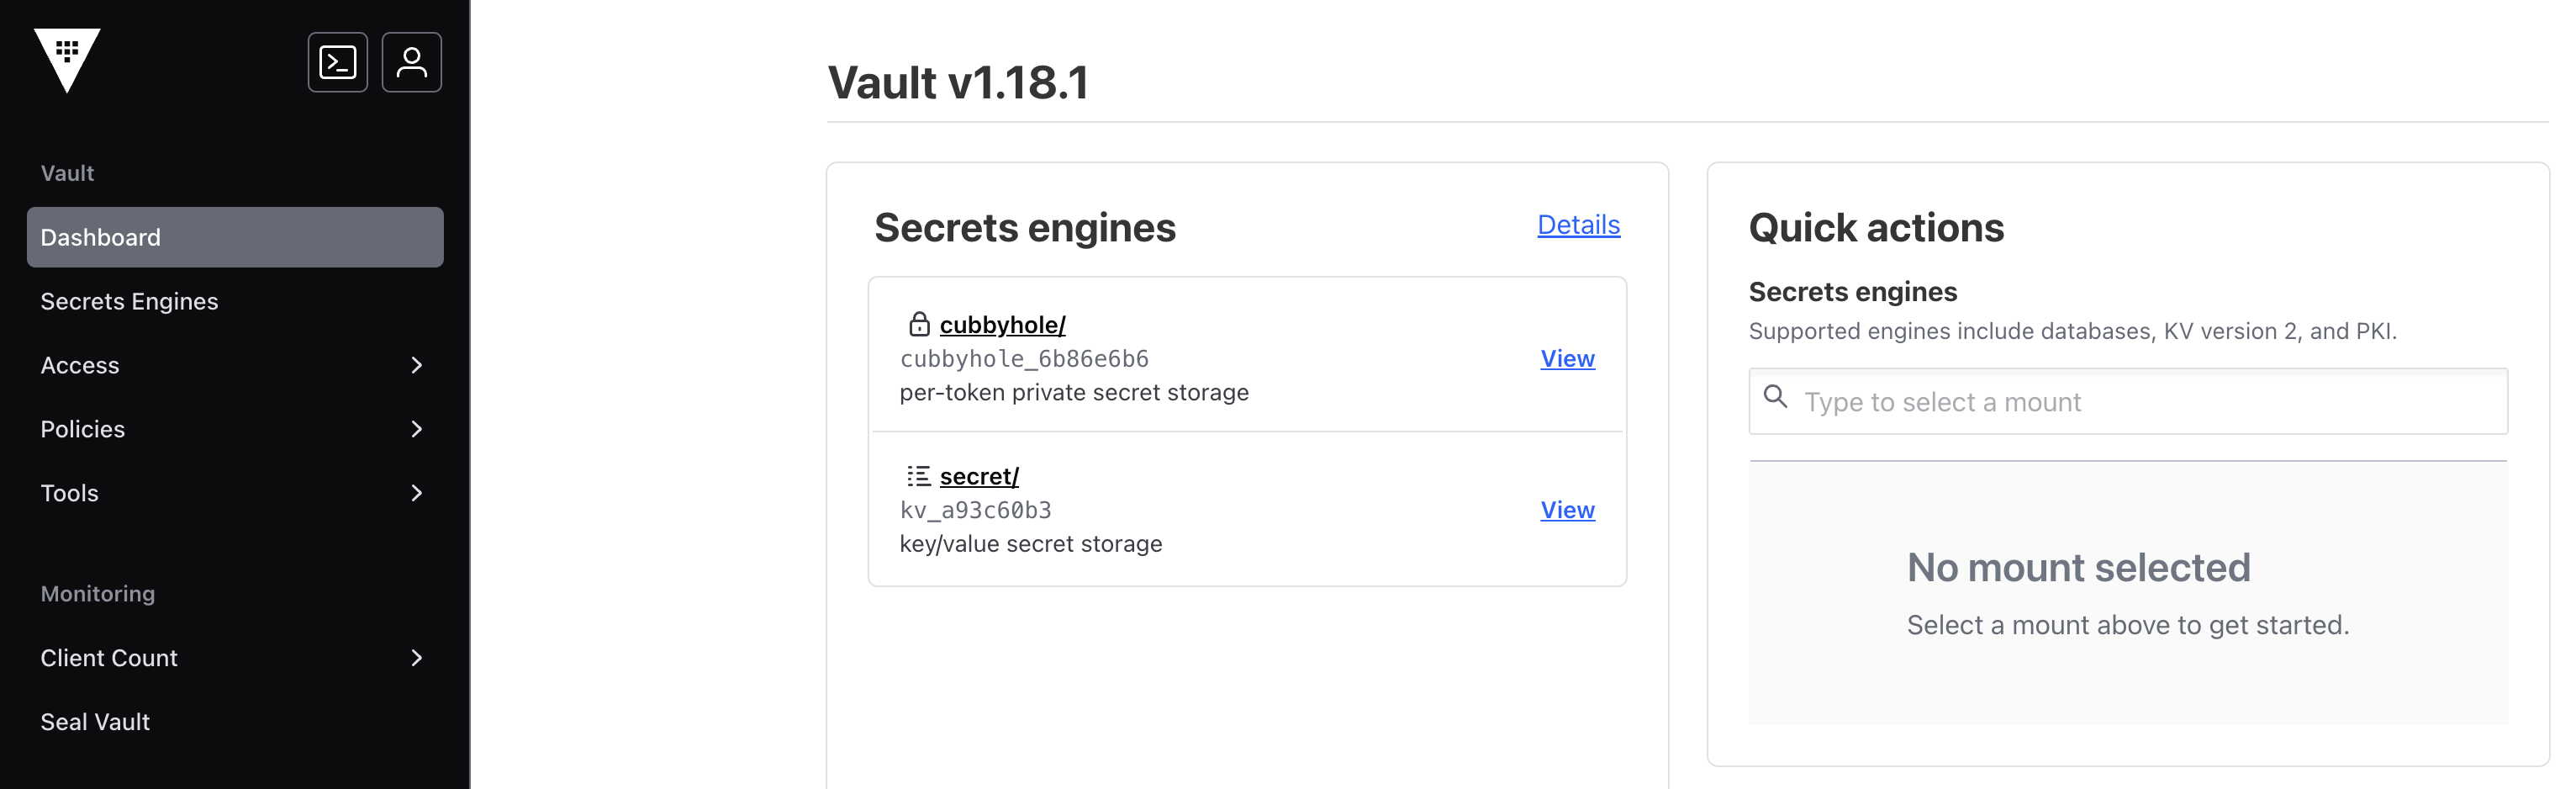
Your Vault development server should resemble the following.
Now that you're logged in to the development server web UI, you can continue on to the next section to enable a new secrets engine.
The transit secrets engine handles cryptographic functions on data in-transit. Vault doesn't store the data sent to the secrets engine. It can also be viewed as "cryptography as a service" or "encryption as a service". The transit secrets engine can also sign and verify data; generate hashes and HMACs of data; and act as a source of random bytes.
The primary use case for transit is to encrypt data from applications while still storing that encrypted data in some primary data store. This relieves the burden of proper encryption/decryption from application developers and pushes the burden onto the operators of Vault.
In this section, you will enable the transit secrets engine in the UI and use it to encrypt example data.
From the left menu, select Secrets Engines.
Under Secrets Engines, select Enable new engine.
Under Enable a Secrets Engine, select Transit.
The minimal required configuration to enable the Transit secrets engine is a value for Path. Vault supports enabling multiple secrets engines at various paths so long as they are unique. If you have not previously configured a Transit secrets engine, then the default path "transit" is acceptable.
transit path and click Method Options.You can use these options to add a description, fine tune the mount configuration, adjust default time-to-live (TTL) values, filter keys in audit devices and allow specific headers.
The Vault API documentation for /sys/mounts API Parameters is a great reference for learning more about these options and how they are configured.
For now, you won't be configuring any of these.
The Transit secrets engine is successfully enabled at the path transit. Before you can encrypt and decrypt data in Transit, you need to create a key that will be used for those purposes.
Click Create key to begin the key creation process.
Enter my-key into the Name field to name it.
Vault supports a range of key types; leave Type set to the default value "aes256-gcm96" for this tutorial.
For now, you also do not need to be concerned with the other options, Exportable, Derived, and Enable convergent encryption. You can learn more about key creation parameters, including details on key types from the Create Key API documentation.
Select transit to navigate back to the list of Transit secrets engine keys.
Select my-key from the list of transit keys to encrypt some plaintext.
Select Encrypt from the available Key Actions.
Enter Learn Vault! into the Plaintext area.
Click Encrypt.
The ciphertext is returned in a dialog that allows for copying it to the clipboard. Select Copy & Close to dismiss the dialog.
Keep the plaintext string handy; here is a ciphertext example:
Under Key Actions, select Decrypt.
Paste the ciphertext string from the previous step into the Ciphertext area.
Select Decrypt.
A dialog returns the base64 encoded plaintext (e.g. TGVhcm4gVmF1bHQh).
Select Copy & Close.
Navigate back to your open Cloud Shell terminal and run the following command to decrypt your base64 encoded plaintext string and write it out to a file:
Learn Vault!:Click Check my progress to verify the objective.
As mentioned earlier, authentication methods are the components in Vault that perform identity validation of Vault clients and responsible for assigning a set of policies to an authenticated client. In this section, you will enable an authentication method in the UI and generate login credentials.
This view is the index and displays all authentication methods, entities, groups, and leases. The token authentication method was enabled when Vault was initialized and cannot be disabled.
This view displays all of the authentication methods that this version of Vault supports.
This view displays the path and the ability to configure the auth method. The path defaults to "userpass."
userpass-ui and click Enable Method.The authentication method is created. The view displays its configuration page.
The User and Password authentication method, abbreviated as userpass, enables the creation of credentials for individual users.
Select the View method action from within the view.
Select the Create user action from within the view. This view displays the ability to create a custom login for a user.
Enter demo in the Username field. Enter password! in the Password field.
Select Save.
You are currently logged in with the root token. To log in with these user credentials requires you to log out first.
You are now logged out of the server.
Choose Username from the Method list. The view changes to show a username and password login interface.
Enter demo in the Username field. Enter password! in the Password field.
Click the More Options dropdown.
Enter userpass-ui for the Mount Path field.
Click Sign In.
You are now logged in through the userpass authentication method you just created!
The capabilities of this user are limited to the policies assigned to this user's auth method. Since you didn't assign any specific policies, the user has been given the default policy. You will learn about Vault policies in the following lab.
In this lab, you first started the Vault development server and created your first secret using the KV secrets engine. You then learned about authentication, created tokens, and enabled and used the userpass auth method. Lastly, you used the Vault web UI to manage authentication methods and encrypted/decrypted data using the transit secret engine.
Check out the following for more information on Vault
...helps you make the most of Google Cloud technologies. Our classes include technical skills and best practices to help you get up to speed quickly and continue your learning journey. We offer fundamental to advanced level training, with on-demand, live, and virtual options to suit your busy schedule. Certifications help you validate and prove your skill and expertise in Google Cloud technologies.
Manual Last Updated November 08, 2024
Lab Last Tested November 08, 2024
Copyright 2025 Google LLC All rights reserved. Google and the Google logo are trademarks of Google LLC. All other company and product names may be trademarks of the respective companies with which they are associated.


Diese Inhalte sind derzeit nicht verfügbar
Bei Verfügbarkeit des Labs benachrichtigen wir Sie per E-Mail

Sehr gut!
Bei Verfügbarkeit kontaktieren wir Sie per E-Mail

One lab at a time
Confirm to end all existing labs and start this one