

Before you begin
- Labs create a Google Cloud project and resources for a fixed time
- Labs have a time limit and no pause feature. If you end the lab, you'll have to restart from the beginning.
- On the top left of your screen, click Start lab to begin
Create the service account and assign roles
/ 20
Create the API proxy
/ 20
Call the Natural Language API
/ 20
Publish a message to Pub/Sub for negative comments
/ 20
Add the MessageLogging policy
/ 20
Apigee is a platform for developing and managing APIs. Apigee can help you leverage Google Cloud services like Pub/Sub, Cloud Logging, or any other cloud service providing a REST API. In this lab, your Apigee API proxy leverages several Google Cloud services.
In this lab, you use multiple Google Cloud services from an Apigee API proxy to handle user comments.
In this lab, you learn how to perform the following tasks:
Read these instructions. Labs are timed and you cannot pause them. The timer, which starts when you click Start Lab, shows how long Google Cloud resources are made available to you.
This hands-on lab lets you do the lab activities in a real cloud environment, not in a simulation or demo environment. It does so by giving you new, temporary credentials you use to sign in and access Google Cloud for the duration of the lab.
To complete this lab, you need:
Click the Start Lab button. If you need to pay for the lab, a dialog opens for you to select your payment method. On the left is the Lab Details pane with the following:
Click Open Google Cloud console (or right-click and select Open Link in Incognito Window if you are running the Chrome browser).
The lab spins up resources, and then opens another tab that shows the Sign in page.
Tip: Arrange the tabs in separate windows, side-by-side.
If necessary, copy the Username below and paste it into the Sign in dialog.
You can also find the Username in the Lab Details pane.
Click Next.
Copy the Password below and paste it into the Welcome dialog.
You can also find the Password in the Lab Details pane.
Click Next.
Click through the subsequent pages:
After a few moments, the Google Cloud console opens in this tab.

Cloud Shell is a virtual machine that is loaded with development tools. It offers a persistent 5GB home directory and runs on the Google Cloud. Cloud Shell provides command-line access to your Google Cloud resources.
Click Activate Cloud Shell 
Click through the following windows:
When you are connected, you are already authenticated, and the project is set to your Project_ID,
gcloud is the command-line tool for Google Cloud. It comes pre-installed on Cloud Shell and supports tab-completion.
Output:
Output:
gcloud, in Google Cloud, refer to the gcloud CLI overview guide.
In this task, you enable the APIs that will be used by the Apigee API proxy.
In the Cloud Console, on the Navigation menu (
This page allows you to enable the APIs that will be used by the Apigee API proxy.
In the Search for APIs & Services box, enter Cloud Natural Language and click Enter.
The Cloud Natural Language API provides natural language insights such as sentiment analysis and entity recognition. This API will be used to determine when a comment indicates a user is unhappy.
Click Cloud Natural Language API.
The API is already enabled.
The gcloud command can also be used to enable APIs.
In Cloud Shell, to enable the required APIs, use the following command:
In addition to the Cloud Natural Language API, you are also enabling the Pub/Sub API and the Cloud Logging API.
Pub/Sub will be used to publish a message to a topic when the Natural Language API indicates that a user is unhappy. You might choose to create a Cloud Function that runs for each message, contacting the user in an attempt to solve the problem and improve customer satisfaction.
Cloud Logging will be used to capture a log entry for each comment that is received. These logs could include internal API details that might help detect issues with services or applications.
In this task, you create a service account to be used by the Apigee proxy.
From the Navigation menu (
Click + Create Service Account.
For Service account name, specify the following:
This service account will allow your Apigee API proxy to access the Google Cloud services you specify.
Click Create and Continue.
For Select a role, select Pub/Sub > Pub/Sub Publisher.
The Apigee API proxy will publish to a Pub/Sub topic.
Click + Add Another Role.
For Select a role, select Logging > Logs Writer.
The Apigee API proxy will write log messages to Cloud Logging.
Click Done.
The service account has been created.
Click Check my progress to verify the objective.
In this task, you create the Apigee API proxy. The API proxy will use policies to call services, so no target will be required.
To open the Apigee console:
Apigee, and then click Apigee API Management in the search results.The Apigee console opens, and the landing page shows quick links to commonly used locations.
), next to Apigee, click Pin ( ).
).Apigee is now pinned to the Navigation menu.
In the navigation menu, select Proxy development > API proxies.
To create a new proxy using the proxy wizard, click Create.
For Proxy template, select General template > No target.
The proxy will not use a backend service. All communication with external services will be done using policies.
Specify the following for the Proxy details:
| Property | Value |
|---|---|
| Proxy name | services-v1 |
| Base path | /services/v1 |
/services/v1 for the base path, not /services-v1.
Click Next.
Leave the Deploy (optional) settings at their defaults, and click Create.
Click the Develop tab in the Proxy Editor.
Select Proxy endpoints > default in the left-hand pane.
Click the + button above the Response pane.
In the Add conditional flow dialog, specify the following values:
| Property | Value |
|---|---|
| Flow Name | postComment |
| Description | post a comment for a particular category |
| Condition Type | select Path and Verb |
| Path | /comments |
| Verb | select POST |
Leave Target URL blank.
Click Add, and then click Save.
Click Check my progress to verify the objective.
In this task, you add a ServiceCallout policy to call the Natural Language API to determine the sentiment of an incoming comment.
The POST /comments resource will use a JSON payload with two parameters: comment, the free text entered by a user, and category, which specifies the type of comment. An ExtractVariables policy will extract the inputs.
In the Flow pane, click the + next to postComment flow in the Request pane.
In the Add policy step dialog, click Create new policy.
In the Select Policy dropdown, select Extract Variables policy type from the Mediation section.
Specify the following:
| Property | Value |
|---|---|
| Display Name | EV-ExtractRequest |
| Name | EV-ExtractRequest |
Click Add.
Click EV-ExtractRequest policy and replace the ExtractVariables XML configuration with:
This policy extracts the comment and category from the POST /comments JSON request. The IgnoreUnresolvedVariables element is set to false, which causes a fault to be raised if those two inputs are not specified.
A ServiceCallout policy will be used to call the Natural Language API to return the sentiment for the comment.
Click the postComment flow if it is not highlighted and then click the + next to postComment flow in the Response pane.
The response from the Natural Language API call will be returned to the caller.
In the Add policy step dialog, click Create new policy.
In the Select Policy dropdown, select Service Callout policy type from the Extension section.
Specify the following:
| Property | Value |
|---|---|
| Display Name | SC-NaturalLanguage |
| Name | SC-NaturalLanguage |
Click Add.
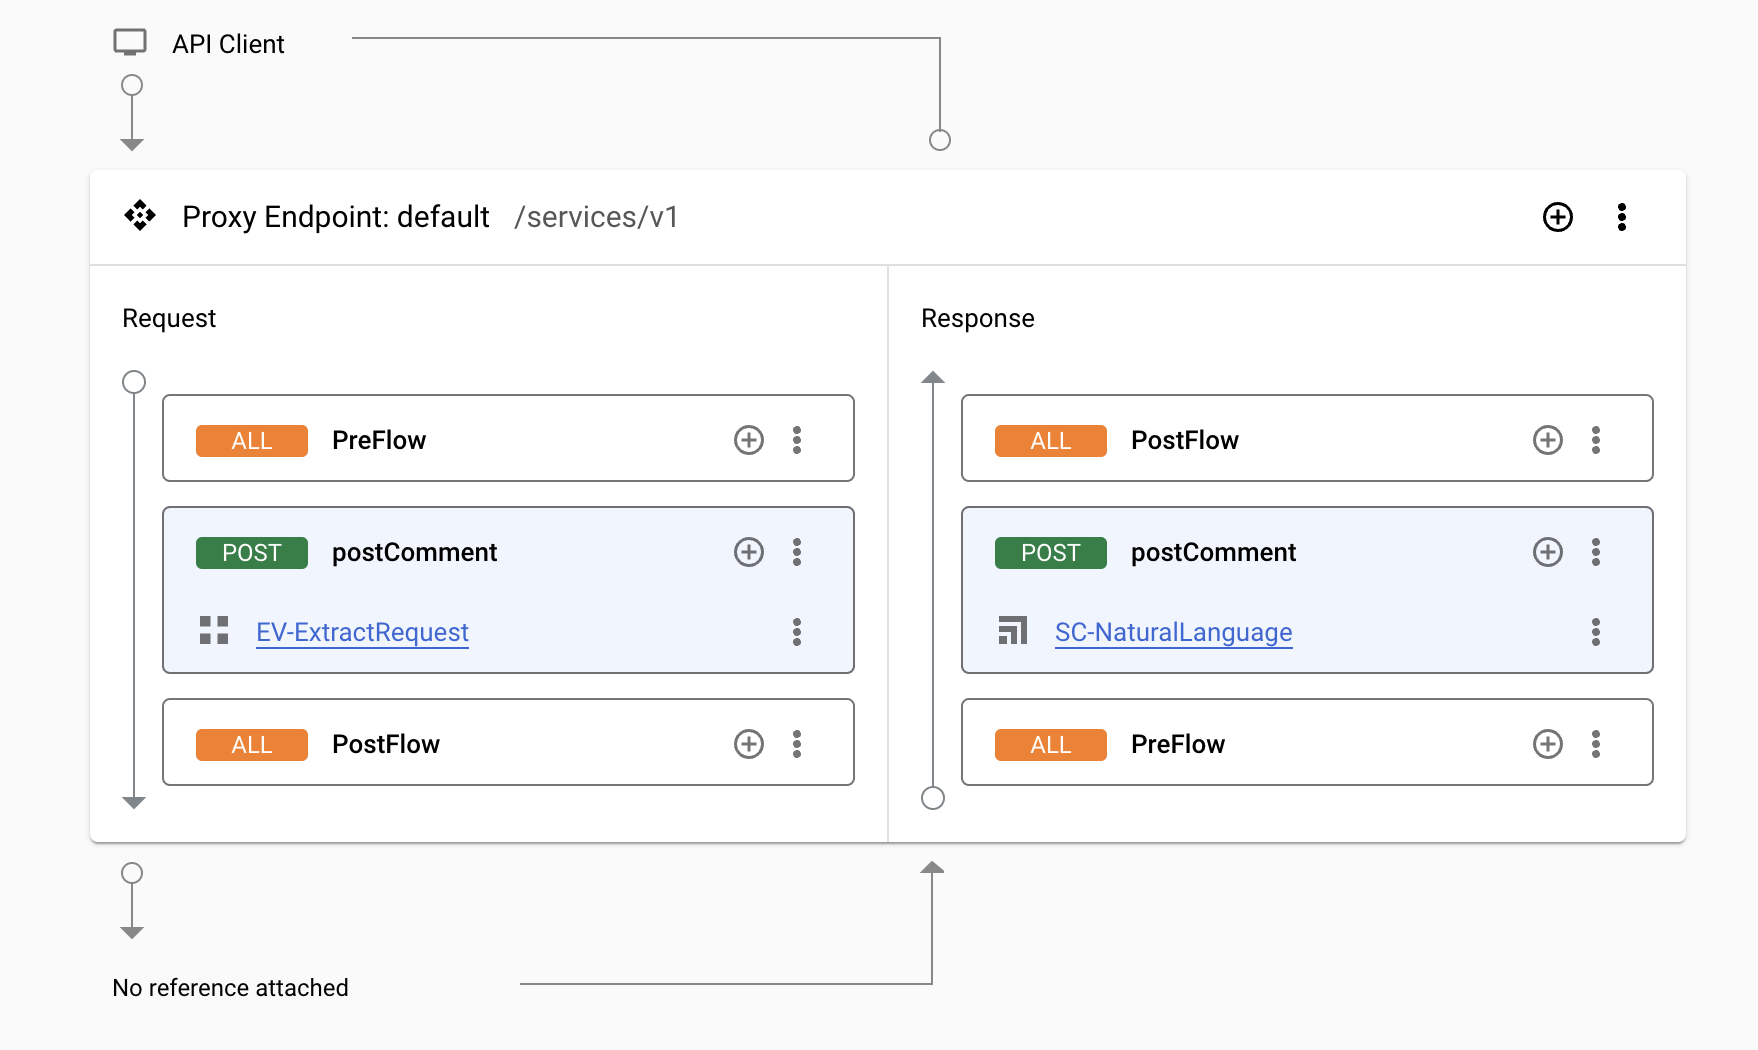
The flow should look similar to this:
Click the SC-NaturalLanguage policy.
Replace the ServiceCallout XML configuration with:
The Request section of the ServiceCallout policy specifies the request POSTed to the service. The format of this payload is specific to the Natural Language API.
The Response element indicates that the Natural Language API response will be stored in the response message.
The HTTPTargetConnection section specifies the service URL that is being called. The URL and the request and response formats can be found in Natural Language API reference.
The Authentication section specifies the authentication for the Google Cloud API. A Google OAuth access token will be automatically added to the callout request. The Scope specifies that the access token will be used to provide access to the Natural Language API.
Click Save.
In Cloud Shell, paste and run the following set of commands:
This series of commands uses the Apigee API to determine when the Apigee runtime instance has been created and the eval environment has been attached.
Wait until the instance is ready.
When the text ***ORG IS READY TO USE*** is displayed, the instance is ready. The Apigee organization (org) may have been created before you started the lab, so you might not have to wait for the instance to be created.
If you are waiting for the org to be ready, you can explore the AI products and services on Google Cloud.
Return to the services-v1 API proxy, and click the Develop tab.
Click Deploy.
For Environment select eval.
For Service Account, specify the service account's email address:
Click Deploy and Confirm.
Click the Overview tab, and wait for the eval deployment status to show that the proxy has been deployed.
Click Check my progress to verify the objective.
The eval environment in the Apigee organization can be called using the hostname eval.example.com. The DNS entry for this hostname has been created within your project, and it resolves to the IP address of the Apigee runtime instance. This DNS entry has been created in a private zone, which means it is only visible on the internal network.
Cloud Shell does not reside on the internal network, so Cloud Shell commands cannot resolve this DNS entry. A virtual machine (VM) within your project can access the private zone DNS. A virtual machine named apigeex-test-vm was automatically created. You can use this machine to call the API proxy.
In Cloud Shell, open an SSH connection to your test VM:
If asked Do you want to continue (Y/n)?, enter Y.
For each question asked in the Cloud Shell, click Enter or Return to specify the default input.
Your logged in identity is the owner of the project, so SSH to this machine is allowed.
Your Cloud Shell session is now running inside the VM.
Call the deployed services-v1 API proxy in the eval environment:
The response from the Natural Language API looks like this:
The documentSentiment score ranges from 1 to -1, with 1 being extremely positive, and -1 being extremely negative. In this case, the sentiment is very positive.
Make another call to the API proxy:
For this comment, the sentiment is quite negative.
Enter the command exit to leave the SSH session and return to Cloud Shell.
In this task, you add a PublishMessage policy to publish a Pub/Sub message to a Pub/Sub topic whenever a negative comment is received. A subscriber to the topic could run a workflow that attempts to solve the problem for the commenter.
A Pub/Sub topic will be created to correspond with each category. A topic must be created before a message may be published to the topic.
In the Navigation menu (
Click + Create Topic.
For the topic ID, enter apigee-services-v1-delivery-reviews, and then click Create.
A new topic and subscription is created.
Return to the Apigee in the cloud console.
On the left navigation menu, select Proxy development > API Proxies and then click services-v1.
Open Develop tab. Click the postComment flow.
In the Flow pane, click the + next to postComment flow in the Response pane.
In the Add policy step dialog, click Create new policy.
In the Select Policy dropdown, select Extract Variables policy type from the Mediation section.
Specify the following:
| Property | Value |
|---|---|
| Display Name | EV-ExtractSentiment |
| Name | EV-ExtractSentiment |
Click Add, and then click the EV-ExtractSentiment policy.
Replace the ExtractVariables XML configuration with:
Click the postComment flow, and then click the + button below the Response flow.
In the Extension section, select the Publish Message policy type.
Specify the following:
| Property | Value |
|---|---|
| Display Name | PM-PublishScore |
| Name | PM-PublishScore |
Click Add, and then click the PM-PublishScore policy.
Replace the PublishMessage XML configuration with:
Click Save. If you are notified that the proxy was saved as a new revision, click Save as new revision.
The response.content is the payload that was returned by the Natural Language API, and will be the Pub/Sub message. The category from the request is used to build the Pub/Sub topic name.
Any categories that are incorrect will result in a topic name that does not exist. In a production API, you would want to verify categories that are specified before trying to publish a Pub/Sub message. In this case, continueOnError is set to true on the policy, so, when the topic does not exist, a fault will not be raised.
Conditions can be used to optionally skip policies in a flow.
In the proxy Navigator menu, under Proxy Endpoints, click default.
The ProxyEndpoint configuration is shown.
To add a condition to the PM-PublishScore step, replace this:
with this:
The PublishMessage policy will only execute when the sentiment score is less than 0.
Click Save. If you are notified that the proxy was saved as a new revision, click Save as new revision.
Click Deploy.
For Environment select eval.
For Service Account, specify the service account's email address:
Click Deploy and Confirm.
Click Check my progress to verify the objective.
In Cloud Shell, open an SSH connection to your test VM:
If asked to authorize, click Authorize.
Call the deployed services-v1 API proxy in the eval environment:
From the Navigation menu (
Click the apigee-services-v1-delivery-reviews topic.
Scroll down to the bottom, and then click on the apigee-services-v1-delivery-reviews-sub subscription.
Click the Messages tab, and then click Pull.
In the message, click the View all row content dropdown button.
You can see the JSON payload that was sent for any comments with negative sentiment.
In this task, you add a MessageLogging policy to log a message to Cloud Logging.
A ProxyEndpoint has an optional flow called the PostClientFlow. Policies attached to this flow run after the response has already been returned to the caller. This can be an ideal location to perform message logging, because the logging would add no additional latency to the request.
Return to the Apigee tab and, if necessary, return to the services-v1 Develop page.
In the proxy Navigator menu, under Proxy Endpoints, click default.
The ProxyEndpoint configuration is shown.
Immediately above the HTTPProxyConnection section, add the following line:
After adding this line, the bottom of your ProxyEndpoint code should resemble this:
This adds an empty PostClientFlow to the ProxyEndpoint.
In the proxy Navigator menu, under Proxy Endpoints, click PostClientFlow, and then click the + button below the Response flow.
In the Add policy step dialog, click Create new policy.
In the Select Policy dropdown, select Message Logging policy type from the Extension section.
Specify the following:
| Property | Value |
|---|---|
| Display Name | ML-LogToCloudLogging |
| Name | ML-LogToCloudLogging |
Click Add, and then click the ML-LogToCloudLogging policy.
Replace the PublishMessage XML configuration with:
The CloudLogging section specifies the information to be logged to Cloud Logging. The policy uses the name of the proxy as part of the LogName, which makes it easy to find in Cloud Logging.
The message in this policy is a JSON message, but any type of text message can be used in your logs. The contents of your logs should typically include proxy flow variables that would help you debug any issues. For example, the variable publishmessage.failed will be true if the Pub/Sub message was not sent.
Labels can also be added to the logged message to categorize the message contents.
Click Save. If you are notified that the proxy was saved as a new revision, click Save as new revision.
Click Deploy.
For Environment select eval.
For Service Account, specify the service account's email address:
Click Deploy and Confirm.
Wait for the deployment to complete.
Click Check my progress to verify the objective.
In Cloud Shell, if your SSH connection has closed, open the SSH connection to your test VM:
If asked to authorize, click Authorize.
Call the deployed services-v1 API proxy in the eval environment:
The category supplied (invalid-category) does not have a corresponding Pub/Sub topic.
From the Navigation menu (
In the Query box, enter the following query:
Click Run query.
Expand the log entry in the Query Results pane, and then expand the jsonPayload.
Expanding the log entry shows the logged JSON message and other metadata. The jsonPayload should resemble this:
publishFailed is true because there wasn't a topic created for this category. Well-designed logs can help find issues in your API proxies and backend services.
In this lab, you enabled Google Cloud APIs, and created a service account. You called the Cloud Natural Language API by using a ServiceCallout policy, leveraging the service account authentication provided by Apigee. You used the PublishMessage policy to publish a message to a Pub/Sub topic. Finally, you used the MessageLogging policy to log a message to Cloud Logging.
Manual last updated January 27, 2025
Manual last tested January 27, 2025
Copyright 2025 Google LLC All rights reserved. Google and the Google logo are trademarks of Google LLC. All other company and product names may be trademarks of the respective companies with which they are associated.


此内容目前不可用
一旦可用,我们会通过电子邮件告知您

太好了!
一旦可用,我们会通过电子邮件告知您

One lab at a time
Confirm to end all existing labs and start this one