Checkpoints
Using the AppRole Auth Method
/ 100
Authentication, Authorization, and Identity with Vault
This lab was developed with our partner, Hashicorp. Your personal information may be shared with Hashicorp, the lab sponsor, if you have opted in to receive product updates, announcements, and offers in your Account Profile.
GSP1005

Overview
Authentication in Vault is the process by which user or machine supplied information is verified against an internal or external system. Vault supports multiple auth methods including GitHub, LDAP, AppRole, and more.
Identity is used to maintain the clients who are recognized by Vault. As such, Vault provides an identity management solution through the Identity secrets engine. In this lab, you will learn about the different types of authentication and auth methods, as well as how to interact with identity in Vault.
Objectives
In this lab, you will:
- Learn about the different types of authentication
- Configure and use the AppRole auth method
- Create aliases with distinct policies
- Create an entity with a base policy
- Associate aliases as entity members
- Create an internal group with an entity member
Setup and requirements
Before you click the Start Lab button
Read these instructions. Labs are timed and you cannot pause them. The timer, which starts when you click Start Lab, shows how long Google Cloud resources will be made available to you.
This hands-on lab lets you do the lab activities yourself in a real cloud environment, not in a simulation or demo environment. It does so by giving you new, temporary credentials that you use to sign in and access Google Cloud for the duration of the lab.
To complete this lab, you need:
- Access to a standard internet browser (Chrome browser recommended).
- Time to complete the lab---remember, once you start, you cannot pause a lab.
How to start your lab and sign in to the Google Cloud console
-
Click the Start Lab button. If you need to pay for the lab, a pop-up opens for you to select your payment method. On the left is the Lab Details panel with the following:
- The Open Google Cloud console button
- Time remaining
- The temporary credentials that you must use for this lab
- Other information, if needed, to step through this lab
-
Click Open Google Cloud console (or right-click and select Open Link in Incognito Window if you are running the Chrome browser).
The lab spins up resources, and then opens another tab that shows the Sign in page.
Tip: Arrange the tabs in separate windows, side-by-side.
Note: If you see the Choose an account dialog, click Use Another Account. -
If necessary, copy the Username below and paste it into the Sign in dialog.
{{{user_0.username | "Username"}}} You can also find the Username in the Lab Details panel.
-
Click Next.
-
Copy the Password below and paste it into the Welcome dialog.
{{{user_0.password | "Password"}}} You can also find the Password in the Lab Details panel.
-
Click Next.
Important: You must use the credentials the lab provides you. Do not use your Google Cloud account credentials. Note: Using your own Google Cloud account for this lab may incur extra charges. -
Click through the subsequent pages:
- Accept the terms and conditions.
- Do not add recovery options or two-factor authentication (because this is a temporary account).
- Do not sign up for free trials.
After a few moments, the Google Cloud console opens in this tab.

Activate Cloud Shell
Cloud Shell is a virtual machine that is loaded with development tools. It offers a persistent 5GB home directory and runs on the Google Cloud. Cloud Shell provides command-line access to your Google Cloud resources.
- Click Activate Cloud Shell
at the top of the Google Cloud console.
When you are connected, you are already authenticated, and the project is set to your Project_ID,
gcloud is the command-line tool for Google Cloud. It comes pre-installed on Cloud Shell and supports tab-completion.
- (Optional) You can list the active account name with this command:
- Click Authorize.
Output:
- (Optional) You can list the project ID with this command:
Output:
gcloud, in Google Cloud, refer to the gcloud CLI overview guide.
Task 1. Install Vault
- In Cloud Shell, add the HashiCorp GPG key:
- Add the official HashiCorp Linux repository:
Press ENTER to continue.
- Update and install Vault:
Verify the installation
After installing Vault, verify the installation worked by checking that the Vault binary is available.
- Execute the
vaultcommand to verify the installation:
You should see help output similar to the following:
Task 2. Start the Vault server
With Vault installed, the next step is to start a Vault server.
Vault operates as a client/server application. The Vault server is the only piece of the Vault architecture that interacts with the data storage and backends. All operations done via the Vault CLI interact with the server over a TLS connection.
In this lab, you will start and interact with the Vault server running in development mode.
This dev-mode server requires no further setup, and your local vault CLI will be authenticated to talk to it. This makes it easy to experiment with Vault or start a Vault instance for development. Every feature of Vault is available in "dev" mode. The -dev flag just short-circuits a lot of setup to insecure defaults.
Starting the dev server
First, start a Vault dev server. The dev server is a built-in, pre-configured server that is not very secure but useful for playing with Vault locally.
- To start the Vault dev server, run:
You should see output relating to your Vault server configuration. Notice that Unseal Key and Root Token values are displayed.
localhost without TLS, and automatically unseals and shows you the unseal key and root access key.
Now that you have the Vault development server running, you can continue setting up access to it.
-
Open a new Cloud Shell tab.
-
Copy and run the export
VAULT_ADDR ... command from the terminal output. This will configure the Vault client to talk to the dev server:
The Vault CLI determines which Vault servers to send requests using the VAULT_ADDR environment variable.
-
Save the unseal key somewhere. Don't worry about how to save this securely. For now, just save it anywhere.
-
Set the
VAULT_TOKENenvironment variable value to the generated Root Token value displayed in the terminal output:
Verify the server is running
- Verify the server is running by running the
vault statuscommand:
If it ran successfully, the output should look like the following:
Great! You've started the Vault development server. You can now continue on to the next section.
Log in to the Vault web UI
- First, click on the web preview icon on the toolbar of Cloud Shell.
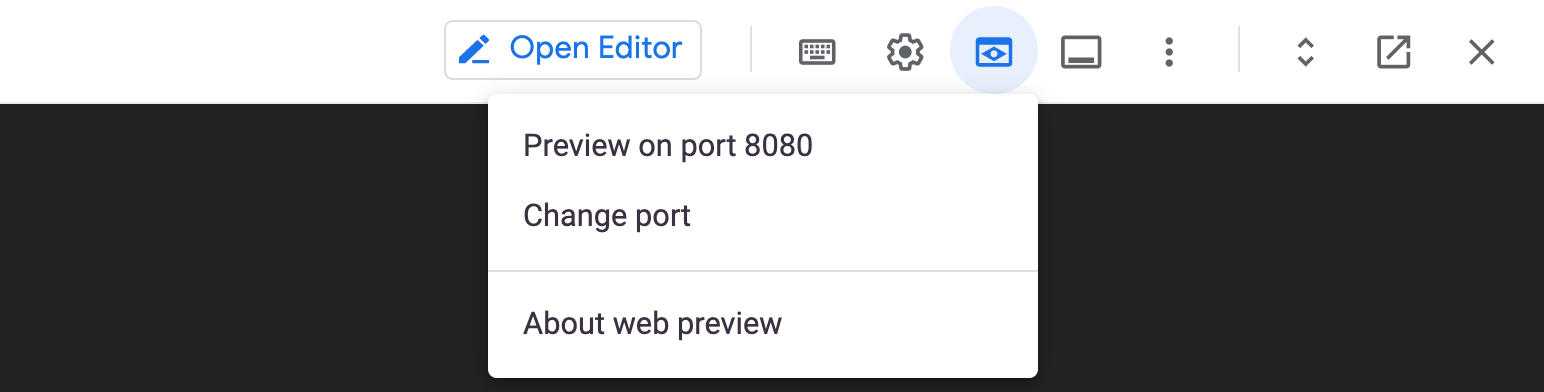
-
Click Change port.
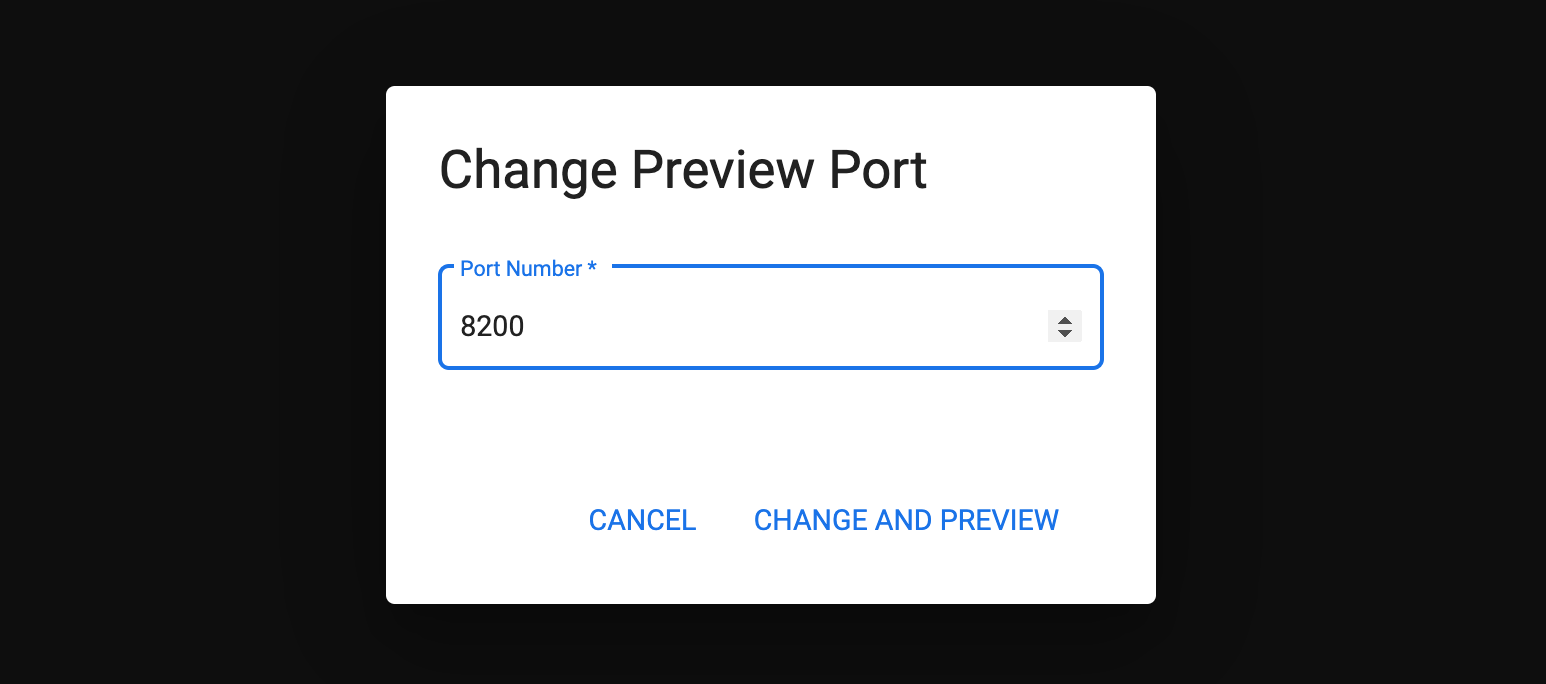
-
Change the Port Number to
8200and click Change and Preview.
- You should be redirected to the Vault sign in page.
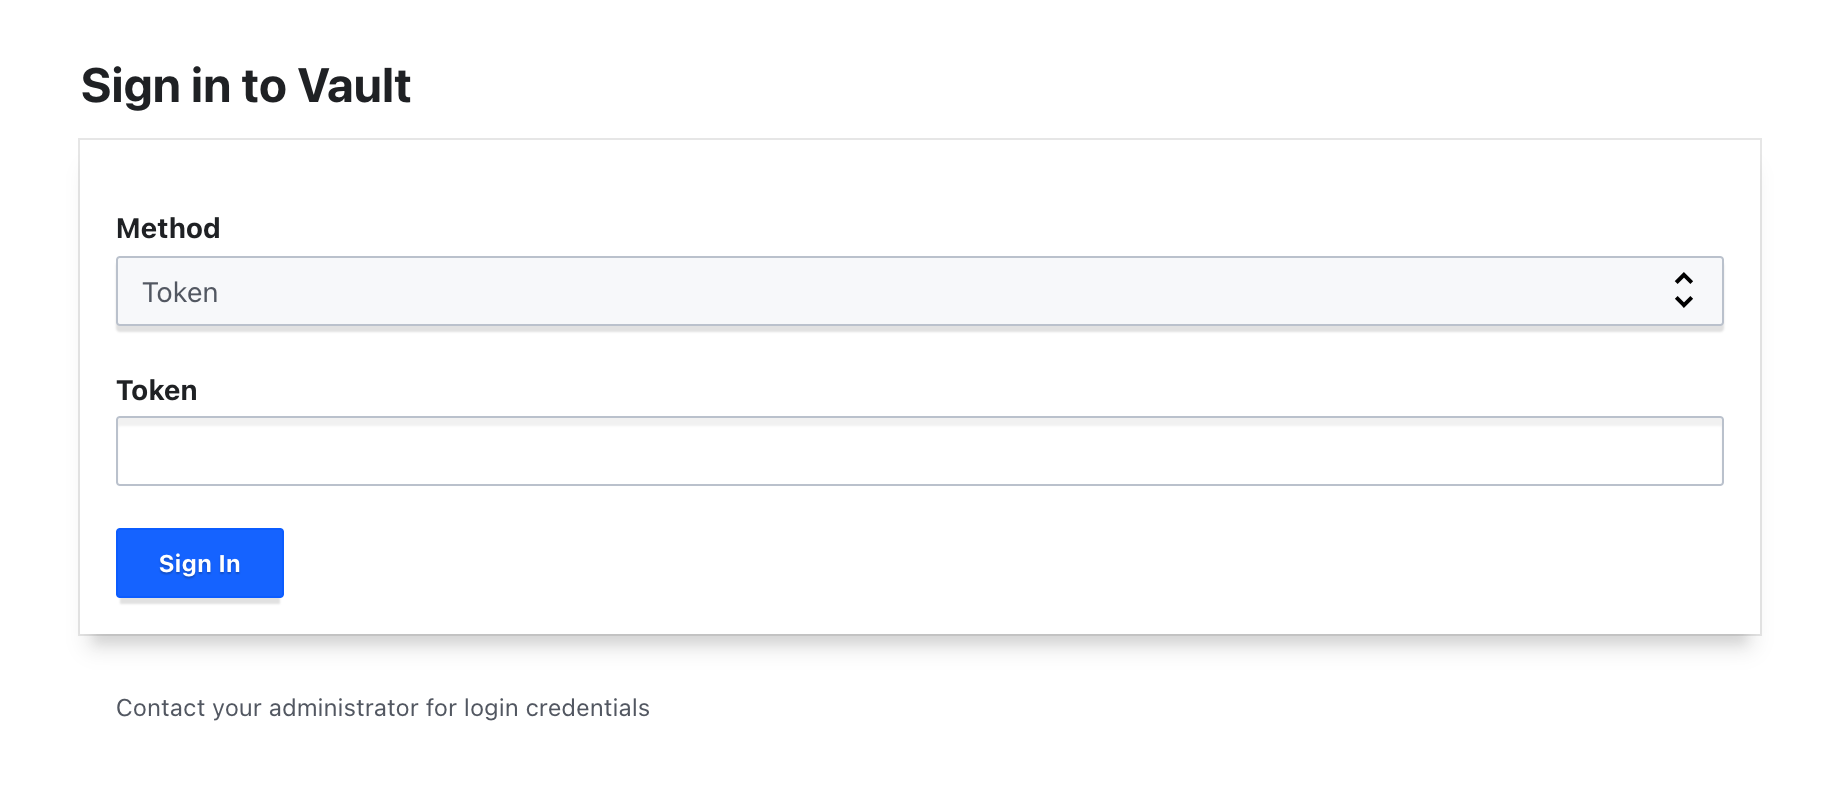
- Enter your Root Token that you saved earlier in the lab and click Sign In.
Your Vault development server should resemble the following.
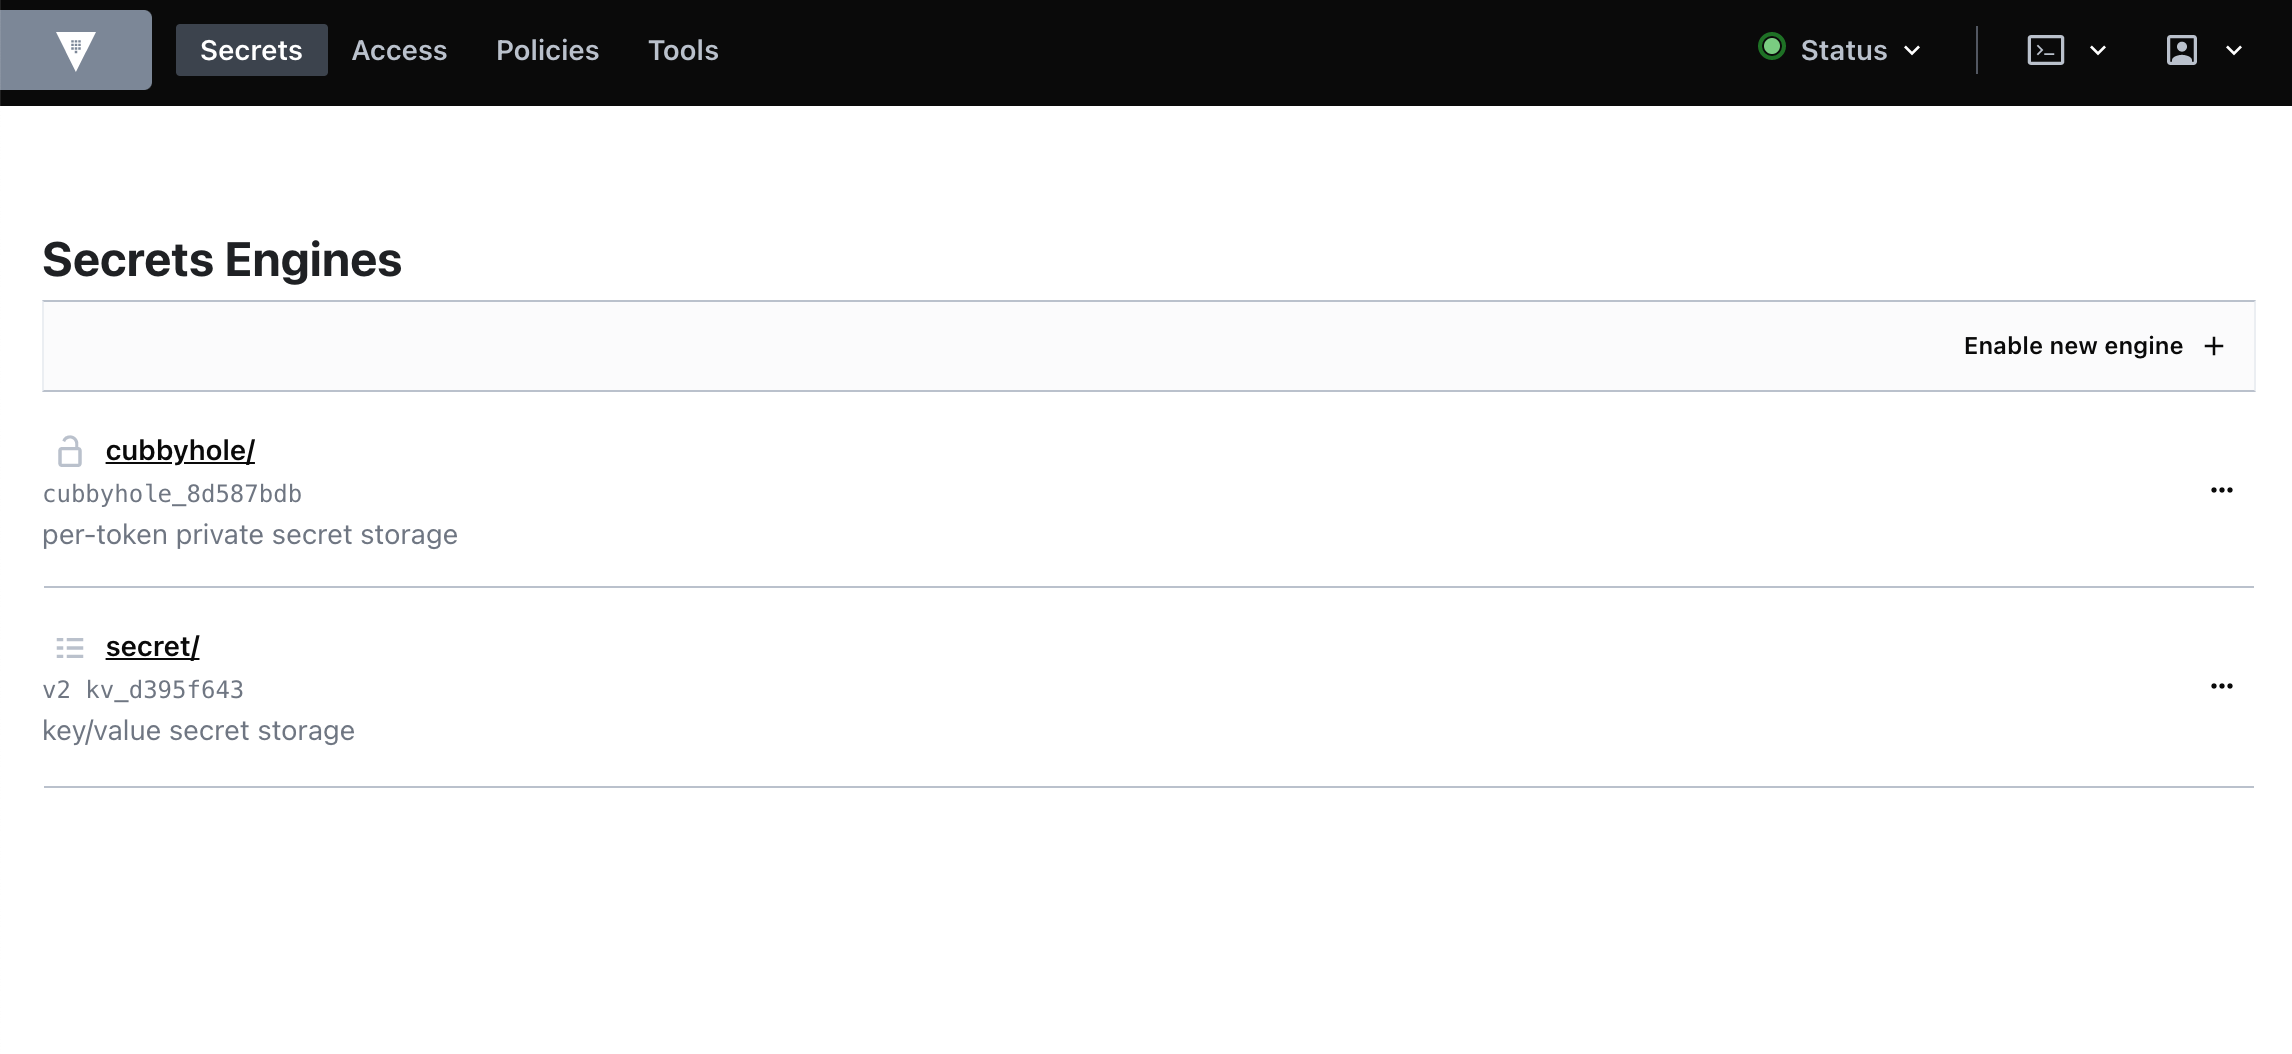
Now that you're logged in to the development server web UI, you can continue on to the next section. Keep this page open as you will need to use the UI later in the lab.
Task 3. Authentication in Vault
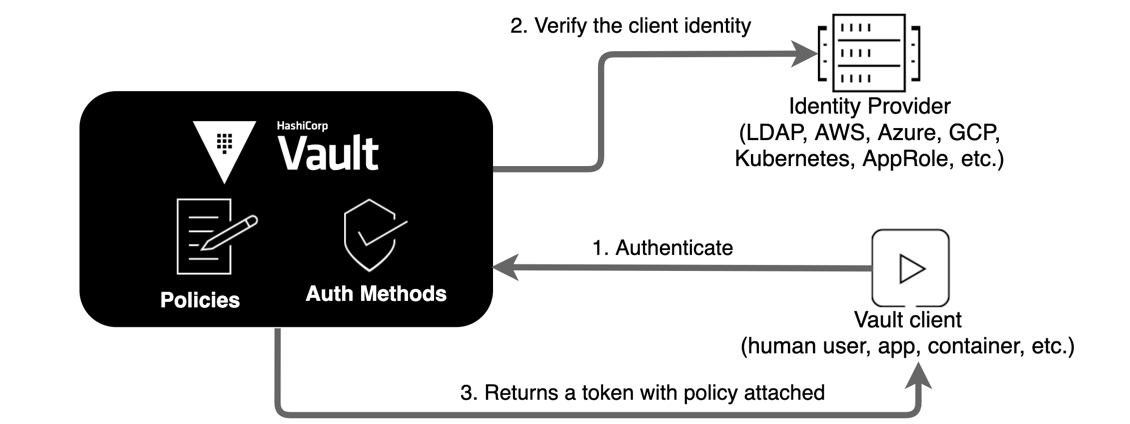
Before a client can interact with Vault, it must authenticate against an auth method. Upon authentication, a token is generated. This token is conceptually similar to a session ID on a website. The token may have attached policy, which is mapped at authentication time. This process is described in detail in the policies concepts documentation.
Auth methods
Vault supports a number of auth methods. Some backends are targeted toward users while others are targeted toward machines. Most authentication backends must be enabled before use. Often you will see authentications at the same path as their name, but this is not a requirement.
To learn more about authentication, you could use the built-in path-help command:
Vault supports multiple auth methods simultaneously, and you can even mount the same type of auth method at different paths. Only one authentication is required to gain access to Vault, and it is not currently possible to force a user through multiple auth methods to gain access, although some backends do support MFA.
Tokens
It is important to understand that authentication works by verifying your identity and then generating a token to associate with that identity.
For example, even though you may authenticate using something like GitHub, Vault generates a unique access token for you to use for future requests. The CLI automatically attaches this token to requests, but if you're using the API you'll have to do this manually.
This token given for authentication with any backend can also be used with the full set of token commands, such as creating new sub-tokens, revoking tokens, and renewing tokens. This is all covered on the token concepts page.
API
API authentication is generally used for machine authentication. Each auth method implements its own login endpoint. Use the vault path-help mechanism to find the proper endpoint. For example, the GitHub login endpoint is located at auth/github/login. And to determine the arguments needed, vault path-help auth/github/login can be used.
Task 4. AppRole auth method overview
The approle auth method allows machines or apps to authenticate with Vault-defined roles. The open design of AppRole enables a varied set of workflows and configurations to handle large numbers of apps. This auth method is oriented to automated workflows (machines and services), and is less useful for human operators.
An "AppRole" represents a set of Vault policies and login constraints that must be met to receive a token with those policies. The scope can be as narrow or broad as desired. An AppRole can be created for a particular machine, or even a particular user on that machine, or a service spread across machines. The credentials required for successful login depend upon the constraints set on the AppRole associated with the credentials.
What makes AppRole better?
The most essential feature of AppRole that makes it better than direct token assignment is that the credential is split into a Role ID and a Secret ID, delivered through different channels. Furthermore, the Secret ID is delivered to the application only at the expected time of use (usually at application startup).
This pattern of authorization by using knowledge delivered just in time, in parts, through independent delivery paths should be familiar from standard multi-factor authentication methods: to log in to a service, you have an already-known identity, but you need a one-time-use token generated and delivered at the time you log in as well.
The Role ID is not sensitive and can be used for any number of instances of a given application; you can hardcode it into things like VM or container images (though as a best practice, you should not provide it to processes that don’t need it, e.g. processes that manage roles rather than using them to authenticate). Role ID can be seen as the “username” for a particular application. This means that multiple instances of the same application can share the same Role ID.
The Secret ID, by contrast, is:
- Always intended to be a secret and can be seen as the “password” that is required to login to Vault.
- Intended to be access-limited so it can be used only by authorized applications; it may be usable by only a single application or even a single app instance.
- Intended to be short-lived to reduce the window for compromise; it may be valid for only seconds.
For more information on AppRole, and the Secret and Role IDs, check out the Authenticating Applications with HashiCorp Vault AppRole documentation.
Task 5. Using the AppRole auth method
Before a client can interact with Vault, it must authenticate against an auth method to acquire a token. This token has policies attached so that the behavior of the client can be governed.
Since tokens are the core method for authentication within Vault, there is a token auth method (often referred to as token store). This is a special auth method responsible for creating and storing tokens. In this section, you will generate tokens for machines or apps by enabling the AppRole auth method.
Challenge
Think of a scenario where a DevOps team wants to configure Jenkins to read secrets from Vault so that it can inject the secrets to an app's environment variables (e.g. MYSQL_DB_HOST) at deployment time. Instead of hardcoding secrets in each build script as plain text, Jenkins retrieves secrets from Vault.
As a user, you can authenticate with Vault using your LDAP credentials, and Vault generates a token. This token has policies granting you permission to perform the appropriate operations. How can a Jenkins server programmatically request a token so that it can read secrets from Vault?
Solution:
Enable the AppRole auth method so that the Jenkins server can obtain a Vault token with appropriate policies attached. Since each AppRole has attached policies, you can write fine-grained policies limiting which app can access which path.
Create a policy and test data
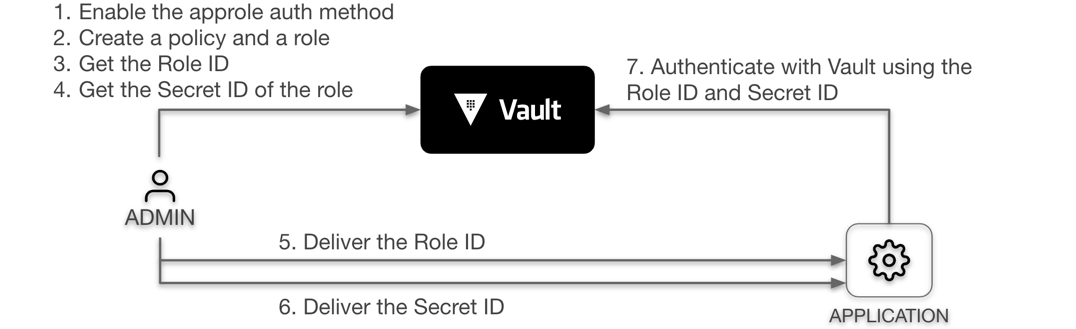
As discussed earlier, AppRole is an authentication mechanism within Vault to allow machines or apps to acquire a token to interact with Vault. It uses RoleID and SecretID for login. The basic workflow is:
admin and app).
- In Cloud Shell, run the following to create some test data:
You should receive the following output:
- Next, enable
approleauth method by executing the following command:
When you enabled the AppRole auth method, it gets mounted at the /auth/approle path. In this example, you are going to create a role for the app persona (jenkins in our scenario).
- Before creating a role, use the following command to create a
jenkinspolicy file:
You should receive the following output:
- Next, create a role named
jenkinswithjenkinspolicy attached:
Output:
The generated token's time-to-live (TTL) is set to 1 hour and can be renewed for up to 4 hours of its first creation. (Note: This example creates a role which operates in pull mode.)
token_policies="jenkins,anotherpolicy".
There are a number of parameters that you can set on a role. If you want to limit the use of the generated secret ID, set secret_id_num_uses or secret_id_ttl parameter values. Similarly, you can specify token_num_uses and token_ttl. You may never want the app token to expire. In such a case, specify the period so that the token generated by this AppRole is a periodic token. To learn more about periodic tokens, refer to the Tokens tutorial.
- Read the
jenkinsrole you created to verify:
Your output should resemble the following:
Get RoleID and SecretID
The RoleID and SecretID are like a username and password that a machine or app uses to authenticate. Since the example created a jenkins role which operates in pull mode, Vault will generate the SecretID. You can set properties such as usage-limit, TTLs, and expirations on the SecretIDs to control its lifecycle.
To retrieve the RoleID, invoke the auth/approle/role/<ROLE_NAME>/role-id endpoint. To generate a new SecretID, invoke the auth/approle/role/<ROLE_NAME>/secret-id endpoint.
Now, you'll need to fetch the RoleID and SecretID of a role.
- Execute the following command to retrieve the RoleID for the
jenkinsrole:
Your output should resemble the following:
- Execute the following command to generate a SecretID for the
jenkinsrole:
You should receive output resembling the following:
The -force (or -f) flag forces the write operation to continue without any data values specified. Or you can set parameters such as cidr_list.
jenkins role has a fixed RoleID. While SecretID is similar to a password that Vault will generate a new value every time you request it.
Login with RoleID & SecretID
The client (in this case, Jenkins) uses the RoleID and SecretID passed by the admin to authenticate with Vault. If Jenkins did not receive the RoleID and/or SecretID, the admin needs to investigate.
- To login, use the
auth/approle/loginendpoint by passing the RoleID and SecretID. Make sure to replace the values with your RoleID and SecretID:
Your output should resemble:
Vault returns a client token with default and jenkins policies attached.
- Store the generated token value in an environment variable named,
APP_TOKEN:
Read secrets using the AppRole token
Once receiving a token from Vault, the client can make future requests using this token.
- Verify that you can access the secrets at secret/mysql/webapp:
Your output should resemble the following:
- The app has a read-only access; therefore, the following
deletecommand will fail:
The error message indicates permission error.
- Run the following command to copy the values of the
mysql/webappsecret to text files:
- Run the following command to copy these file to a pre-created Cloud Storage bucket to track your progress:
Click Check my progress to verify the objective.
Response wrap the SecretID
The RoleID is equivalent to a username, and SecretID is the corresponding password. The app needs both to log in with Vault. Naturally, the next question becomes how to deliver those values to the client securely.
A common solution involves three personas instead of two: admin, app, and trusted entity. The trusted entity delivers the RoleID and SecretID to the client by separate means.
For example, Terraform as a trusted entity can deliver the RoleID onto the virtual machine. When the app runs on the virtual machine, the RoleID already exists on the virtual machine.
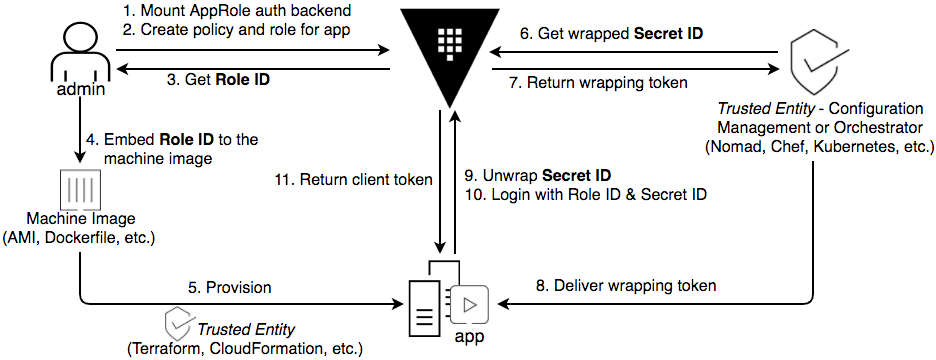
SecretID is like a password. To keep the SecretID confidential, use response wrapping so that only the expecting client can unwrap the SecretID.
Earlier, you executed the following command to retrieve the Secret ID.
- Instead, you can use response wrapping by passing the
-wrap-ttlparameter:
- Now you can send this
wrapping_tokento the client so that the response can be unwrapped and obtain the SecretID:
You should now see the SecretID unwrapped:
Limit the SecretID usages
Another best practice is to treat the SecretID like a password and force it to be regenerated after a number of use.
- To do so, update the role definition with
secret_id_num_usesset:
In this example, a SecretID of the jenkins role can be used for up to 10 times to authenticate and fetch a client token. After the number of uses is reached, the SecretID expires and you would need to generate a new one. This is similar to forcing a password rotation.
Task 6. Entities, aliases, and groups
A common scenario is that users may have multiple accounts with various identity providers, and Vault supports many of those providers to authenticate with Vault. Vault Identity can tie authentications from various auth methods to a single representation. This representation of a consolidated identity is called an Entity and their corresponding accounts with authentication providers can be mapped as Aliases. In essence, each entity is made up of zero or more aliases. An entity cannot have more than one alias for a particular authentication backend.
The idea of Identity is to maintain the clients who are recognized by Vault. As such, Vault provides an identity management solution through the Identity secrets engine. For more information about the Identify secrets engine and how it is used, refer to the Identify Secrets Engine documentation.
Challenge
Bob has accounts in both Github and LDAP. Both Github and LDAP auth methods are enabled on the Vault server that he can authenticate using either one of his accounts. Although both accounts belong to Bob, there is no association between the two accounts to set some common properties.
Solution:
Create an entity representing Bob, and associate aliases representing each of his accounts as the entity member. You can set additional policies and metadata on the entity level so that both accounts can inherit.
When Bob authenticates using either one of his accounts, the entity identifier will be tied to the authenticated token. When such tokens are put to use, their entity identifiers are audit logged, marking a trail of actions performed by specific users.
Create an entity with Alias
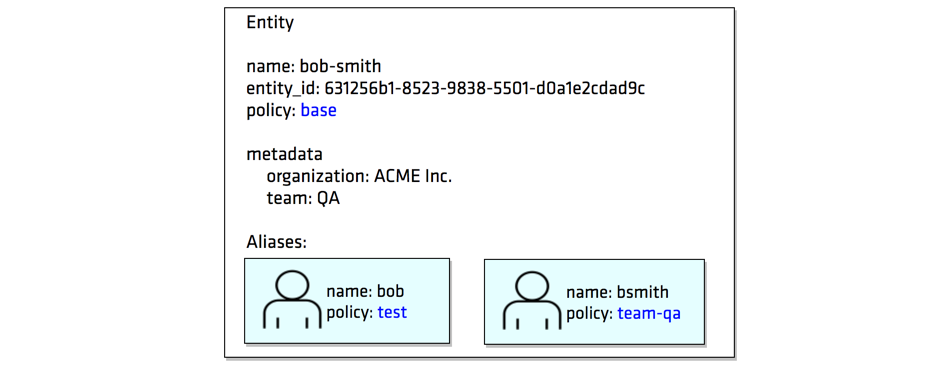
You are first going to create a new entity with base policy assigned. The entity defines two entity aliases with each having a different policy assigned.
For this lab, let's assume a user, Bob Smith at ACME Inc. happened to have two sets of credentials: bob and bsmith. Bob can authenticate with Vault using either one of his accounts. To manage the user's accounts and link them to identity Bob Smith in QA team, you are going to create an entity for Bob.
For the simplicity of this lab, you are going to work with the userpass auth method. In reality, the user bob might be a username that exists in Active Directory, and bsmith might be Bob's username in GitHub. To mock the behavior, you are going to enable the userpass auth method at two separate paths: userpass-test and userpass-qa. Pretend that they are two different types of auth methods.
You'll first start by creating the appropriate policies.
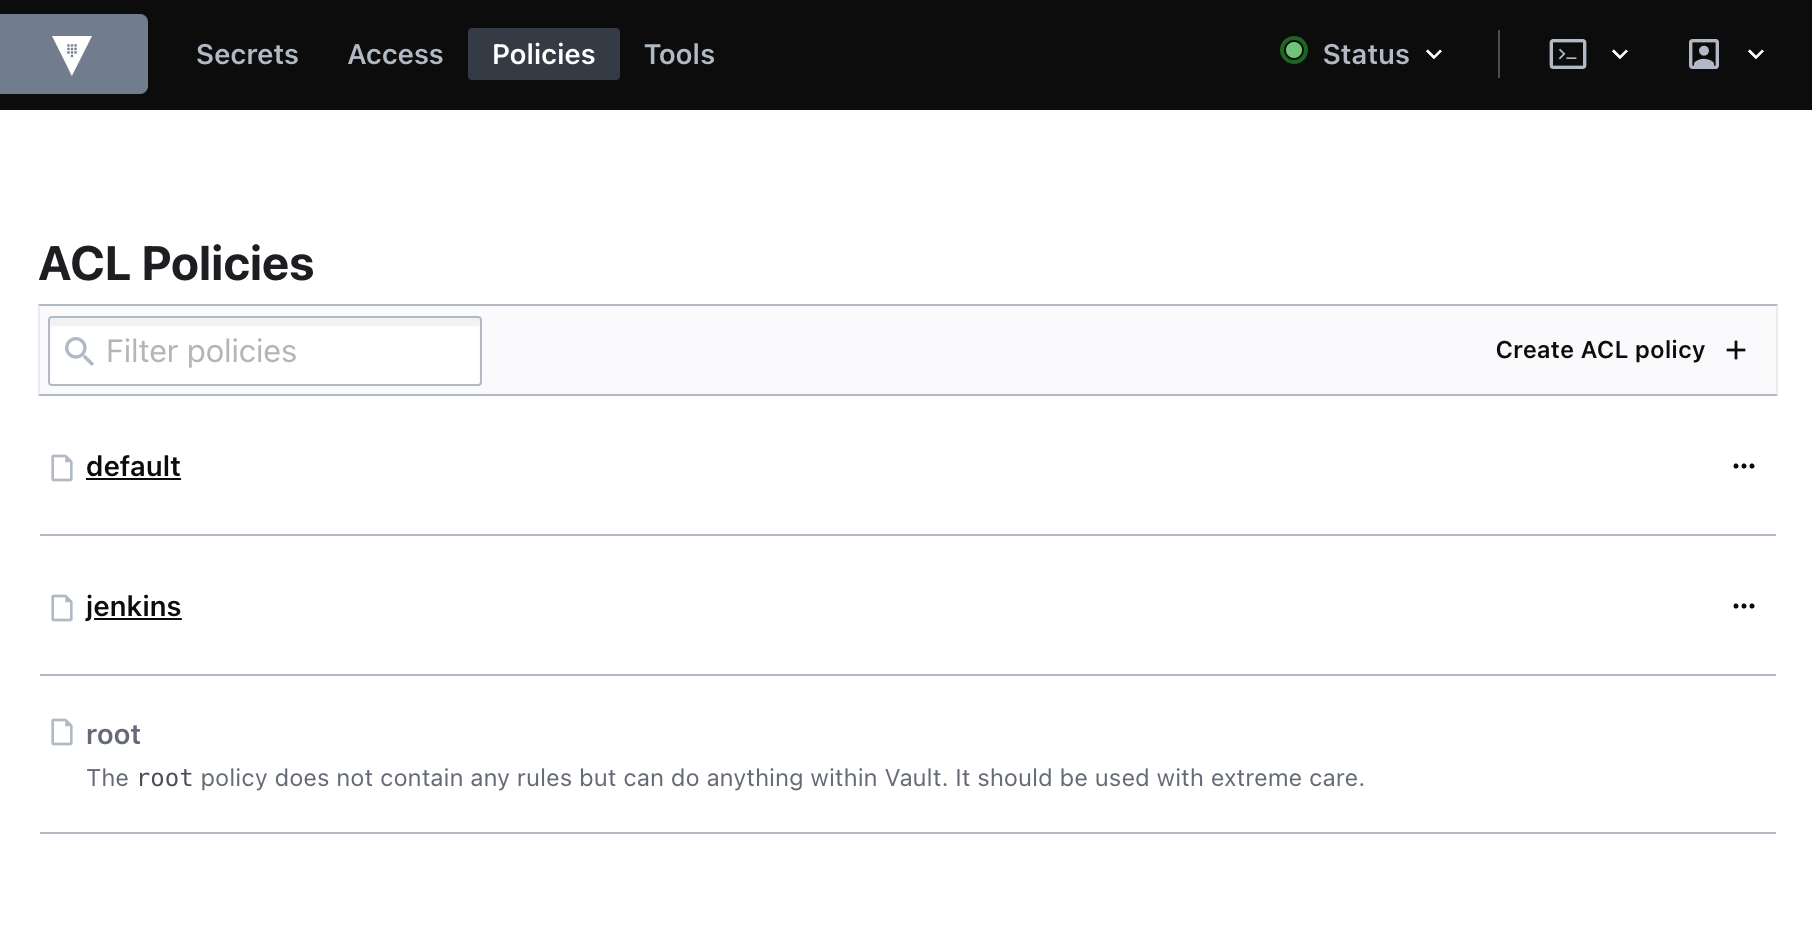
- Navigate to the Vault UI. Click the Policies tab from the home page. You should see the default and root ACL policies, along with the
jenkinspolicy you created earlier.
-
Click Create ACL policy.
-
Name this policy:
base. -
In the Policy box, add the following policy:
-
Click Create policy.
-
Click ACL Policies to navigate back to the Policies page.
-
Click Create ACL policy .
-
Name this policy:
test. -
In the Policy box, add the following policy:
-
Click Create policy.
-
Click ACL Policies to navigate back to the Policies page.
-
Click Create ACL policy .
-
Name this policy:
team-qa. -
In the Policy box, add the following policy:
-
Click Create policy.
-
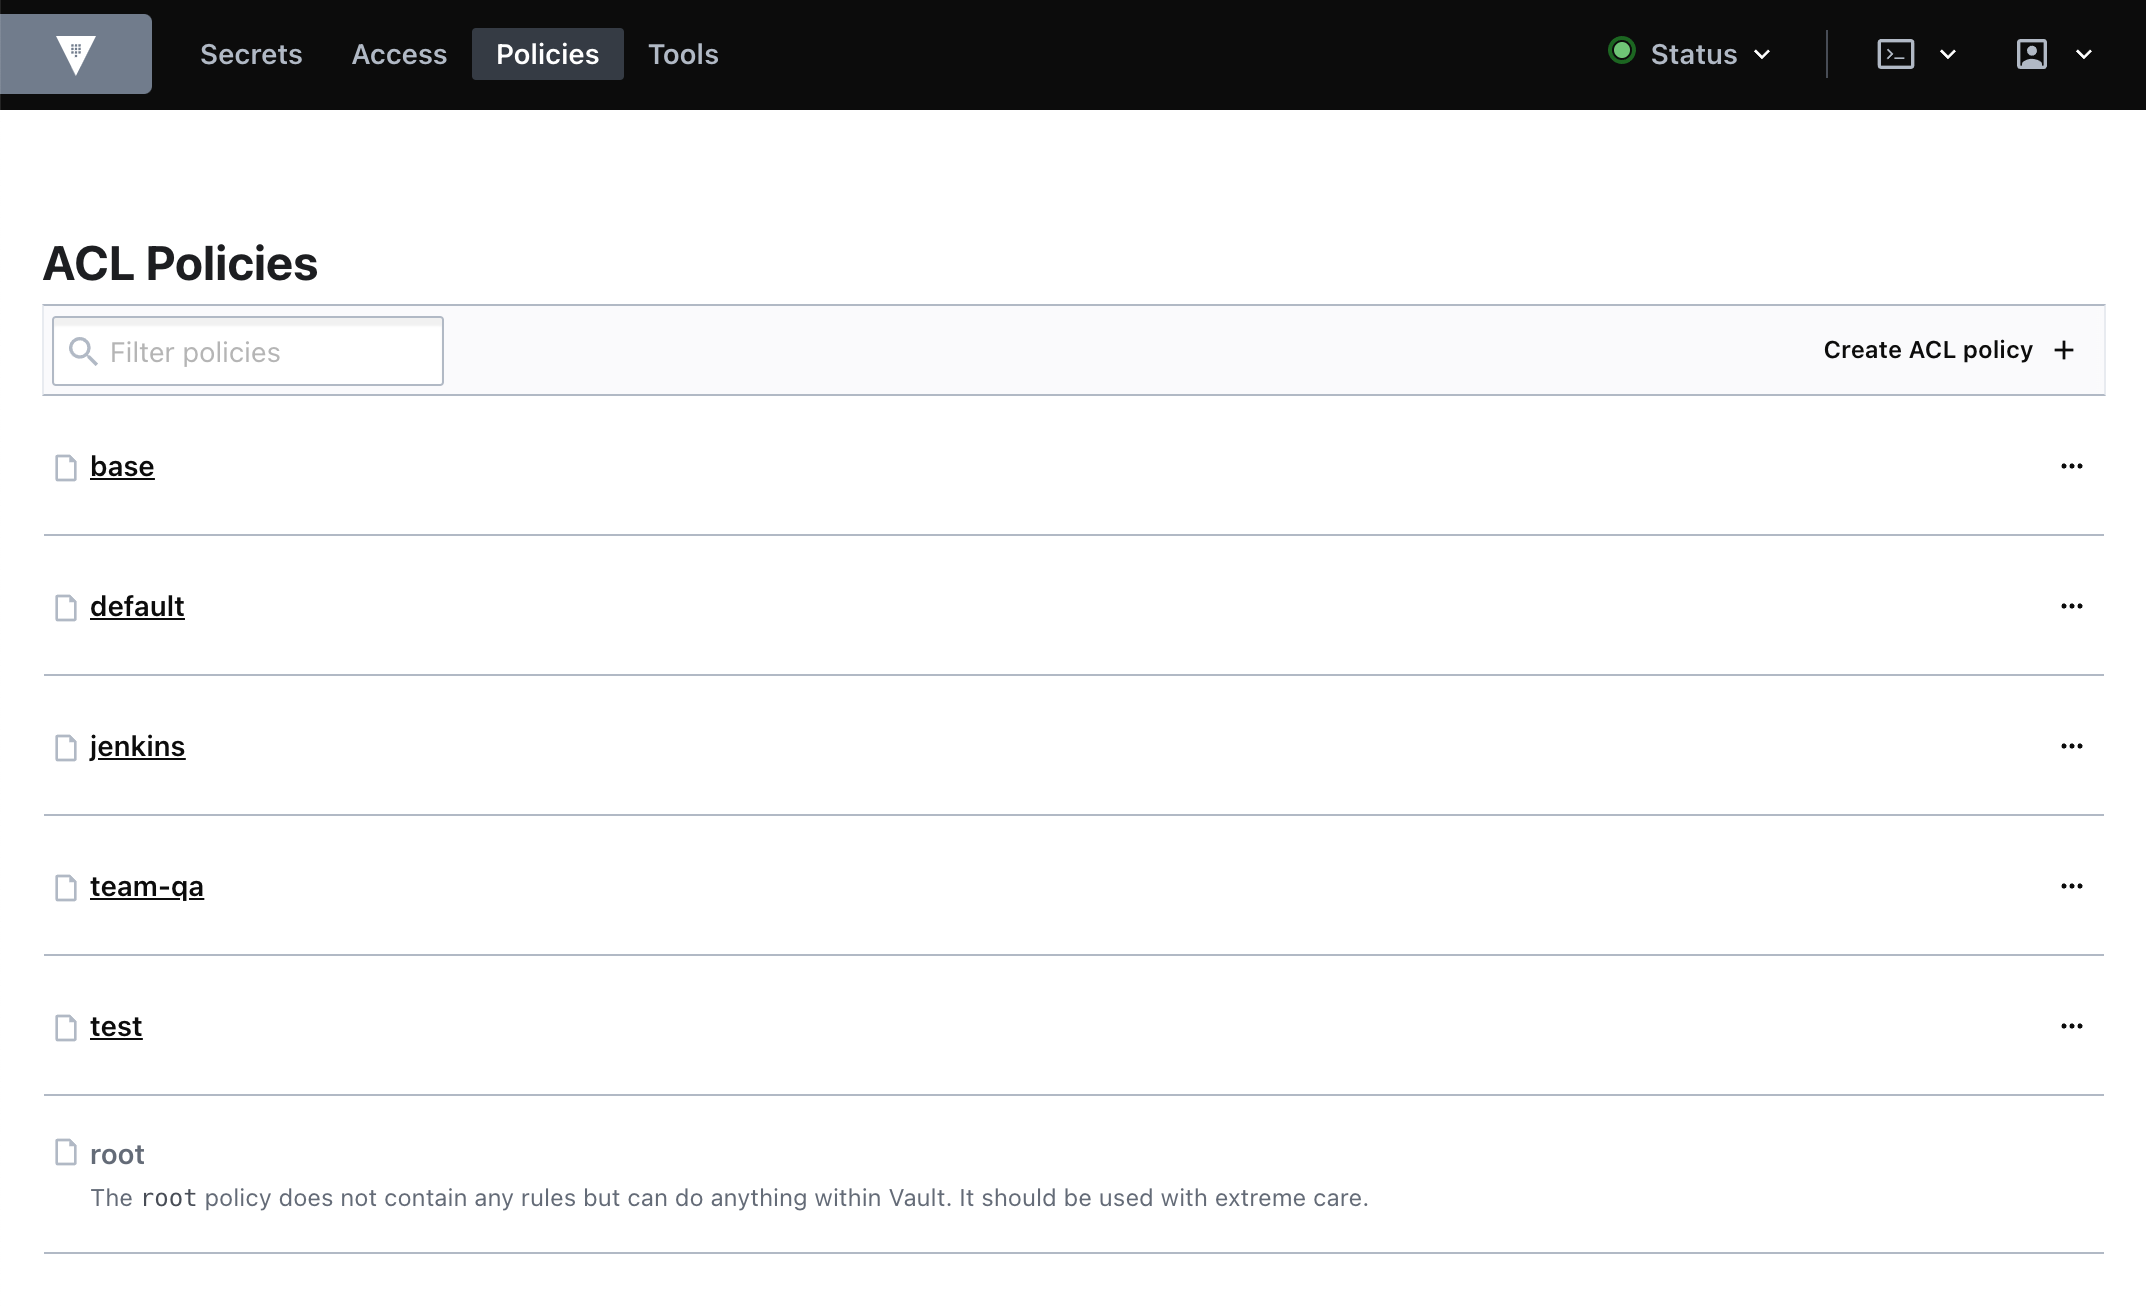
Click ACL Policies to navigate back to the Policies page.
Your policies should resemble the following:
Create the users and attach policies
Now, you are going to create bob and bsmith users with appropriate policies attached.
- On the Navigation menu click the Access tab and then click Enable new method.
-
Select Username & Password and click Next.
-
For the Path, use:
userpass-test. -
Click Enable Method.
-
Navigate back to the
userpass-testauth method.
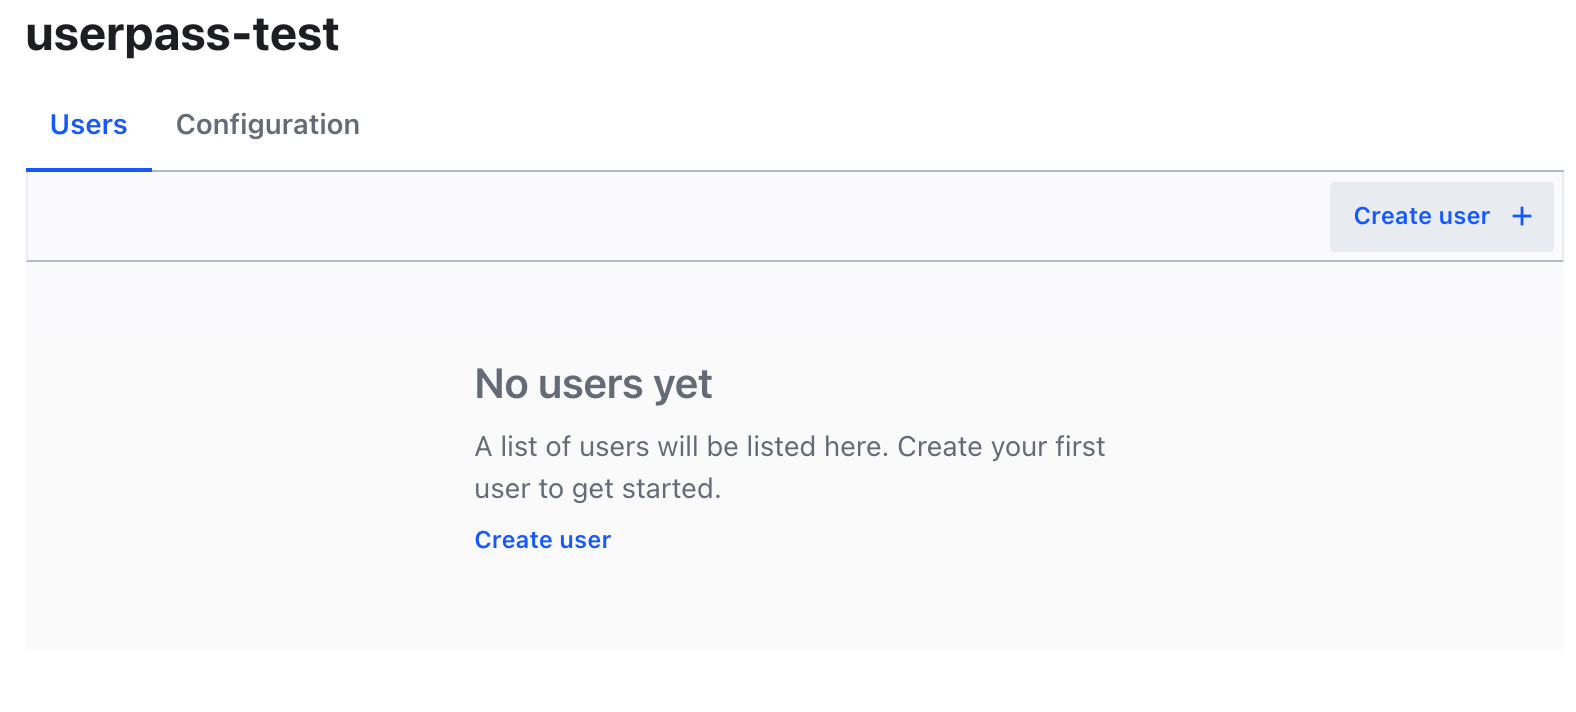
-
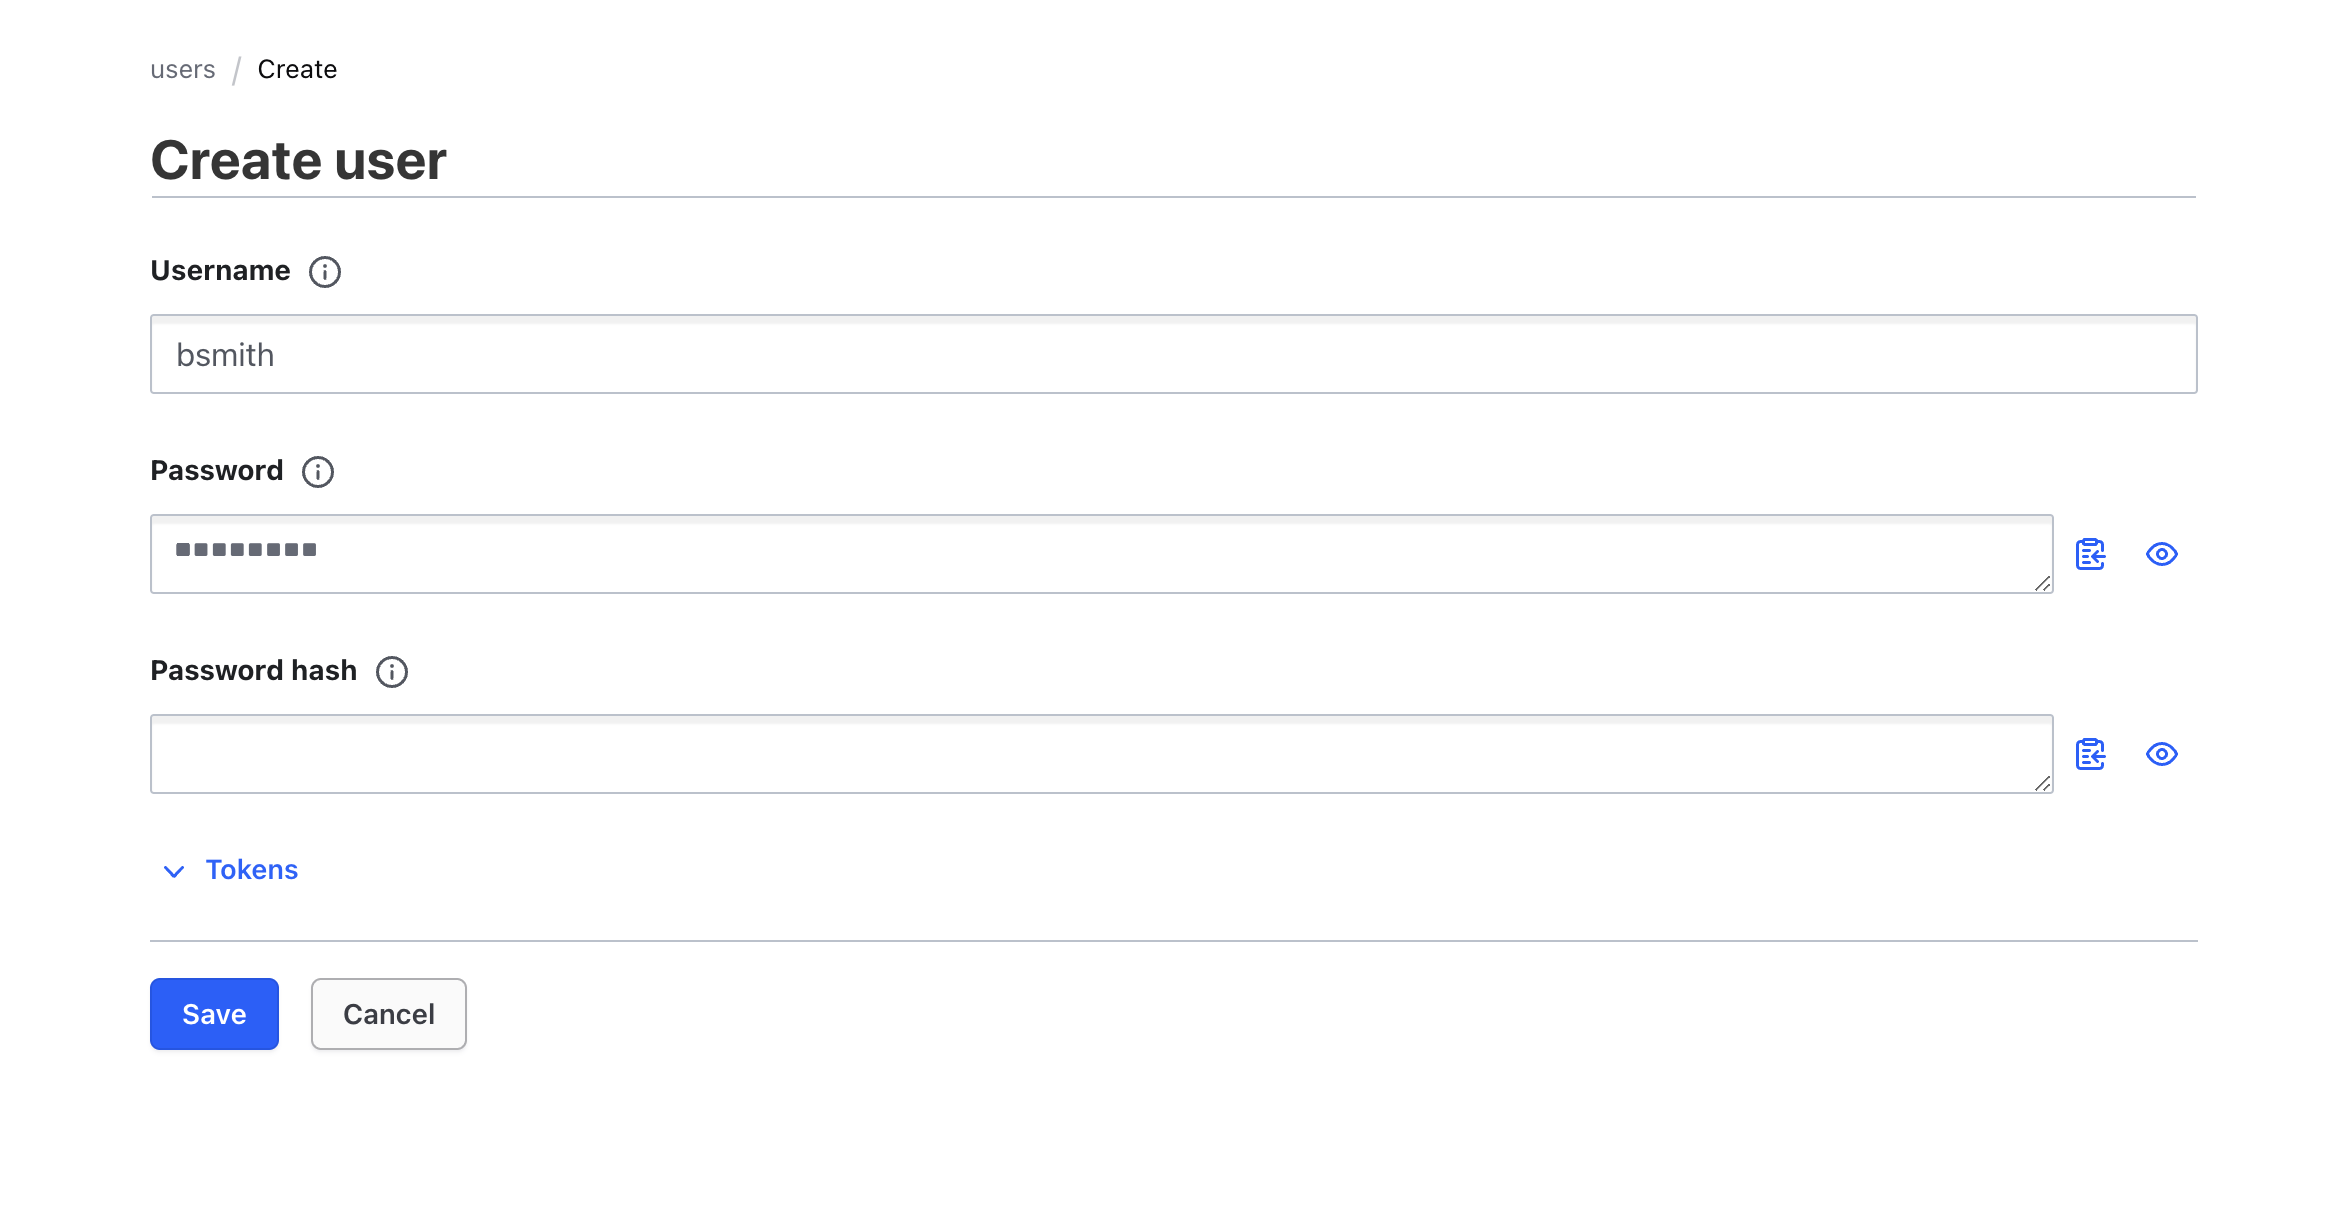
Click Create user.
-
For the Username, use
bob. For the Password, usetraining.
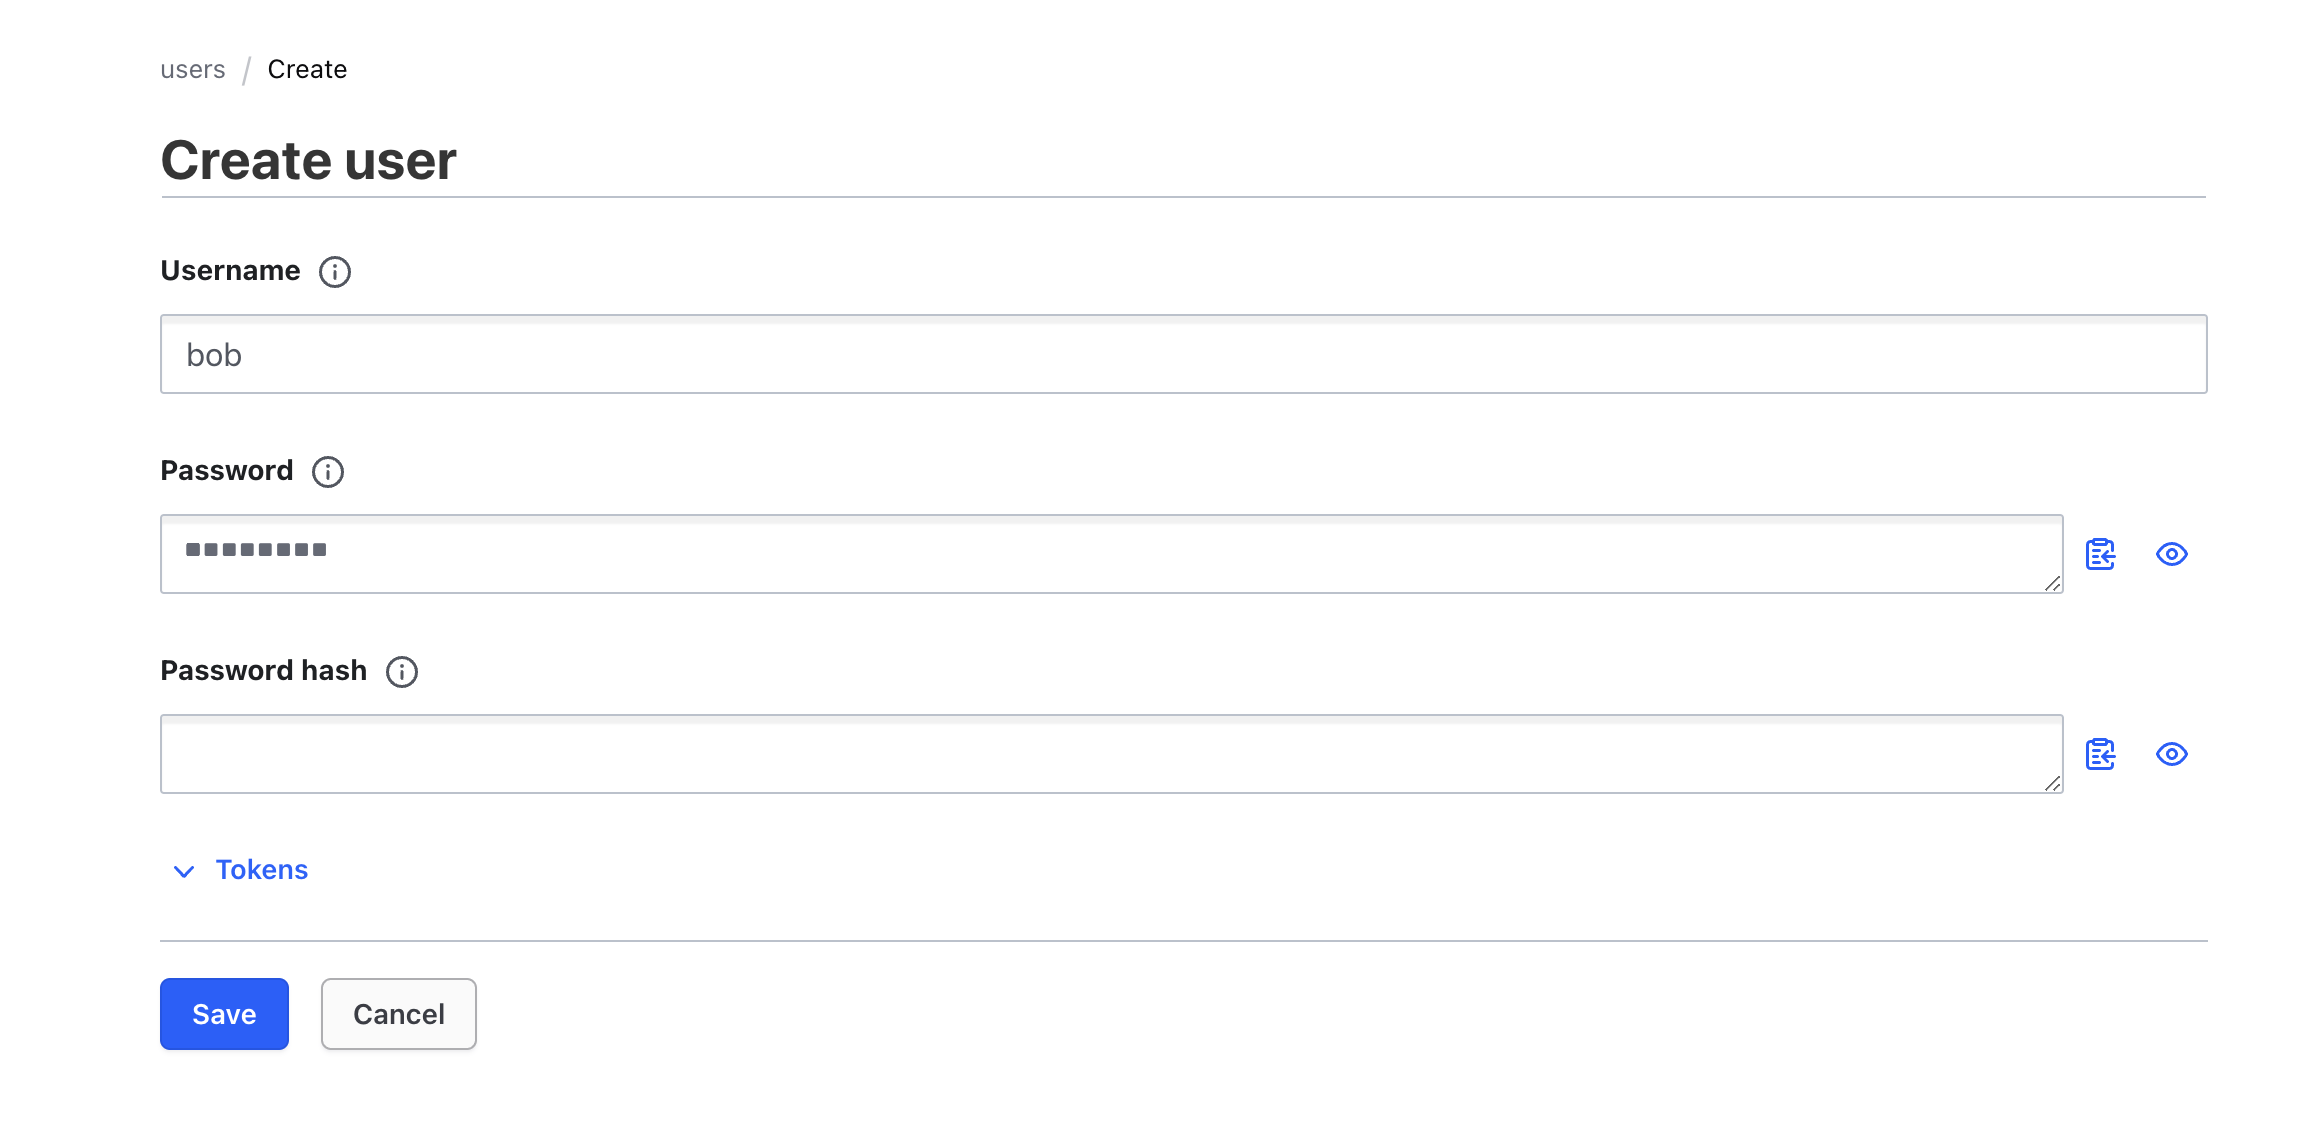
-
Click Tokens to open the sub-menu.
-
Under Generated Token's Policies, add the
testpolicy. -
Click Save.
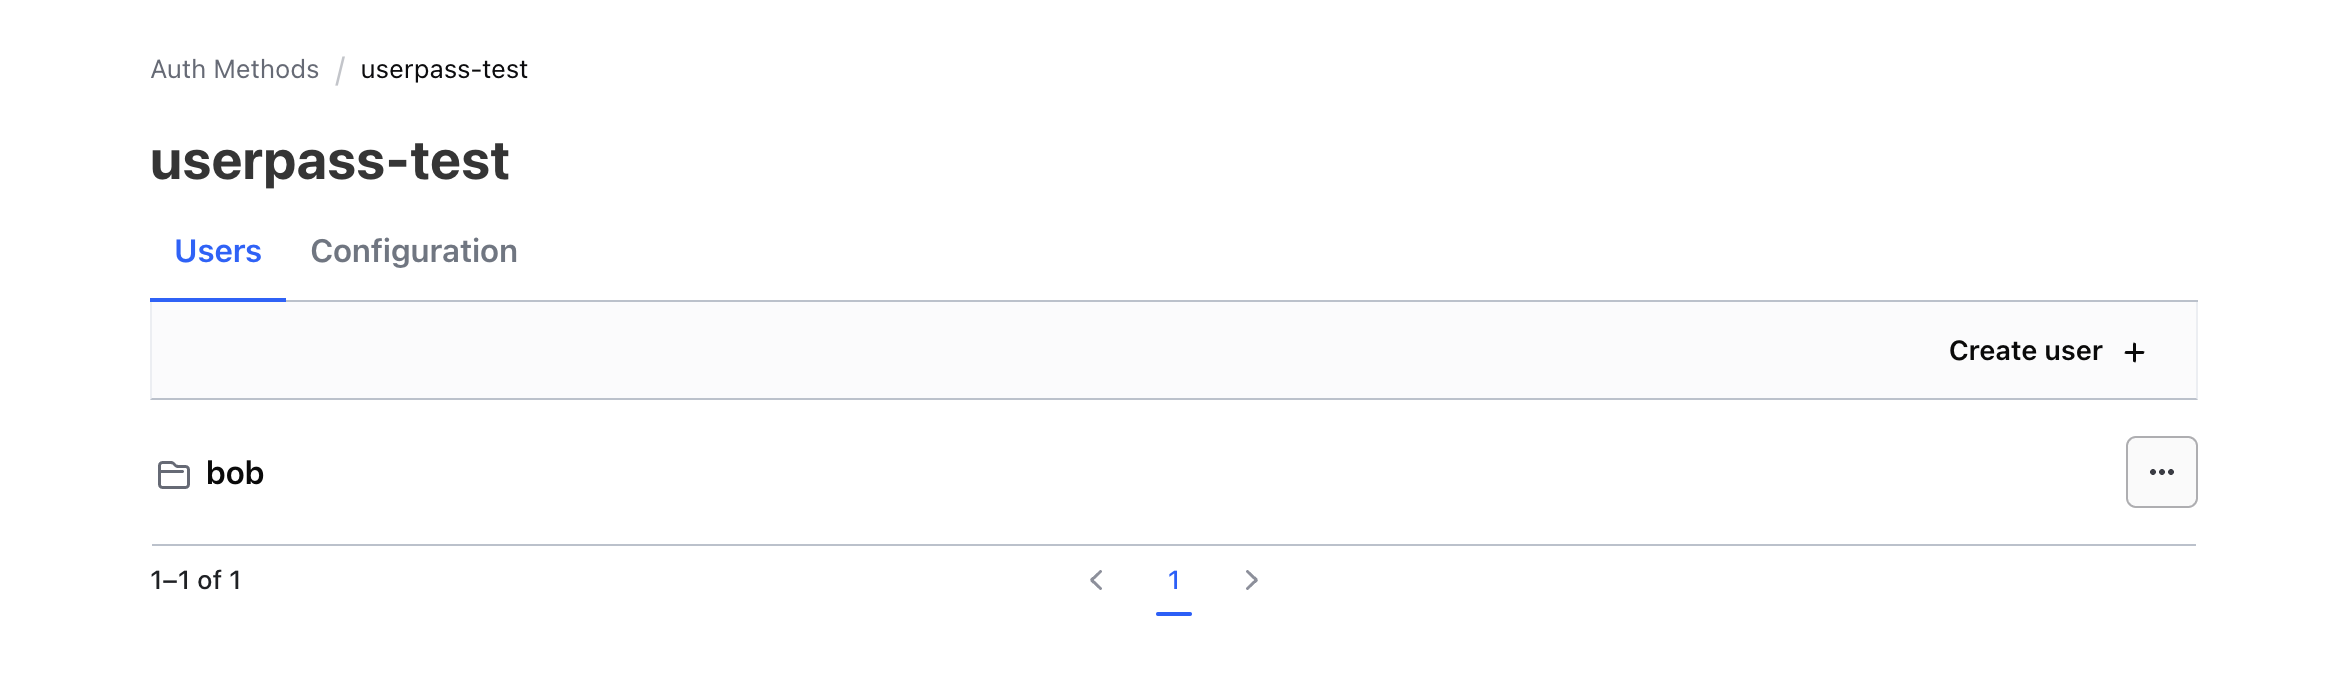
Great! You've created the bob user on the userpass-test path and attached the test policy to it.
- Click Auth methods to navigate back to the Authentication Methods page.
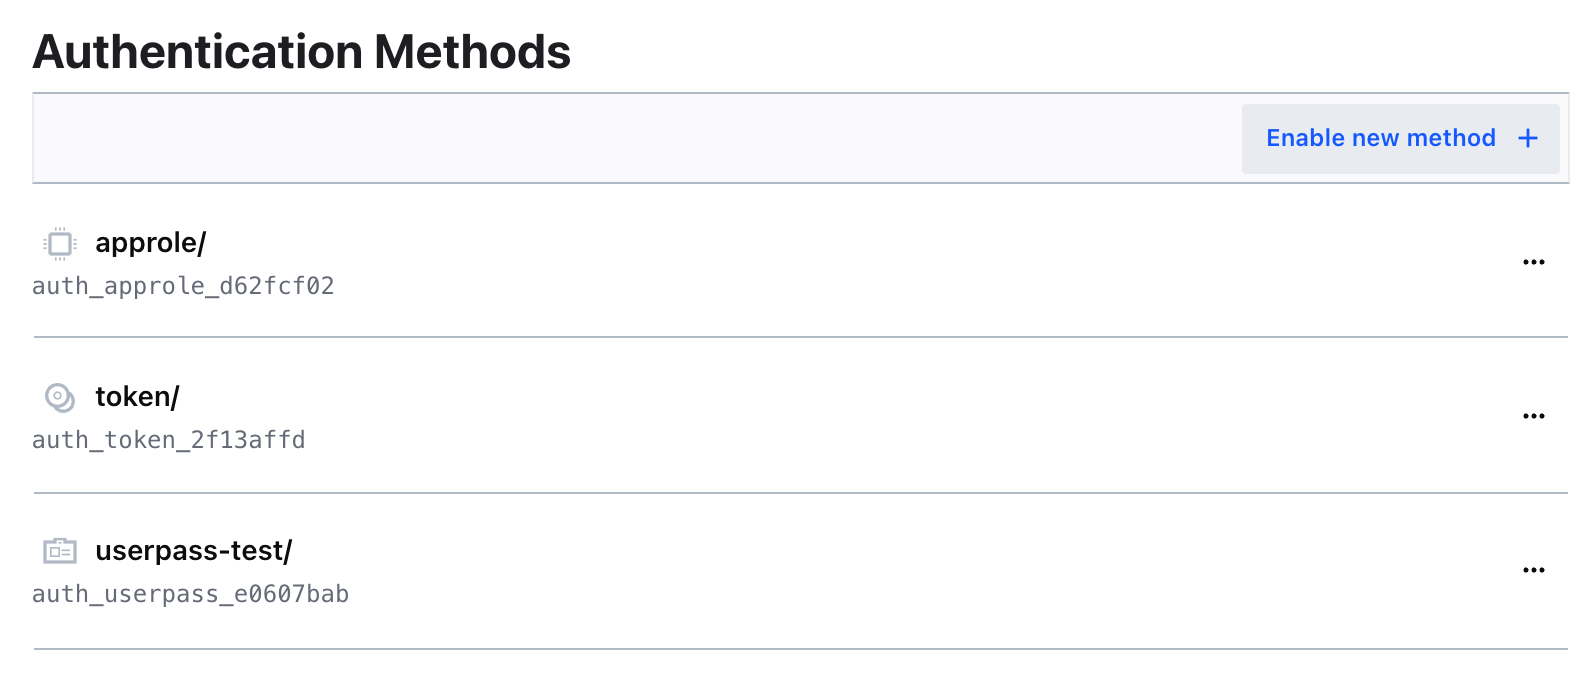
-
Click Enable new method.
-
Select Username & Password and click Next.
-
For the Path, use:
userpass-qa. -
Click Enable Method.
-
Navigate back to the
userpass-qaauth method.
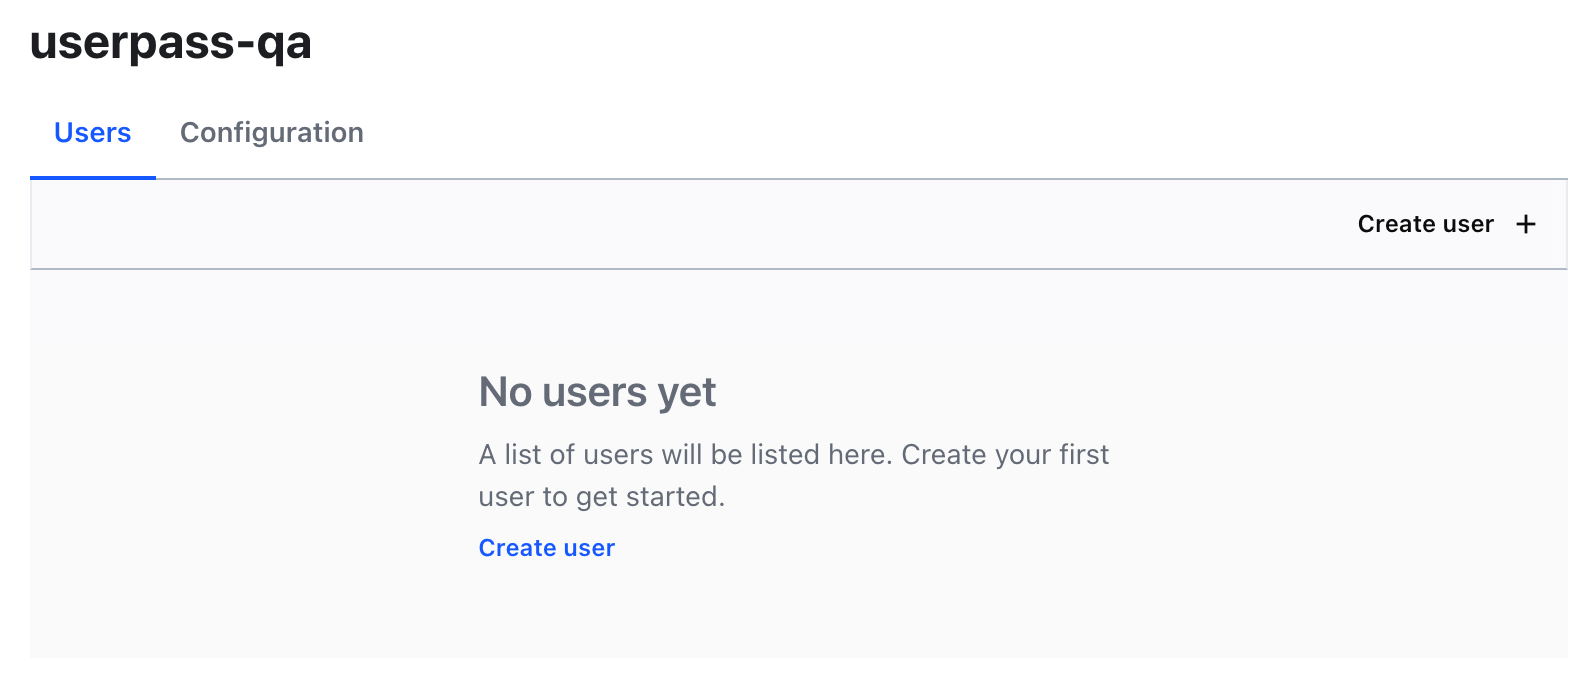
-
Click Create user.
-
For the Username, use
bsmith. For the Password, usetraining.
-
Click Tokens to open the sub-menu.
-
Under Generated Token's Policies, add the
team-qapolicy. -
Click Save.

Associate aliases as entity members
You can set policies on the entity level that both accounts can inherit. In this section you will associate two aliases (bob and bsmith) as entity members.
-
Click Back to main navigation and click the Access tab, then under the Access menu on the left, click Entities.
-
Click Create entity.
-
For the name, use
bob-smith. -
For the Policies, choose
base.
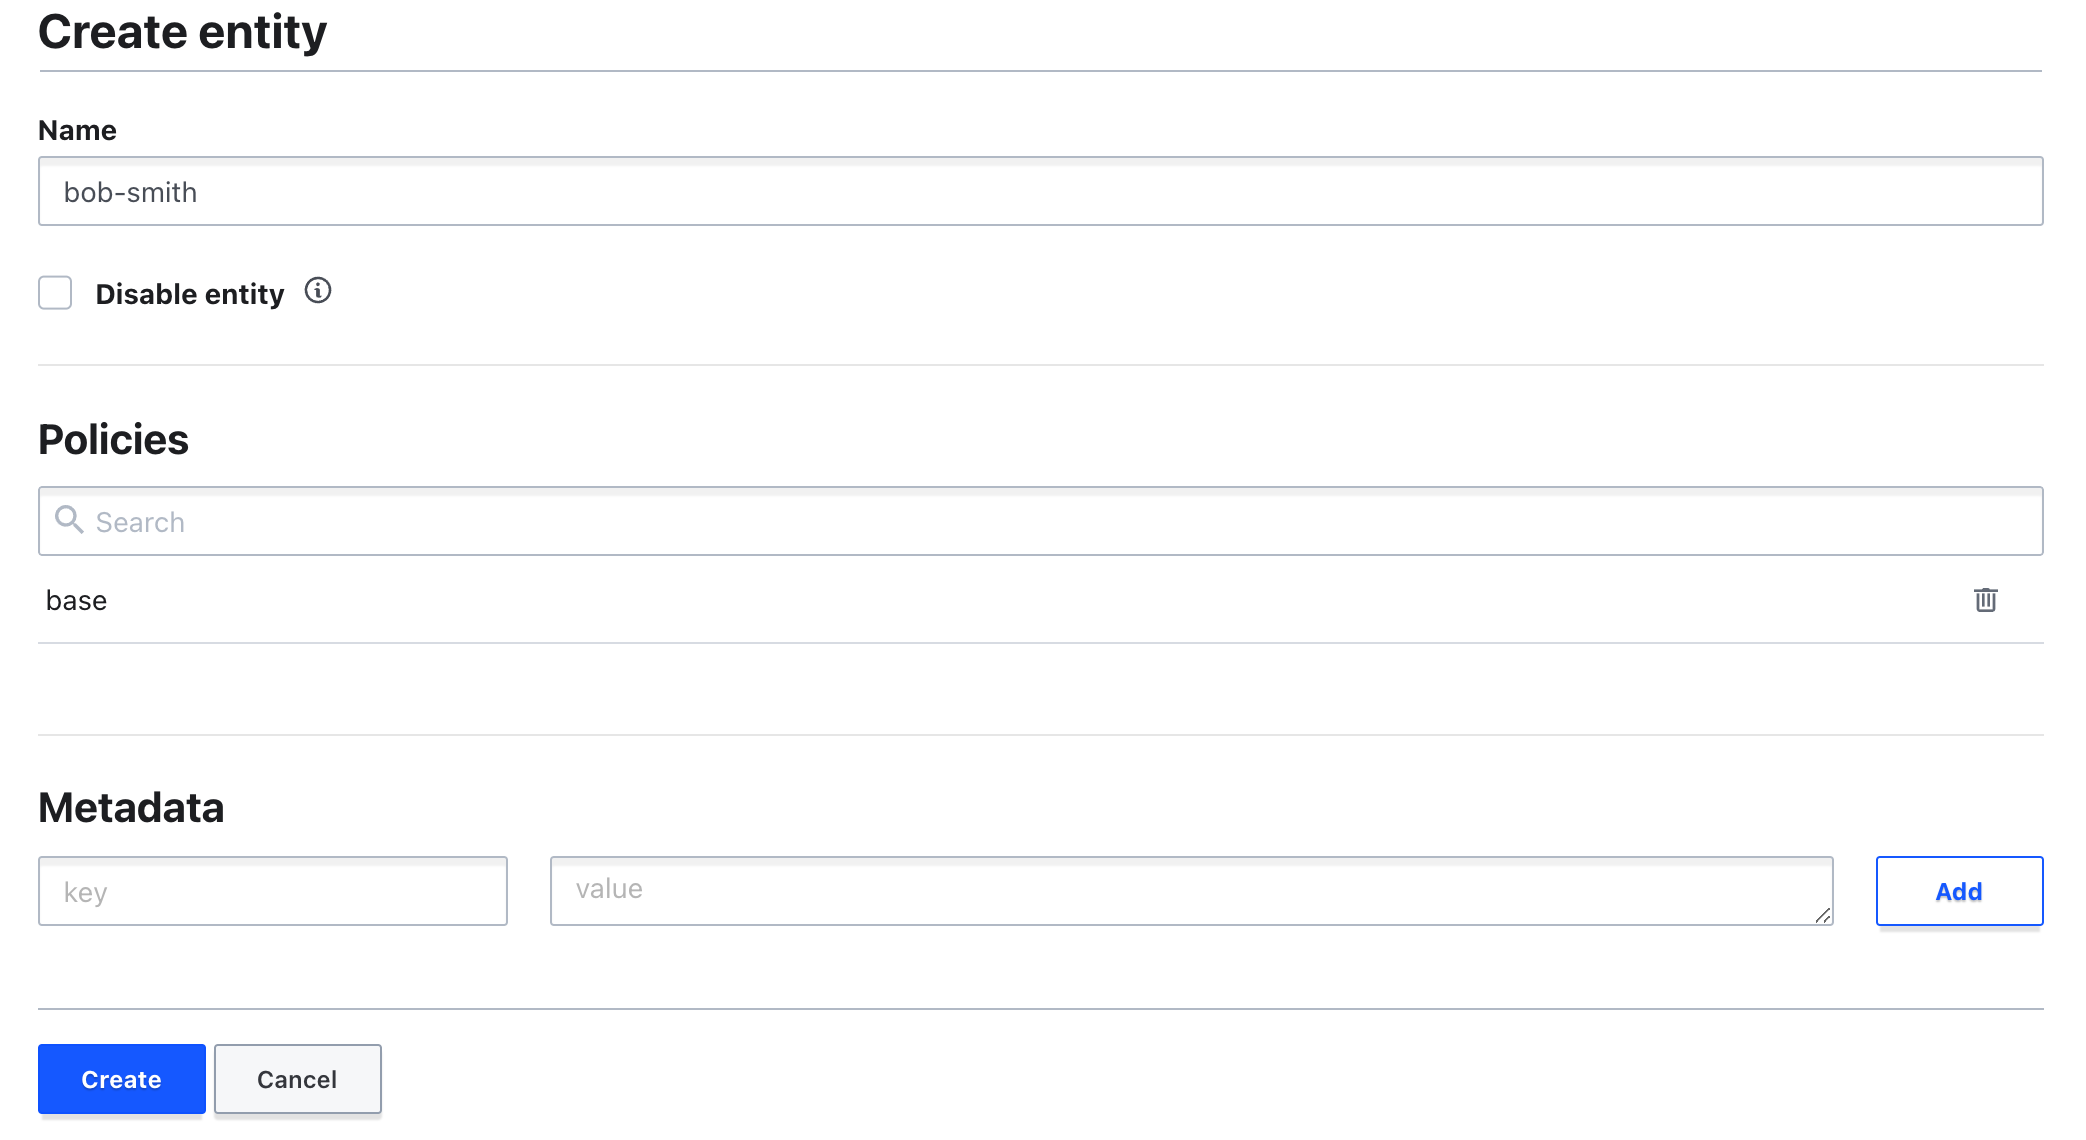
- Click Create.

Now it's time to create aliases.
-
Click Add alias.
-
For the Name, use
bob. -
For Auth Backend, select
userpass-test/.
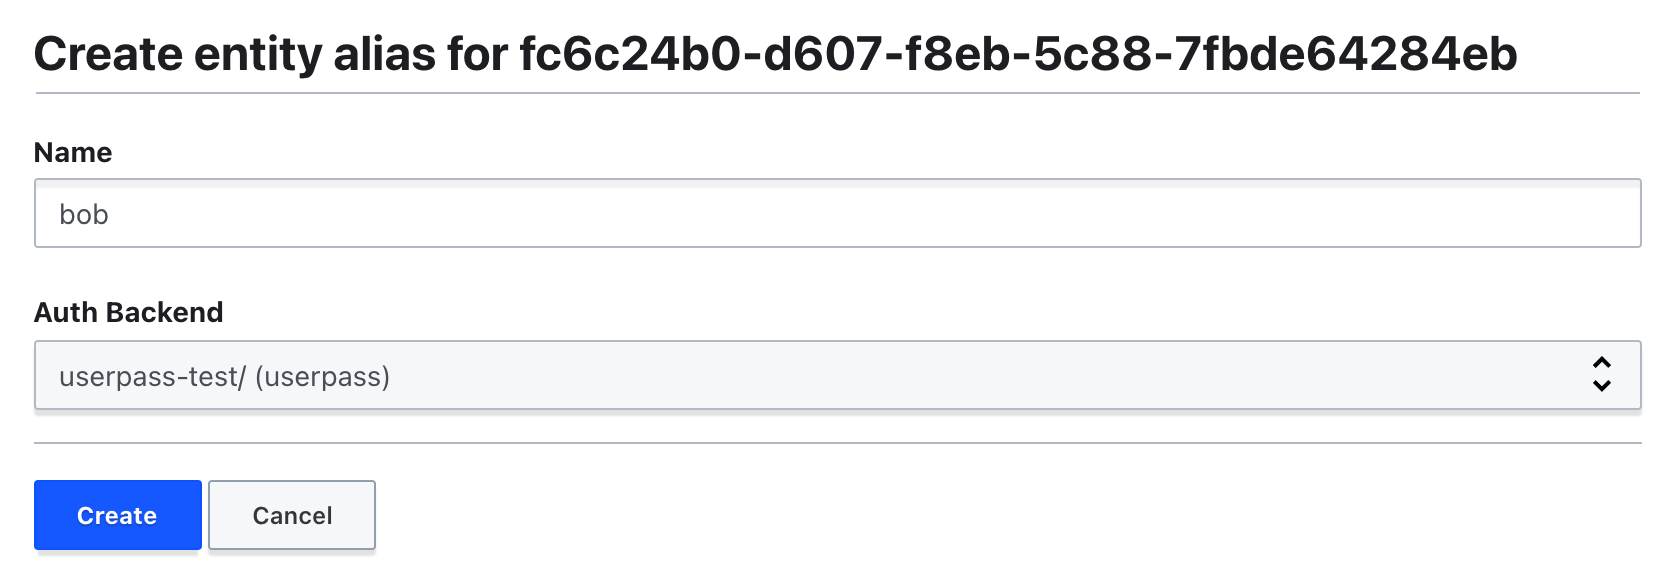
- Click Create. Your alias should resemble the following.
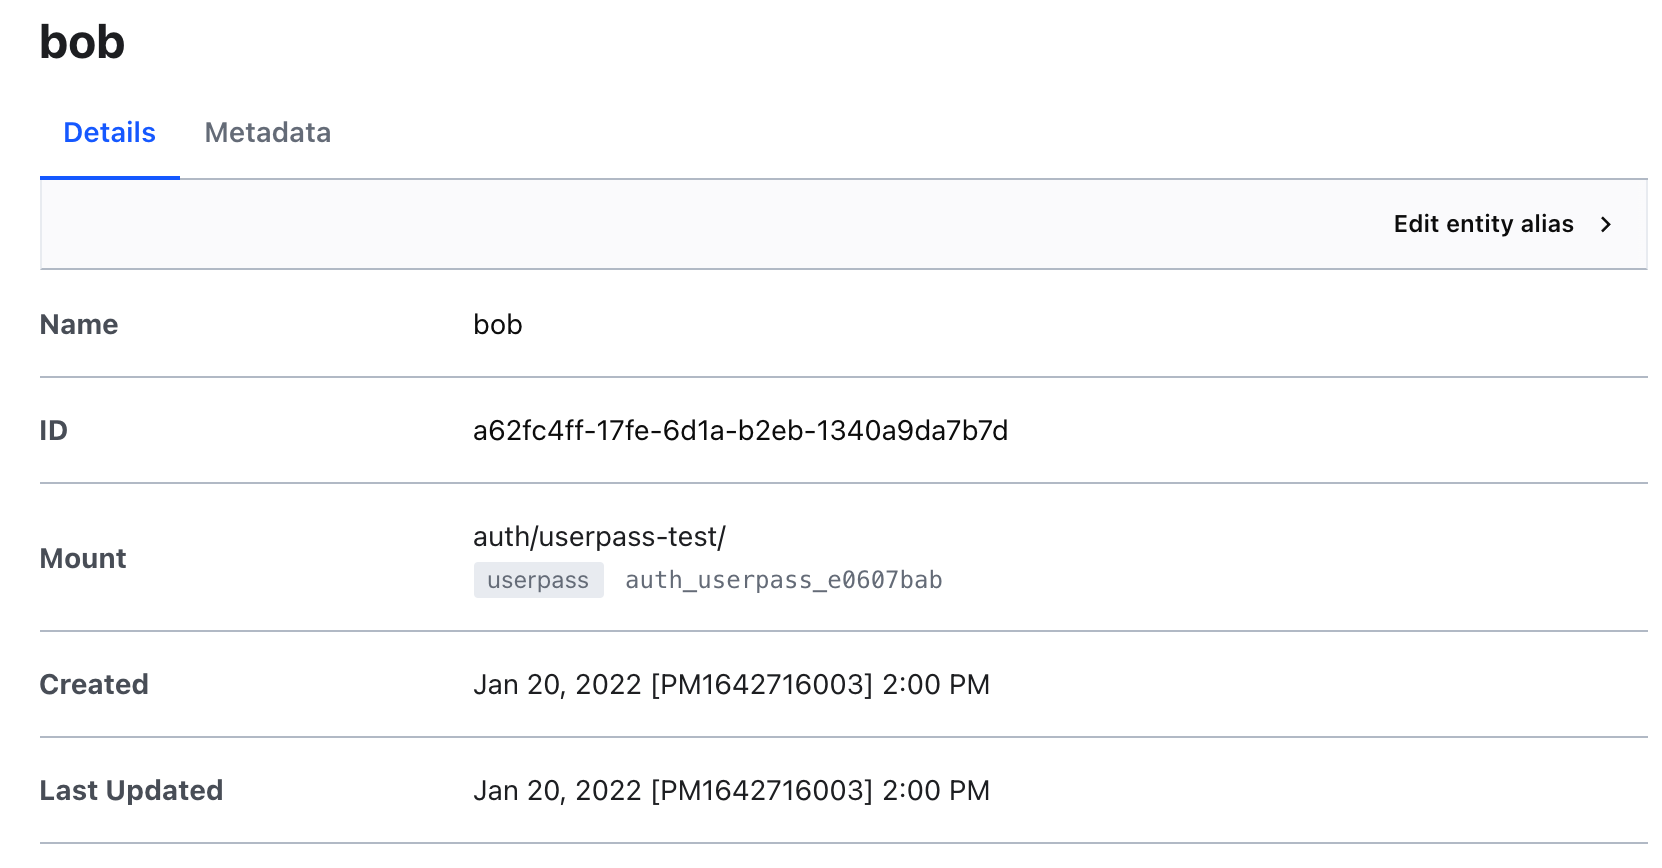
-
Navigate back to the bob-smith entity.
-
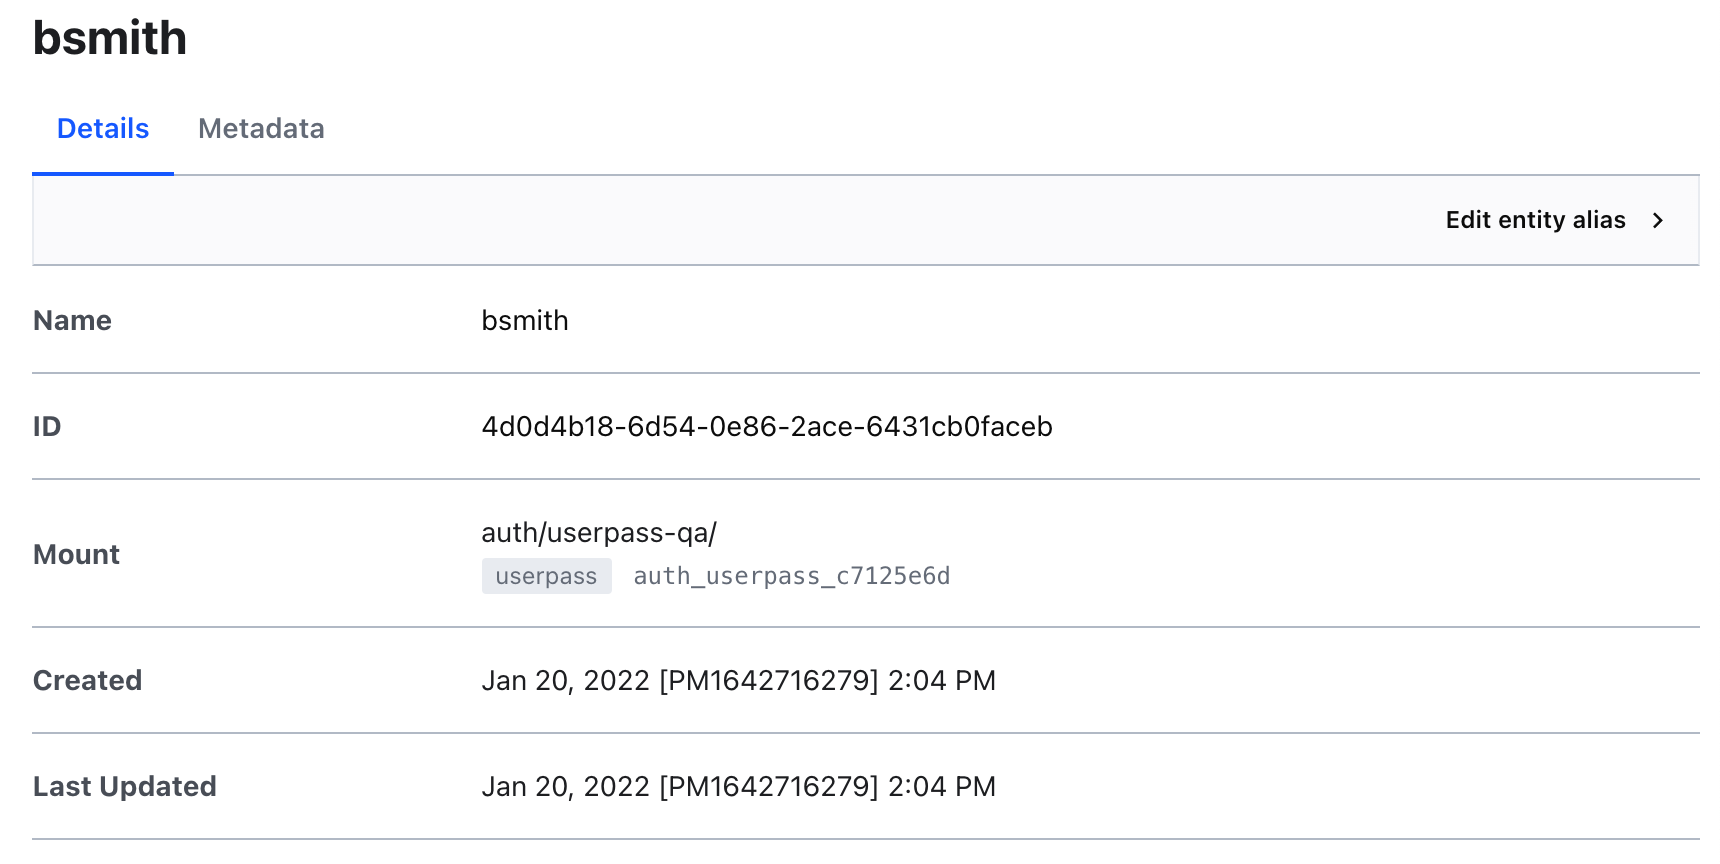
Click Add alias.
-
For the Name, use
bsmith. -
For Auth Backend, select
userpass-qa/.
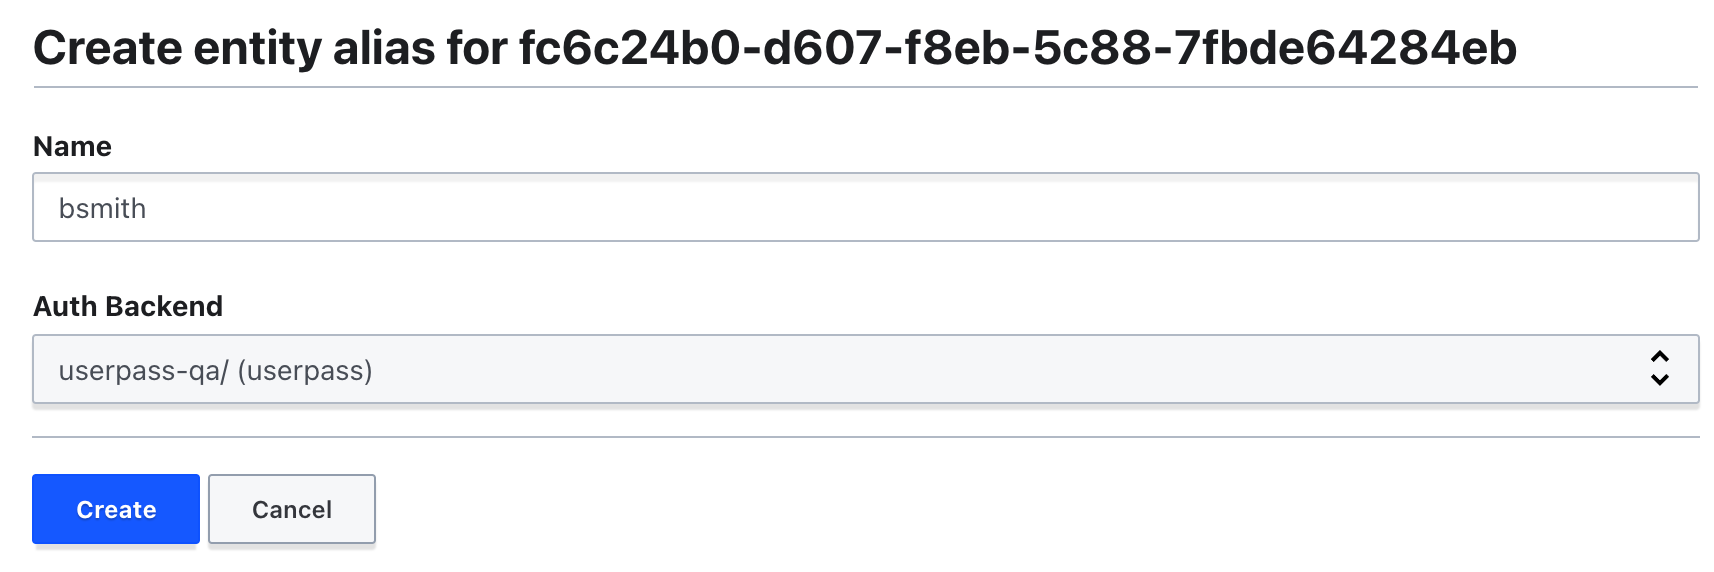
- Click Create. Your alias should resemble the following.
- Click Entities on the left menu to navigate back to the entities page. You should see the
bob-smithentity with 2 aliases.

Test the entity
- First, navigate back to Cloud Shell and run the following command to log in as the
bobuser:
You should see the following output:
- Notice the two lines:
identity_policiesandpolicies.
Here you see that within the policies, there are three policies attached: base, default, and test. The test policy is the one directly associated with the user, and the base policy is the one inherited by the entity.
The identity_policies shows which policies are coming directly from the entity. Although the username bob does not have base policy attached, the token inherits the capabilities granted in the base policy because bob is a member of the bob-smith entity, and the entity has base policy attached. Check to see that the bob's token inherited the capabilities.
- Copy the token for
boband run the following command to check the token capabilities:
You should see:
The base policy grants create and read capabilities on secret/training_* path; therefore bob is permitted to run create and read operations against any path starting with secret/training_*.
- What about the
secret/team-qapath?
You should see:
The user bob only inherits capability from its associating entity's policy. The user can access the secret/team-qa path only if he logs in with bsmith credentials. Let's try that now.
- Next, run the following command to log in as the
bsmithuser:
You should see the following output:
- Notice the two lines:
identity_policiesandpolicies.
Again, you see that within the policies, there are three policies attached: base, default, and team-qa. The team-qa policy is the one directly associated with the user, and the base policy is inheritied. You can now optionally test out the token capabilities.
Create an internal group
Vault identity has support for groups. A group can contain multiple entities as its members. A group can also have subgroups. Policies set on the group are granted to all members of the group. During request time, when the token's entity ID is being evaluated for the policies that it has access to, policies that are inherited due to group memberships are granted along with the policies on the entity itself.
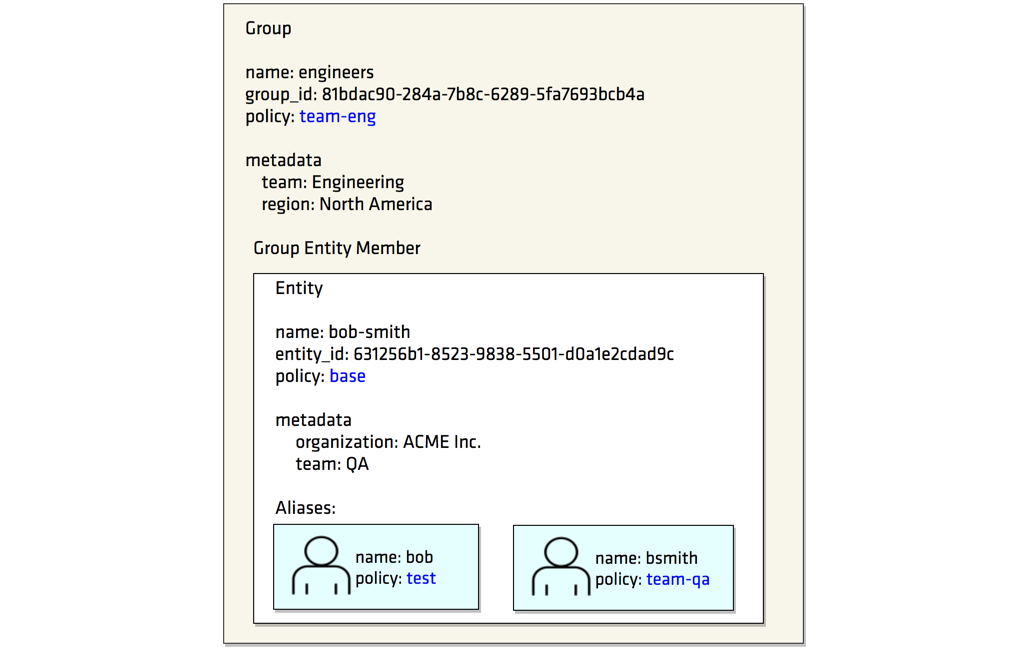
Now you are going to create an internal group named engineers. Its member is bob-smith entity that you created earlier.
-
Navigate back to the Vault UI and click on the Policies tab.
-
Click Create ACL Policy.
-
For the name, use
team-eng. -
In the Policy box, add the following policy:
-
Click Create policy.
-
Click the Access tab, then select Groups from the left hand side.
-
Click Create group.
-
For the name, use:
engineers. -
For Policies, choose
team-eng. -
For Member Entity IDs, select
bob-smith. -
Click Create.
Now verify that the user has inherited the policy.
- Navigate back to Cloud Shell and run the following command to log in as
bob:
You should see similar output:
- Notice the following lines:
Here you see that within the policies, there are now four policies attached: base, default, test, and team-eng. Within the identity_policies, you can also see that team-eng is now associated with the user. You can optionally log in with the bsmith user and verify this is the case as well.
By default, the groups created in identity store are called the internal groups. The membership management of these groups should be carried out manually. A group can also be created as an external group. In this case, the entity membership in the group is managed semi-automatically. An external group serves as a mapping to a group that is outside of the identity store. For more information on external groups, you can check out the following tutorial.
Congratulations!
In this lab, you learned about the different types of authentication and used the AppRole auth method in Vault. You then created users with distinct policies, associated aliases as entity members to an entity with a base policy, and created an internal group with an entity member.
Next steps / Learn more
Check out the following for more information on Vault
- Vault Getting Started tutorials
- Vault documentation
- Vault Identity documentation
- Vault Authentication documentation
Google Cloud training and certification
...helps you make the most of Google Cloud technologies. Our classes include technical skills and best practices to help you get up to speed quickly and continue your learning journey. We offer fundamental to advanced level training, with on-demand, live, and virtual options to suit your busy schedule. Certifications help you validate and prove your skill and expertise in Google Cloud technologies.
Manual Last Updated August 26, 2024
Lab Last Tested August 26, 2024
Copyright 2024 Google LLC All rights reserved. Google and the Google logo are trademarks of Google LLC. All other company and product names may be trademarks of the respective companies with which they are associated.

