GSP1047

Overview
Data validation is a critical step in data warehouse, database, or data lake migration. It involves comparing data from the source and target tables and verifying that they match after each migration step.
Data Validation Tool (DVT) is an open-sourced Python command line tool that provides an automated and repeatable solution for validation across different environments. The tool uses the open sourced Ibis framework to connect to a large number of data sources including BigQuery, Hive, Teradata, Cloud SQL, and more.
What you will learn
In this lab, you will learn and get hands-on experience and learn how to:
- Install DVT
- Create database connections
- Validate data through command line (schema, column, and row level)
- Run validations using a YAML config file
- Generate validation reports
Prerequisites
DVT prints results in the command line interface by default, but can also write results to BigQuery. It is recommended to use BigQuery as a report handler to store and analyze the output.
Setup and requirements
Before you click the Start Lab button
Read these instructions. Labs are timed and you cannot pause them. The timer, which starts when you click Start Lab, shows how long Google Cloud resources will be made available to you.
This hands-on lab lets you do the lab activities yourself in a real cloud environment, not in a simulation or demo environment. It does so by giving you new, temporary credentials that you use to sign in and access Google Cloud for the duration of the lab.
To complete this lab, you need:
- Access to a standard internet browser (Chrome browser recommended).
Note: Use an Incognito or private browser window to run this lab. This prevents any conflicts between your personal account and the Student account, which may cause extra charges incurred to your personal account.
- Time to complete the lab---remember, once you start, you cannot pause a lab.
Note: If you already have your own personal Google Cloud account or project, do not use it for this lab to avoid extra charges to your account.
How to start your lab and sign in to the Google Cloud console
-
Click the Start Lab button. If you need to pay for the lab, a pop-up opens for you to select your payment method.
On the left is the Lab Details panel with the following:
- The Open Google Cloud console button
- Time remaining
- The temporary credentials that you must use for this lab
- Other information, if needed, to step through this lab
-
Click Open Google Cloud console (or right-click and select Open Link in Incognito Window if you are running the Chrome browser).
The lab spins up resources, and then opens another tab that shows the Sign in page.
Tip: Arrange the tabs in separate windows, side-by-side.
Note: If you see the Choose an account dialog, click Use Another Account.
-
If necessary, copy the Username below and paste it into the Sign in dialog.
{{{user_0.username | "Username"}}}
You can also find the Username in the Lab Details panel.
-
Click Next.
-
Copy the Password below and paste it into the Welcome dialog.
{{{user_0.password | "Password"}}}
You can also find the Password in the Lab Details panel.
-
Click Next.
Important: You must use the credentials the lab provides you. Do not use your Google Cloud account credentials.
Note: Using your own Google Cloud account for this lab may incur extra charges.
-
Click through the subsequent pages:
- Accept the terms and conditions.
- Do not add recovery options or two-factor authentication (because this is a temporary account).
- Do not sign up for free trials.
After a few moments, the Google Cloud console opens in this tab.
Note: To view a menu with a list of Google Cloud products and services, click the Navigation menu at the top-left.

Activate Cloud Shell
Cloud Shell is a virtual machine that is loaded with development tools. It offers a persistent 5GB home directory and runs on the Google Cloud. Cloud Shell provides command-line access to your Google Cloud resources.
- Click Activate Cloud Shell
 at the top of the Google Cloud console.
When you are connected, you are already authenticated, and the project is set to your Project_ID, . The output contains a line that declares the Project_ID for this session:
Your Cloud Platform project in this session is set to {{{project_0.project_id | "PROJECT_ID"}}}
gcloud is the command-line tool for Google Cloud. It comes pre-installed on Cloud Shell and supports tab-completion.
- (Optional) You can list the active account name with this command:
gcloud auth list
- Click Authorize.
Output:
ACTIVE: *
ACCOUNT: {{{user_0.username | "ACCOUNT"}}}
To set the active account, run:
$ gcloud config set account `ACCOUNT`
- (Optional) You can list the project ID with this command:
gcloud config list project
Output:
[core]
project = {{{project_0.project_id | "PROJECT_ID"}}}
Note: For full documentation of gcloud, in Google Cloud, refer to the gcloud CLI overview guide.
Task 1: Install DVT on a Compute Engine VM
- From the Navigation menu, go to Compute Engine. You should see an instance running named
data-validator which has python and git already installed.
- Switch to it's SSH terminal where you will run DVT.
- Now run the below commands to install or update required software:
# Startup script for running DVT on GCE Debian 11 VM. Requires sudo
# Install or update needed software
sudo apt-get update
sudo apt-get install -yq git python3 python3-pip python3-distutils
sudo pip install --upgrade pip virtualenv
- Create a python virtual environment and install DVT using the commands below:
virtualenv -p python3 env
source env/bin/activate
# Install below 2 packages that are required for Hive connections
pip install hdfs
pip install thrift-sasl
# Install DVT
pip install google-pso-data-validator==4.3.0
- Verify if DVT commands are working fine by running:
data-validation -h
Once the DVT is installed successfully the above command provides output as shown.
(Output)
usage: The Data Validation CLI tool is intended to help to build and execute
data validation runs with ease.
The Data Validator can be called either using:
data-validation -h
python -m data_validation -h
ex.
Step 1) Store Connection to be used in validation
data-validation connections add -c my_bq_conn BigQuery --project-id pso-kokoro-resources
Step 2) Run Validation using supplied connections
data-validation validate column -sc my_bq_conn -tc my_bq_conn -tbls bigquery-public-data.new_york_citibike.citibike_trips,bigquery-public-data.new_york_citibike.citibike_stations --sum '*' --count '*'
python -m data_validation validate column -sc my_bq_conn -tc my_bq_conn -tbls bigquery-public-data.new_york_citibike.citibike_trips --grouped-columns starttime --sum tripduration --count tripduration
data-validation validate column -sc my_bq_conn -tc my_bq_conn -tbls bigquery-public-data.new_york_citibike.citibike_trips,bigquery-public-data.new_york_citibike.citibike_stations --sum tripduration,start_station_name --count tripduration,start_station_name -bqrh pso-kokoro-resources.pso_data_validator.results
-c ex_yaml.yaml
data-validation run-config -c ex_yaml.yaml
positional arguments:
{validate,run-config,configs,connections,find-tables,query,run,beta}
validate Run a validation and optionally store to config
run-config Run validations stored in a YAML config file. Note: the 'configs run' command is now the recommended approach
configs Run validations stored in a YAML config file
connections Manage & Store connections to your Databases
find-tables Build tables list using approx string matching
query Run an adhoc query against the supplied connection
run Run a validation and optionally store to config (deprecated)
beta Run a Beta command for new utilities and features.
optional arguments:
-h, --help show this help message and exit
--verbose, -v Verbose logging
(env) student-04-43eb3a811a93@data-validator:~$
Click Check my progress to verify the objective.
Install DVT on a Compute Engine VM
Task 2: Create source and target connections
- DVT supports multiple connection types. To list the supported connection types run the command:
data-validation connections add -h
- Replace the <PROJECT_ID> with provided project ID in the connection details pane and run the below command:
gcloud config set project <PROJECT_ID>
export PROJECT_ID=$(gcloud config get-value project)
- You will be comparing a Hive database running on Dataproc to a BigQuery dataset in the same project. First, create the source connection for Hive by running the following:
When Hive is running on Dataproc, the HOST should be the master node internal IP address.
From the Navigation menu, go to Compute Engine. You should see an instance running with the name hive-cluster-m.
Copy the internal IP of hive-cluster-m instance, and replace it with <DATAPROC_MASTER_IP> in the below command. Now run the command:
data-validation connections add --connection-name HIVE_CONN Impala --host <DATAPROC_MASTER_IP> --port 10000 --database default
(Output)
Without an HDFS connection, certain functionality may be disabled
Success! Config output written to /home/student-04-43eb3a811a93/.config/google-pso-data-validator/HIVE_CONN.connection.json
(env) student-04-43eb3a811a93@data-validator:~$
- Create the target connection for BigQuery:
# BigQuery Target Connection
data-validation connections add --connection-name BQ_CONN BigQuery --project-id $PROJECT_ID
As you see above, Hive and Bigquery have different sets of custom arguments (i.e ‘project' for BQ versus ‘host' for Hive).
(Output)
Success! Config output written to /home/student-04-43eb3a811a93/.config/google-pso-data-validator/BQ_CONN.connection.json
- Every connection type requires its own configuration for connectivity. To find out the parameters for each connection type, use the following command:
data-validation connections add -h
- This command will list the existing connections:
data-validation connections list
You will see the two connections listed.
(Output)
Connection Name: BQ_CONN
Connection Name: HIVE_CONN
Click Check my progress to verify the objective.
Create source and target connections
Task 3: Run data validations
Now run a validation between Hive and BigQuery. This will check if the underlying data within the Hive Dataproc cluster and the BigQuery dataset is the same.
The default validation if no aggregation provided is COUNT(*). The tool will count the number of rows in the source table and verify it matches the count on the target table.
Tables against which validations can be performed are:
Hive: default.mascots
BigQuery: $PROJECT_ID.dvtlab.mascots,
$PROJECT_ID.dvtlab.mascots_errordata (This table does not completely match with the Hive mascots table.)
The Hive and BigQuery tables are already created on Dataproc and BigQuery respectively.
To verify BigQuery data:
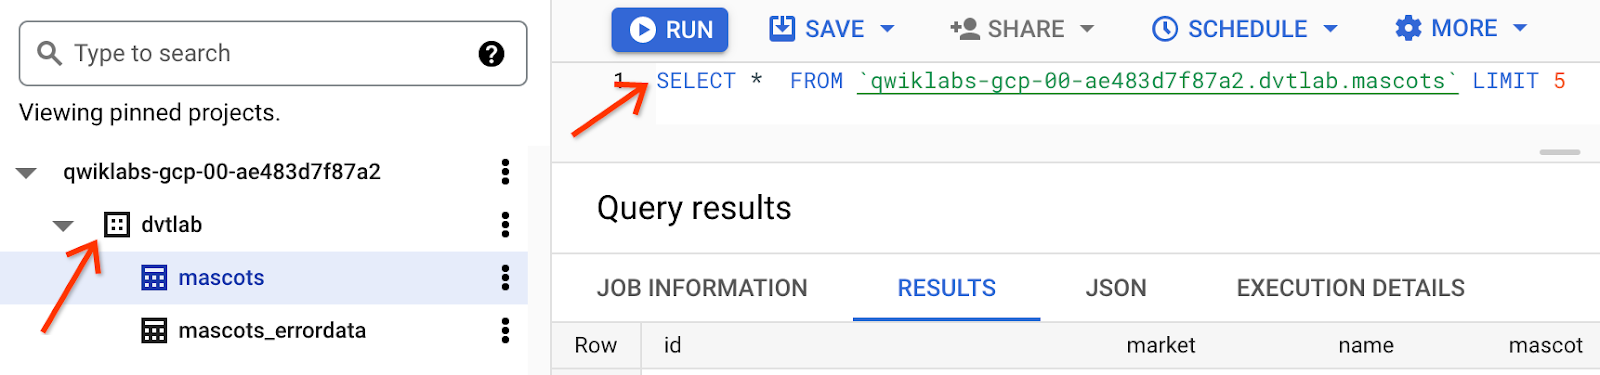
- Search for
BigQuery in the Cloud Console search bar, then select BigQuery to open it.
- Expand the project starting with
qwiklabs. You should now see the dataset dvtlab. Expand the dataset to view the 2 BigQuery tables.
To verify Hive data: SSH into hive-cluster-m server.
- Connect to hive database by typing "
hive" in the terminal
- Run the following to view the data in hive terminal:
select * from default.mascots limit 5;
(Output)
Query ID = student-01-529b6474fc3a_20230214070225_1d4f5442-f5a4-4cec-8fa4-677e9a5a4123
Total jobs = 1
Launching Job 1 out of 1
Status: Running (Executing on YARN cluster with App id application_1676278603927_0002)
....
Column Validation
Next, run the following scripts to perform validations at different levels in the SSH of data-validator VM.
data-validation validate column \
--source-conn HIVE_CONN \
--target-conn BQ_CONN \
--tables-list default.mascots=$PROJECT_ID.dvtlab.mascots
This will run a simple COUNT (*) on both source and target and ensure the results match. You can see the results in the source_agg_value and target_agg_value columns and the final status as ‘success'. See all the options for column validations including column aggregations like SUM() and AVG() here.
Column validation output:
Without an HDFS connection, certain functionality may be disabled
Without an HDFS connection, certain functionality may be disabled
╤════════╤════════════════════╤══════════════╤══════════════════╤═════════════════════╕
││ validation_name│validation_type│source_table_name │source_column_name│source_agg_value │ target_table_name │target_column_name │target_agg_value│group_by_columns│ difference │ pct_difference│validation_status│
╞════╪═══════════════════╪═══════════════════╪═════════════════════╪═══════════════════
═════════════════╡
│ 0 │ count │ Column │ default.mascots │ │ 351 │ qwiklabs-gcp-04-3e734784336c.dvtlab.mascots │ │ 351 │ │ 0 │ 0 │ success │
╘════╧═══════════════════╧═══════════════════╧═════════════════════╧══════════════════════╧════════════════════╧═════════════════════════════════════════════╧══════════════════════╧════════════════════╧════════════════════╧══════════════╧══════════════════╧═════════════════════╛
(env) student-04-43eb3a811a93@data-validator:~$
Sum validation
data-validation validate column \
--source-conn HIVE_CONN \
--target-conn BQ_CONN \
--tables-list default.mascots=$PROJECT_ID.dvtlab.mascots \
--sum price
Sum validation output
Without an HDFS connection, certain functionality may be disabled
Without an HDFS connection, certain functionality may be disabled
╤════════╤════════════════════╤══════════════╤══════════════════╤═════════════════════╕
││ validation_name│validation_type│source_table_name │source_column_name│source_agg_value │ target_table_name │target_column_name │target_agg_value│group_by_columns│ difference │ pct_difference│validation_status│
╞════╪═══════════════════╪═══════════════════╪═════════════════════╪══════════════════════╪════════════════════╪═════════════════════════════════════════════╪══════════════════════╪════════════════════╪════════════════════╪══════════════╪══════════════════╪═════════════════════╡
│ 0 │ sum__price │ Column │ default.mascots │ price │ 14130 │ qwiklabs-gcp-04-3e734784336c.dvtlab.mascots │ price │ 14130 │ │ 0 │ 0 │ success │
├────┼───────────────────┼───────────────────┼─────────────────────┼──────────────────────┼────────────────────┼─────────────────────────────────────────────┼──────────────────────┼────────────────────┼────────────────────┼──────────────┼──────────────────┼─────────────────────┤
│ 1 │ count │ Column │ default.mascots │ │ 351 │ qwiklabs-gcp-04-3e734784336c.dvtlab.mascots │ │ 351 │ │ 0 │ 0 │ success │
╘════╧═══════════════════╧═══════════════════╧═════════════════════╧══════════════════════╧════════════════════╧═════════════════════════════════════════════╧══════════════════════╧════════════════════╧════════════════════╧══════════════╧══════════════════╧═════════════════════╛
(env) student-04-43eb3a811a93@data-validator:~$
Row Validation
data-validation validate row \
--source-conn HIVE_CONN \
--target-conn BQ_CONN \
--tables-list default.mascots=$PROJECT_ID.dvtlab.mascots \
--hash '*' \
--primary-keys id \
--use-random-row --random-row-batch-size 50
This will run a checksum validation where it will first sanitize the data and then hash each row and compare the results. The --use-random-row and --random-row-batch-size flags specify that you want to only validate a subset of rows at random. This comes in handy when you have large tables since row validation requires more memory and compute than column level validation. In this validation, select 50 rows from the source and validate that they have an exact match in the target dataset.
This screenshot shows the validation for only 1 randomly selected row but it can be run with more rows.
Row validation output
Without an HDFS connection, certain functionality may be disabled
Without an HDFS connection, certain functionality may be disabled
WARNING:root:Data Client <class 'ibis.backends.impala.client.ImpalaClient'> Does Not Enforce Random Sort on Sample
╒════╤═══════════════════╤═══════════════════╤═════════════════════╤══════════════════════╤══════════════════════════════════════════════════════════════════╤═════════════════════════════════════════════╤══════════════════════╤══════════════════════════════════════════════════════════════════╤════════════════════════════════════════════════╤══════════════╤══════════════════╤═════════════════════╕
│ │ validation_name │ validation_type │ source_table_name │ source_column_name │ source_agg_value │ target_table_name │ target_column_name │ target_agg_value │ group_by_columns │ difference │ pct_difference │ validation_status │
╞════╪═══════════════════╪═══════════════════╪═════════════════════╪══════════════════════╪══════════════════════════════════════════════════════════════════╪═════════════════════════════════════════════╪══════════════════════╪══════════════════════════════════════════════════════════════════╪════════════════════════════════════════════════╪══════════════╪══════════════════╪═════════════════════╡
│ 0 │ hash__all │ Row │ default.mascots │ hash__all │ 9ca394296c14c44377aba5b1531a5b9268580a6b76ec2b44a88a090343ab37bf │ qwiklabs-gcp-04-3e734784336c.dvtlab.mascots │ hash__all │ 9ca394296c14c44377aba5b1531a5b9268580a6b76ec2b44a88a090343ab37bf │ {"id": "bdc2561d-f603-4fab-a262-f1d2af462277"} │ │ │ success │
╘════╧═══════════════════╧═══════════════════╧═════════════════════╧══════════════════════╧══════════════════════════════════════════════════════════════════╧═════════════════════════════════════════════╧══════════════════════╧══════════════════════════════════════════════════════════════════╧════════════════════════════════════════════════╧══════════════╧══════════════════╧═════════════════════╛
(env) student-04-43eb3a811a93@data-validator:~$
Schema Validation
data-validation validate schema \
--source-conn HIVE_CONN \
--target-conn BQ_CONN \
--tables-list default.mascots=$PROJECT_ID.dvtlab.mascots
Schema validation will get the column data type for each column in the source and verify that it matches the target. Read more about schema validation here.
In this screenshot the validation_status for 2 columns fails, that's because hive translates Integer to int32 and BigQuery translates it to int64.
Schema validation output
Without an HDFS connection, certain functionality may be disabled
Without an HDFS connection, certain functionality may be disabled
╒════╤═══════════════════╤═══════════════════╤══════════╤═════════════════════╤═════════════════════════════════════════════╤══════════════════════╤══════════════════════╤═════════════════════╕
│ │ validation_name │ validation_type │ labels │ source_table_name │ target_table_name │ source_column_name │ target_column_name │ validation_status │
╞════╪═══════════════════╪═══════════════════╪══════════╪═════════════════════╪═════════════════════════════════════════════╪══════════════════════╪══════════════════════╪═════════════════════╡
│ 0 │ Schema │ Schema │ [] │ default.mascots │ qwiklabs-gcp-04-3e734784336c.dvtlab.mascots │ id │ id │ success │
├────┼───────────────────┼───────────────────┼──────────┼─────────────────────┼─────────────────────────────────────────────┼──────────────────────┼──────────────────────┼─────────────────────┤
│ 1 │ Schema │ Schema │ [] │ default.mascots │ qwiklabs-gcp-04-3e734784336c.dvtlab.mascots │ market │ market │ success │
├────┼───────────────────┼───────────────────┼──────────┼─────────────────────┼─────────────────────────────────────────────┼──────────────────────┼──────────────────────┼─────────────────────┤
│ 2 │ Schema │ Schema │ [] │ default.mascots │ qwiklabs-gcp-04-3e734784336c.dvtlab.mascots │ name │ name │ success │
├────┼───────────────────┼───────────────────┼──────────┼─────────────────────┼─────────────────────────────────────────────┼──────────────────────┼──────────────────────┼─────────────────────┤
│ 3 │ Schema │ Schema │ [] │ default.mascots │ qwiklabs-gcp-04-3e734784336c.dvtlab.mascots │ mascot │ mascot │ success │
├────┼───────────────────┼───────────────────┼──────────┼─────────────────────┼─────────────────────────────────────────────┼──────────────────────┼──────────────────────┼─────────────────────┤
│ 4 │ Schema │ Schema │ [] │ default.mascots │ qwiklabs-gcp-04-3e734784336c.dvtlab.mascots │ mascot_name │ mascot_name │ success │
├────┼───────────────────┼───────────────────┼──────────┼─────────────────────┼─────────────────────────────────────────────┼──────────────────────┼──────────────────────┼─────────────────────┤
│ 5 │ Schema │ Schema │ [] │ default.mascots │ qwiklabs-gcp-04-3e734784336c.dvtlab.mascots │ mascot_common_name │ mascot_common_name │ success │
├────┼───────────────────┼───────────────────┼──────────┼─────────────────────┼─────────────────────────────────────────────┼──────────────────────┼──────────────────────┼─────────────────────┤
│ 6 │ Schema │ Schema │ [] │ default.mascots │ qwiklabs-gcp-04-3e734784336c.dvtlab.mascots │ flag │ flag │ fail │
├────┼───────────────────┼───────────────────┼──────────┼─────────────────────┼─────────────────────────────────────────────┼──────────────────────┼──────────────────────┼─────────────────────┤
│ 7 │ Schema │ Schema │ [] │ default.mascots │ qwiklabs-gcp-04-3e734784336c.dvtlab.mascots │ price │ price │ fail │
╘════╧═══════════════════╧═══════════════════╧══════════╧═════════════════════╧═════════════════════════════════════════════╧══════════════════════╧══════════════════════╧═════════════════════╛
(env) student-04-43eb3a811a93@data-validator:~$
Click Check my progress to verify the objective.
Run a validation between Hive and BigQuery
Task 4: Run data validations using YAML config file
Another method of running validations is by saving your validation configuration to a YAML file. This way you can store previous validations and modify your validation configuration easily.
By providing the --config-file flag, you can generate the YAML file. The validation will not execute when this flag is provided; instead, only the configuration file will be generated.
By default, YAML config files will be stored locally wherever you are running DVT. You can also save your config files to GCS by setting the PSO_DV_CONFIG_HOME=path/to/gcs/bucket environment variable. Read more here.
- Generate the YAML configuration file by specifying the
--config-file flag and the YAML file you want to create named ‘mascots.yaml'.
data-validation validate column \
--source-conn HIVE_CONN \
--target-conn BQ_CONN \
--tables-list default.mascots=$PROJECT_ID.dvtlab.mascots \
--config-file mascots.yaml
(Output)
Without an HDFS connection, certain functionality may be disabled
Success! Config output written to ./mascots.yaml
- This is a sample YAML configuration file for GroupedColumn Validation.
vi mascots_groupedcol.yaml
result_handler:
project_id: my-project-id
table_id: pso_data_validator.results
type: BigQuery
source: HIVE_CONN
target: BQ_CONN
validations:
- aggregates:
- field_alias: count
source_column: null
target_column: null
type: count
- field_alias: sum__num_bikes_available
source_column: num_bikes_available
target_column: num_bikes_available
type: sum
- field_alias: sum__num_docks_available
source_column: num_docks_available
target_column: num_docks_available
type: sum
filters:
- source: region_id=71
target: region_id=71
type: custom
grouped_columns:
- cast: null
field_alias: region_id
source_column: region_id
target_column: region_id
labels:
- !!python/tuple
- description
- test
schema_name: default
table_name: mascots
target_schema_name: $PROJECT_ID.dvtlab
target_table_name: mascots
threshold: 0.0
type: GroupedColumn
- Once the yaml file is ready:
- You can view a list of all saved validation YAML files using:
data-validation configs list
- Print a YAML config using:
data-validation configs get -c mascots.yaml
- Run the validation using:
data-validation configs run -c mascots.yaml
Click Check my progress to verify the objective.
Run data validations using YAML config file
Task 5: Generate validation reports
The output handler tells DVT where to store the results of each validation. The tool can write the results of a validation run to BigQuery or print the results in the command line (default).
Store the results in BigQuery with the following steps:
- You can use the bq command line tool from the Google Cloud SDK or VM to create the table using the result_schema.json file.
Follow below steps to create a results table in Bigquery:
- In Cloud Shell, open a
vi editor and create a file named results_schema.json then add the below script:
[
{
"name": "run_id",
"type": "STRING",
"description": "Unique validation run id"
},
{
"name": "validation_name",
"type": "STRING",
"description": "Unique name of the validation"
},
{
"name": "validation_type",
"type": "STRING",
"description": "Enum value of validation types [Column, GroupedColumn]"
},
{
"name": "start_time",
"type": "TIMESTAMP",
"description": "Timestamp when the validation starts"
},
{
"name": "end_time",
"type": "TIMESTAMP",
"description": "Timestamp when the validation finishes"
},
{
"name": "source_table_name",
"type": "STRING",
"description": "Source table name with schema info"
},
{
"name": "target_table_name",
"type": "STRING",
"description": "Target table name with schema info"
},
{
"name": "source_column_name",
"type": "STRING",
"description": "Source column name"
},
{
"name": "target_column_name",
"type": "STRING",
"description": "Target column name"
},
{
"name": "aggregation_type",
"type": "STRING",
"description": "Aggregation type: count, min, max, avg, sum"
},
{
"name": "group_by_columns",
"type": "STRING",
"description": "Group by columns, stored as a key-value JSON mapping"
},
{
"name": "primary_keys",
"type": "STRING",
"description": "Primary keys for the validation"
},
{
"name": "num_random_rows",
"type": "INTEGER",
"description": "Number of random row batch size"
},
{
"name": "source_agg_value",
"type": "STRING",
"description": "Source aggregation result, casted to a string"
},
{
"name": "target_agg_value",
"type": "STRING",
"description": "Target aggregation result, casted to a string"
},
{
"name": "difference",
"type": "FLOAT",
"description": "Difference between the source and target aggregation result (derived from target_agg_value and source_agg_value for convenience)"
},
{
"name": "pct_difference",
"type": "FLOAT",
"description": "Percentage difference between the source and target aggregation result, based on source_agg_value."
},
{
"name": "pct_threshold",
"type": "FLOAT",
"description": "Percentage difference threshold set by the user, based on source_agg_value."
},
{
"name": "validation_status",
"type": "STRING",
"description": "Status of the validation. If the pct_difference is less than pc_threshold, it is considered as success. [success, fail]"
},
{
"name": "labels",
"type": "RECORD",
"mode": "REPEATED",
"description": "Validation run labels.",
"fields": [
{
"name": "key",
"type": "STRING",
"description": "Label key."
},
{
"name": "value",
"type": "STRING",
"description": "Label value."
}
]
},
{
"name": "configuration_json",
"type": "STRING",
"description": "JSON representation of the validation metadata"
},
{
"name": "error_result",
"type": "RECORD",
"description": "Error info for debugging purpose",
"fields": [
{
"name": "code",
"type": "INTEGER",
"description": "Error code. See: https://cloud.google.com/apis/design/errors#handling_errors"
},
{
"name": "message",
"type": "STRING",
"description": "A developer-facing error message, which should be in English."
},
{
"name": "details",
"type": "STRING",
"description": "JSON-encoded information about the error(s)."
}
]
}
]
Save the file and exit from vi.
- Now run the below command in Cloud Shell to create dataset and table in BigQuery where the validation results will be stored:
export FILE_PATH=$(echo $HOME)
bq mk --dataset $PROJECT_ID:data_validator
bq mk --table \
--time_partitioning_field start_time \
--clustering_fields validation_name,run_id \
$PROJECT_ID:data_validator.results \
$FILE_PATH/results_schema.json
-
SSH into the data-validator Compute Engine instance. You will now run DVT.
-
Run a validation and save the validation results in the newly created BQ table:
data-validation validate column \
--source-conn HIVE_CONN \
--target-conn BQ_CONN \
--tables-list default.mascots=$PROJECT_ID.dvtlab.mascots \
--bq-result-handler $PROJECT_ID.data_validator.results
Next, query the results from the BigQuery table.
- Navigate to BigQuery from the Cloud Console, then run the below query to view the validation report:
Example:
select * from data_validator.results
- Identify any failed validations by analyzing the report:
Failed Validation: This validation is for the mascots table in Hive with mascots_errordata table in BQ to illustrate the validation failure when there is data mismatch between the source and target tables.
data-validation validate column \
--source-conn HIVE_CONN \
--target-conn BQ_CONN \
--tables-list default.mascots=$PROJECT_ID.dvtlab.mascots_errordata \
--sum price
You will notice the column validation for the price column will fail.
To find out more details, run a row validation and save the results to BigQuery for analysis.
Run a row validation by running the following command in the VM:
data-validation validate row \
--source-conn HIVE_CONN \
--target-conn BQ_CONN \
--tables-list default.mascots=$PROJECT_ID.dvtlab.mascots_errordata \
--hash '*' \
--primary-keys id \
--bq-result-handler $PROJECT_ID.data_validator.results
View the output of row validation by querying the BigQuery results table.
#Run below query to view the output of row validation:
#Copy your project id and replace <PROJECT_ID> with it.
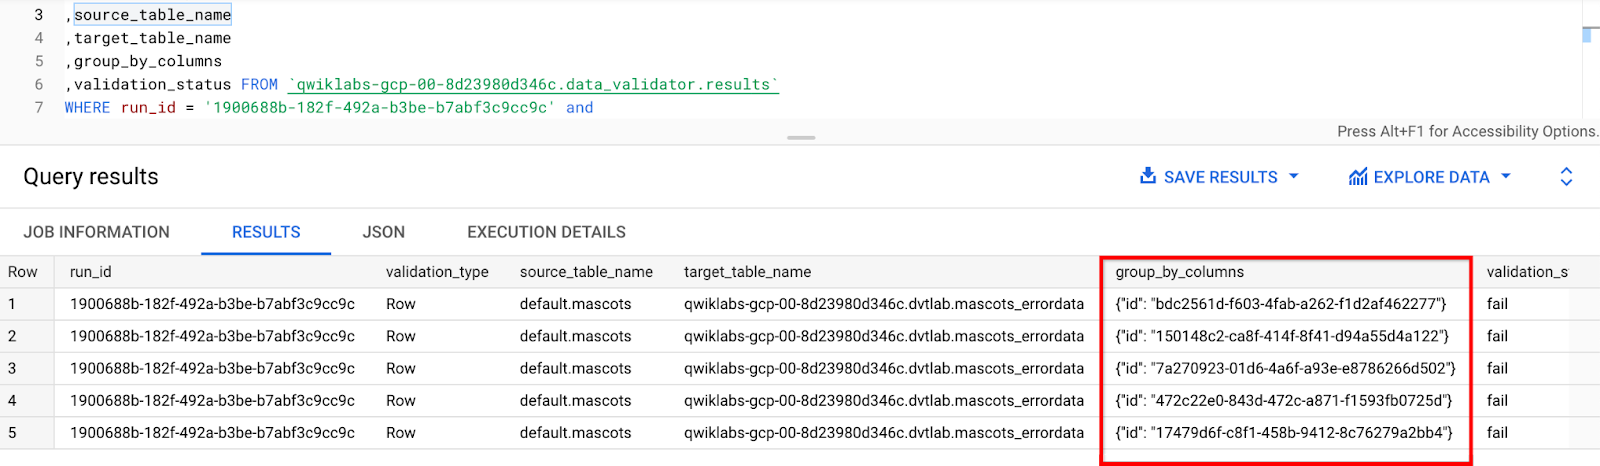
select * from `<PROJECT_ID>.data_validator.results`;
# Copy the run_id from above query results and paste it in for the following query to view the failed validations:
#To find out the
SELECT run_id
,validation_type
,source_table_name
,target_table_name
,group_by_columns
,validation_status FROM `<PROJECT_ID>.data_validator.results`
WHERE run_id = '$RUN_ID' and
validation_status = 'fail'
This query will show the primary keys for the rows with mismatched data between Hive and BigQuery as shown below. Now, you can run queries on the source and target tables and filter by those primary key values to see the actual mismatch if necessary.
Click Check my progress to verify the objective.
Generate validation reports
Congratulations!
Data Validation is a critical part of migrating data successfully. You got hands-on on how to install DVT, create connections and perform validations now you can start incorporating DVT into your data movement process.
Next steps / Learn more
- Find more information on sources and connections in the Connection Guide.
- See all the options for row validations here.
Google Cloud training and certification
...helps you make the most of Google Cloud technologies. Our classes include technical skills and best practices to help you get up to speed quickly and continue your learning journey. We offer fundamental to advanced level training, with on-demand, live, and virtual options to suit your busy schedule. Certifications help you validate and prove your skill and expertise in Google Cloud technologies.
Manual Last Updated July 18, 2024
Lab Last Tested July 18, 2024
Copyright 2024 Google LLC All rights reserved. Google and the Google logo are trademarks of Google LLC. All other company and product names may be trademarks of the respective companies with which they are associated.

