GSP393

Overview
In a challenge lab you’re given a scenario and a set of tasks. Instead of following step-by-step instructions, you will use the skills learned from the labs in the course to figure out how to complete the tasks on your own! An automated scoring system (shown on this page) will provide feedback on whether you have completed your tasks correctly.
When you take a challenge lab, you will not be taught new Google Cloud concepts. You are expected to extend your learned skills, like changing default values and reading and researching error messages to fix your own mistakes.
To score 100% you must successfully complete all tasks within the time period!
This lab is recommended for students enrolled in the Implement CI/CD Pipelines on Google Cloud course. Are you ready for the challenge?
Topics tested
- Using Cloud Build and Artifact Registry for containers.
- Setting up Cloud Deploy pipelines using Skaffold.
- Deploying to multiple environments with promotion approvals.
- Rolling back deployments.
Setup
Before you click the Start Lab button
Read these instructions. Labs are timed and you cannot pause them. The timer, which starts when you click Start Lab, shows how long Google Cloud resources are made available to you.
This hands-on lab lets you do the lab activities in a real cloud environment, not in a simulation or demo environment. It does so by giving you new, temporary credentials you use to sign in and access Google Cloud for the duration of the lab.
To complete this lab, you need:
- Access to a standard internet browser (Chrome browser recommended).
Note: Use an Incognito (recommended) or private browser window to run this lab. This prevents conflicts between your personal account and the student account, which may cause extra charges incurred to your personal account.
- Time to complete the lab—remember, once you start, you cannot pause a lab.
Note: Use only the student account for this lab. If you use a different Google Cloud account, you may incur charges to that account.
You must wait for the lab to provision before making any changes to the environment! The pre-configured parts of the environment that you need to work with will be available to you as soon as the lab indicates it is ready.
Challenge Scenario
You have started a new role as a Cloud Engineer for Jooli Inc. New management has decided to modernize and believe it's best to completely replace their legacy systems with managed infrastructure and automated integration and delivery pipelines. They have tasked you with finding and testing the best tools and services to achieve this.
By the end of the day, management would like to see a proof of concept that can address all of the following:
- Container images stored in a secure and reliable registry.
- Automatic container image scanning with detailed reports on security vulnerabilities.
- A test web application running on managed infrastructure.
- A CI/CD pipeline defined as code in order to eliminate manual errors.
- A reliable, easy, and quick way to deploy code and promote to a production-like environment or rollback if necessary.
You're expected to help manage the Cloud infrastructure and deployment tools at Jooli. Common tasks include provisioning resources for projects and implementing new products and services to ensure Jooli Inc. is modernizing effectively and following best practices.
You are expected to have the skills and knowledge for these tasks, so step-by-step guides won't be provided.
Some Jooli Inc. standards you should follow:
- Create all resources in the region, unless otherwise directed.
- Use the project default VPC.
- Allocate cost effective resource sizes. Projects are monitored and excessive resource use will result in the containing project's termination (and possibly yours), so beware. This is the guidance the monitoring team is willing to share; unless directed, use the default machine types.
Your challenge
As soon as you sit down at your desk and open your new laptop, you receive the following request to complete a set of tasks. Good luck!
- PRE-WORK - Enable APIs, Create GKE clusters and create an docker repository in Artifact Registry.
- Clone source code, build image, and push to artifact registry.
- Create delivery pipeline, targets, and release.
- Rebuild and push image, tag with latest.
- Create new release with latest version.
- Promote the latest release to second cluster.
- Rollback changes to second cluster, modify, and re-release.
Task 1. Prework - Set up environment, enable APIs and create clusters
- Set up environment variables for your Project ID (this is important as it is used in several of the configuration files below). You can use the commands below:
export PROJECT_ID=$(gcloud config get-value project)
export PROJECT_NUMBER=$(gcloud projects describe $PROJECT_ID --format='value(projectNumber)')
export REGION={{{ project_0.default_region }}}
gcloud config set compute/region $REGION
- Enable the following services in your Google Cloud project using the following commands:
- container.googleapis.com
- clouddeploy.googleapis.com
- artifactregistry.googleapis.com
- cloudbuild.googleapis.com
gcloud services enable \
container.googleapis.com \
clouddeploy.googleapis.com \
artifactregistry.googleapis.com \
cloudbuild.googleapis.com
- Enable permissions for both Kubernetes and Cloud Deploy using the following commands:
gcloud projects add-iam-policy-binding $PROJECT_ID \
--member=serviceAccount:$(gcloud projects describe $PROJECT_ID \
--format="value(projectNumber)")-compute@developer.gserviceaccount.com \
--role="roles/clouddeploy.jobRunner"
gcloud projects add-iam-policy-binding $PROJECT_ID \
--member=serviceAccount:$(gcloud projects describe $PROJECT_ID \
--format="value(projectNumber)")-compute@developer.gserviceaccount.com \
--role="roles/container.developer"
- Create an Artifact Repository
Create a repository for storing your Docker containers.
Name the repository: cicd-challenge
gcloud artifacts repositories create cicd-challenge \
--description="Image registry for tutorial web app" \
--repository-format=docker \
--location=$REGION
- Create the Google Kubernetes Engine clusters
Create two GKE clusters for Staging and Production named cd-staging and cd-production. Clusters should be single zone and single node.
gcloud container clusters create cd-staging --node-locations={{{ project_0.default_zone }}} --num-nodes=1 --async
gcloud container clusters create cd-production --node-locations={{{ project_0.default_zone }}} --num-nodes=1 --async
Task 2. Build the images and upload to the repository
- Clone the repository for the lab into your home directory using the commands below:
cd ~/
git clone https://github.com/GoogleCloudPlatform/cloud-deploy-tutorials.git
cd cloud-deploy-tutorials
git checkout c3cae80 --quiet
cd tutorials/base
- Create the skaffold.yaml configuration using the command below:
envsubst < clouddeploy-config/skaffold.yaml.template > web/skaffold.yaml
cat web/skaffold.yaml
The web directory now contains the skaffold.yaml configuration file, which provides instructions for Skaffold to build a container image for your application.
- Run the skaffold command to build the application and deploy the container image to the Artifact Registry repository previously created:
HINT: use the full path to the repository you created earlier
cd web
skaffold build --interactive=false \
--default-repo <INSERT YOUR ARTIFACT REPOSITORY HERE> \
--file-output artifacts.json
cd ..
Validate that the container was created and added to the repository
Task 3. Create the Delivery Pipeline
Run the following commands to copy the pipeline template file:
- Create the delivery-pipeline resource using the delivery-pipeline.yaml file:
cp clouddeploy-config/delivery-pipeline.yaml.template clouddeploy-config/delivery-pipeline.yaml
sed -i "s/targetId: staging/targetId: cd-staging/" clouddeploy-config/delivery-pipeline.yaml
sed -i "s/targetId: prod/targetId: cd-production/" clouddeploy-config/delivery-pipeline.yaml
sed -i "/targetId: test/d" clouddeploy-config/delivery-pipeline.yaml
-
Set the deployment region using the
deploy/region configuration parameter.
-
Apply the pipeline configuration you created above using thef
gcloud beta deploy command
- Verify the delivery pipeline was created using the command below:
gcloud beta deploy delivery-pipelines describe web-app
Configure the deployment targets
Two delivery pipeline targets will be created - one for each of the GKE clusters.
Ensure that the clusters are ready
The two GKE clusters should now be running but it's useful to verify this.
- Get the status of the clusters:
gcloud container clusters list --format="csv(name,status)"
All clusters should be in the RUNNING state, as indicated in the output below. If they are not yet marked as RUNNING, retry the command above until their status has changed to RUNNING.
Create a context for each cluster
- Use the commands below to get the credentials for each cluster and create an easy-to-use kubectl context for referencing the clusters later:
CONTEXTS=({INSERT YOUR TARGETS HERE})
for CONTEXT in ${CONTEXTS[@]}
do
gcloud container clusters get-credentials ${CONTEXT} --region ${REGION}
kubectl config rename-context gke_${PROJECT_ID}_${REGION}_${CONTEXT} ${CONTEXT}
done
Create a namespace in each cluster
- Use the commands below to create a Kubernetes namespace (web-app) in each of the clusters:
for CONTEXT in ${CONTEXTS[@]}
do
kubectl --context ${CONTEXT} apply -f kubernetes-config/web-app-namespace.yaml
done
Create the delivery pipeline targets
- Create a target definition file for each of the targets using the commands below (no changes needed):
envsubst < clouddeploy-config/target-staging.yaml.template > clouddeploy-config/target-cd-staging.yaml
envsubst < clouddeploy-config/target-prod.yaml.template > clouddeploy-config/target-cd-production.yaml
sed -i "s/staging/cd-staging/" clouddeploy-config/target-cd-staging.yaml
sed -i "s/prod/cd-production/" clouddeploy-config/target-cd-production.yaml
- Apply the target files to Cloud Deploy.
The targets are described in a yaml file. Each target configures the relevant cluster information for the target.
Display the details for the staging target:
cat clouddeploy-config/target-cd-staging.yaml
Verify that the Cloud Deploy targets have been created.
Task 4. Create a Release
- Create a release using the
gcloud beta deploy releases command and the skaffold and artifacts.json files you created earlier.
- Name the release
web-app-001 and use the delivery-pipeline web-app.
HINT: your source directory should be web/
- Verify that your application has been deployed to the staging environment (cd-staging) via the command below or in the console.
gcloud beta deploy rollouts list \
--delivery-pipeline web-app \
--release web-app-001
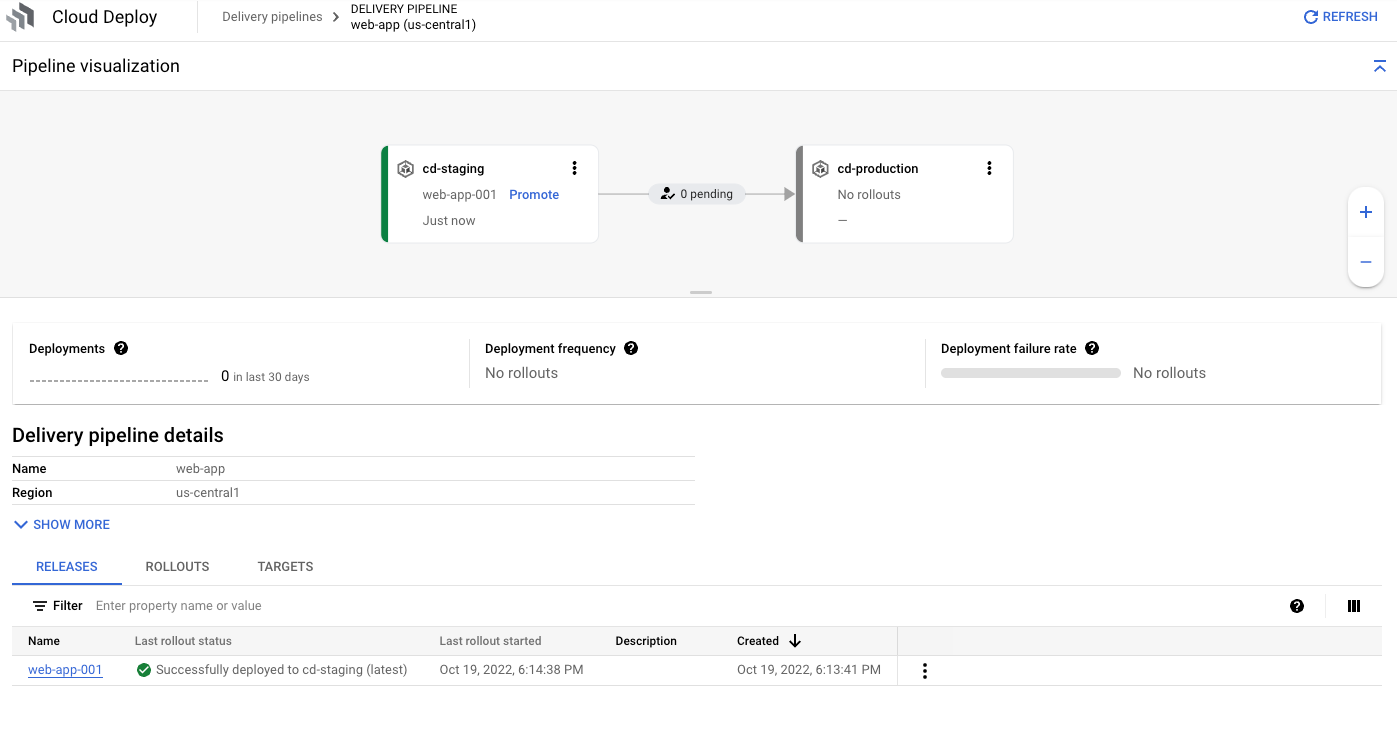
Verify the release to the Staging environment
Task 5. Promote your application to production
- Promote your application from the Staging (cd-staging) environment to the Production (cd-production) environment.
HINT: Don't forget to approve the deployment!
Verify the release to the Production environment
Task 6. Make a change to the application and redeploy it
- Using the editor, open the
cloud-deploy-tutorials/tutorials/base/web/leeroy-app/ directory and modify the app.go file. Change line 24 to say: fmt.Fprintf(w, "leeroooooy app v2!!\n")
-
Build the application and push to the Artifact Registry.
-
Create a new release on your pipeline you created earlier. Name the release
web-app-002
- Verify the new version has been deployed to the staging environment.
gcloud beta deploy rollouts list \
--delivery-pipeline web-app \
--release web-app-002
Task 7. Rollback The Change
Oh No! Your QA Engineers have found a bug in your release to staging so you will need to rollback to the previous version.
-
Use Cloud Deploy to rollback to the original version of the application -
web-app-001
- Verify that the original version is running.
Verify the rollback ran successfully
Congratulations!
In this lab, you have successfully set up a CI/CD pipeline using Google Cloud Deploy and Artifact Registry. You've created a proof of concept that addressed all of management's requirements. Jooli Inc. is now well on their way towards achieving higher ROI with the benefits of application modernization!
Earn your next skill badge
This lab is part of the Implement CI/CD Pipelines on Google Cloud course. Completing this skill badge course earns you the badge above, to recognize your achievement. Share your badge on your resume and social platforms, and announce your accomplishment using #GoogleCloudBadge.
This skill badge course is part of Google Cloud’s DevSecOps Learning Path. Continue your learning journey here DevSecOps Learning Path!
Next Steps / Learn More
Google Cloud training and certification
...helps you make the most of Google Cloud technologies. Our classes include technical skills and best practices to help you get up to speed quickly and continue your learning journey. We offer fundamental to advanced level training, with on-demand, live, and virtual options to suit your busy schedule. Certifications help you validate and prove your skill and expertise in Google Cloud technologies.
Manual Last Updated March 4, 2024
Lab Last Tested August 28, 2023
Copyright 2025 Google LLC All rights reserved. Google and the Google logo are trademarks of Google LLC. All other company and product names may be trademarks of the respective companies with which they are associated.


