Puntos de control
Enable the required services, grant the desired roles and store the code in source repository
/ 20
Create the CloudRun service and view the authenticated service response
/ 20
Set up the branch trigger and update the sample application
/ 20
Create the master trigger and build a new revision
/ 20
Create the tag trigger and view the updated revision
/ 20
Cloud Run Canary Deployments
GSP1078

Overview
In this lab you will learn how to implement a deployment pipeline for Cloud Run that executes a progression of code from developer branches to production with automated canary testing and percentage based traffic management. It is intended for developers and DevOps engineers who are responsible for creating and managing CI/CD pipelines to Cloud Run.
Many organizations use robust release pipelines to move code into production. Cloud Run provides unique traffic management capabilities that let you implement advanced release management techniques with little effort.
Objectives
In this lab, you will learn how to:
- Create your Cloud Run service.
- Enable developer branch.
- Implement canary testing.
- Rollout safely to production.
Prerequisites
This lab assumes that you have a basic understanding of Git, Cloud Run, and CI/CD pipeline concepts.
Setup
Before you click the Start Lab button
Read these instructions. Labs are timed and you cannot pause them. The timer, which starts when you click Start Lab, shows how long Google Cloud resources will be made available to you.
This hands-on lab lets you do the lab activities yourself in a real cloud environment, not in a simulation or demo environment. It does so by giving you new, temporary credentials that you use to sign in and access Google Cloud for the duration of the lab.
To complete this lab, you need:
- Access to a standard internet browser (Chrome browser recommended).
- Time to complete the lab---remember, once you start, you cannot pause a lab.
How to start your lab and sign in to the Google Cloud console
-
Click the Start Lab button. If you need to pay for the lab, a pop-up opens for you to select your payment method. On the left is the Lab Details panel with the following:
- The Open Google Cloud console button
- Time remaining
- The temporary credentials that you must use for this lab
- Other information, if needed, to step through this lab
-
Click Open Google Cloud console (or right-click and select Open Link in Incognito Window if you are running the Chrome browser).
The lab spins up resources, and then opens another tab that shows the Sign in page.
Tip: Arrange the tabs in separate windows, side-by-side.
Note: If you see the Choose an account dialog, click Use Another Account. -
If necessary, copy the Username below and paste it into the Sign in dialog.
{{{user_0.username | "Username"}}} You can also find the Username in the Lab Details panel.
-
Click Next.
-
Copy the Password below and paste it into the Welcome dialog.
{{{user_0.password | "Password"}}} You can also find the Password in the Lab Details panel.
-
Click Next.
Important: You must use the credentials the lab provides you. Do not use your Google Cloud account credentials. Note: Using your own Google Cloud account for this lab may incur extra charges. -
Click through the subsequent pages:
- Accept the terms and conditions.
- Do not add recovery options or two-factor authentication (because this is a temporary account).
- Do not sign up for free trials.
After a few moments, the Google Cloud console opens in this tab.

Activate Cloud Shell
Cloud Shell is a virtual machine that is loaded with development tools. It offers a persistent 5GB home directory and runs on the Google Cloud. Cloud Shell provides command-line access to your Google Cloud resources.
- Click Activate Cloud Shell
at the top of the Google Cloud console.
When you are connected, you are already authenticated, and the project is set to your Project_ID,
gcloud is the command-line tool for Google Cloud. It comes pre-installed on Cloud Shell and supports tab-completion.
- (Optional) You can list the active account name with this command:
- Click Authorize.
Output:
- (Optional) You can list the project ID with this command:
Output:
gcloud, in Google Cloud, refer to the gcloud CLI overview guide.
Task 1. Preparing your environment
- In Cloud Shell, create environment variables to use in this lab:
- Enable the following APIs with the code below:
- Cloud Resource Manager
- GKE
- Cloud Source Repositories
- Cloud Build
- Container Registry
- Cloud Run
- Grant the Cloud Run Admin role (roles/run.admin) to the Cloud Build service account:
- Grant the IAM Service Account User role (roles/iam.serviceAccountUser) to the Cloud Build service account for the Cloud Run runtime service account:
- If you haven't used Git in Cloud Shell previously, set the
user.nameanduser.emailvalues that you want to use (it's not necessary to have an existing account on GitHub):
- Clone and prepare the sample repository:
-
Using nano, vi or any editor replace the
REGIONinbranch-cloudbuild.yaml,master-cloudbuild.yamlandtag-cloudbuild.yamlfiles with the pre-populatedREGIONin Step 1. -
Replace the placeholder values in the sample repository with your
PROJECT_IDandPROJECT_NUMBER:
- Store the code from the sample repository in Google Source Repository:
Click Check my progress to verify the objective.
Task 2. Creating your Cloud Run service
In this section, you build and deploy the initial production application that you use throughout this lab.
- In Cloud Shell, build and deploy the application, including a service that requires authentication. To make a public service use the
--allow-unauthenticatedflag as explained in the Cloud Run documentation.
The output looks similar to the following:
The output includes the service URL and a unique URL for the revision. Your values will differ slightly from what's indicated here.
-
After the deployment is complete, view the newly deployed service by selecting Cloud Run from the Cloud Console menu, choosing the hello-cloudrun service, and selecting the Revisions page.
-
In Cloud Shell, view the authenticated service response:
Click Check my progress to verify the objective.
Task 3. Enabling Dynamic Developer Deployments
In this section, you enable developers with a unique URL for development branches in Git. Each branch is represented by a URL identified by the branch name. Commits to the branch trigger a deployment, and the updates are accessible at that same URL.
- In Cloud Shell, set up the trigger:
-
To review the trigger, select Cloud Build from the Cloud Console menu and select Triggers.
-
In Cloud Shell, create a new branch:
- Open the sample application using your favorite editor or using the Cloud Shell IDE:
- You can now browse or modify the code with the editor. In the sample application (~/training-data-analyst/self-paced-labs/cloud-run/canary/app.py), modify line 24 to indicate
v1.1instead ofv1.0:
-
To return to your terminal, click Open Terminal.
-
In Cloud Shell, commit the change and push to the remote repository:
-
To review the build in progress, go back to the Cloud Build page and view the current build running on your new branch.
-
After the build completes, to review the revision, go to Cloud Run from the Cloud Console menu, choose the hello-cloudrun service, and select the Revisions page.
Click Check my progress to verify the objective.
- In Cloud Shell, get the unique URL for this branch:
- Access the authenticated URL:
The updated response output looks like the following:
Task 4. Automating canary testing
When code is released to production, it's common to release to a small subset of live traffic before migrating all traffic to the new code base.
In this section, you implement a trigger that is activated when code is committed to the main branch. The trigger deploys the code to a unique canary URL and routes 10% of all live traffic to it.
- In Cloud Shell, set up the branch trigger:
-
To review the new trigger, go to the Cloud Build > Triggers page.
-
In Cloud Shell, merge the branch to the main line and push to the remote repository:
-
To review the build in progress, go back to the Cloud Build page and view the current build.
-
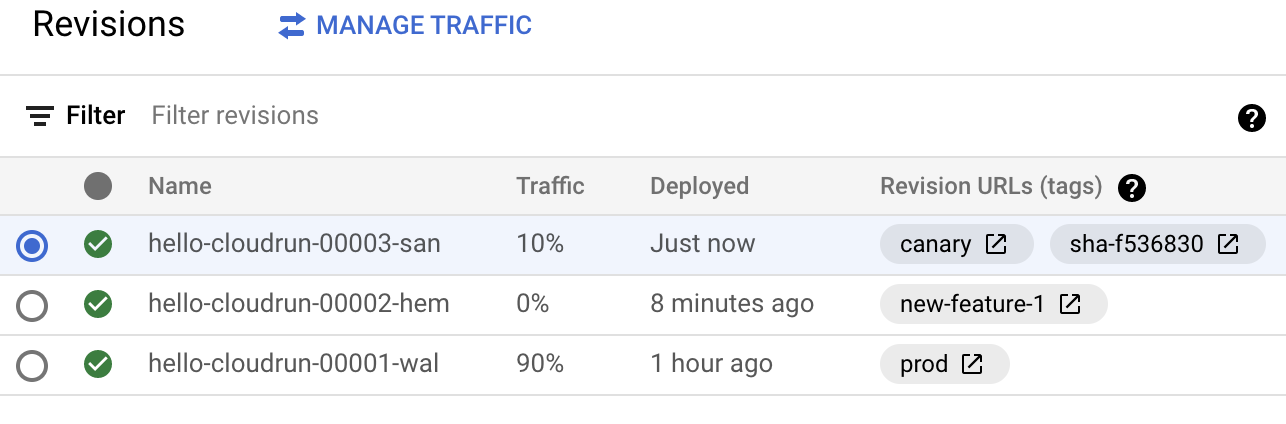
After the build completes, to review the new revision, go to Cloud Run, choose the hello-cloudrun service , and select the Revisions page. Note that 90% of the traffic is routed to prod, 10% to canary, and 0% to the branch revisions.
Click Check my progress to verify the objective.
- Review the key lines of
master-cloudbuild.yamlthat implement the logic for the canary deploy.
Lines 39-44 deploy the new revision and use the tag flag to route traffic from the unique canary URL:
Line 61 adds a static tag to the revision that notes the Git short SHA of the deployment:
Line 62 updates the traffic to route 90% to production and 10% to canary:
- In Cloud Shell, get the unique URL for the canary revision:
- Review the canary endpoint directly:
- To see percentage-based responses, make a series of requests:
Task 5. Releasing to Production
After the canary deployment is validated with a small subset of traffic, you release the deployment to the remainder of the live traffic.
In this section, you set up a trigger that is activated when you create a tag in the repository. The trigger migrates 100% of traffic to the already deployed revision based on the commit SHA of the tag. Using the commit SHA ensures the revision validated with canary traffic is the revision utilized for the remainder of production traffic.
- In Cloud Shell, set up the tag trigger:
-
To review the new trigger, go to the Cloud Build Triggers page in the Cloud console.
-
In Cloud Shell, create a new tag and push to the remote repository:
-
To review the build in progress, go to the Cloud Build Builds page in the Cloud console.
-
After the build is complete, to review the new revision, go to the Cloud Run, choose the hello-cloudrun service, and select the Revisions page in the Cloud console. Note that the revision is updated to indicate the prod tag and it is serving 100% of live traffic.

Click Check my progress to verify the objective.
- In Cloud Shell, to see percentage-based responses, make a series of requests:
- Review the key lines of
tag-cloudbuild.yamlthat implement the production deployment logic.
Line 37 updates the canary revision adding the prod tag. The deployed revision is now tagged for both prod and canary:
Line 39 updates the traffic for the base service URL to route 100% of traffic to the revision tagged as prod:
Congratulations!
Congratulations! In this lab, you learned how to implement a deployment pipeline for Cloud Run that executes a progression of code from developer branches to production with automated canary testing and percentage based traffic management. Now you can use Cloud Build to create and rollback continuous integration pipelines with Cloud Run on Google Cloud!
Next steps / Learn more
- Review documentation for Managing Revisions with CloudRun.
- Read the CloudRun documentation for Rollbacks, gradual rollouts, and traffic migration.
- Review the documentation for Using tags for accessing revisions.
- Learn more about Creating and managing build triggers in CloudBuild.
Google Cloud training and certification
...helps you make the most of Google Cloud technologies. Our classes include technical skills and best practices to help you get up to speed quickly and continue your learning journey. We offer fundamental to advanced level training, with on-demand, live, and virtual options to suit your busy schedule. Certifications help you validate and prove your skill and expertise in Google Cloud technologies.
Manual Last Updated August 27, 2024
Lab Last Tested August 27, 2024
Copyright 2024 Google LLC All rights reserved. Google and the Google logo are trademarks of Google LLC. All other company and product names may be trademarks of the respective companies with which they are associated.

