


Before you begin
- Labs create a Google Cloud project and resources for a fixed time
- Labs have a time limit and no pause feature. If you end the lab, you'll have to restart from the beginning.
- On the top left of your screen, click Start lab to begin
Create a development machine in Compute Engine
/ 5
Install Software in the development machine
/ 5
Create a GCS bucket
/ 5
Download some sample images into your bucket
/ 5
Create a Cloud Dataproc cluster
/ 5
Submit your job to Cloud Dataproc
/ 5
In this hands-on lab, you will learn how to use Apache Spark on Cloud Dataproc to distribute a computationally intensive image processing task onto a cluster of machines. This lab is part of a series of labs on processing scientific data.
This is an advanced level lab. Familiarity with Cloud Dataproc and Apache Spark is recommended, but not required. If you're looking to get up to speed in these services, be sure to check out the following labs:
Once you're ready, scroll down to learn more about the services that you'll be using in this lab.
Read these instructions. Labs are timed and you cannot pause them. The timer, which starts when you click Start Lab, shows how long Google Cloud resources are made available to you.
This hands-on lab lets you do the lab activities in a real cloud environment, not in a simulation or demo environment. It does so by giving you new, temporary credentials you use to sign in and access Google Cloud for the duration of the lab.
To complete this lab, you need:
Click the Start Lab button. If you need to pay for the lab, a dialog opens for you to select your payment method. On the left is the Lab Details pane with the following:
Click Open Google Cloud console (or right-click and select Open Link in Incognito Window if you are running the Chrome browser).
The lab spins up resources, and then opens another tab that shows the Sign in page.
Tip: Arrange the tabs in separate windows, side-by-side.
If necessary, copy the Username below and paste it into the Sign in dialog.
You can also find the Username in the Lab Details pane.
Click Next.
Copy the Password below and paste it into the Welcome dialog.
You can also find the Password in the Lab Details pane.
Click Next.
Click through the subsequent pages:
After a few moments, the Google Cloud console opens in this tab.

Cloud Dataproc is a managed Spark and Hadoop service that lets you take advantage of open source data tools for batch processing, querying, streaming, and machine learning. Cloud Dataproc automation helps you create clusters quickly, manage them easily, and save money by turning clusters off when you don't need them. With less time and money spent on administration, you can focus on your jobs and your data.
Consider using Cloud Dataproc to scale out compute-intensive jobs that meet these characteristics:
If different subsets require different amounts of processing (or if you don't already know Apache Spark), Apache Beam on Cloud Dataflow is a compelling alternative because it provides autoscaling data pipelines.
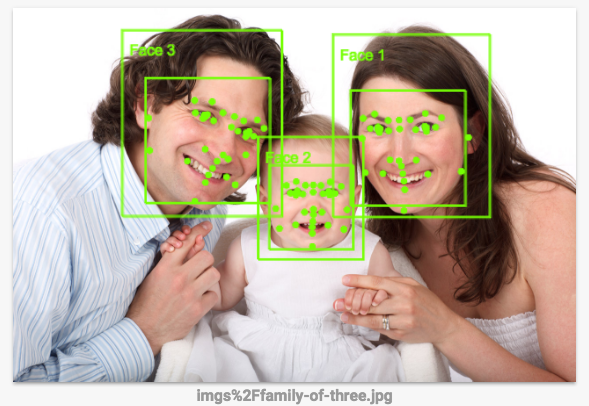
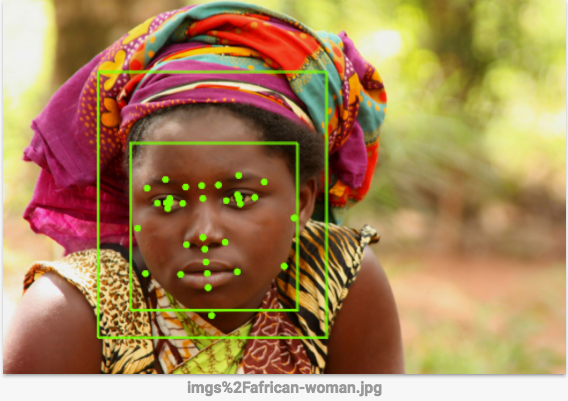
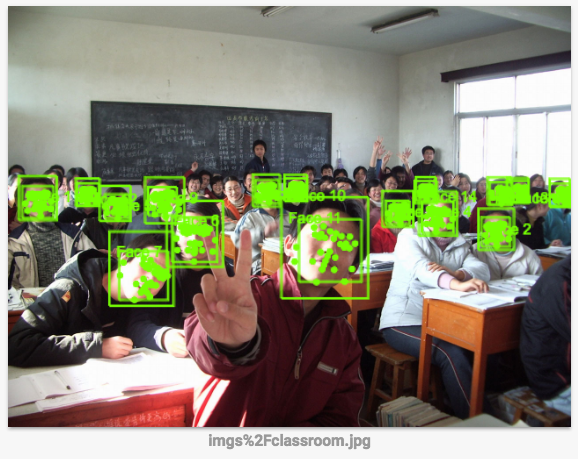
In this lab, the job that you will run outlines the faces in the image using a set of image processing rules specified in OpenCV. The Vision API is a better way to do this, since these sort of hand-coded rules don't work all that well, but this lab is an example of doing a compute-intensive job in a distributed way.
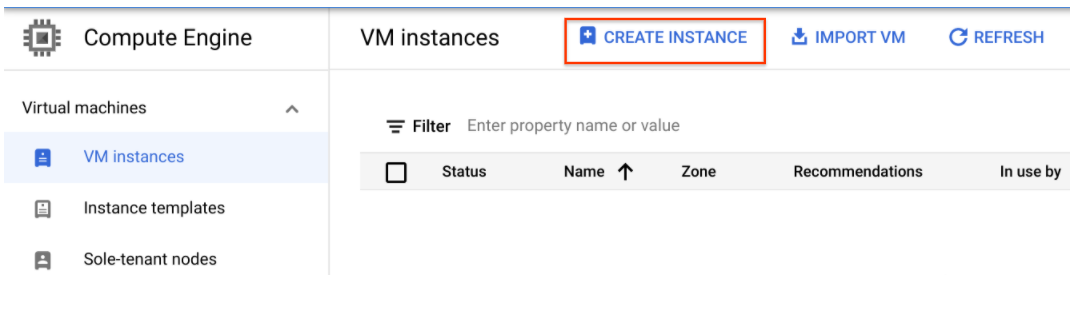
First, you create a virtual machine to host your services.
In the Machine configuration.
Select the following value:
devhost
E2
e2-standard-2 (2 vCPUs)Click Security.
Click Create. This will serve as your development bastion host.
Click Check my progress to verify your performed task. If you have completed the task successfully you will granted with an assessment score.
Now set up the software to run the job. Using sbt, an open source build tool, you'll build the JAR for the job you'll submit to the Cloud Dataproc cluster. This JAR will contain the program and the required packages necessary to run the job. The job will detect faces in a set of image files stored in a Cloud Storage bucket, and write out image files with the faces outlined, to either the same or to another Cloud Storage bucket.
Scala and sbt with the following commands so that you can compile the code:Now you'll build the Feature Detector files. The code for this lab is a slight modification of a solution which exists in the Cloud Dataproc repository on GitHub. You'll download the code, then cd into the directory for this lab and build a "fat JAR" of the feature detector so that it can be submitted to Cloud Dataproc.
Click Check my progress to verify your performed task. If you have completed the task successfully you will granted with an assessment score.
Now that you built your Feature Detector files, create a Cloud Storage bucket and add some sample images to it.
gsutil program, which comes with gcloud in the Cloud SDK, to create the bucket to hold your sample images:Click Check my progress to verify your performed task. If you have completed the task successfully you will granted with an assessment score.
You just downloaded the following images into your Cloud Storage bucket:
Click Check my progress to verify your performed task. If you have completed the task successfully you will granted with an assessment score.
Output:
MYCLUSTER variable. You'll be using the variable in commands to refer to your cluster:This might take a couple minutes. The default cluster settings, which include two worker nodes, should be sufficient for this lab. e2-standard-2 is specified as both the worker and master machine type to reduce the overall number of cores used by the cluster.
For the initialization-actions flag, you are passing a script which installs the libgtk2.0-dev library on each of your cluster machines. This library will be necessary to run the code.
gcloud dataproc clusters delete ${MYCLUSTER}) and then retrying the previous cluster creation command.
Click Check my progress to verify your performed task. If you have completed the task successfully you will granted with an assessment score.
In this lab the program you're running is used as a face detector, so the inputted haar classifier must describe a face. A haar classifier is an XML file that is used to describe features that the program will detect. You will download the haar classifier file and include its Cloud Storage path in the first argument when you submit your job to your Cloud Dataproc cluster.
imgs directory in your Cloud Storage bucket as input to your Feature Detector. You must include the path to that directory as the second argument of your job-submission command.You can add any other images to use to the Cloud Storage bucket specified in the second argument.
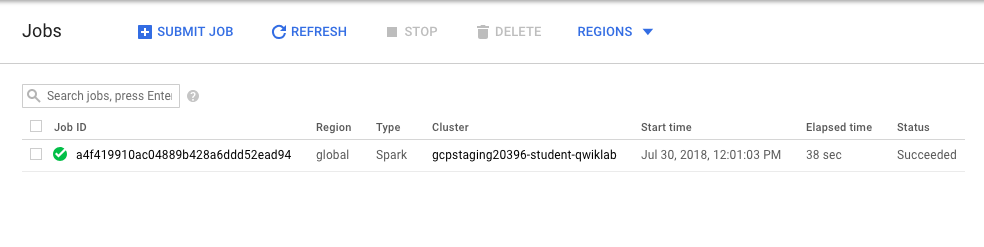
Move on to the next step when you get a similar output:
Click Check my progress to verify your performed task. If you have completed the task successfully you will granted with an assessment score.
When the job is complete, go to Navigation menu > Cloud Storage and find the bucket you created (it will have your username followed by student-image followed by a random number) and click on it.
Click on an image in the Out directory.
Click on Download icon, the image will download to your computer.
How accurate is the face detection? The Vision API is a better way to do this, since this sort of hand-coded rules don't work all that well. You can see how it works next.
(Optional) In your bucket go to the imgs folder and click on the other images you uploaded to your bucket. This will download the three sample images. Save them to your computer.
Click on this link to go to the Vision API page, scroll down to the Try the API section and upload the images you downloaded from your bucket. You'll see the results of the image detection in seconds. The underlying machine learning models keep improving, so your results may not be the same:
FeatureDetector code, then re-run sbt assembly and the gcloud dataproc and jobs submit commands.Below are multiple-choice questions to reinforce your understanding of this lab's concepts. Answer them to the best of your abilities.
You learned how to spin up a Cloud Dataproc cluster and run jobs!
This self-paced lab is part of the Scientific Data Processing quest. A quest is a series of related labs that form a learning path. Completing this quest earns you a badge to recognize your achievement. You can make your badge or badges public and link to them in your online resume or social media account. Enroll in this quest and get immediate completion credit. Refer to the Google Cloud Skills Boost catalog for all available quests.
Continue your quest with Analyzing Natality Data Using Datalab and BigQuery, or try below one:
...helps you make the most of Google Cloud technologies. Our classes include technical skills and best practices to help you get up to speed quickly and continue your learning journey. We offer fundamental to advanced level training, with on-demand, live, and virtual options to suit your busy schedule. Certifications help you validate and prove your skill and expertise in Google Cloud technologies.
Manual Last Updated December 11, 2024
Lab Last Tested October 21, 2024
Copyright 2025 Google LLC All rights reserved. Google and the Google logo are trademarks of Google LLC. All other company and product names may be trademarks of the respective companies with which they are associated.


Ce contenu n'est pas disponible pour le moment
Nous vous préviendrons par e-mail lorsqu'il sera disponible

Parfait !
Nous vous contacterons par e-mail s'il devient disponible

One lab at a time
Confirm to end all existing labs and start this one