Punkty kontrolne
Create a bucket using the GCP Console
/ 5
Create a bucket using Cloud Shell
/ 5
Upload a file to Storage bucket
/ 5
Working with the Google Cloud Console and Cloud Shell (AWS)
As an IT professional who is familiar with AWS, you know that people within your organization have different ways of interacting with the AWS infrastructure based on their particular needs. Let’s do a high level overview of three ways you can interact with AWS infrastructure.
AWS Management Console The AWS Management Console is a web application that includes and refers to a broad collection of service consoles used to manage AWS resources. When you sign in, the console home page provides access to each service console and offers a single place to access the information you need to perform your AWS related tasks.
AWS CloudShell The AWS CloudShell is a browser-based, pre-authenticated shell launched directly from the AWS Management Console.
AWS Command Line Interface The AWS Command Line Interface (AWS CLI) is an open source tool enabling you to interact with AWS services using commands in your command-line shell. As with any CLI you can write your own scripts and automations to deploy and manage services and resources.
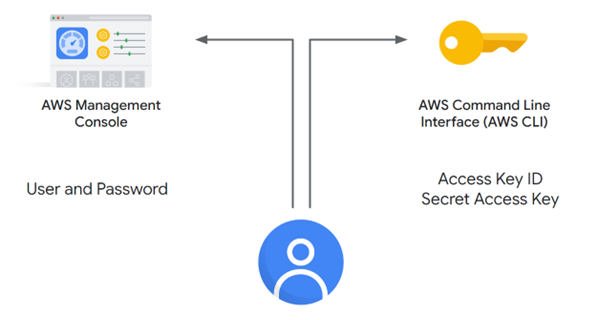
You set up IAM users with access to these tools in various ways depending upon their roles and how they will use the AWS resources:
- For people in teams, such as development and testing, you create IAM users that can access AWS services and resources programmatically through the CLI client.
- For users with AWS Management Console access, you only need to create a password.
- For users with programmatic access where the IAM user might need to make API calls through the CLI Client, AWS tools for PowerShell, or the AWS tools for Linux, you need to create an Access Key Pair (Access Key ID and Secret Access Key).
- You can also create IAM users with both levels of access or disable the key pair for a previously created user.
Let’s explore how you would interface with different options within Google Cloud to access its services and features.
Overview
In this lab, you become familiar with the Google Cloud web-based interface. There are two integrated environments: a GUI (graphical user interface) environment called the Cloud Console, and a CLI (command-line interface) called Cloud Shell. In this lab, you use both environments.
Here are a few things you need to know about the Cloud Console:
- The Cloud Console is under continuous development, so occasionally the graphical layout changes. This is most often to accommodate new Google Cloud features or changes in the technology, resulting in a slightly different workflow.
- You can perform most common Google Cloud actions in the Cloud Console, but not all actions. In particular, very new technologies or sometimes detailed API or command options are not implemented (or not yet implemented) in the Cloud Console. In these cases, the command line or the API is the best alternative.
- The Cloud Console is extremely fast for some activities. The Cloud Console can perform multiple actions on your behalf that might require many CLI commands. It can also perform repetitive actions. In a few clicks you can accomplish activities that would require a lot of typing and would be susceptible to typing errors.
- The Cloud Console is able to reduce errors by offering only valid options through its menus. It can leverage access to the platform "behind the scenes" through the SDK to validate configuration before submitting changes. A command line can't do this kind of dynamic validation.
Objectives
In this lab, you learn how to perform the following tasks:
- Get access to Google Cloud.
- Use the Cloud Console to create a Cloud Storage bucket.
- Use Cloud Shell to create a Cloud Storage bucket.
- Become familiar with Cloud Shell features.
Qwiklabs setup
For each lab, you get a new Google Cloud project and set of resources for a fixed time at no cost.
-
Sign in to Qwiklabs using an incognito window.
-
Note the lab's access time (for example,
1:15:00), and make sure you can finish within that time.
There is no pause feature. You can restart if needed, but you have to start at the beginning. -
When ready, click Start lab.
-
Note your lab credentials (Username and Password). You will use them to sign in to the Google Cloud Console.
-
Click Open Google Console.
-
Click Use another account and copy/paste credentials for this lab into the prompts.
If you use other credentials, you'll receive errors or incur charges. -
Accept the terms and skip the recovery resource page.
Task 1. Use the Cloud Console to create a bucket
In this task, you create a bucket. However, the text also helps you become familiar with how actions are presented in the lab instructions in this class and teaches you about the Cloud Console interface.
Navigate to the Storage service and create the bucket
- In the Cloud Console, on the Navigation menu (
), click Cloud Storage > Bucket.
- Click Create.
- For Name, type a globally unique bucket name; leave all other values as their defaults.
- Click Create.
Explore features in the Cloud Console
The Google Cloud menu contains a Notifications icon. Sometimes, feedback from the underlying commands is provided there. If you are not sure what is happening, check Notifications for additional information and history.
Click Check my progress to verify the objective.
Task 2. Access Cloud Shell
In this section, you explore Cloud Shell and some of its features.
You can use the Cloud Shell to manage projects and resources via command line without having to install the Cloud SDK and other tools on your computer.
Cloud shell provides the following:
- Temporary Compute Engine VM
- Command-line access to the instance via a browser
- 5 GB of persistent disk storage ($HOME dir)
- Pre-installed Cloud SDK and other tools
- gcloud: for working with Compute Engine and many Google Cloud services
- gsutil: for working with Cloud Storage
- kubectl: for working with Google Kubernetes Engine and Kubernetes
- bq: for working with BigQuery
- Language support for Java, Go, Python, Node.js, PHP, and Ruby
- Web preview functionality
- Built-in authorization for access to resources and instances
Learn more about Cloud Shell from the Google Cloud Cloud Shell Documentation.
Open Cloud Shell and explore features
-
In the Google Cloud menu, click Activate Cloud Shell (
). If prompted, click Continue. Cloud Shell opens at the bottom of the Cloud Console window.
There are three buttons on the far right of the Cloud Shell toolbar:
- Minimize/Restore: The first one minimizes or restores the window, giving you full access to the Cloud Console without closing Cloud Shell.
- Open in a new window: Having Cloud Shell at the bottom of the Cloud Console is useful when you are issuing individual commands. However, sometimes you will be editing files or want to see the full output of a command. For these uses, this button pops the Cloud Shell out into a full-sized terminal window.
- Close terminal: This button closes Cloud Shell. Every time you close Cloud Shell, the virtual machine is reset and all machine context is lost.
-
Close Cloud Shell now.

Task 3. Use Cloud Shell to create a Cloud Storage bucket
Create a second bucket and verify in the Cloud Console
- Open Cloud Shell again.
- Use the gsutil command to create another bucket. Replace <BUCKET_NAME> with a globally unique name (you can append a 2 to the globally unique bucket name you used previously):
- If prompted, click Authorize.
- In the Cloud Console, on the Navigation menu (
Click Check my progress to verify the objective.
Task 4. Explore more Cloud Shell features
Upload a file
- Open Cloud Shell.
- Click the More button (
) in the Cloud Shell toolbar to display further options.
- Click Upload. Upload any file from your local machine to the Cloud Shell VM. This file will be referred to as [MY_FILE].
- In Cloud Shell, type
lsto confirm that the file was uploaded. - Copy the file into one of the buckets you created earlier in the lab. Replace [MY_FILE] with the file you uploaded and [BUCKET_NAME] with one of your bucket names:
If your filename has whitespaces, be sure to place single quotes around the filename. For example, gsutil cp ‘my file.txt' gs://[BUCKET_NAME]
- Explore the options available in Cloud Shell by clicking on different icons in the Cloud Shell toolbar.
- Close all the Cloud Shell sessions.
Click Check my progress to verify the objective.
Task 5. Create a persistent state in Cloud Shell
In this section you will learn a best practice for using Cloud Shell. The gcloud command often requires you to specify values such as a Region, Zone, or Project ID. Entering them repeatedly increases the chance of making typing errors. If you use Cloud Shell frequently, you may want to set common values in environment variables and use them instead of typing the actual values.
Create and verify an environment variable
-
Open Cloud Shell from the Cloud Console. Note that this allocates a new VM for you.
-
Create an environment variable and replace [YOUR_REGION] with the region you selected in the previous step:
- Verify it with echo:
You can use environment variables like this in gcloud commands to reduce the opportunities for typos and so that you won't have to remember a lot of detailed information.
Append the environment variable to a file
- Create a subdirectory for materials used in this lab:
- Create a file called
configin the infraclass directory:
- Append the value of your Region environment variable to the
configfile:
- Create a second environment variable for your Project ID.
- Append the value of your Project ID environment variable to the
configfile:
- Use the source command to set the environment variables, and use the echo command to verify that the project variable was set:
- Close and re-open Cloud Shell. Then issue the echo command again:
There will be no output because the environment variable no longer exists.
Modify the bash profile and create persistence
- Edit the shell profile with the following command:
- Add the following line to the end of the file:
- Press Ctrl+O, ENTER to save the file, and then press Ctrl+X to exit nano.
- Close and then re-open Cloud Shell to reset the VM.
- Use the echo command to verify that the variable is still set:
You should now see the expected value that you set in the config file.
Task 6. Review the Google Cloud interface
Cloud Shell is an excellent interactive environment for exploring Google Cloud by using Google Cloud SDK commands like gcloud and gsutil.
You can install the Google Cloud SDK on a computer or on a VM instance in Google Cloud. The gcloud and gsutil commands can be automated by using a scripting language like bash (Linux) or Powershell (Windows). You can also explore using the command-line tools in Cloud Shell, and then use the parameters as an implementation guide in the SDK using one of the supported languages.
The Google Cloud interface consists of two parts: the Cloud Console and Cloud Shell.
The Console:
- Provides a fast way to perform tasks.
- Presents options to you, instead of requiring you to know them.
- Performs behind-the-scenes validation before submitting the commands.
Cloud Shell provides:
- Detailed control
- A complete range of options and features
- A path to automation through scripting
In this lab, you've explored the tools that you can use in Google Cloud. These tools manage the scripts that run your operations, as well as deploy and manage your resources programmatically similar to how you manage them in AWS.
In AWS, every action that you perform, either in the web interface or programmatically, is an API call. The AWS Management Console, the AWS CLI client, and the AWS CloudShell sessions sit on top of the API, allowing you to interact with your resources. Depending on the method that your users choose to interact with their AWS services, they will need different credentials:
- To access the AWS Management Console, the user will need a password,
- To use the AWS CLI, an Access Key pair is required.
In Google Cloud, you can interact in the same three ways by making use of the Cloud Console, the CLI Client or Cloud SDK, and the Cloud Shell. The CLI Client or Cloud SDK comes with several pre-built capabilities that will make your tasks easier, for example, the following:
- gcloud: primary tool to set local configuration, manage Authentication Accessing, and access Google Cloud resources
- bq: to create and manage BigQuery resources like datasets and queries
- gsutil: to manage Cloud Storage and create, delete or list buckets, upload objects, and more
End your lab
When you have completed your lab, click End Lab. Google Cloud Skills Boost removes the resources you’ve used and cleans the account for you.
You will be given an opportunity to rate the lab experience. Select the applicable number of stars, type a comment, and then click Submit.
The number of stars indicates the following:
- 1 star = Very dissatisfied
- 2 stars = Dissatisfied
- 3 stars = Neutral
- 4 stars = Satisfied
- 5 stars = Very satisfied
You can close the dialog box if you don't want to provide feedback.
For feedback, suggestions, or corrections, please use the Support tab.
Copyright 2022 Google LLC All rights reserved. Google and the Google logo are trademarks of Google LLC. All other company and product names may be trademarks of the respective companies with which they are associated.

