
Before you begin
- Labs create a Google Cloud project and resources for a fixed time
- Labs have a time limit and no pause feature. If you end the lab, you'll have to restart from the beginning.
- On the top left of your screen, click Start lab to begin
Create a virtual machine using the GCP Console
/ 5
Create a virtual machine using the gcloud command line
/ 5
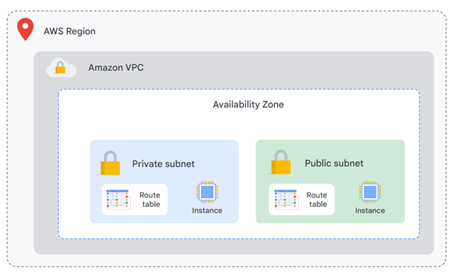
As a cloud professional who is already familiar with AWS, you know that designing a multi-tier architecture includes the compute layer. In general, your compute layer designs include virtual machines (VM). Some of the considerations involved in configuring virtual machine include the following:
In AWS, your organization deploys VMs, called Elastic Compute Cloud instances, programmatically through the AWS Command Line Interface (AWS CLI) and the AWS Software Development Kit (SDK). VM instances can also be deployed with the AWS Management Console.
To interact with your Elastic Compute Cloud (EC2) instances, you use a key pair to securely connect through Secure Shell (SSH) in Linux instances or to decrypt the administrator password in Windows instances. Alternatively, for instances where a key pair may pose a security risk, you use the AWS Systems Manager Session Manager to manage your EC2 instances through an interactive browser-based shell.
To enable communication between instances, a simple pattern is to place them inside of the same VPC using the proper definitions in route tables to allow traffic between subnets.
Now you will explore how to create a similar architecture in Google Cloud.
In this lab, you will create virtual machines (VMs) and connect to them. You will also create connections between the instances.
In this lab, you will learn how to perform the following tasks:
For each lab, you get a new Google Cloud project and set of resources for a fixed time at no cost.
Sign in to Qwiklabs using an incognito window.
Note the lab's access time (for example, 1:15:00), and make sure you can finish within that time.
There is no pause feature. You can restart if needed, but you have to start at the beginning.
When ready, click Start lab.
Note your lab credentials (Username and Password). You will use them to sign in to the Google Cloud Console.
Click Open Google Console.
Click Use another account and copy/paste credentials for this lab into the prompts.
If you use other credentials, you'll receive errors or incur charges.
Accept the terms and skip the recovery resource page.
 ), click Compute Engine > VM instances.
my-vm-1.Click Check my progress to verify the objective.
In the Cloud console, on the top right toolbar, click the Activate Cloud Shell button (
Click Continue.
To display a list of all the zones in the region to which Google Cloud Skills Boost assigned you, enter this partial command gcloud compute zones list | grep followed by the region that Google Cloud Skills Boost or your instructor assigned you to.
Your completed command will look like this:
Choose a zone from that list other than the zone to which Google Cloud Skills Boost assigned you. For example, if Google Cloud Skills Boost assigned you to region
To set your default zone to the one you just chose, enter this partial command gcloud config set compute/zone followed by the zone you chose.
Your completed command will look like this:
To create a VM instance called my-vm-2 in that zone, execute this command:
To close the Cloud Shell, execute the following command:
Click Check my progress to verify the objective.
In the Navigation menu, click Compute Engine > VM instances.
You will see the two VM instances you created, each in a different zone.
Notice that the Internal IP addresses of these two instances share the first three bytes in common. They reside on the same subnet in their Google Cloud VPC even though they are in different zones.
To open a command prompt on the my-vm-2 instance, click SSH in its row in the VM instances list.
Use the ping command to confirm that my-vm-2 can reach my-vm-1 over the network:
Notice that the output of the ping command reveals that the complete hostname of my-vm-1 is my-vm-1.
Press Ctrl+C to abort the ping command.
Return to the Cloud Console tab.
Click SSH in the my-vm-1 row in the VM instances list.
At the command prompt on my-vm-1, install the Nginx web server:
Use the nano text editor to add a custom message to the homepage of the web server:
Use the arrow keys to move the cursor to the line just below the h1 header. Add text like this, and replace YOUR_NAME with your name:
Press Ctrl+O and then press Enter to save your edited file, and then press Ctrl+X to exit the nano text editor.
Confirm that the web server is serving your new page. At the command prompt on my-vm-1, execute this command:
The response will be the HTML source of the web server's home page, including your line of custom text.
Return to the command prompt on my-vm-2
To confirm that my-vm-2 can reach the web server on my-vm-1, at the command prompt on my-vm-2, execute this command:
The response will again be the HTML source of the web server's home page, including your line of custom text.
In the Navigation menu, click Compute Engine > VM instances.
Copy the External IP address for my-vm-1 and paste it into the address bar of a new browser tab.
You will see your web server's home page, including your custom text.
In this lab, you created virtual machine (VM) instances in two different zones and connected to them using ping, ssh, and HTTP.
Google Compute Engine and Amazon Elastic Compute Cloud (EC2) are both Infrastructure-as-a-Service (IaaS) offerings from Google Cloud and Amazon Web Services (AWS), respectively. Now that you have a better understanding of Compute Engine, let’s take a look into some of the key similarities and differences between Compute Engine and EC2:
Similarities:
Differences:
When you have completed your lab, click End Lab. Google Cloud Skills Boost removes the resources you’ve used and cleans the account for you.
You will be given an opportunity to rate the lab experience. Select the applicable number of stars, type a comment, and then click Submit.
The number of stars indicates the following:
You can close the dialog box if you don't want to provide feedback.
For feedback, suggestions, or corrections, please use the Support tab.
Copyright 2022 Google LLC All rights reserved. Google and the Google logo are trademarks of Google LLC. All other company and product names may be trademarks of the respective companies with which they are associated.


This content is not currently available
We will notify you via email when it becomes available

Great!
We will contact you via email if it becomes available

One lab at a time
Confirm to end all existing labs and start this one