Chronicle SIEM: Multi Event Rules
GSP1099
Overview
Chronicle Security Operations empowers cloud-first, modern SecOps teams to protect their organizations confidently, with cloud-native architecture, petabyte scale, sub-second queries, and automated responses.
In this lab you will learn the basics for performing basic administrative tasks within the Chronicle platform.
Objectives
In this lab, you learn how to perform the following tasks:
- Multi Event Rules
Multiple Events
You now have some foundational knowledge and hands-on experience with single-event rules. Now, let's add another layer to this and look at what is needed for multi-event rules.
Builds on the Previous Concepts
- Combine multiple events into a single rule.
- The Match Section of the rule is no longer optional.
- The good news is that the previous material is all relevant, you are just going to add the match section because for all multi-event rules, this section is no longer optional. To be clear, the match section can enhance your single-event rules as well. One example that comes to mind is the output you saw in the mimikatz exercise with two process creation events at the same time yielding a single detection grouped together rather than two distinct detections.
- Variables will be used to connect the events together.
- You have already learned about use of variables but now you will learn how to use variables to associate multiple events together. An important item to remember about the match section is that a time range is required so determining which fields you want to match on is important. The next question is, how long do we want that match to last to associate additional events?
- A time range is required to correlate events in the match section
- Events outside the time range are ignored
- Minimum time range is 1 minute
- Maximum time range is 48 hours
- Time syntax is s | m | h | d (where s=seconds, m=minutes, etc)
- Example - Find events that occur within 15 minutes of one another
- $$event1, $$event2 over 15m
Time Windows
Hop (Default)
- Based on duration in the match section
- Does not look at the order of the events, just if the events occurred within the window
- The match condition creates a time window as mentioned. That time window by default is what we refer to as a hop. This basically means that the rule engine will look at events that match the variables laid out and put a timer on them and place them all in a bucket to work with regardless of which event came in first. To be very clear, the default time window is to take all matched events without worrying about the order.
Sliding
-
Provides an opportunity to focus on specific event order.
-
This does have a performance cost.
-
Add before | after and the specific event variable to measure after
-
Example
$var1, $var2 over 5m after $event1 -
The alternative is a sliding window which allows the rule to look for events that come in a specific order. As always there are pros and cons to this approach. It does have a performance cost and there is additional complexity involved. By calling it complex, it is not like you have to create a script or anything, just that you will append either before or after, as well as an additional event variable to the existing match condition.
-
In the case of a sliding window, you are going to match on specific fields over a specific period of time but only before or after another event condition has been met. That way when the first event condition is hit, the clock starts running and all other events that contain the match conditions for that time window are folded into that detection.
Example: Brute Force on Single Login w/ Success
-
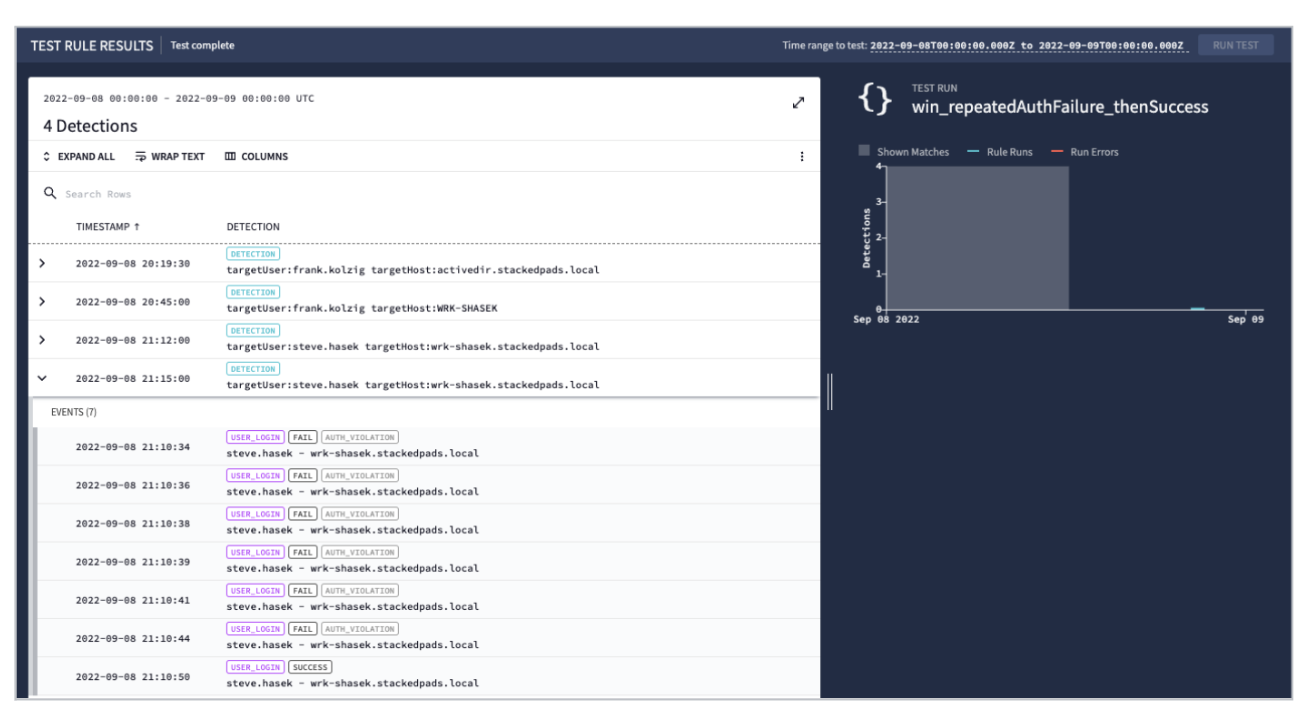
With those basic conditions in mind, let’s look at multiple failed logins followed by a successful login. It will be called a brute force authentication attack. To be fair there aren’t a lot of brute force password guesses just a handful followed by a successful login. We also removed the meta section for readability.
-
In the event section you can see that the event variables being used are $$fail and $$success in an effort to discern the failed attempts and the successful one. There are specific values in the Microsoft event that are being captured including the event type and vendor name, as well as the security_result category and action. The action changes here so you can see that both the fail and success event variables are listed in your conditions. The use of the product_event_type of 4648 removes that event code from the assessment of the successful attempt that has a User Login event type with an Allow action for greater precision.
-
Notice that there are two placeholder variables that you will be using as match variables as well. In the event section you will capture the hostname where the multiple logins were being attempted, the user-id that is attempting to log in over and over (as well as its successful user-id), and the timestamps of the failed and successful login. This is a good example where you can use the default time window of "hop" rather than the "sliding window" by comparing the timestamps with a greater than or less than a statement in the events.
-
As you move on to the match section, you will be looking to group the events by user-id and the hostname over a 15-minute window. The condition section tells you to trigger the rule when you get more than 4 failed login attempts and a successful event. Depending on how broad or narrow you want your rule, you may have to group by both hostname and user.
-
If you ran this rule, you would see multiple detections. However, each detection would have multiple events in it. In the example on the slide, you should have 16 events inside of the one detection, both the failed attempts and successes.
Exercise 3: Multi Event Rule - Password Spray
Based on what you learned in the previous example, you will now apply it to a different authentication problem. A password spray is a way for an attacker to sidestep account lockout policies that an organization may put in place. A password spray will try the same password over and over again but will vary the userid it is attacking, so while it may take a long time to achieve, it can be very quiet if it is not being looked for and detected. As a side note, the use of password sprays is a very popular way to probe for access into cloud environments.
In this example, you are going to use a Windows environment and use some of the fields called out in the prior example, mainly to streamline the exercise but still understand this rule can be ported to numerous other areas. You won't need to worry about successful logins at this point, you will just be trying to determine if a password spray is occurring.
As a reminder, this is where you will access the Chronicle Demo Platform at https://goo.gle/chroniclelab.
- Create a multiple event rule called win_password_spray_(add your initials to it) that detects the execution of a password spray attack
- Fields of interest for failed authentication include:
- metadata.event_type - USER_LOGIN
- metadata.vendor_name - Microsoft
- security_result.action - BLOCK
- While password sprays could go on for hours or days, you are going to make a logical deduction that for us to detect a spray, you want to see the same host failing while using numerous userids (more than 10) over a 30 minute time window.
- Write syntax based on the use case above and test your rule over the past 3 days.
Review Exercise 3: Multi Event Rule - Password Spray
-
Below is the syntax based on the requirements laid out in the exercise. Notice that this differs from the brute force attack in the match and condition sections as well as only having one type of event, that is the Blocked User Logins. In this case, the target host will be the same but the user will be changing so you want to count the number of unique target users in the condition.
Rule discussion:
rule win_password_spray_20220613 { meta: author = "Chronicle Security" description = "Detect repeated authentication failure from the same host but with multiple users may be indicative of a password spray attack." severity = "Low" events: $event.metadata.event_type = "USER_LOGIN" $event.metadata.vendor_name = "Microsoft" $event.principal.hostname = $targetHost $event.target.user.userid = $targetUser $event.security_result.action = "BLOCK" match: $targetHost over 30m condition: #targetUser > 10 } -
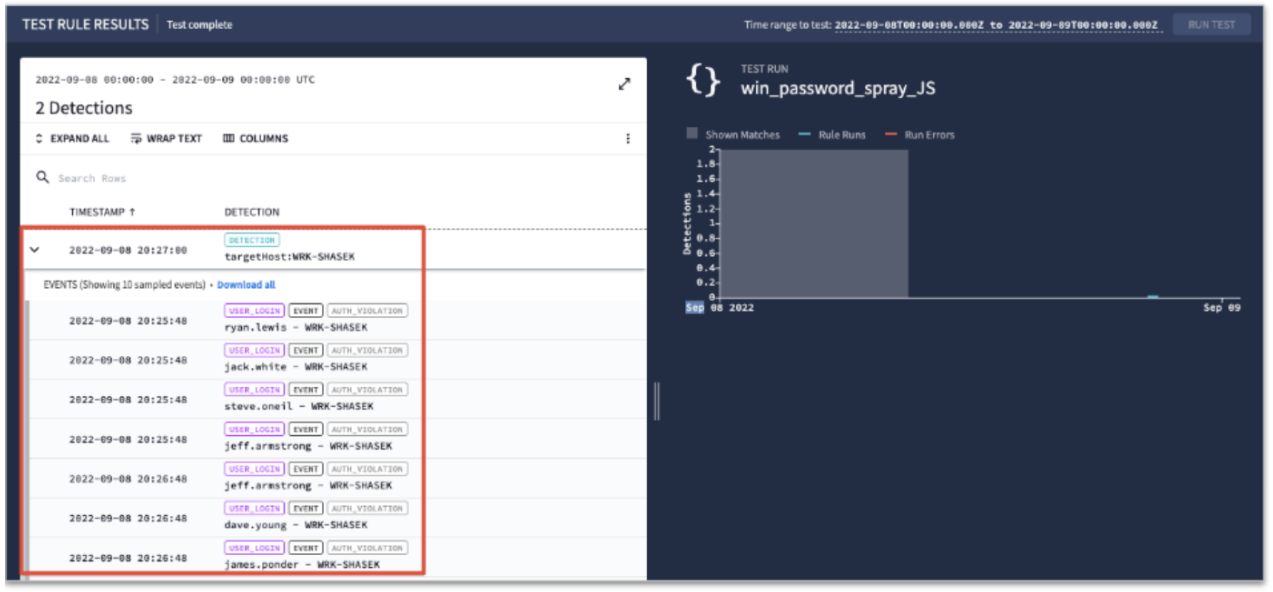
You can see that the host running the spray was wrk-shasek but the user login names are varied. What else do you notice about the events?
-
The timestamps between the same user being attempted appears to be about a minute apart. This is the way that a password spray attempts to bypass account lockout policies. Also notice that the events section of the detection shows 10 sampled events but the capability exists to download all of the supporting events.
Adding Entity Data into Rules
You have already built single-event rules and now you have built multi-event rules. However, everything to date has been event-centric. You are now going to add entity data to your rules.
Entity Data
-
There is nothing different about adding in entity data and additional context to your rules beyond the need to add them. There is no additional section, no additional syntax, you can fold entity data in just like you would with other events.
-
Provides additional contextualization to the events.
-
Some contextualization is absorbed into the event stream natively without adding the entity data model fields directly
-
An entity can potentially be a little confusing due to event enrichment in Chronicle, there are some entity fields and values that get absorbed into the event stream natively without lifting a finger. For example, a rule could be written that bounds the rule to only consider individuals within the finance department. This rule could be written based on the department field in the UDM event that was automatically enriched or it could use the entity field in the graph which would be entity.principal.user.department.
-
Use Case
- A rule could be run limiting the scope to just those in the Finance department based on LDAP data of the users
-
Entity data is associated with the event at the time the event occurred. This can be very helpful to associate actions of a particular user or system based on the characteristics that individual had when that event occurred.
- Example - Alice works in the Finance department until April 30 but on May 1 she moved to the Fraud department and her LDAP data (source of Entity data) is updated
- Rules evaluating the Finance department activities would only apply to her during her time in Finance (up until April 30)
Adding Entity Context to a Rule - User Example
Let’s look at how you can start by creating the plumbing to associate the entity fields to the events. In this example, you'll have our three key sections: events, match, and condition. Because you are associating one or more events with an entity, you'll need to have the match condition because in this case an event and an entity are two events, thus it falls under the multi-event rule.
-
To associate your event data to our entity, you need to create a placeholder variable for the event userid and another with the entity userid to create the linkage between the user entity and the events. For additional precision, you can identify that this entity type is a user and not some other entity. You could then include additional entity fields to narrow your rule against.
-
In the match section, you must have a common value to join the event and entity so you will be looking for all events that have the same userid. Match conditions must have a period of time, but the entity-to-event match is not bound by this time frame. If you had multiple events, the time plays into this, but not for Entity. In the next exercise, you will use 10 minutes.
-
Finally, in the condition section, you previously had the event but now because you have an entity, you would need to specify that as well. This would be easily handled with an "and" between the event and the entity.
-
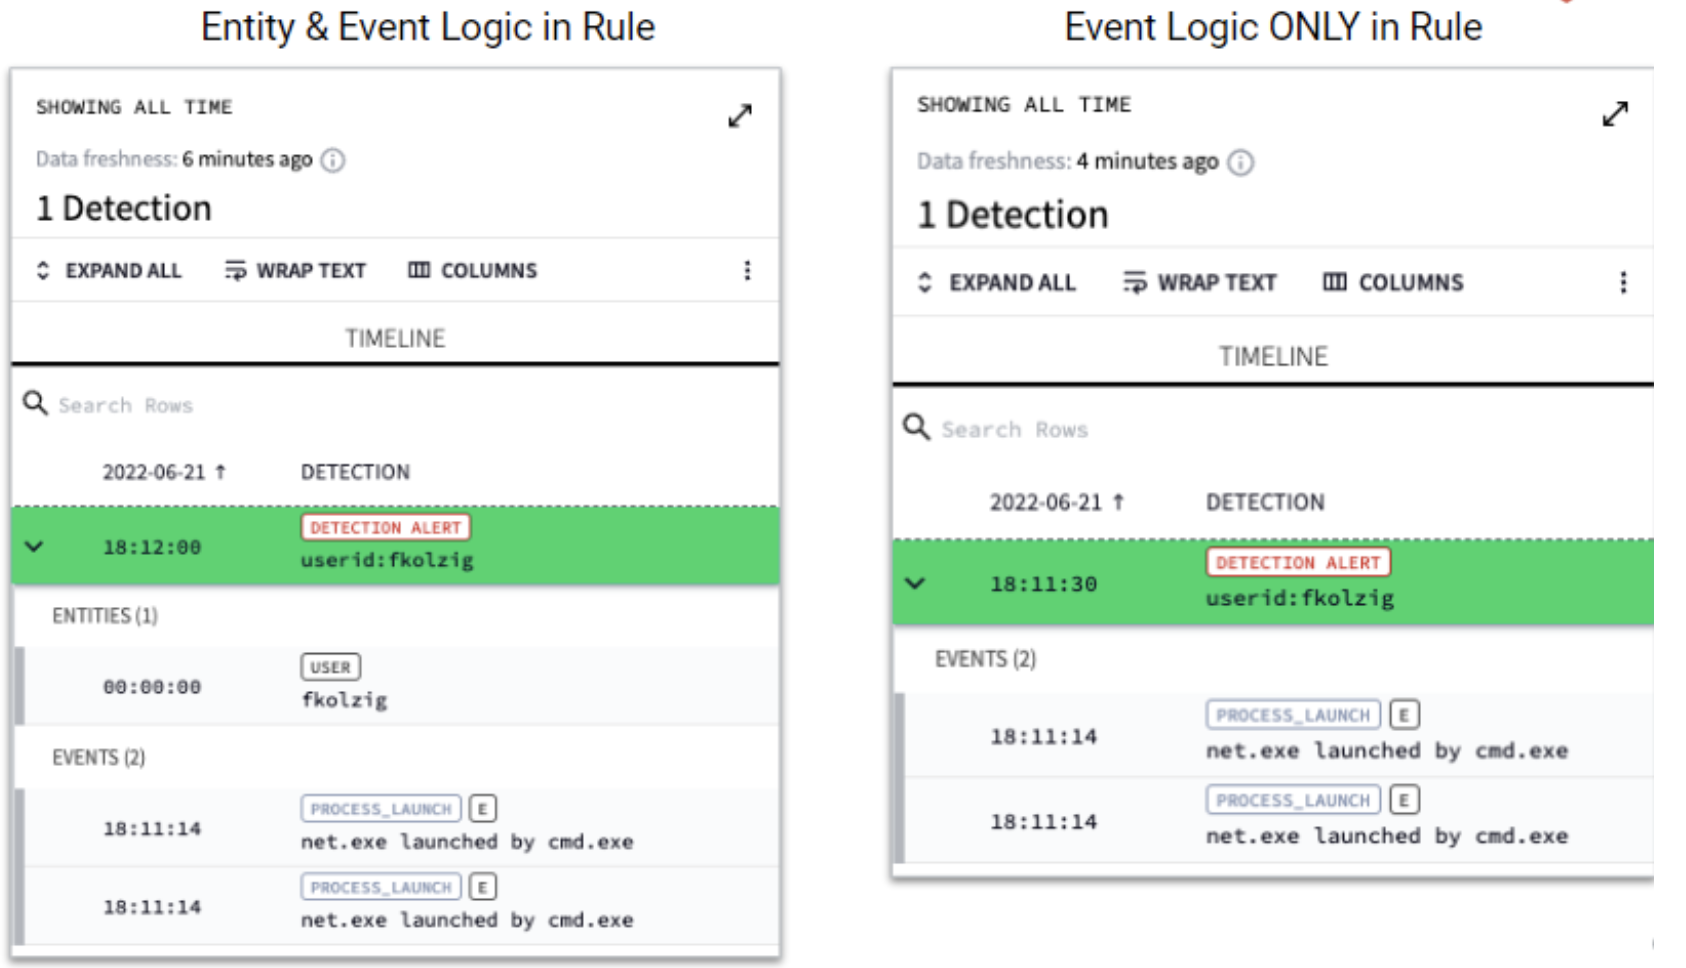
You might be wondering what the difference is between using the entity in the detection versus just leveraging the enriched fields in the event, assuming that the enriched field is available. Above is a visual output of the detection in the Chronicle UI that shows the detection with entity correlation and without. They both will trigger, but in this example, the entity correlation will also include the specific entity (user). Not all fields in the event stream describes the entity.
Exercise #4: Adding Entity Context to Existing Rule
- Let’s take what you just learned and continue to evolve your rule to include entity information around your users. In this case, you are going to take your rule around Microsoft Windows admin shares and add entity data to it in the manner just discussed. The rationale here is that you may be a bit more forgiving of admin shares being created by members of the IT staff. It is something that any other user in the organization should not be doing and while your certain employees in IT may have the ability to create these shares, you will want to know where and when they are doing this.
- From the Chronicle Demo environment (https://goo.gle/Chronicle, find the rule you cloned earlier (mitre_attack_T1021_002_windows_admin_share with your initials)
- Enhance the existing rule to add Entity data
- Configure the rule to fire if the user is NOT part of the department (graph.entity.user.department) Information Technology
- OR if the user has a title (graph.entity.user.title) of Intern
- Once you are happy with your syntax, test your rule over the specified time range (10 minutes)
- See User Example Template below for Adding Entity Context to a Rule
- Bold text is additional criteria to add to the existing rule
Review Exercise #4: Adding Entity Context to Existing Rule
-
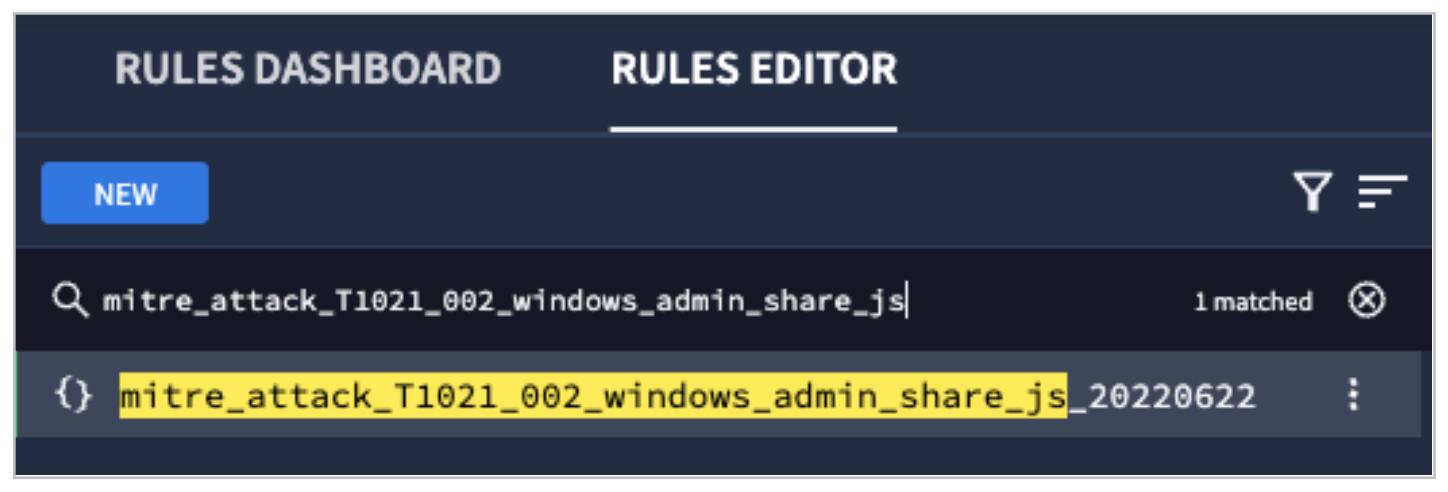
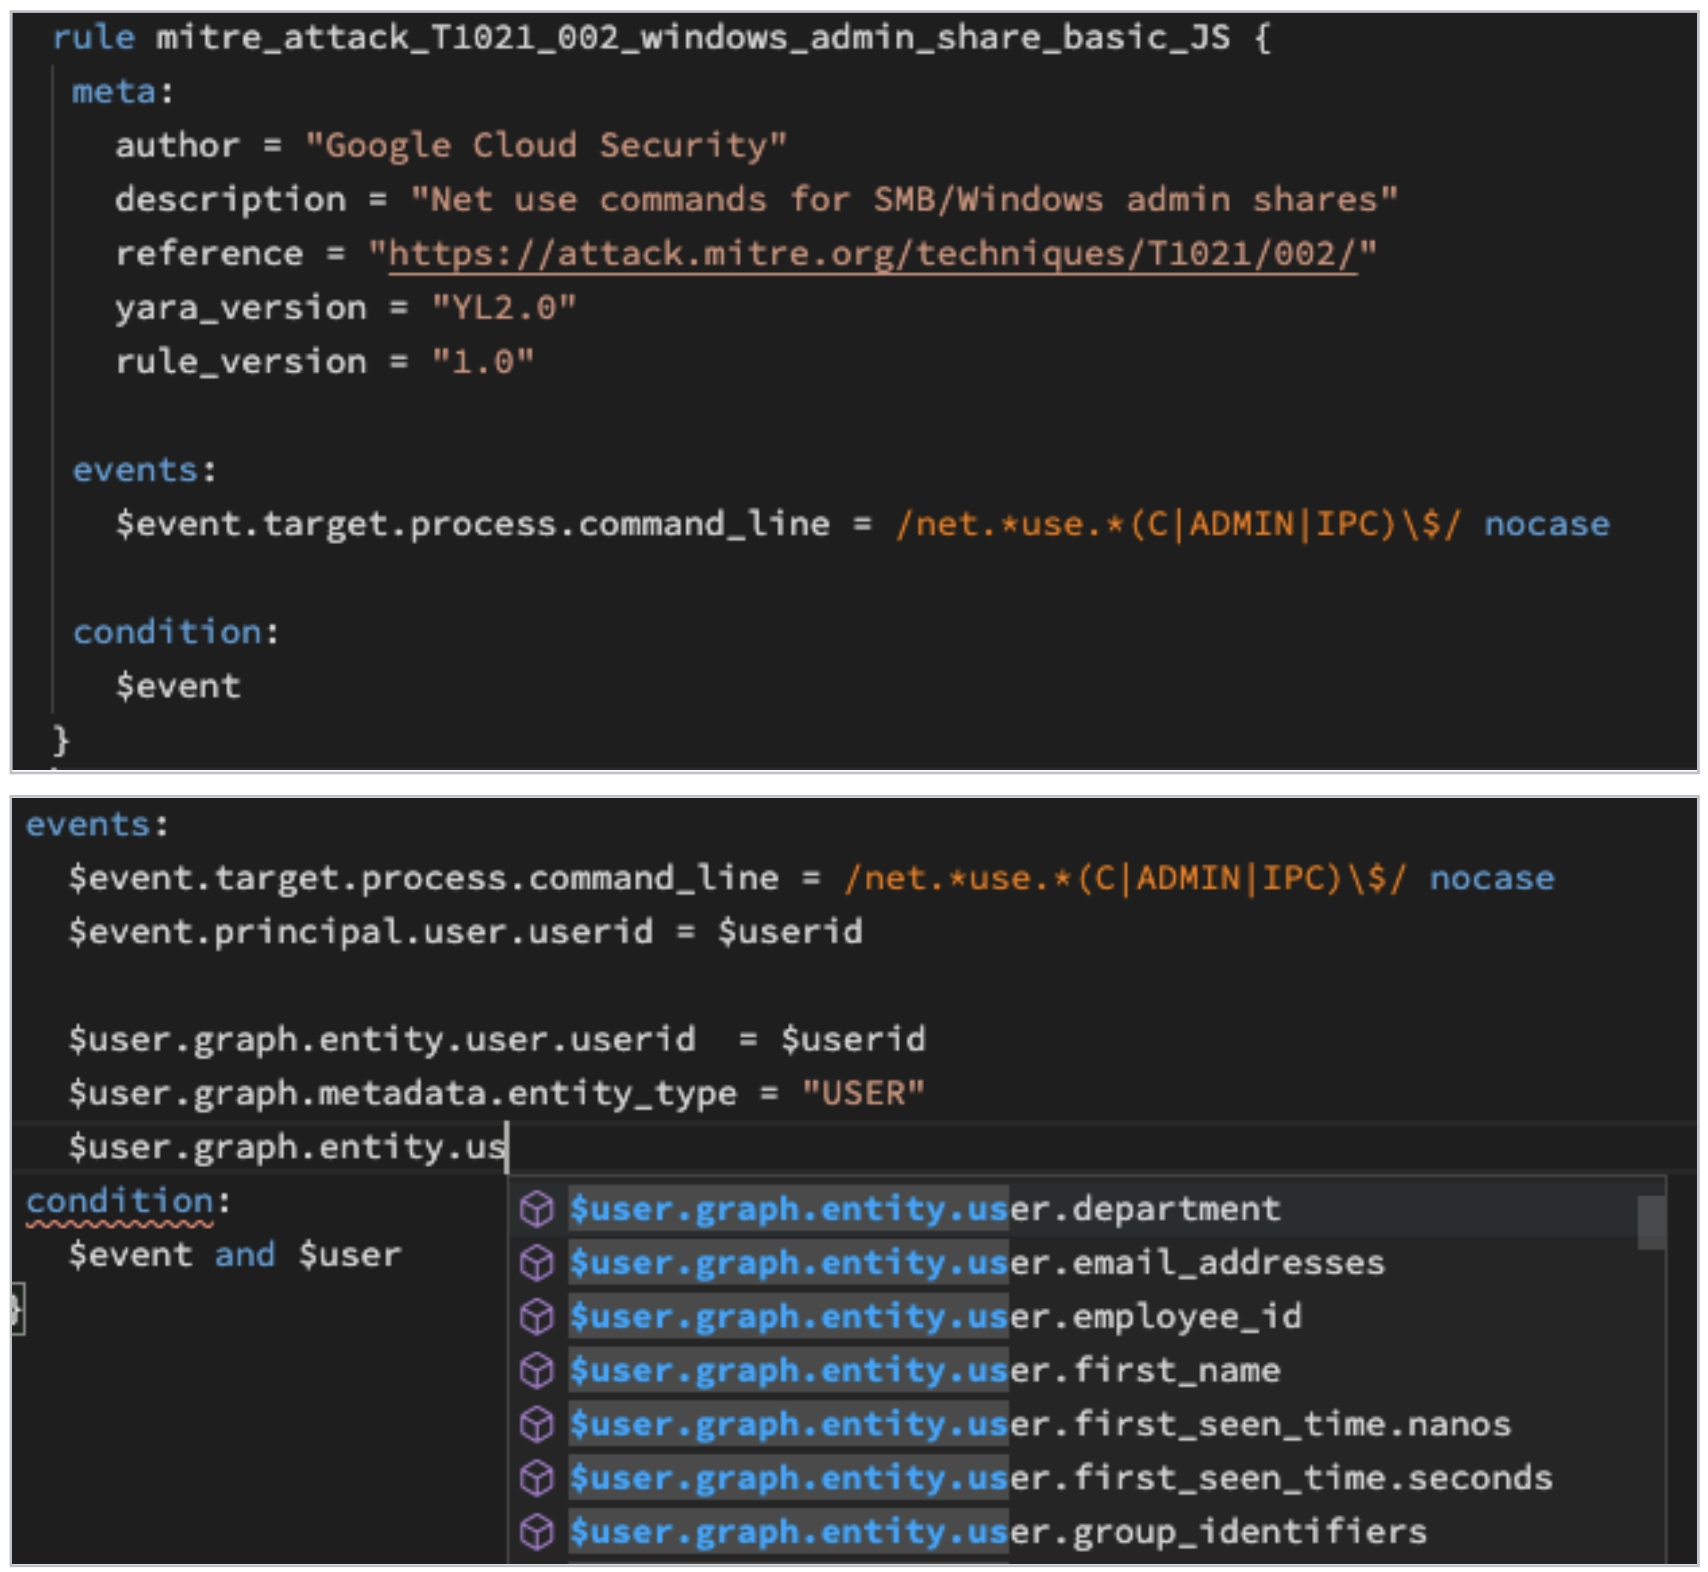
Let’s walk through this exercise. You are going to navigate to the rules editor and start typing in the name of your rule to find it. See the rule below.
-
You should have added your placeholder variable for userid for the event as well as the entity placeholder variable and entity_type of user. From there, you could have explored for fields that fit the criteria you were trying to establish. Notice that as you typed in the field names, a tip list showed possible fields available.
Rule syntax
- Here is what your completed rule should look like. If you are satisfied with what you have, save the rule and run your test.
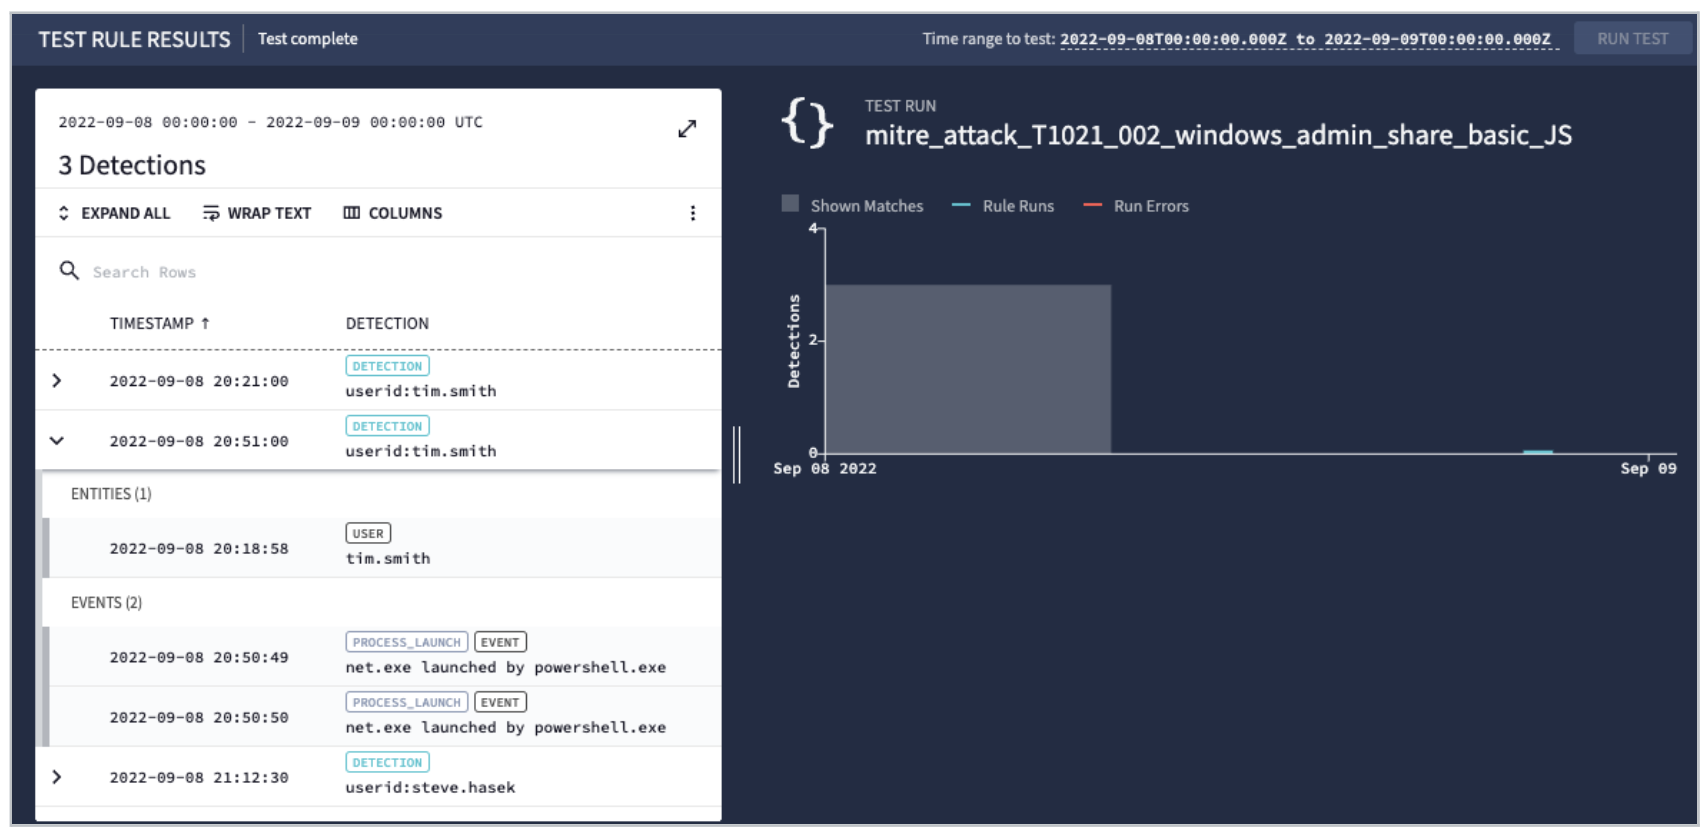
-
Below you can see three detections, two for Tim Smith and one for Steve Hasek. If you expand the detections, you can see the entity. In this case, the userid is tim.smith and has two events associated with it.
-
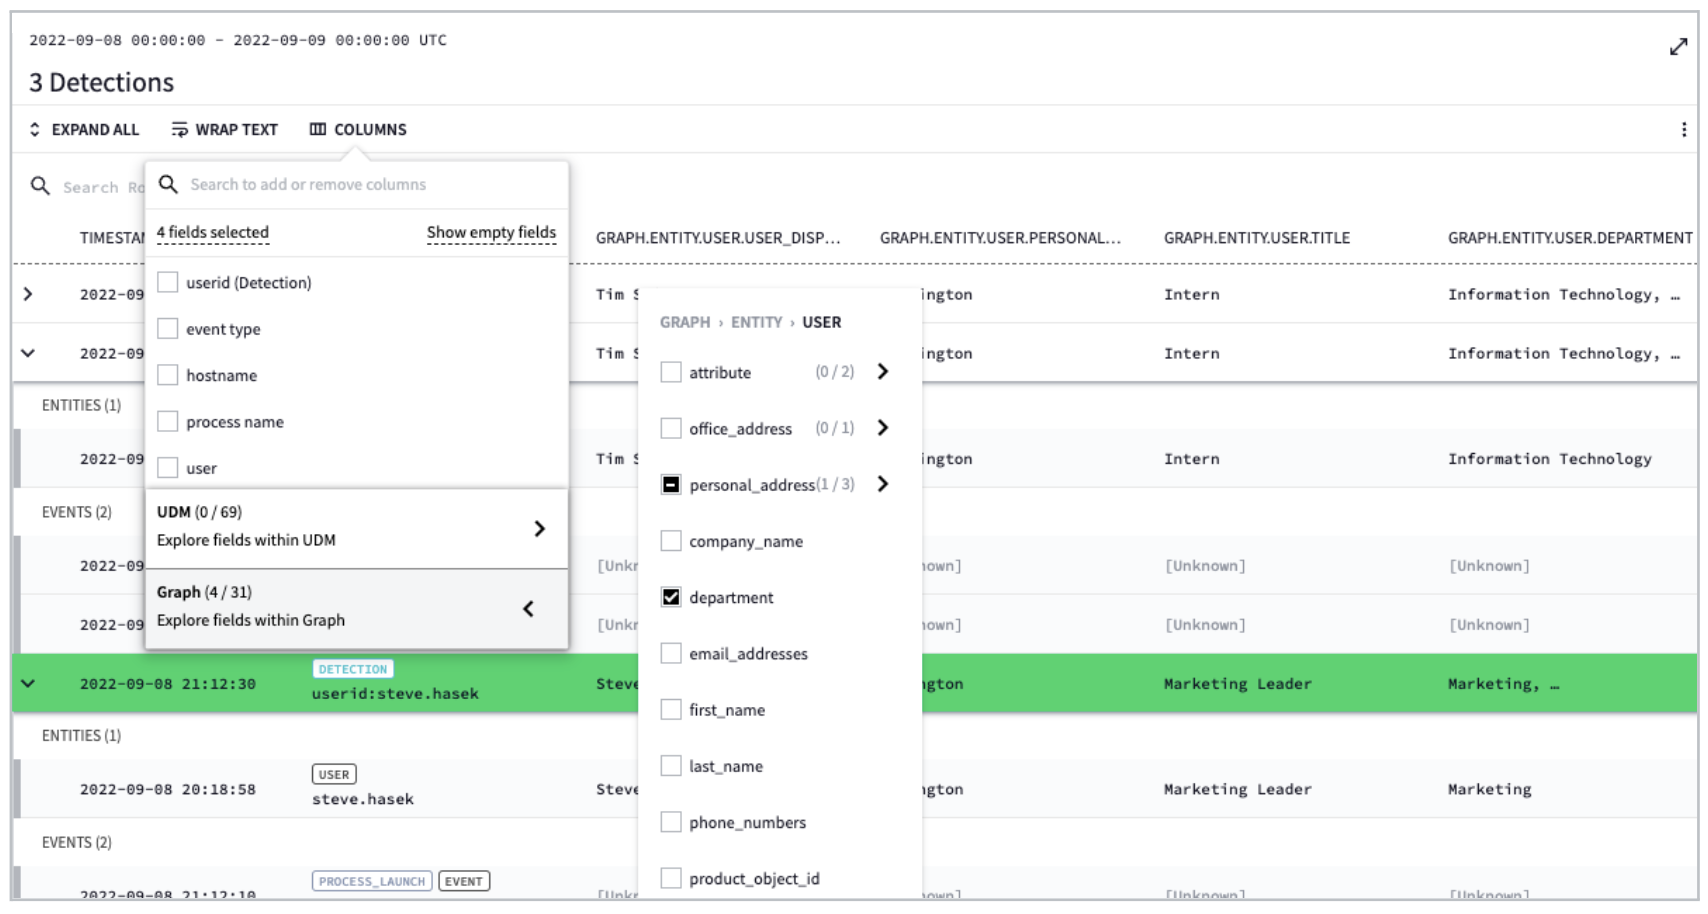
One additional item to call out. Earlier it was mentioned columns can be viewed to gain more context within the detection. Notice that when the entity data is correlated with the event data additional fields are available in the columns listing beyond the UDM (event) fields. The entity data is denoted as a Graph and can be added as columns that can be viewed in the detection. You can see the user location from the entity data in addition to their department and title. You used the title and department prior as a method to focus your rule on a specific subset of the organization.
-
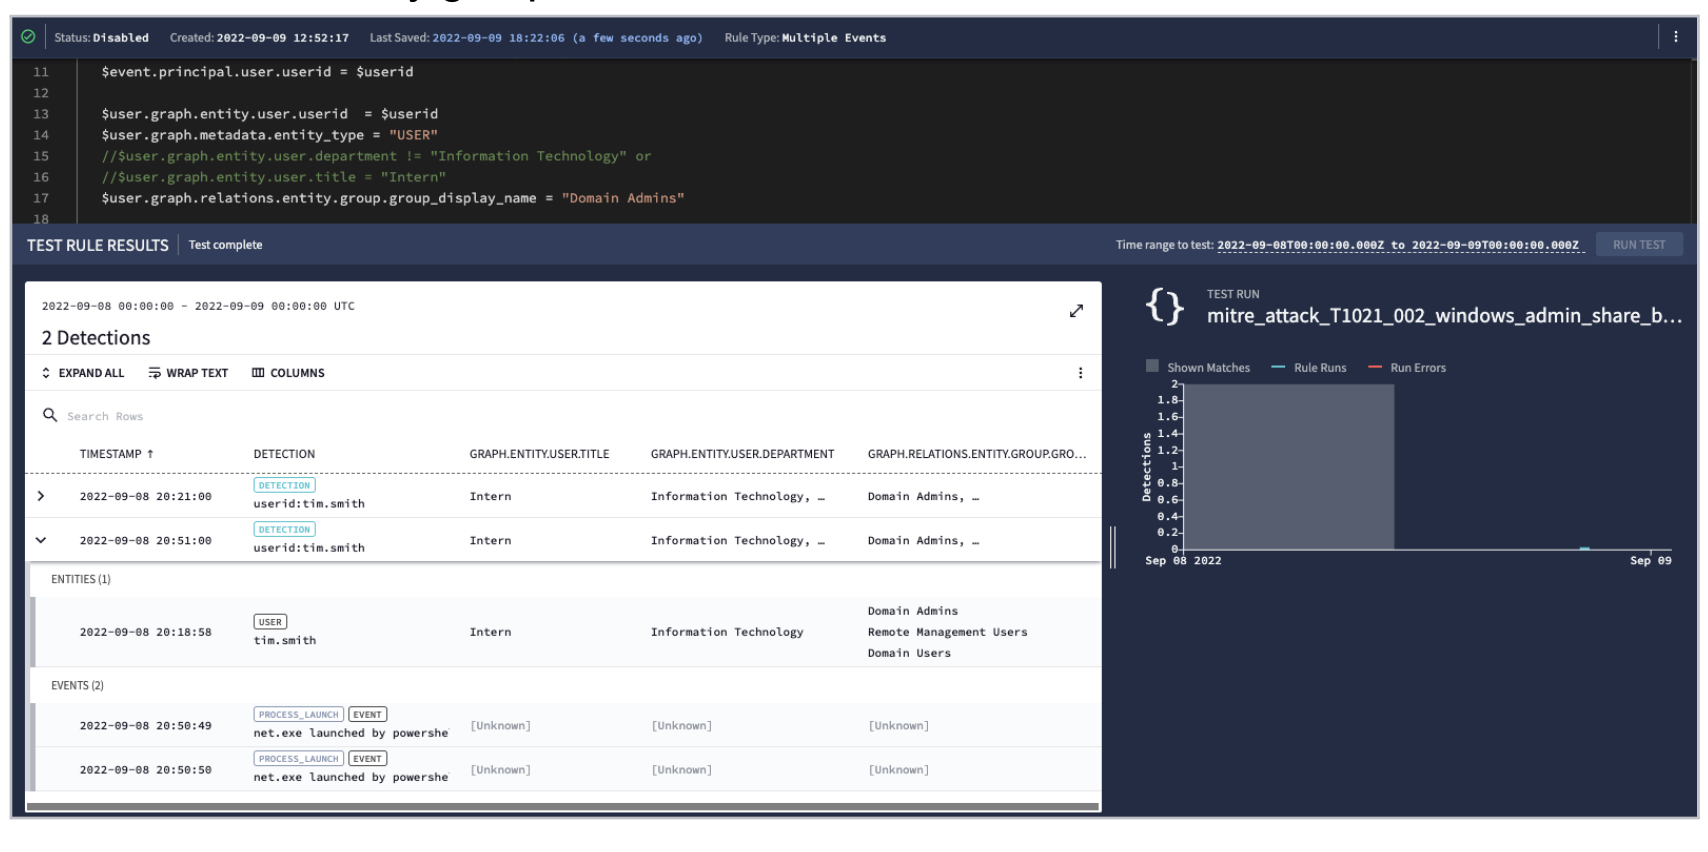
Fields like department and title are in the UDM event listing when you look at the columns. Some of the entity fields exist within the UDM events because Chronicle enriches the data. However, not every enrichment is stored there and items like entity groups aren’t found in the enrichment.
-
In this example above, you commented out the title and department from the rule you were just using for the exercise and replaced it with just detecting on individuals in the domain admins group. Using the entity data model for rules provides you with great flexibility.
-
Rule syntax:
$user.graph.relations.entity.group.group_display_name = "Domain Admins"
Congratulations!
You now have now a solid understanding of several basic administrative actions when using Chronicle.
Manual Last Updated: November 19, 2024
Lab Last Tested: November 19, 2024
Copyright 2024 Google LLC All rights reserved. Google and the Google logo are trademarks of Google LLC. All other company and product names may be trademarks of the respective companies with which they are associated.

