Checkpoints
Initiate and mitigate a threat with Event Threat Detection
/ 20
Configure a cloud environment to detect threats
/ 20
Manage SCC findings with Event Threat Detection
/ 20
Detect and Investigate Threats with Security Command Center
GSP1125

Overview
Event Threat Detection is an integrated service of Security Command Center (SCC) that monitors Google Cloud logs for patterns signaling suspicious activities.
Container Threat Detection is another integrated service of SCC. This service can continuously monitor GKE working nodes. When it detects suspicious events, it analyzes them to confirm whether they can be treated as incidents or not.
In this lab, you receive hands-on practice with SCC's threat detection features and learn how to investigate and triage common vulnerabilities associated with events and virtual machines. You learn how to surface and manage your findings with SCC's Event Threat Detection features.
What you'll do
In this lab, you learn how to:
- Initiate and mitigate a threat with Event Threat Detection
- Configure a cloud environment to detect threats
- Manage SCC findings with Event Threat Detection
Prerequisites
It is recommended the learner has familiarity with the following before starting this lab:
- Fundamental understanding of cloud computing concepts
- Familiarity with the Google Cloud Console
- Familiarity with the Security Command Center interface
- Familiarity with containers and Google Kubernetes Engine is recommended, but not required
Scenario

Cymbal Bank is an American retail bank with over 2,000 branches in all 50 states. It offers comprehensive debit and credit services that are built on top of a robust payments platform. Cymbal Bank is a digitally transforming legacy financial services institution.
Cymbal Bank was founded in 1920 under the name Troxler. Cymbal Group acquired the company in 1975 after it had been investing heavily in Cymbal Group's proprietary ATMs. As the bank grew into a national leader, they put strategic emphasis on modernizing the customer experience both in-person at their branches and digitally through an app they released in 2014. Cymbal Bank employs 42,000 people nationwide and, in 2019, reported $24 billion in revenue.
As a Cloud Security Engineer at Cymbal Bank, your task is to explore and implement robust security measures, leveraging Security Command Center's Event and Container Threat Detection capabilities for its Google Cloud resources. By integrating these services, you will ensure real-time monitoring, swift anomaly identification, and proactive vulnerability management for our event-driven architectures and containerized applications.
Setup and requirements
Before you click the Start Lab button
Read these instructions. Labs are timed and you cannot pause them. The timer, which starts when you click Start Lab, shows how long Google Cloud resources will be made available to you.
This hands-on lab lets you do the lab activities yourself in a real cloud environment, not in a simulation or demo environment. It does so by giving you new, temporary credentials that you use to sign in and access Google Cloud for the duration of the lab.
To complete this lab, you need:
- Access to a standard internet browser (Chrome browser recommended).
- Time to complete the lab---remember, once you start, you cannot pause a lab.
How to start your lab and sign in to the Google Cloud console
-
Click the Start Lab button. If you need to pay for the lab, a pop-up opens for you to select your payment method. On the left is the Lab Details panel with the following:
- The Open Google Cloud console button
- Time remaining
- The temporary credentials that you must use for this lab
- Other information, if needed, to step through this lab
-
Click Open Google Cloud console (or right-click and select Open Link in Incognito Window if you are running the Chrome browser).
The lab spins up resources, and then opens another tab that shows the Sign in page.
Tip: Arrange the tabs in separate windows, side-by-side.
Note: If you see the Choose an account dialog, click Use Another Account. -
If necessary, copy the Username below and paste it into the Sign in dialog.
{{{user_0.username | "Username"}}} You can also find the Username in the Lab Details panel.
-
Click Next.
-
Copy the Password below and paste it into the Welcome dialog.
{{{user_0.password | "Password"}}} You can also find the Password in the Lab Details panel.
-
Click Next.
Important: You must use the credentials the lab provides you. Do not use your Google Cloud account credentials. Note: Using your own Google Cloud account for this lab may incur extra charges. -
Click through the subsequent pages:
- Accept the terms and conditions.
- Do not add recovery options or two-factor authentication (because this is a temporary account).
- Do not sign up for free trials.
After a few moments, the Google Cloud console opens in this tab.

Enable the Security Command Center API
-
Click on the Navigation menu in the top left corner of the Google Cloud console.
-
Select APIs & Services from the drop down and click on Enable APIs & Services.
-
Click + Enable APIs & Services
-
Search for
Security Command Center APIin the search box. -
Click on Security Command Center API, then click Enable
Task 1. Initiate and mitigate a threat with Event Threat Detection
Your first task as a Cloud Security Engineer for Cymbal Bank is to initiate and mitigate non-compliant accounts threats with Event Threat Detection.
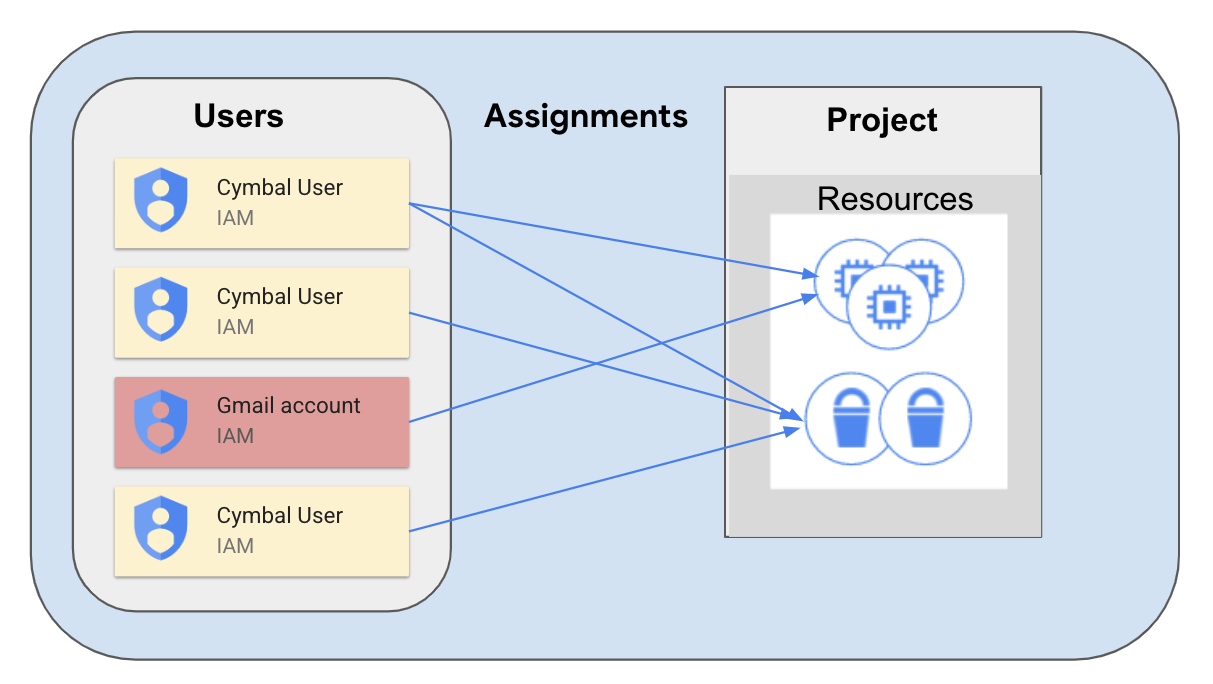
The Event Threat Detection service of SCC detects many threats by monitoring suspicious activities reported in Google Cloud logs. One of these activities might be delegating sensitive roles to an external user, such as someone who has a miscellaneous gmail.com account that isn't tied to your corporate domain.
This might happen in situations when an intruder has managed to access a GCP organization and now they are interested in establishing persistence. To do this, the hacker would grant sensitive roles to their @gmail.com account.
This delegation simulates establishing persistence. If a hacker accidentally gets temporary access to your system, they will need to establish persistence and to get access to a more stable account.
-
In the Google Cloud Console, open the navigation menu and select IAM & Admin > IAM.
-
Press the Grant Access button.
-
In the "New principals" field, enter the demo email address
demouser1@gmail.com -
For the Role field, select BigQuery > BigQuery Admin and click Save.
-
Open the navigation menu and select Security > Security Command Center > Findings.
-
Change the Time Range dropdown to the Last 6 hours.
You should see three Findings, two of which are related to the access you just granted:
- Non org IAM member
- Persistence: IAM anomalous grant
-
Click on the Finding Non org IAM member and scroll down to check the "Source display name" in the description of this Finding.
-
Ensure that the display name is set to Security Health Analytics—this is the SCC service that detected a misconfiguration in your Google Cloud Project.
-
Close the window with the Finding.
-
Click on the other Finding Persistence: IAM anomalous grant and scroll down to check the "Source display name" in the description of this Finding.
-
Ensure that the display name is set to "Event Threat Detection"—this is the SCC service that detected a misconfiguration in your Google Cloud Project.
-
Scroll to the top of the window and select the tab Source Properties.
-
In this tab expand the Properties > sensitiveRoleGrant field.
-
There you can find the most important characteristics of this finding:
- principalEmail: who performed the suspicious action
- bindingDetails: information about the role and the member to whom this role has been granted
- members: to whom the permission has been granted
-
Close the Finding window.
-
From the navigation menu, select IAM & Admin > IAM.
-
Click the checkbox next to the
demouser1@gmail.comprincipal and click the button Remove Access. -
Click Confirm.
-
Now open the navigation menu and select Security > Security Command Center > Findings.
Note that the Findings "Non org IAM member" has disappeared from the list of findings. This is because the Security Health Analytics service has checked the updated configuration of IAM policies and deactivated this Finding.
The Finding "Persistence: IAM anomalous grant" has not changed its status. It was initiated by the ETD service, and cannot be deactivated automatically. We have already investigated this Finding and we can be sure that the user from gmail.com domain does not have access to our project.
Click Check my progress to verify the objective.
Task 2. Configure a cloud environment to detect threats
Now that you've investigated and checked for non-compliant accounts, you'll configure Cymbal's environment to detect service account threats through logging.
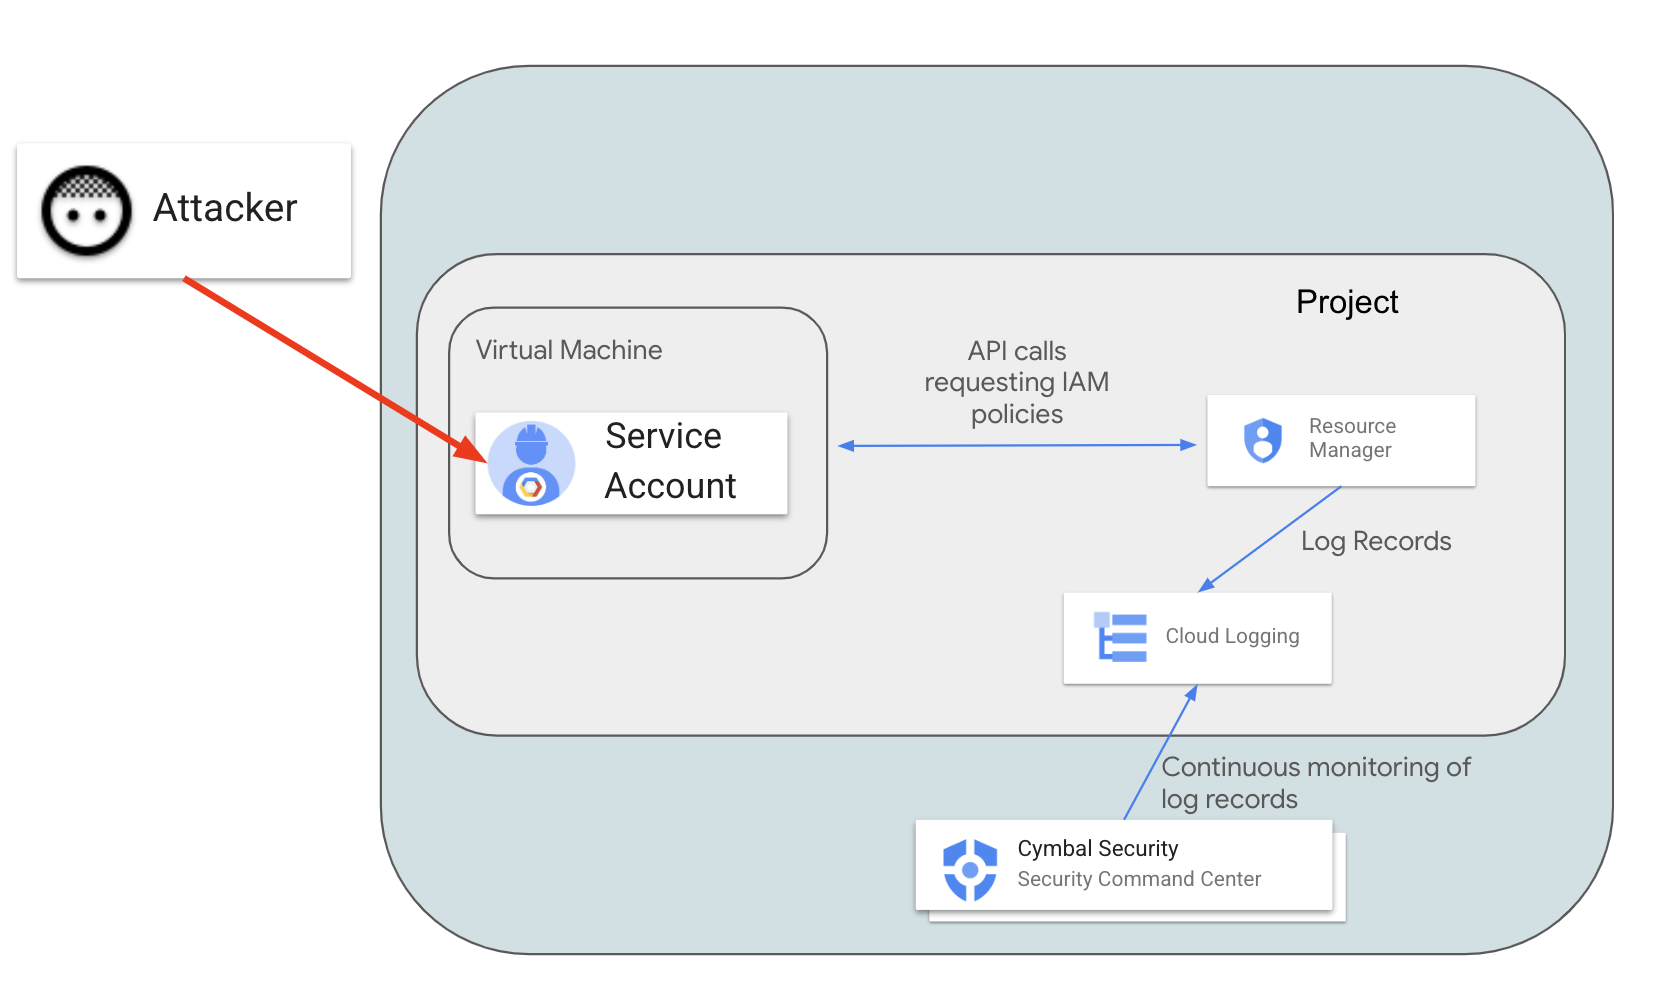
Many logs in Google Cloud are enabled by default, but for detecting specific threats you will need to enable additional data access logs. In this exercise we will investigate the Service Account Self-Investigation threat.
In this scenario, a malicious actor exploits vulnerable software on a virtual machine and obtains access to the Default Service Account (which was used to create the instance). The actor wants to understand what they can do in the Google Cloud environment. To check their permissions, the actor will call the projects.getIamPolicy method. SCC should detect and report this suspicious activity recorded in the logs.
For SCC to detect this activity, we need to enable Resource Manager Admin Read logs.
- In the Google Cloud Console open the navigation menu and select IAM & Admin > Audit Logs.
- In the list of services find Cloud Resource Manager API and click the checkbox next to it.
-
On the right side of the tab, find the configuration frame: Cloud Resource Manager API - Permission Types.
-
Select the Admin Read check box and click Save.
Now Resource Manager Data Read audit logs are collected and Event Threat Detection can analyze them.
For reproducing the scenario, you will need to create a new virtual machine with a default Service Account and cloud-platform access scope.
-
Open the navigation menu and select Compute Engine > VM instances.
-
Then click the Create Instance button.
-
Select region as
and set zone as . -
In the "Access scopes" section, select the Allow full access to all Cloud APIs value.
-
Leave all other parameters set to their default value.
-
Click Create to launch the new VM instance.
-
Once the instance is created, click on the SSH button.
-
Accept the authorization prompts when the new SSH window opens.
-
In the SSH session, enter the following command:
You should see the list of IAM permissions granted to users in the Google Cloud project.
-
Open the navigation menu and select Security > Security Command Center > Findings.
-
Set the value of the time range selector to Last hour.
You should see 5 Security Findings related to the instance you just created:
- Discovery: Service Account Self-Investigation
- Full API access
- Default service account used
- Compute secure boot disabled
- Public IP address
The Finding "Discovery: Service Account Self-Investigation" was initiated by Event Threat Detection (ETD), which classifies findings with the THREAT Finding Class.
Other findings have been initiated by the Security Health Analytics component, which classifies Findings as MISCONFIGURATION.
-
Click on the Finding Discovery: service account self-investigation.
-
Select the Source Properties tab at the top of the window.
-
Now expand the field properties > serviceAccountGetsOwnIamPolicy.
-
Inspect the following values:
- principalEmail - the email address of the Service Account that is investigating its own permissions
-
callerIp - IP address from which the
projects.getIamPolicymethod was called. In our case it should be the external IP address of the virtual machineinstance-1.
- Exit out of the Finding window.
Outside of this scenario, this Finding can inform us that our virtual machine and the default Service Account have been compromised and we need to investigate and contain this incident.
Now that we've investigated this finding, let's mute it.
-
Click on the checkbox next to the Discovery: Service Account Self-Investigation Finding.
-
Click on the MUTE OPTIONS drop-down list.
-
Then select the Mute option.
-
Ensure that this Finding no longer appears in the SCC interface.
Click Check my progress to verify the objective.
Task 3. Manage SCC findings with Event Threat Detection
As you see, for detecting some threats you need to enable additional logs, which are not enabled by default. For detecting some findings, you also need to create additional configurations, such as DNS policies.
This will allow you to detect malicious software running on compute resources and identify well-known malicious DNS addresses.
When a DNS request is made on a virtual machine, this query is not logged by default, and in turn SCC cannot detect connections to malicious internet resources.
In the previous task, we enabled logs for the Resource Manager service using an IAM configuration. For logging all DNS queries, you will need to create a DNS policy with enabled logging.
-
To enable full DNS query logging, open the navigation menu and select Network services > Cloud DNS.
-
Select the "DNS Server Policies" tab and then click the Create Policy button.
-
Enter dns-test-policy for the name of the DNS policy.
-
Select the On radio-button for DNS logs.
-
In the "Alternate DNS servers" part, select default from the network dropdown and click OK.
-
Click the Create button.
-
Now return to the SSH session of our virtual machine and try connecting to the malicious URL by running the following command:
You should receive a similar output:
-
Return to the Google Cloud Console.
-
Open the navigation menu and select Security > Security Command Center > Findings.
-
You should now see a new threat appear "Malware: Bad Domain"
-
Click on this Finding.
-
In the new window, click on the SOURCE PROPERTIES tab.
-
Expand the properties field and examine the following:
- domains: the list of domains for which the instance requested address resolution
- instanceDetails: the ID of the instance that connected to the "malicious" domain
-
Close the Finding Window.
-
Click on the checkbox near the Finding Malware: Bad Domain.
-
Now click on the Mute Options drop-down list.
-
Click Mute. This Finding will now be removed from the SCC interface.
-
From the navigation menu, select Compute Engine > VM instances.
-
Click on the checkbox next to the virtual machine instance you created previously and press Delete.
-
Confirm the delete action by clicking Delete.
Click Check my progress to verify the objective.
Congratulations!
Throughout this lab, you learned how to:
- Initiate and mitigate a threat with Event Threat Detection
- Configure a cloud environment to detect threats
- Manage SCC findings with Event Threat Detection
Next steps / Learn more
- Check out the lab titled Mitigate Threats and Vulnerabilities with Security Command Center: Challenge Lab.
Google Cloud training and certification
...helps you make the most of Google Cloud technologies. Our classes include technical skills and best practices to help you get up to speed quickly and continue your learning journey. We offer fundamental to advanced level training, with on-demand, live, and virtual options to suit your busy schedule. Certifications help you validate and prove your skill and expertise in Google Cloud technologies.
Manual Last Updated September 11, 2024
Lab Last Tested September 11, 2024
Copyright 2024 Google LLC All rights reserved. Google and the Google logo are trademarks of Google LLC. All other company and product names may be trademarks of the respective companies with which they are associated.

