检查点
Configure OAuth Consent Screen and Create OAuth Client ID
/ 20
Clone Application Repository
/ 20
Add Private Key
/ 20
Deploy W3bstream Applet
/ 10
Configure the Web App
/ 10
Add the Yoga Sesion (with OAuth Playground)
/ 10
Run and Test the Web App
/ 10
Building Fitness-Driven dApps: Streaming Google Fit Data with W3bstream
- GSP1178
- What you'll learn
- Prerequisites
- Setup and requirements
- Task 1. Building the Web App
- Task 2. Get your NFT ready
- Task 3. Deploying the NFT Smart Contracts
- Task 4. Deploy the W3bstream applet
- Task 5. Granting minting permission to W3bstream applet
- Task 6. Configure the Web App
- Task 7. Add the yoga session (with OAuth Playground)
- Task 8. OPTIONAL: Add the yoga session (with Google Fit App)
- Task 9. Run and test the Web App
- Task 10. Code highlights (optional)
- Congratulations!
GSP1178

W3bstream is a decentralized network that allows IoT devices and other data sources to stream and process data, serving as a bridge between real-world data sources and the blockchain. Through it, data like steps, locations, and achieved fitness goals, can be easily streamed and processed to prove real world activities to blockchain contracts. This enables developers to craft gamified experiences using blockchain - healthy behaviors can be incentivised by rewarding users with NFTs or ERC20 tokens.
In this lab you will learn how to channel Google Fit data via W3bstream to develop decentralized applications (dApps) that mint crypto assets based on user fitness activities. This lab is ideal for developers interested in building applications that bridge the worlds of Web2 and Web3, combining the strengths of Web2 services with the advantages of Web3 incentives.
What you'll learn
- Integrate Google Fit API in your applications: Connect and access fitness activity data from Google Fit API, including steps, distance, calories burned, and location data.
- Gamify Real-World behaviors with Web3: Design engaging challenges, incentivize healthy habits, and reward users for their accomplishments with blockchain incentives.
- Set up a W3bstream Project: W3bstream is a web3 streaming platform that allows real-time data streaming from various sources to prove real-world facts to blockchain applications.
- Minting Crypto Assets: mint NFTs or ERC20 tokens based on predefined user's goals and achievements and understand the smart contract implementation and integration with the streaming data.
Application workflow overview
The application workflow can be summarized as follows:
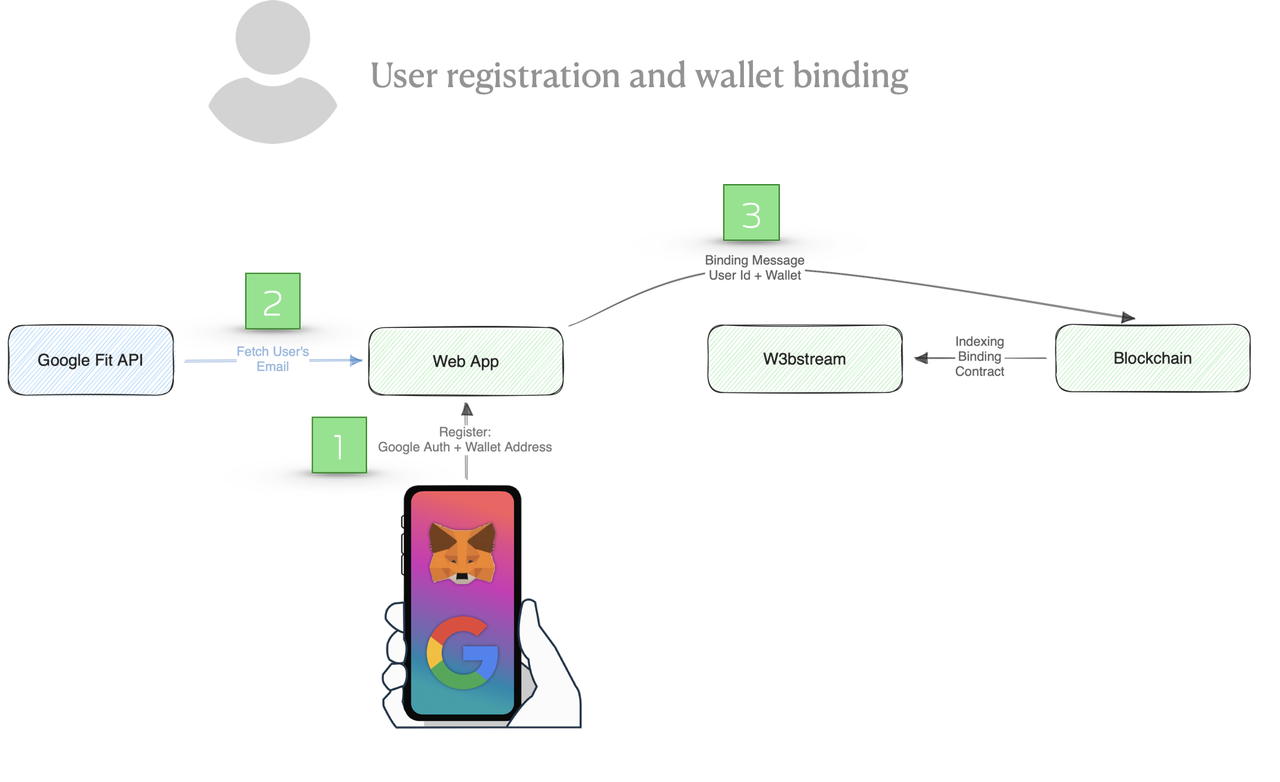
- User Registration: Users will authorize the web application to access their Google Fit data using a Google Account provided for you after you click Start Lab. Upon authorization, the web app fetches the user's email from Google Fit and hashes it to generate a unique user ID. The user wallet address is also fetched from the user's Metamask plugin. Finally, the binding between the user id and the wallet address is registered in a smart contract on the blockchain.
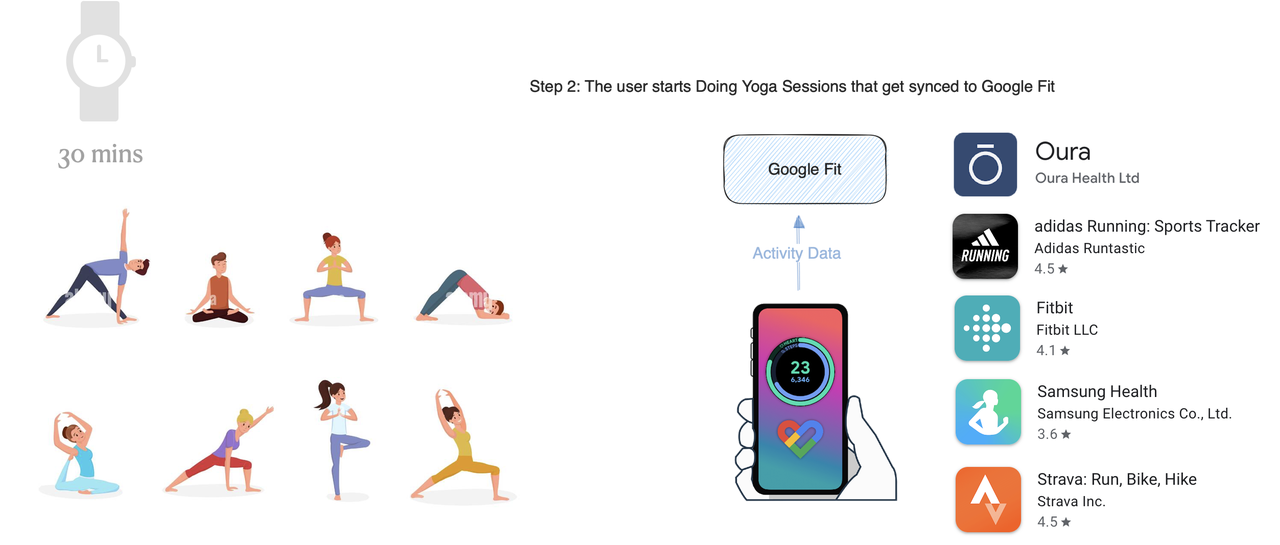
- User Fitness Activity: Users engage in fitness activities using their smartphones with Google Fit or connected fitness apps.
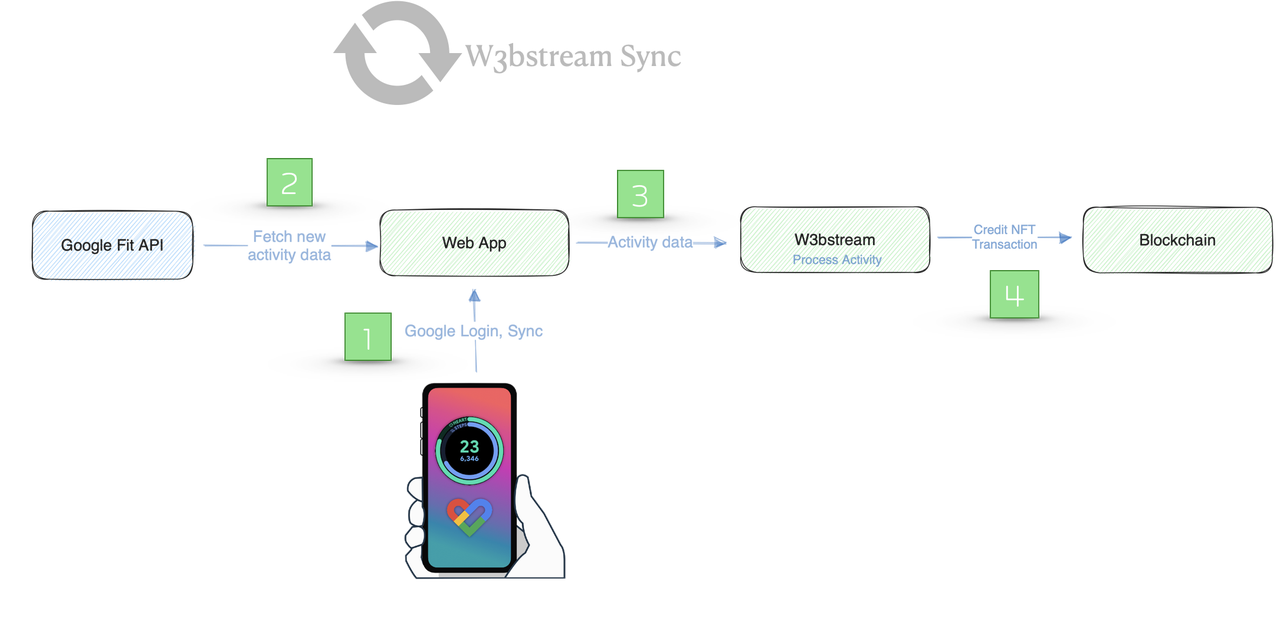
- W3bstream Data Sync & Processing: Users log into the web app using the previously mentioned Google Account to sync the latest sessions data to W3bstream. The web app forwards activity data along with the user IDs to W3bstream. W3bstream processes the data, determines if users deserve NFTs based on predefined conditions, and interacts with the smart contract to increase user balances.
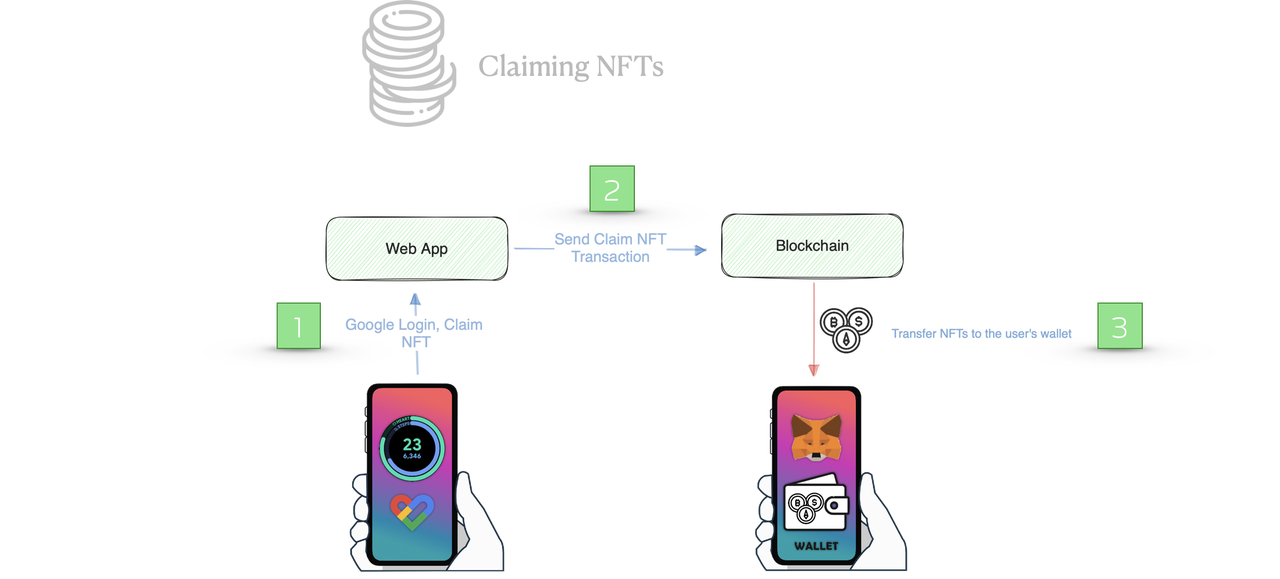
- Claiming the rewards: Log into the web app using the same Google Account credentials to view your NFT balances reflecting activity-based rewards. You can optionally claim NFTs associated with achievements and get them sent to your wallet. In this example, they are minted for completing yoga sessions lasting at least 30 minutes.
Prerequisites
- This lab must be run on a Chrome browser.
- The Metamask Plugin must be installed and configured on your Chrome browser.
- Optional: For an enhanced lab experience, add the Google Fit App to your mobile device to perform Task 8.
Setup and requirements
Please do the following BEFORE you click the Start Lab button!
Install Metamask plugin and fund your wallet
-
Metamask Browser Plugin: Install the Metamask browser plugin, which allows you to interact with blockchain networks. Set up an account and configure Metamask to interact with the IoTeX Testnet Blockchain
-
Fund your Metamask wallet with some test IOTX tokens by claiming them from the IoTeX public faucet. If you want more, you can log in to the IoTeX Developer Portal and claim them from your personal dashboard (you can refer to this article for step-by-step instructions on how to configure Metamask and claim test tokens).
-
To Add IoTeX Network Testnet network manually in Metamask wallet, use the below details:
| Network Name | IoTeX Network Testnet |
|---|---|
| New RPC URL | https://babel-api.testnet.iotex.io |
| Chain ID | 4690 |
| Currency Symbol | IOTX |
Now you're ready to click Start lab.
Before you click the Start Lab button
Read these instructions. Labs are timed and you cannot pause them. The timer, which starts when you click Start Lab, shows how long Google Cloud resources will be made available to you.
This Qwiklabs hands-on lab lets you do the lab activities yourself in a real cloud environment, not in a simulation or demo environment. It does so by giving you new, temporary credentials that you use to sign in and access Google Cloud for the duration of the lab.
What you need
To complete this lab, you need:
- Access to a standard internet browser (Chrome browser recommended).
- Time to complete the lab.
Note: If you already have your own personal Google Cloud account or project, do not use it for this lab.
Note: If you are using a Pixelbook, open an Incognito window to run this lab.
A Windows VM is being provisioned for this lab, so it will take few minutes for the lab to be ready.
To access the Windows VM, click on the Open Windows VM button from Lab Details panel. Use either PowerShell or Visual Studio Code to perform the tasks for this lab.
Task 1. Building the Web App
For this lab, use the temporaroy Google Account that has been provisioned for you as a student. Use this as both the developer account to access the Google Fit API and as the end user account to generate some fitness data and mint the NFT to our wallet.
Allow Google OAuth Client to get access to the Fitness REST API. Follow these steps to obtain a GOOGLE_ID (Client ID) and a GOOGLE_SECRET (Client secret).
-
Go to the Google API Console.
-
Select your project
-
From the Navigation menu choose APIs & Services > Library.
-
Search for Fitness API and click the MANAGE button.
-
In the navigation menu of Fitness API, choose Credentials.
-
Click Create credentials, then select OAuth Client ID.
-
If it asks you to CONFIGURE CONSENT SCREEN, follow the configuration:
-
Select User type: Internal.
-
Click on CREATE.
-
Enter app name.
-
User support email and Developer contact information can be the one of the lab test credentials.
-
Click SAVE AND CONTINUE.
-
Click on ADD OR REMOVE SCOPES.
-
Under Manually add scopes add
https://www.googleapis.com/auth/fitness.activity.writeand then click on ADD TO TABLE. -
Click on UPDATE.
-
Click on SAVE AND CONTINUE two times.
-
Click on BACK TO DASHBOARD.
-
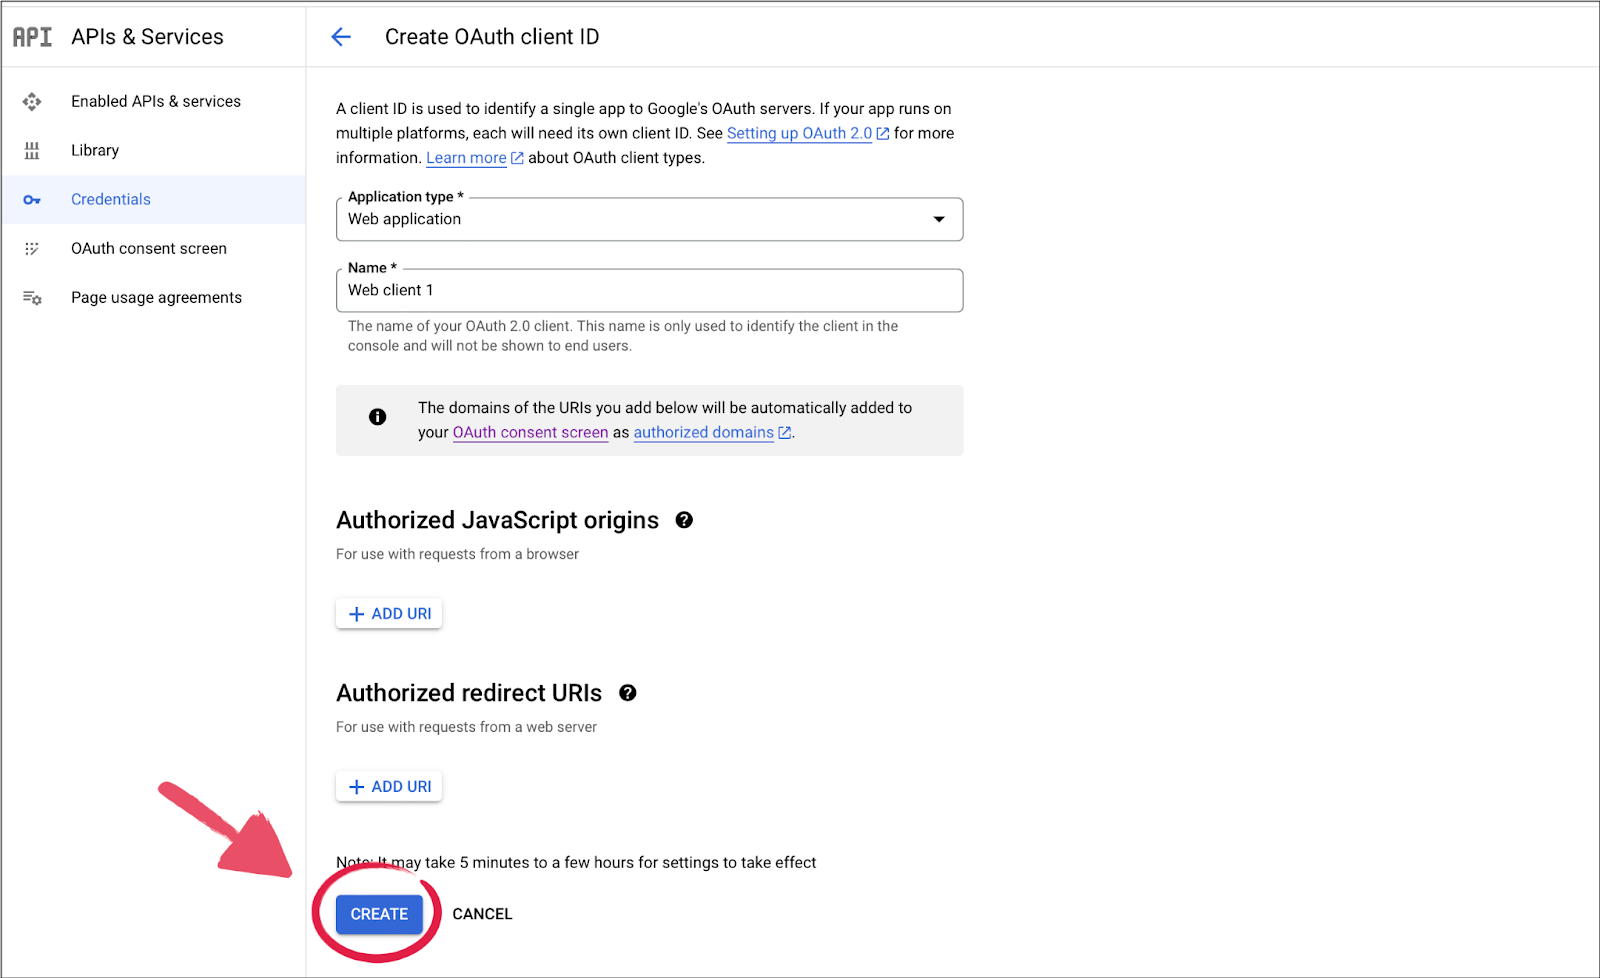
Click on Credentials > Create credentials, then select OAuth Client ID.
-
Under Application type, select Web application.
-
Under Authorized JavaScript origins, add
https://developers.google.com. -
Under Authorized redirect URI, enter the URL of the site where responses will be handled and add
http://localhost:3000/api/auth/callback/google.
-
-
Click Create. Your new OAuth 2.0 Client ID and secret appear in the list of IDs for your project. An OAuth 2.0 Client ID is a string of characters, something like this:
780816631155-gbvyo1o7r2pn95qc4ei9d61io4uh48hl.apps.googleusercontent.com
Click Check my progress to verify the objective.
- Clone the application repository - in either Windows PowerShell or a code editor like VSCode, run the following command:
Click Check my progress to verify the objective.
Task 2. Get your NFT ready
- After cloning the repository, navigate to the nft directory within the main directory and install the Node.js dependencies:
- Inside the /assets subdirectory, you will find the images for an SBT (Soul Bound Token) and a Rewards NFTs.
- Run the following to create a new file named .env in the
nftfolder and add your developer wallet PRIVATE_KEY to this file:
The provided account will be used to pay Bundlr fees with testnet tokens. Bundlr is a decentralized storage solution that you will use to store the NFT images. The Bundlr fee can be paid using MATIC tokens, so make sure that the corresponding account has some test MATIC tokens by using one of the following links: https://testmatic.vercel.app/ or https://mumbaifaucet.com (make sure you select the MUMBAI Testnet).
- Add MUMBAI Testnet network in Metamask wallet.
| Network Name | Mumbai Testnet |
|---|---|
| New RPC URL | https://rpc-mumbai.maticvigil.com |
| Chain ID | 80001 |
| Currency Symbol | MATIC |
| Block Explorer URL | https://polygonscan.com/ |
- Run the following command to upload your images and metadata
You'll find the generated NFT URI's nft/uploads.json which you'll need in the next step.
Task 3. Deploying the NFT Smart Contracts
- Navigate to the blockchain directory:
- In the blockchain directory, create an .env file, then populate the file with the contents of
.env.template:
- Edit the file and provide your developer PRIVATE_KEY that will be used for contract deployment and access control tasks.
- Update the
SBT_URIandREWARDS_URIvariables in the.envfile as per your set up with the values generated in the Get your NFT ready step. Find them in the nft/uploads.json file. - The
OPERATOR_ADDRESSwill be obtained in the next step. - Compile the contracts and generate contract types by running:
- Ensure everything is working by running a test:
- Deploy your contracts by executing:
npm i command in the directory.Click Check my progress to verify the objective.
Task 4. Deploy the W3bstream applet
- Navigate to the applet directory:
- From the applet directory, compile the
AssemblyScriptcode by running:
- Point your browser to W3bstream Studio, log in with your Metamask developer wallet, and click the Import a Project button.
- Use
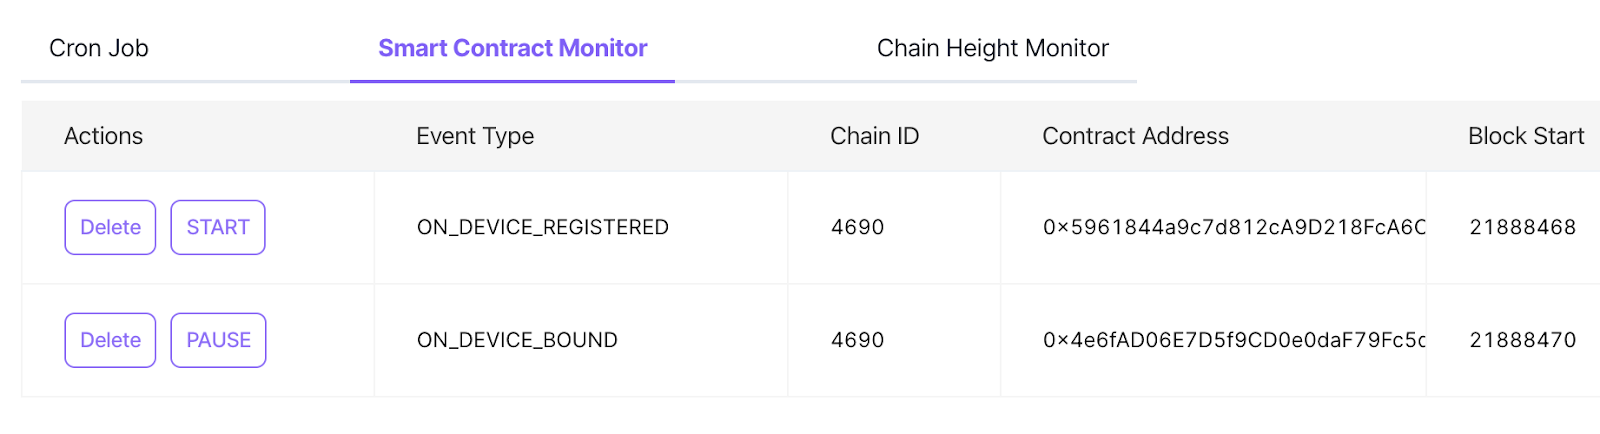
applet/wsproject.jsonas the Project file andapplet/build/release.wasmas the Wasm file. - In the Events tab in W3bstream Studio, select the Smart Contract Monitor tab and click the Start button for each Smart Contract Monitor:
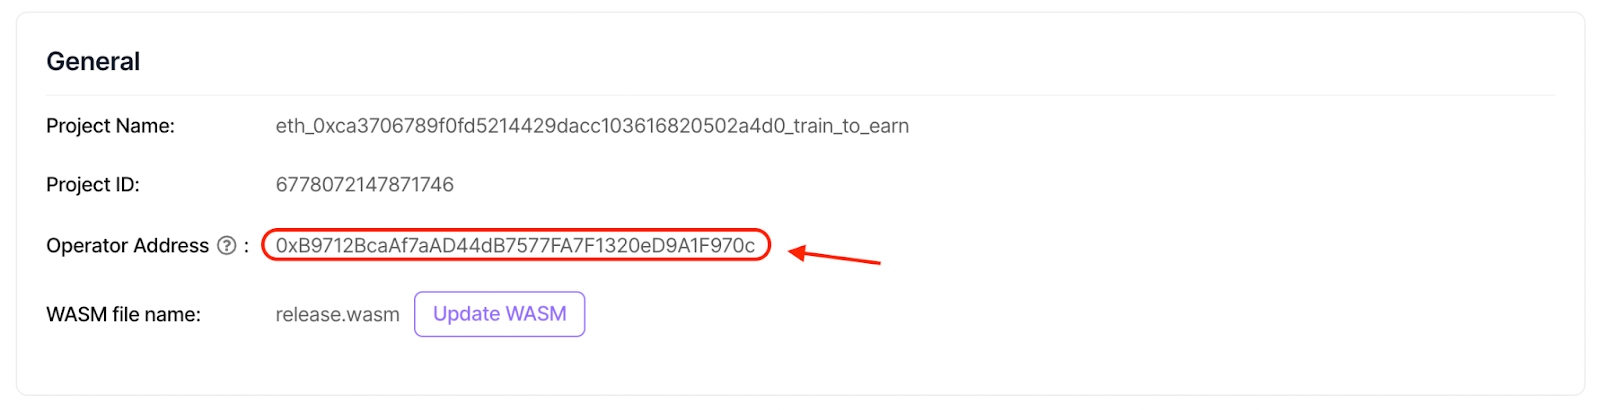
- Find your W3bstream Operator_Address in your project's Settings, and use Metamask to transfer some IOTX test tokens from your Developer Address to the Operator Address (1 IOTX should suffice):
Click Check my progress to verify the objective.
Task 5. Granting minting permission to W3bstream applet
- Return to the
blockchaindirectory and update the Operator_Address from the previous step in your.envfile with your W3bstream Operator Address. - Runthe following command to assign the SBT minter role to the W3bstream operator:
- Run this command to assign the Rewards NFT minter role to the W3bstream operator:
npm i command in the directory.Task 6. Configure the Web App
- Navigate to the
adapterdirectory:
- Create a new file named
.env.localand populate it with the variables from.env.template. - Navigate to Account settings in the studio interface to create an API key with Publisher and Event read and write permissions and update API_TOKEN.
-
NEXTAUTH_SECRETcan be acquired in Vercel secret generator - Find the
HTTP_ROUTEunder Event Sources:

- Use the GOOGLE_ID and GOOGLE_SECRET you obtained in the earlier step.
.env.local with required values. - For the
NEXTAUTH_URLuse http://localhost:3000 as address.
Click Check my progress to verify the objective.
Task 7. Add the yoga session (with OAuth Playground)
- Follow OAuth Playground steps to submit yoga session to your lab user account.
- Use your lab user credentials provided for this lab
- Select the following scope for Fitness API v1: https://www.googleapis.com/auth/fitness.activity.write
- Use
PUTmethod with the following url: https://www.googleapis.com/fitness/v1/users/me/sessions/1 - Click on Enter request body and use the request body below to submit a test yoga session:
- Click the Send the request button to submit the request
Click Check my progress to verify the objective.
Task 8. OPTIONAL: Add the yoga session (with Google Fit App)
- Make sure you installed the Google Fit App on your mobile device.
- Log in to Google Fit with the lab user credentials.
- Add at least one 30 min yoga session in your Google Fit App.

Task 9. Run and test the Web App
- Start the web app by running the following command:
-
Navigate to
localhost:3000in your web browser. -
Follow the on-screen instructions to register your device and claim your SBT:

- Sync the Google Fit data and then recheck the studio db and proceed to claim your rewards.
- Import the NFTs into Metamask. The NFT contract addresses are present in Environment variables within the Settings tab. The SBT ID is "device id" and the Rewards token ID is "1".
Click Check my progress to verify the objective.
Task 10. Code highlights (optional)
Some of the more relevant components of your application:
- Auth with google with applied activity scopes
You start with the user authentication handled by the NextAuth library in auth/[...nextauth].ts, where you establish secure user sessions using Google as the identity provider. This forms the basis for secure interactions throughout the application.
This file sets up Google OAuth authentication for a Next.js application using the NextAuth.js library. The key components of the setup are the providers and callbacks within the authOptions object. The providers array contains the Google provider, configured with necessary details such as clientId, clientSecret, and the scope of authorization required from Google's API, which in this case includes basic profile information and read access to Google Fit data.
The callbacks object contains two methods: jwt and session. The jwt callback intercepts the JSON Web Token (JWT) after authentication, and if an account is authenticated, it assigns the access token from the account to the token object. The session callback is called whenever a session is accessed, and it adds the access token to the session object.
Finally, the authOptions object is passed to the NextAuth function and exported as the default from this module. This setup process allows the Next.js application to handle user authentication via Google, and have access to the user's access token in both the JWT and the session for further authenticated requests to Google's APIs.
- Device registration
Following this, you have the device registration process in register/route.ts, which registers the user's device on a blockchain network for unique identification, further enhancing our application's security.
This file is for registering devices on a blockchain using the DeviceRegistry contract. It imports necessary modules and contract details from a deployments file, and creates a representation of the contract using the getContract function.
The registerDevice function handles the device registration process. It first checks if a device is already registered. If not, it simulates a contract operation to register the device, writes this transaction to the blockchain using walletClient.writeContract, and waits for the transaction to be confirmed.
The isRegistered function checks if a device is already registered by reading from the DeviceRegistry contract. If any errors occur during this process, it logs the error and returns false.
- Fetch fitness data from Google and relay it to W3bstream
With the foundation laid, you look at pull-data/route.ts, where the application interacts with Google's Fit API, pulling and processing fitness data for a specific device. The processed data is then uploaded to a W3bstream, marking a key step in our application's data flow.
This file processes fitness data from Google Fit for a specific device. The POST function extracts a deviceId from the request, obtains an access token, and processes the device's fitness data. The processDevice function fetches the fitness sessions from Google Fit, processes the data to extract valid points, and uploads the data to W3bstream. The fetchFitSessions function makes a GET request to Google Fit's endpoint to fetch fitness data, and googleAxiosInstance returns an Axios instance configured for Google Fit's API.
- Send data to W3bstream
Next, you delve into client.ts under services/w3bstream, which manages the actual data upload to the W3bstream, enabling the application to persist and retrieve fitness data.
This TypeScript file manages the upload of fitness data to W3bstream. The uploadFitSessionToWS function checks if there's any fitness data to send, and if so, it prepares a POST request with the device ID and the data, and sends it to a specified HTTP route. The sendRequest function is used to execute the fetch request, and if any errors occur during the process, they are logged and re-thrown.
- Collect rewards
Finally, you conclude with the frontend code in CollectButton.tsx, a user-facing React component. It interacts with a rewards contract on the blockchain, allowing users to collect rewards for their fitness activities, tying the whole application together in a user-centric manner.
This component is used for interacting with a rewards contract on a blockchain. It uses hooks from the wagmi library to prepare and execute a contract write operation, and to wait for the transaction's confirmation.
The usePrepareContractWrite hook prepares the contract write operation to call the mintFromAllowance function of the rewards contract with the provided tokenId as an argument.
The useContractWrite hook executes the contract write operation when the write function is called, which is triggered by a click event on the button.
The useWaitForTransaction hook waits for the transaction's confirmation.
The button is disabled while the write operation is being prepared, is in progress, or while waiting for the transaction confirmation. Feedback is given to the user through the text displayed below the button, indicating whether the transaction is being prepared, is in progress, or has been successful. The transaction data is displayed when the transaction has been successful.
Together, these components form the core of our application, managing everything from user authentication, device registration, data retrieval and processing, to enabling users to receive on-chain rewards for their fitness activities.
Congratulations!
You've successfully navigated through a complex landscape of code, learned to integrate the Google Fit API, gamify decentralized applications based on real-world behaviors, set up a W3bstream project, and mint crypto assets.
These skills are not just isolated techniques. They form a holistic approach to building modern, user-centric, and engaging applications. You have learned how to pull real-world data from Google Fit, process it, and use it within a decentralized application to promote healthy behaviors. You've also set up a W3bstream project and used it as a platform for storing and managing fitness data.
Next steps
Were you intrigued by W3bstream and how to use it to build decentralized applications on real world data? Remember that integrating with a cloud solution is only one of the multiple ways of building real world based applications with W3bstream. These other tutorials will help you keep up your progress:
- Build and end-to-end DePIN project with W3bstream
- Stream data to W3bstream from your RPi board
- Build an energy efficient smart grid
- Manage device identity and binding on-chain with W3bstream
Google Cloud Training & Certification
...helps you make the most of Google Cloud technologies. Our classes include technical skills and best practices to help you get up to speed quickly and continue your learning journey. We offer fundamental to advanced level training, with on-demand, live, and virtual options to suit your busy schedule. Certifications help you validate and prove your skill and expertise in Google Cloud technologies.
Manual Last Updated Date: November 14, 2023
Lab Last Tested Date: September 20, 2023
Copyright 2022 Google LLC All rights reserved. Google and the Google logo are trademarks of Google LLC. All other company and product names may be trademarks of the respective companies with which they are associated.