Checkpoints
Enable the required APIs
/ 10
Build the images with Cloud Build
/ 20
Create Artifact Registry repository
/ 20
Scan the images using On Demand Scanning
/ 10
Verify that the build breaks when a CRITICAL severity vulnerability is found
/ 20
Fix the Vulnerability
/ 20
Secure Builds with Cloud Build
GSP1184

Overview
Software vulnerabilities are weaknesses that can cause an accidental system failure or provide bad actors a means to compromise your software. Artifact Analysis provides two kinds of OS scanning to find vulnerabilities in containers:
- The On-Demand Scanning API allows you to manually scan container images for OS vulnerabilities, either locally on your computer or remotely in Artifact Registry. This gives you granular control over the containers you want to scan for vulnerabilities.
- The Container Scanning API allows you to automate OS vulnerability detection, scanning each time you push an image to Artifact Registry. You can use On-Demand Scanning to scan images in your CI/CD pipeline before deciding whether to store them in a registry. Enabling this API also enables language package scans for Go and Java vulnerabilities.
In this lab you'll learn how to build and scan for vulnerabilities conainer images stored in Artifact Registry wth Cloud Build.
What you'll learn
In this lab you'll:
- Build Images with Cloud Build
- Use Artifact Registry for Containers
- Utilize automated vulnerability scanning
- Configure On-Demand Scanning
- Add image scanning in CI/CD in Cloud Build
Setup and Requirements
Before you click the Start Lab button
Read these instructions. Labs are timed and you cannot pause them. The timer, which starts when you click Start Lab, shows how long Google Cloud resources will be made available to you.
This hands-on lab lets you do the lab activities yourself in a real cloud environment, not in a simulation or demo environment. It does so by giving you new, temporary credentials that you use to sign in and access Google Cloud for the duration of the lab.
To complete this lab, you need:
- Access to a standard internet browser (Chrome browser recommended).
- Time to complete the lab---remember, once you start, you cannot pause a lab.
How to start your lab and sign in to the Google Cloud Console
-
Click the Start Lab button. If you need to pay for the lab, a pop-up opens for you to select your payment method. On the left is a panel populated with the temporary credentials that you must use for this lab.
-
Copy the username, and then click Open Google Console. The lab spins up resources, and then opens another tab that shows the Sign in page.
Tip: Open the tabs in separate windows, side-by-side.
-
In the Sign in page, paste the username that you copied from the left panel. Then copy and paste the password.
Important: You must use the credentials from the left panel. Do not use your Google Cloud Training credentials. If you have your own Google Cloud account, do not use it for this lab (avoids incurring charges).
-
Click through the subsequent pages:
- Accept the terms and conditions.
- Do not add recovery options or two-factor authentication (because this is a temporary account).
- Do not sign up for free trials.


After a few moments, the Cloud Console opens in this tab.
Activate Cloud Shell
Cloud Shell is a virtual machine that is loaded with development tools. It offers a persistent 5GB home directory and runs on the Google Cloud. Cloud Shell provides command-line access to your Google Cloud resources.
In the Cloud Console, in the top right toolbar, click the Activate Cloud Shell button.

Click Continue.

It takes a few moments to provision and connect to the environment. When you are connected, you are already authenticated, and the project is set to your PROJECT_ID. For example:

gcloud is the command-line tool for Google Cloud. It comes pre-installed on Cloud Shell and supports tab-completion.
You can list the active account name with this command:
(Output)
(Example output)
You can list the project ID with this command:
(Output)
(Example output)
Environment Setup
- In Cloud Shell, set your project ID and the project number for your project. Save them as
PROJECT_IDandPROJECT_NUMBERvariables:
- Enable all necessary services:
Click Check my progress to verify the objective.
Task 1. Build images with Cloud Build
In this section you will create an automated build pipeline to build your container image, scan it, then evaluate the results. If no CRITICAL vulnerabilities are found it will push the image to the repository. If CRITICAL vulnerabilities are found the build will fail and exit.
- Provide access for Cloud Build Service Account:
Cloud Build will need rights to access the on-demand scanning api. Provide access with the following commands.
- Create and change into a work directory:
- Define a sample image:
Create a file called Dockerfile with the following contents:
- Create a file called main.py with the following contents:
Create the Cloud Build pipeline
You will create a cloudbuild.yaml file in your directory that will be used for the automated process. For this lab the steps are limited to the container build process. In practice, however, you would include application specific instructions and tests in addition to the container steps.
- Create the file with the following command:
- Run the CI pipeline:
Submit the build for processing:
- Once the build process has started, in the Cloud console, open the Cloud Build dashboard to view the contents.
Click Check my progress to verify the objective.
Task 2. Artifact Registry for containers
Create Artifact Registry repository
You will be using Artifact Registry to store and scan your images.
- Create the repository with the following command:
- Configure docker to utilize your gcloud credentials when accessing Artifact Registry:
- Modify the Cloud Build pipeline to push the resulting image to Artifact Registry:
- Run the CI pipeline:
Click Check my progress to verify the objective.
Task 3. Automated vulnerability scanning
Scanning is triggered automatically every time you push a new image to Artifact Registry. Vulnerability information is continuously updated when new vulnerabilities are discovered.
In this section you'll review the image you just built and pushed to the Artifact Registry and explore the vulnerability results.
Review Image Details
Once the build process has completed, review the image and vulnerability results in the Artifact Registry dashboard.
- In the Cloud console, open Artifact Registry.
- Click on the artifact-scanning-repo to view the contents.
- Click into the image details.
- Click into the latest digest of your image.
- Once the scan has finished, click on the Vulnerabilities tab for the image.
From the vulnerabilities tab you will see the results of the automatic scanning for the image you just built.
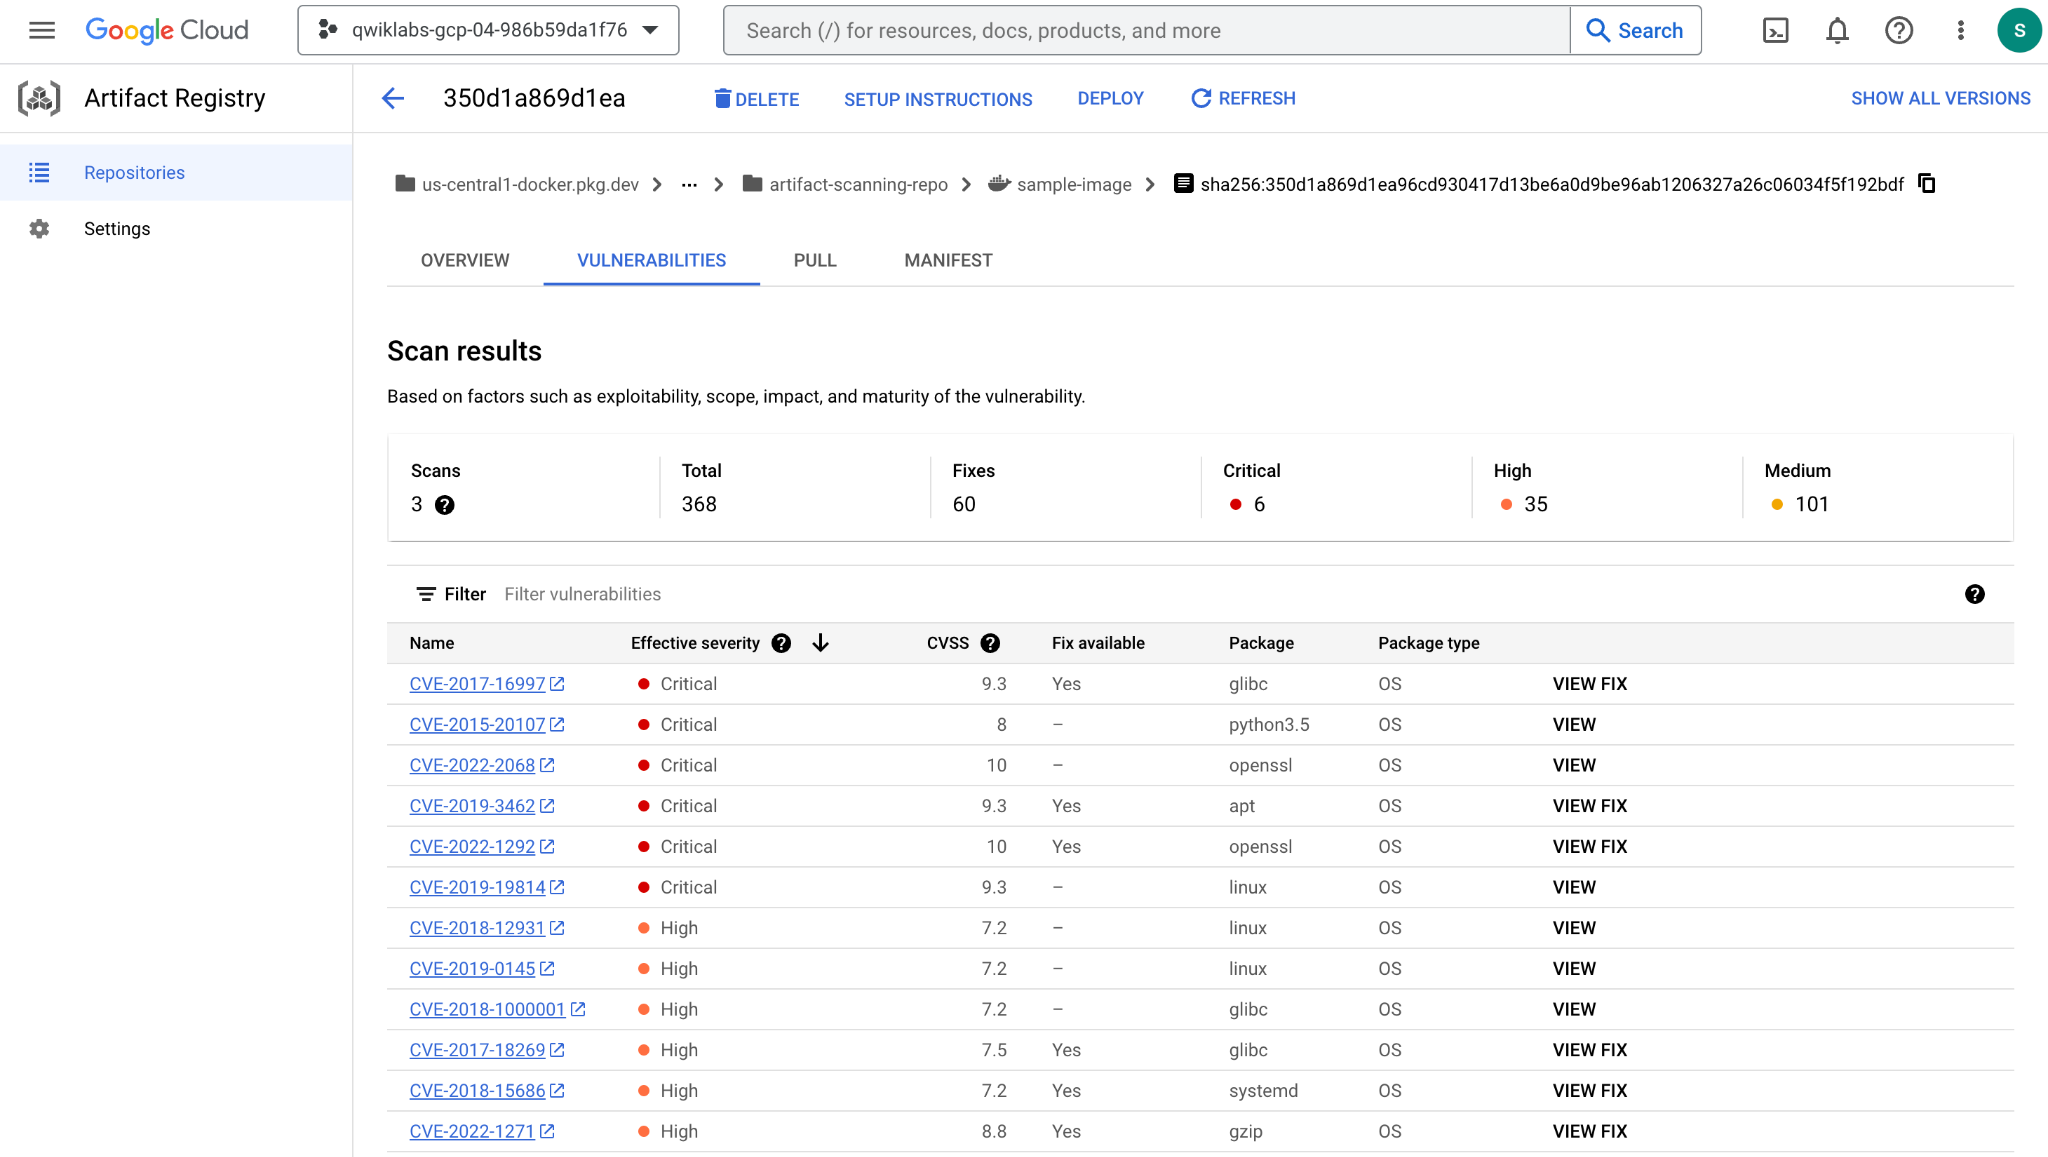
Auto scanning is enabled by default. Explore the Artifact Registry Settings to see how you can turn off/on auto scanning.
Task 4. On Demand Scanning
There are various scenarios where you may need to perform a scan before pushing the image to a repository. For example, a container developer may scan an image and fix the issues it finds before pushing code to the source control.
In the example below you will build and analyze the image locally before acting on the results.
- Use local docker to build the image to your local cache:
- Once the image has been built, request a scan of the image:
The results of the scan are stored in a metadata server. The job completes with a location of the results in the metadata server.
- Review the output which was stored in the
scan_id.txtfile:
Notice the report location of the scan results in the metadata server.
- To view the actual results of the scan, use the
list-vulnerabilitiescommand on the report location noted in the output file:
The output contains a significant amount of data about all the vulnerabilities in the image Humans rarely use the data stored in the report directly. Typically the results are used by an automated process.
- Use the commands below to read the report details and log if any CRITICAL vulnerabilities were found:
The output from this command will be
Click Check my progress to verify the objective.
Task 5. Scanning in CICD with Cloud Build
First, you'll provide Cloud Build rights to access the on-demand scanning api.
- Provide access with the following commands:
- Update the Cloud Build pipeline with the following command which creates a
cloudbuild.yamlfile that will be used for the automated process:
For this example the steps are limited to the container build process. In practice you would include application specific instructions and tests in addition to the container steps.
- Submit the build for processing to verify that the build breaks when a CRITICAL severity vulnerability is found.
- Review Build Failure in the Cloud Build History page.
Click Check my progress to verify the objective.
Fix the Vulnerability
Update the Dockerfile to use a base image that does not contain CRITICAL vulnerabilities.
- Overwrite the Dockerfile to use the Debian 10 image with the following command:
- Submit the build for processing to verify that the build will succeed when no CRITICAL severity vulnerabilities are found:
- In the Cloud console, navigate to Cloud Build > Cloud Build History to review the build success.
Click Check my progress to verify the objective.
Review Scan results
Review the good image in Artifact Registry.
- Open Artifact Registry in the Cloud console.
- Click on the artifact-scanning-repo to view the contents.
- Click into the image details.
- Click into the latest digest of your image.
- Click on the Vulnerabilities tab for the image.
Congratulations!
You have learned how to build an image with Cloud Build and store the image in Artifact Registry, and seen how Artifact scanning triggers automatically. You also know how to scan images "on-demand" - prior to being pushed to source control.
What's next
- Read more from the Cloud Build documentation page - Securing image deployments to Cloud Run and Google Kubernetes Engine
- Quickstart: Configure a Binary Authorization policy with GKE | Google Cloud
Google Cloud Training & Certification
...helps you make the most of Google Cloud technologies. Our classes include technical skills and best practices to help you get up to speed quickly and continue your learning journey. We offer fundamental to advanced level training, with on-demand, live, and virtual options to suit your busy schedule. Certifications help you validate and prove your skill and expertise in Google Cloud technologies.
Manual Last Updated January 12, 2024
Lab Last Tested January 12, 2024
Copyright 2023 Google LLC All rights reserved. Google and the Google logo are trademarks of Google LLC. All other company and product names may be trademarks of the respective companies with which they are associated.