

 Ruby, Software Consultant
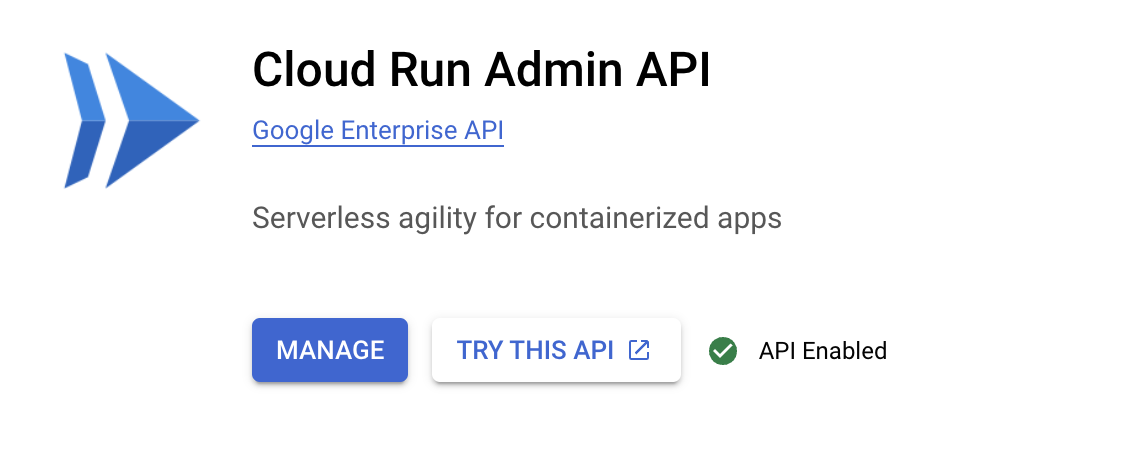


Before you begin
- Labs create a Google Cloud project and resources for a fixed time
- Labs have a time limit and no pause feature. If you end the lab, you'll have to restart from the beginning.
- On the top left of your screen, click Start lab to begin
Build simple a REST API
/ 20
Create a Revision for Cloud Run
/ 20
Create two cloud storage buckets
/ 10
Create a Pub/Sub topic for receiving notification from storage bucket
/ 10
Create a Pub/Sub subscription
/ 10
Create another build for REST API
/ 15
Create a new Revision
/ 15
Twelve years ago, Lily started the Pet Theory chain of veterinary clinics. Pet Theory currently sends invoices in DOCX format to clients, but many clients have complained that they are unable to open them. To improve customer satisfaction, Lily has asked Patrick in IT to investigate an alternative to improve the current situation.
Pet Theory's Ops team is a single person, so they are keen to invest in a cost efficient solution that doesn't require a lot of ongoing maintenance. After analyzing the various processing options, Patrick decides to use Cloud Run.
Cloud Run is serverless, so it abstracts away all infrastructure management and lets you focus on building your application instead of worrying about overhead. As a Google serverless product, it is able to scale to zero, meaning it won't incur cost when not used. It also lets you use custom binary packages based on containers, which means building consistent isolated artifacts is now feasible.
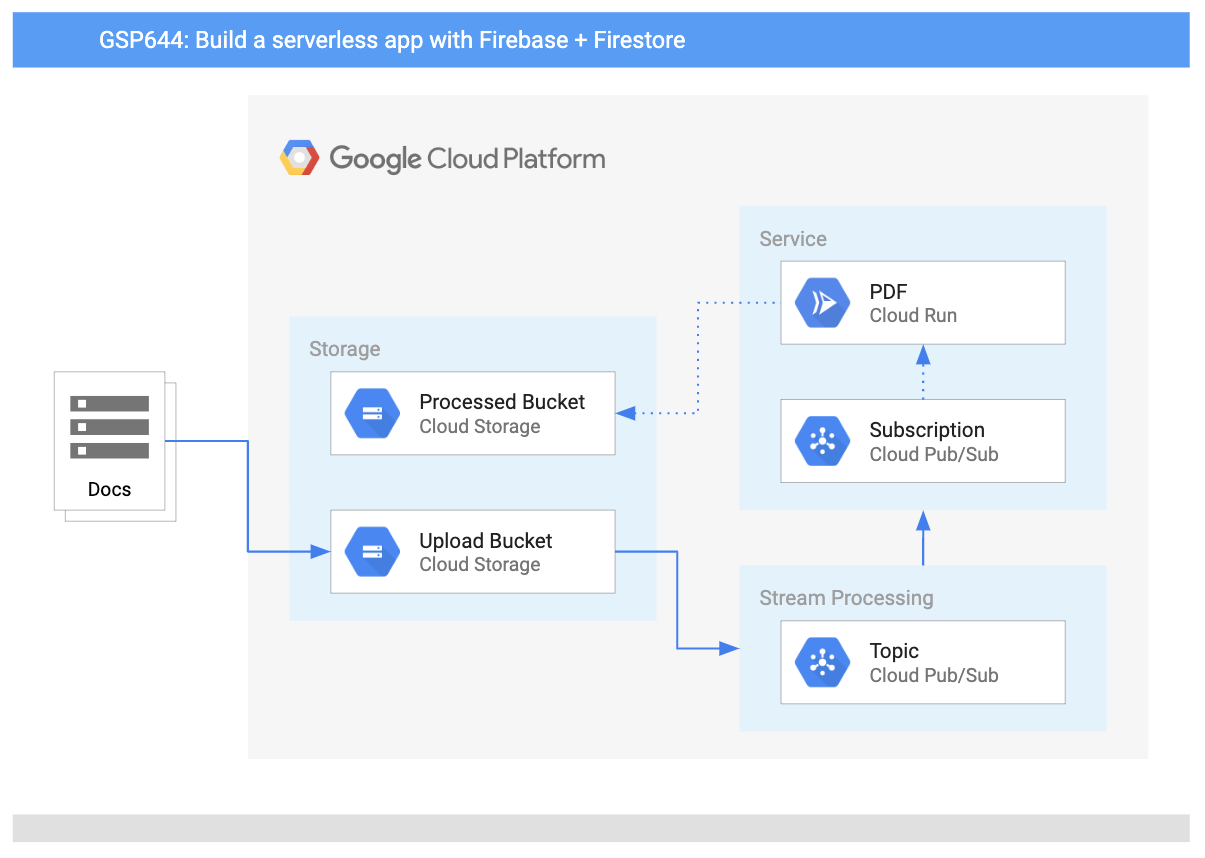
In this lab you will build a PDF converter web app on Cloud Run that automatically converts files stored in Cloud Storage into PDFs stored in separate folders.
This diagram gives you an overview of the services you will be using and how they connect to one another:
In this lab, you will learn how to:
This is an intermediate level lab. This assumes familiarity with the console and shell environments. Experience with Firebase will be helpful, but it is not required. Before taking this lab it is recommended that you have completed the following Google Cloud Skills Boost labs before taking this one:
Once you're ready, scroll down and follow the steps below to set up your lab environment.
Read these instructions. Labs are timed and you cannot pause them. The timer, which starts when you click Start Lab, shows how long Google Cloud resources are made available to you.
This hands-on lab lets you do the lab activities in a real cloud environment, not in a simulation or demo environment. It does so by giving you new, temporary credentials you use to sign in and access Google Cloud for the duration of the lab.
To complete this lab, you need:
Click the Start Lab button. If you need to pay for the lab, a dialog opens for you to select your payment method. On the left is the Lab Details pane with the following:
Click Open Google Cloud console (or right-click and select Open Link in Incognito Window if you are running the Chrome browser).
The lab spins up resources, and then opens another tab that shows the Sign in page.
Tip: Arrange the tabs in separate windows, side-by-side.
If necessary, copy the Username below and paste it into the Sign in dialog.
You can also find the Username in the Lab Details pane.
Click Next.
Copy the Password below and paste it into the Welcome dialog.
You can also find the Password in the Lab Details pane.
Click Next.
Click through the subsequent pages:
After a few moments, the Google Cloud console opens in this tab.

Cloud Shell is a virtual machine that is loaded with development tools. It offers a persistent 5GB home directory and runs on the Google Cloud. Cloud Shell provides command-line access to your Google Cloud resources.
Click Activate Cloud Shell 
Click through the following windows:
When you are connected, you are already authenticated, and the project is set to your Project_ID,
gcloud is the command-line tool for Google Cloud. It comes pre-installed on Cloud Shell and supports tab-completion.
Output:
Output:
gcloud, in Google Cloud, refer to the gcloud CLI overview guide.
Pet theory would like to convert their invoices into PDFs so that customers can open them reliably. The team wants to accomplish this conversion automatically to minimize the workload for Lisa, the office manager.
Ruby, Pet Theory's computer consultant, gets a message from Patrick in IT...
|
Patrick, IT Administrator |
Hi Ruby, I've done some research and found that LibreOffice is good at converting many different file formats to PDF. Would it be possible to run LibreOffice in the cloud without having to maintain the servers? Patrick |
|
|
Hey Patrick, I think I have just the thing for this type of situation. I just watched a great video from Next 19 about Cloud Run on YouTube. It looks like we can run LibreOffice in a serverless environment with Cloud Run. No server maintenance is needed! I'll send over some resources that will help you get set up. Ruby |
Help Patrick set up and deploy Cloud Run.
Open the Navigation menu (
Click Enable and then hit the back button in your browser twice. Your Console should now resemble the following:
Ruby has developed a Cloud Run prototype and would like Patrick to deploy it onto Google Cloud. Now help Patrick establish the PDF Cloud Run service for Pet Theory.
package.json with Cloud Shell Code Editor or your preferred text editor. In the "scripts" section, add "start": "node index.js", as shown below:lab03/index.js file and review the code.The application will be deployed as a Cloud Run service that accepts HTTP POSTs. If the POST request is a Pub/Sub notification about an uploaded file, the service writes the file details to the log. If not, the service simply returns the string "OK".
lab03/Dockerfile.The above file is called a manifest and provides a recipe for the Docker command to build an image. Each line begins with a command that tells Docker how to process the following information:
The command builds a container with your code and puts it in the Artifact Registry of your project.
Return to the Cloud Console, on the Navigation menu (
Open the gcr.io repository. You should see your container hosted:
Test completed task
Click Check my progress to verify that you've performed the above task.
When the deployment is complete, you will see a message like this:
$SERVICE_URL for the app so you can easily access it:Test completed task
Click Check my progress to verify that you've performed the above task.
This will result in an error message saying "Your client does not have permission to get the URL". This is good; you don't want the service to be callable by anonymous users.
If you get the response "OK" you have successfully deployed a Cloud Run service. Well done!
Now that the Cloud Run service has been successfully deployed, Ruby would like Patrick to create a staging area for the data to be converted. The Cloud Storage bucket will use an event trigger to notify the application when a file has been uploaded and needs to be processed.
Test completed task
Click Check my progress to verify that you've performed the above task.
The notifications will be labeled with the topic "new-doc".
Test completed task
Click Check my progress to verify that you've performed the above task.
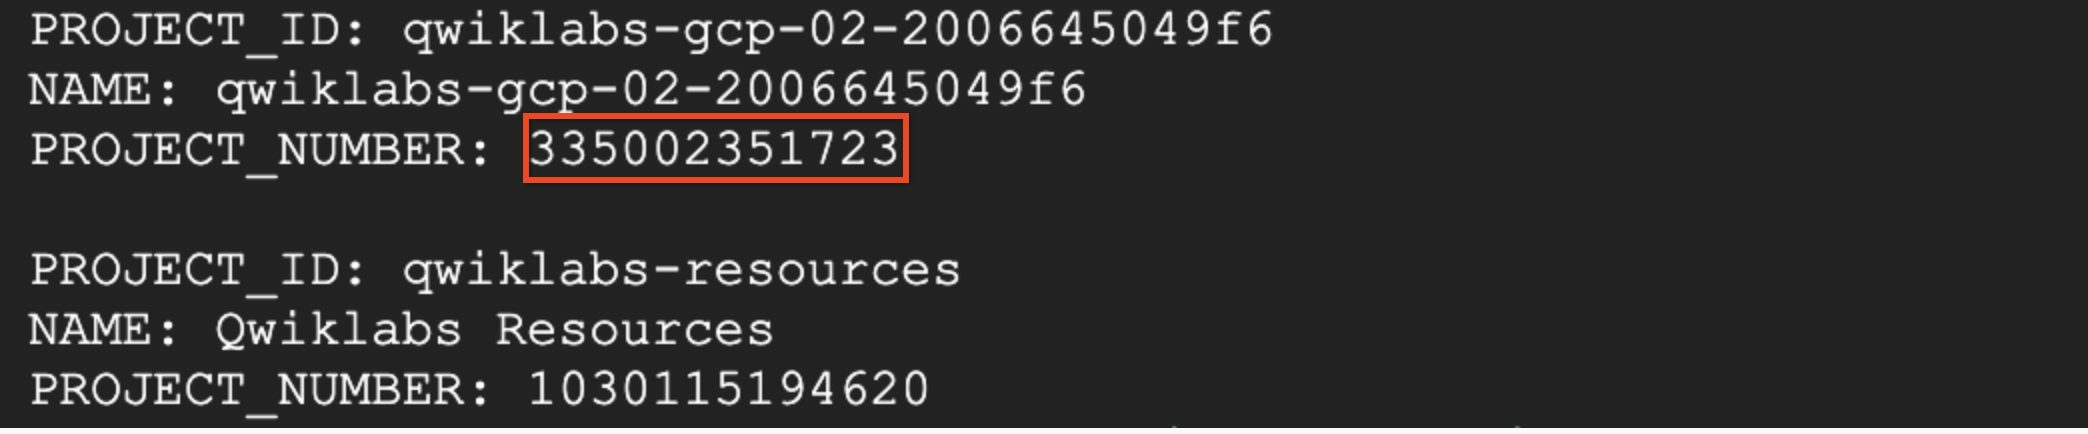
Look for the project whose name starts with "qwiklabs-gcp-". You will be using the value of the Project Number in the next command.
PROJECT_NUMBER environment variable, replacing [project number] with the Project Number from the last command:service account does not exist on executing the above command. Enable the Cloud Pub/Sub API and if it is already enabled, first Disable it and then Enable it again. Then, re-run the above command.
Test completed task
Click Check my progress to verify that you've performed the above task.
To verify the application is working as expected, Ruby asks Patrick to upload some test data to the named storage bucket and then check Cloud Logging.
Once the upload is done, return to your Cloud Console tab, open the Navigation menu and click VIEW ALL PRODUCTS. Select Logging under the Observability section.
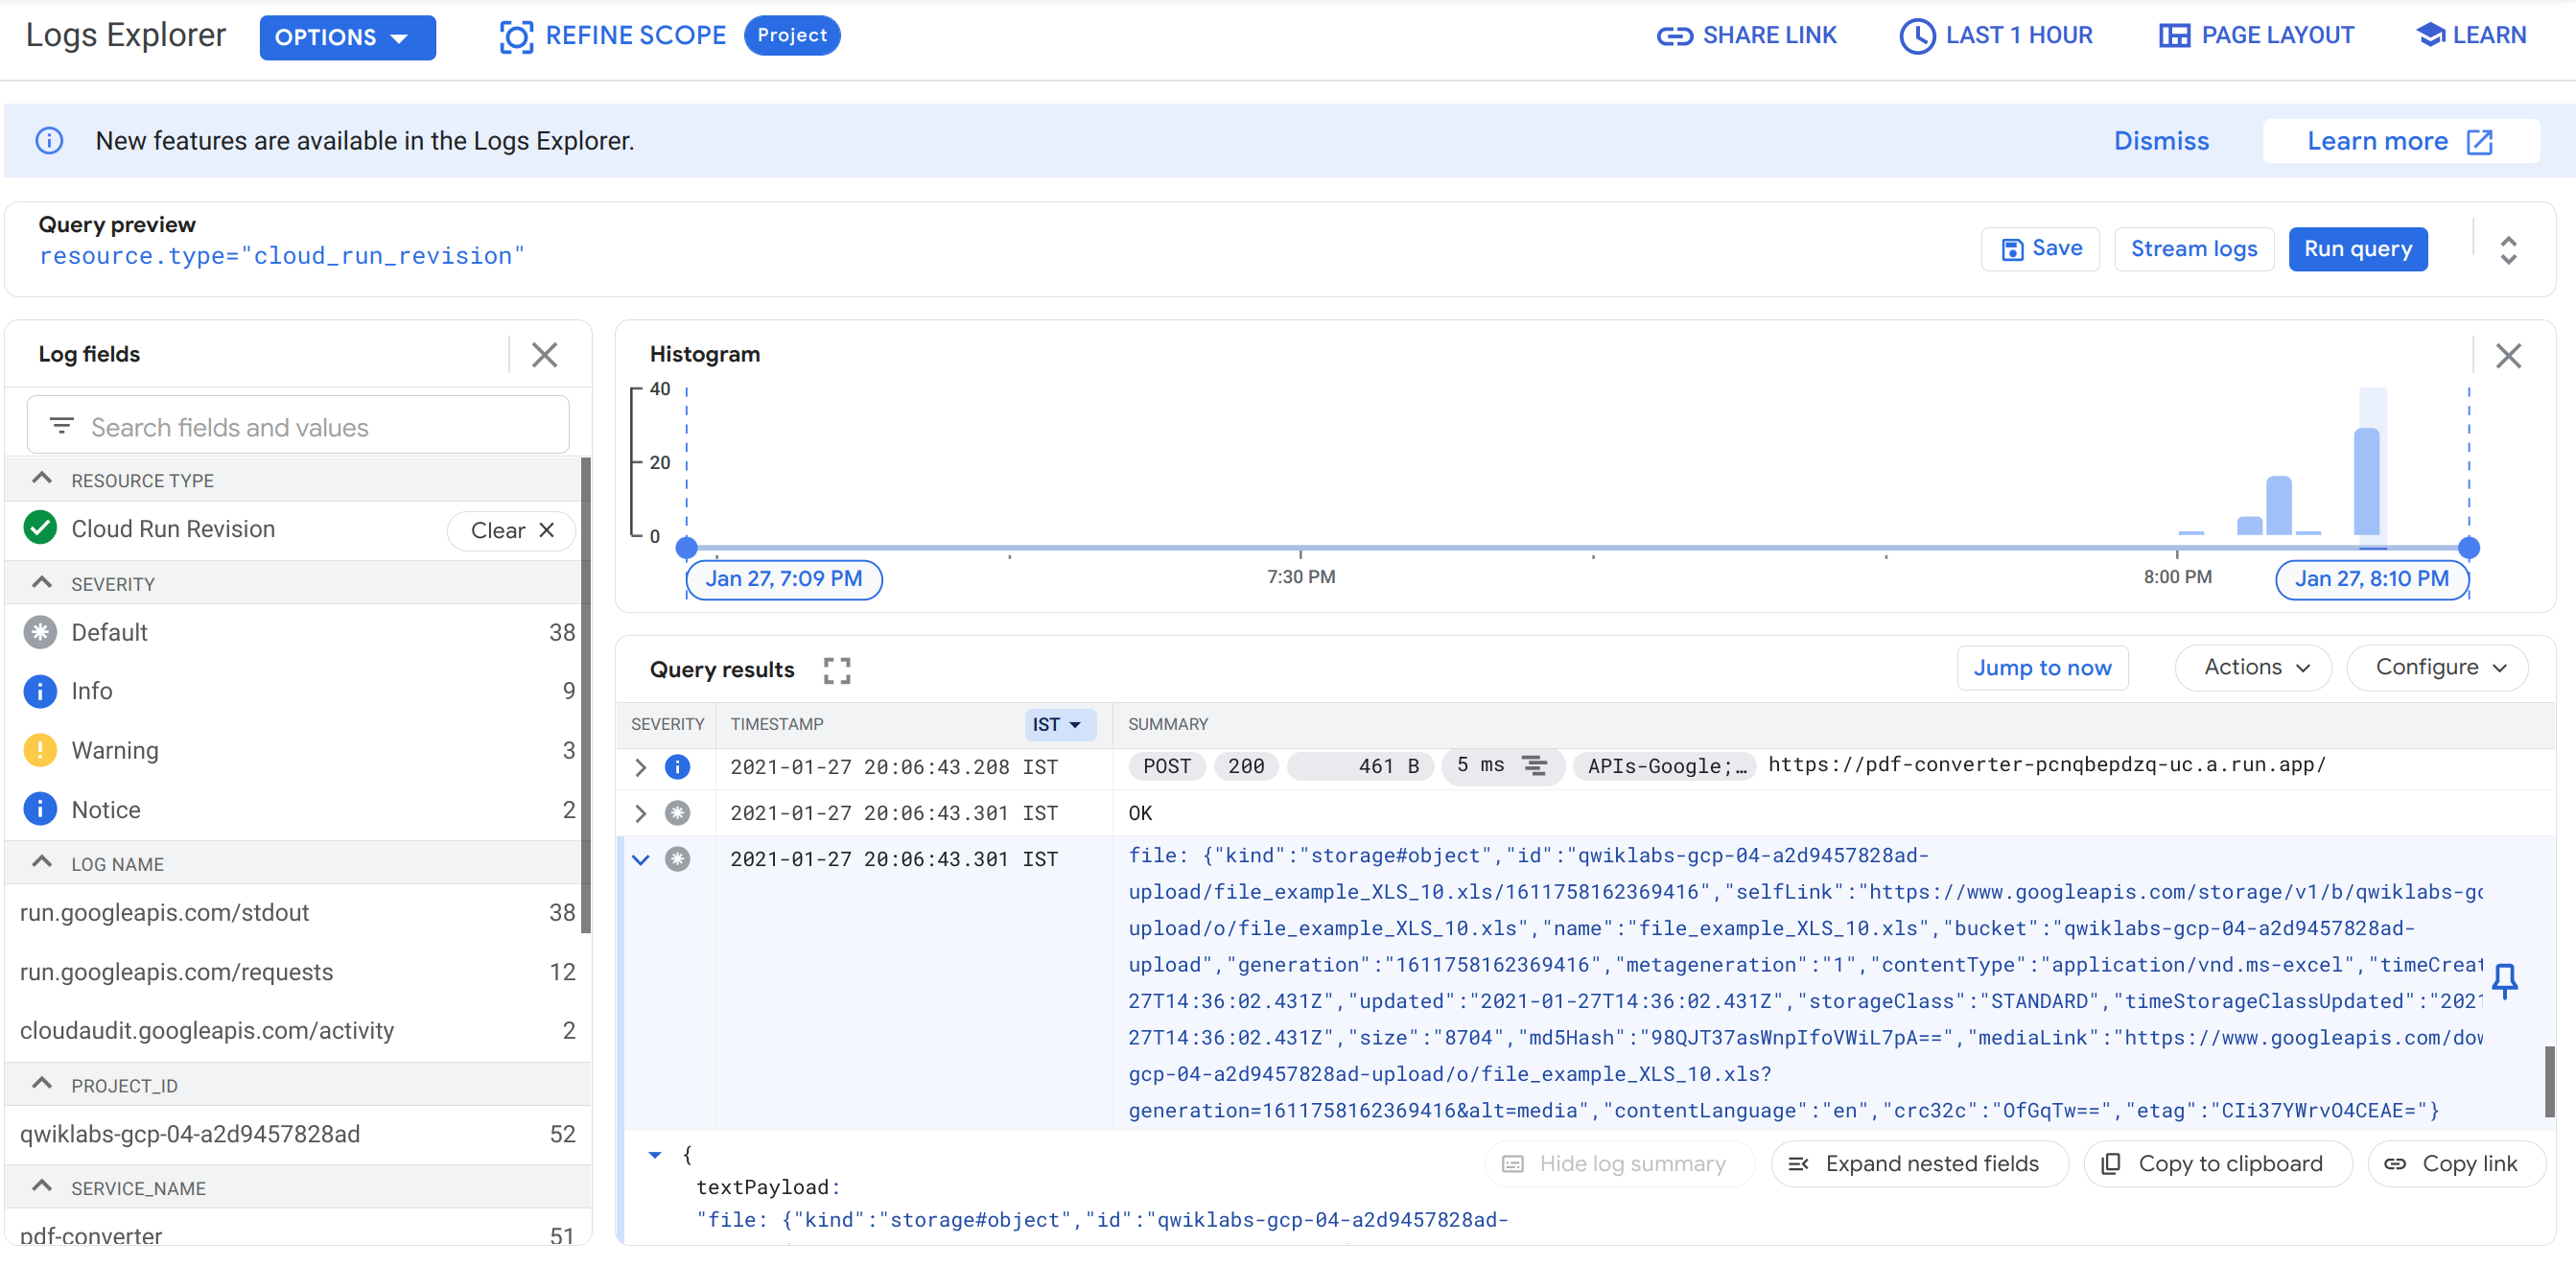
In the All resources dropdown, filter your results to Cloud Run Revision and click Apply. Then click Run Query.
In the Query results, look for a log entry that starts with file: and click it. It shows a dump of the file data that Pub/Sub sends to your Cloud Run service when a new file is uploaded.
Can you find the name of the file you uploaded in this object?
upload directory by deleting the files in it:Patrick needs to convert a backlog of invoices to PDFs so all customers can open them. He emails Ruby for some help...
|
Patrick, IT Administrator |
Hi Ruby Based on your findings, I think we can automate this process and also move to using PDF as the invoice format. I spent a bit of time yesterday coding a solution and built a Node.js script to do what we need. Could you take a look? Patrick |
Patrick sends Ruby the code fragment he wrote to produce a PDF from a file:
Ruby responds back to Patrick...
|
Ruby, Software Consultant |
Hi Patrick Cloud Run uses containers, so we need to provide your application in this format. For the next step we need to create a Dockerfile manifest for the application. Your code uses LibreOffice. Can you send me the command for installing that software? I will need to include it in the container. Ruby |
|
Patrick, IT Administrator |
Hi Ruby Awesome, here is how I usually install LibreOffice on servers in the office:
Let me know if you need any more information. Patrick |
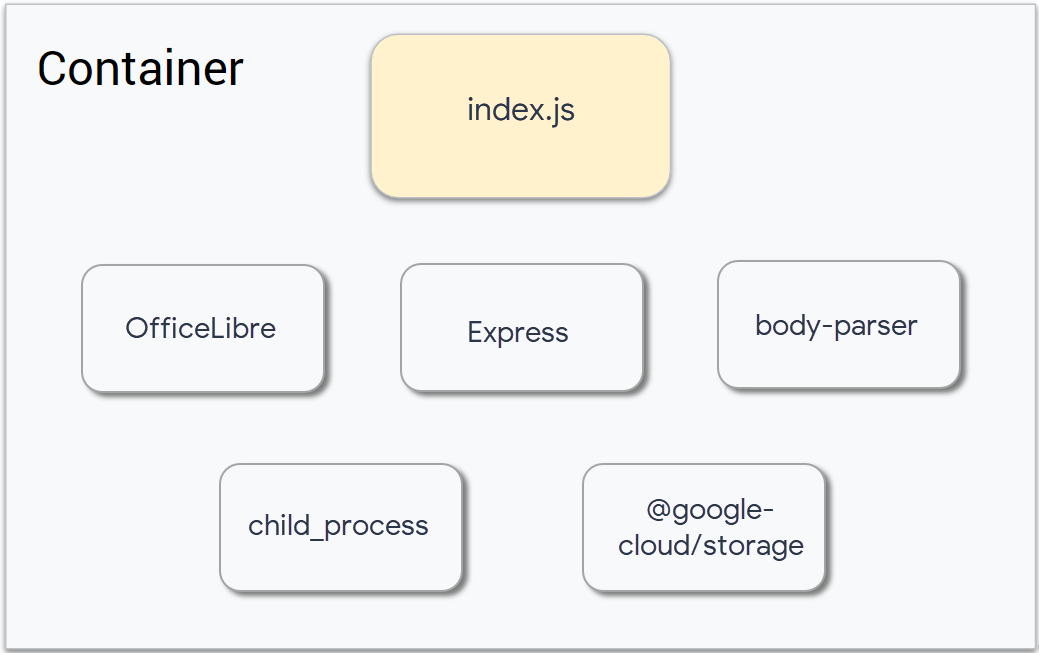
Building the container will require the integration of a number of components:
With all the files identified, the manifest can now be created. Help Ruby set up and deploy the container.
The package for LibreOffice was not included in the container before, which means it now needs to be added.
Patrick has previously provided the commands he uses to build his application, Ruby will add these as a RUN command within the Dockerfile.
Open the Dockerfile manifest and add the command RUN apt-get update -y && apt-get install -y libreoffice && apt-get clean line as shown below:
Open the index.js file and add the following package requirements at the top of the file:
Replace the app.post('/', async (req, res) with the following code:
Now add the following code that processes LibreOffice documents to the bottom of the file:
Ensure your index.js file looks like the following:
index.js file with this example code.
The main logic is housed in these functions:
Whenever a file has been uploaded, this service gets triggered. It performs these tasks, one per line above:
process.env.PDF_BUCKET contains the name of the Cloud Storage bucket to write PDFs to. You will assign a value to this variable when you deploy the service below.The rest of index.js implements the functions called by this top-level code.
It's time to deploy the service, and to set the PDF_BUCKET environment variable. It's also a good idea to give LibreOffice 2 GB of RAM to work with (see the line with the --memory option).
Run the following command to build the container:
Y if you receive an pop to enable the Cloud Build APITest completed task
Click Check my progress to verify that you've performed the above task.
Now deploy the latest version of your application:
With LibreOffice part of the container, this build will take longer than the previous one. This is a good time to get up and stretch for a few minutes.
Click Check my progress to verify the objective.
Once the deployment commands finish, make sure that the service was deployed correctly by running:
If you get the response "OK" you have successfully deployed the updated Cloud Run service. LibreOffice can convert many file types to PDF: DOCX, XLSX, JPG, PNG, GIF, etc.
Create a script to perform the upload
Run the following command to upload some example files:
Return to the Cloud Console, open the Navigation menu and select Cloud Storage. Open the -upload bucket and click on the Refresh button a couple of times to see how the files are deleted, one by one, as they are converted to PDFs.
Then click Buckets from the left menu, and click on the bucket whose name ends in "-processed". It should contain PDF versions of all files. Feel free to open the PDF files to make sure they were properly converted:
-processed bucket.
Pet Theory now has a system for converting their archive of old files to PDFs. By simply uploading the old files to the "upload" bucket, the pdf-converter service converts them and writes them as PDFs to the "processed" bucket.
Continue your serverless journey in the Serverless Cloud Run Development course. You will read through a fictitious business scenario and assist the characters with their serverless migration plan.
...helps you make the most of Google Cloud technologies. Our classes include technical skills and best practices to help you get up to speed quickly and continue your learning journey. We offer fundamental to advanced level training, with on-demand, live, and virtual options to suit your busy schedule. Certifications help you validate and prove your skill and expertise in Google Cloud technologies.
Manual Last Updated June 06, 2024
Lab Last Tested June 06, 2024
Copyright 2025 Google LLC All rights reserved. Google and the Google logo are trademarks of Google LLC. All other company and product names may be trademarks of the respective companies with which they are associated.


Questi contenuti non sono al momento disponibili
Ti invieremo una notifica via email quando sarà disponibile

Bene.
Ti contatteremo via email non appena sarà disponibile

One lab at a time
Confirm to end all existing labs and start this one