GSP643


總覽
莉莉在 12 年前創立了連鎖獸醫診所 Pet Theory。過去幾年來,Pet Theory 的連鎖事業成長得非常快速。原本的預約系統無法應付目前的顧客人數,也無法讓顧客自行預約看診時間,因此莉莉拜託 IT 部門的阿克和顧問小茹,請他們建構能輕鬆擴充的雲端式系統。在本研究室中,您將建構完善的 Firebase 網頁應用程式,供使用者記錄資訊和即時預約看診時間。
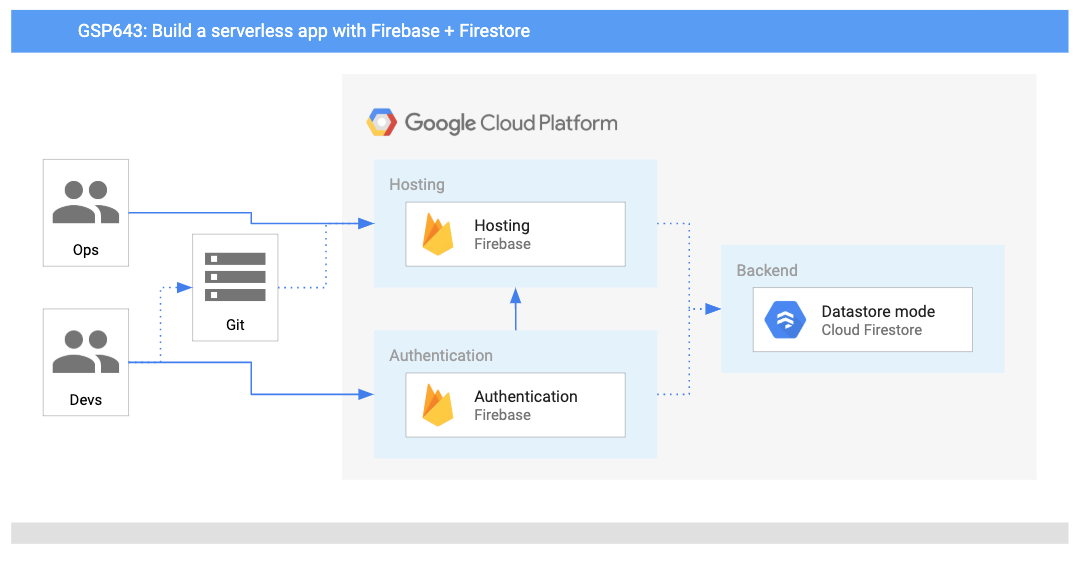
架構
下方圖表概述了您將使用的服務,以及這些服務之間的關係:
目標
本研究室的學習內容包括:
- 在 Google Cloud 專案中啟用 Firebase API。
- 建立及設定 Firebase 專案。
- 設定 Firestore 安全機制,將伺服器端的驗證和授權程序自動化。
- 為網頁應用程式加入 Google 登入功能。
- 設定資料庫,讓使用者得以新增聯絡資訊。
- 瀏覽及部署程式碼,讓使用者得以預約看診時間。
- 在網頁應用程式中瀏覽 Firebase 的即時更新。
先備知識
本研究室的難度為中級,亦即假設您已熟悉 Cloud 控制台和殼層環境。具備 Firebase 的使用經驗會有所幫助,但沒有也無妨。在進行本研究室之前,建議您先完成以下研究室:
此外,您也須熟悉檔案的編輯方式。您可以使用慣用的文字編輯器 (例如 nano、vi 等),或是從 Cloud Shell 頂端的工具列啟動程式碼編輯器:

準備好後,請向下捲動,並按照下列步驟設定研究室環境。
工作 1:佈建 Firebase 環境
小茹傳送電子郵件給阿克:
|

軟體顧問小茹
|
阿克你好:
上週辛苦了。很高興看到診所的資料都遷移到 Firestore 了!
下一步應該就是使用 Firebase 託管 Pet Theory 網站。
小茹敬上
|
|

IT 管理員阿克
|
小茹你好:
我沒有聽過 Firebase 託管。這項功能有什麼優勢呢?我該從哪裡著手呢?
阿克敬上
|
|
軟體顧問小茹
|
阿克你好:
Firebase 託管的主要優勢在於不使用伺服器,因此無須管理基礎架構,而且安全性規則也會內嵌在應用程式中,因此能限制權限,減少處理顧客資料時產生的問題。
此外,Firebase 採「即付即用」的計費模式,是相當符合我們需求的完善行動開發平台。
小茹敬上
|
|

IT 管理員阿克
|
小茹你好:
聽起來 Firebase 可大幅簡化安全性和基礎架構管理作業,我的工作有很大一部分在處理這些事務。我現在非常期待不必為閒置伺服器付費的那天到來了!
阿克敬上
|
小茹透過電子郵件傳送了一些背景資訊給阿克,之後他們開會討論,歸納出幾項重要工作。在這場會議中,他們決議阿克應完成以下工作:
- 將 Firestore CLI 新增到 Google Cloud 專案。
- 建立 Firestore 資料庫。
- 設定 Firebase 專案。
- 建立安全性政策。
接下來,請協助阿克完成這些工作。
工作 2:安裝 Firebase CLI
附註:開發環境已預先使用 Firebase 工具完成設定。
-
從「Lab Details」面板複製「IDE」連結,然後貼到新的瀏覽器分頁,藉此開啟 Cloud Code。
-
開啟終端機來存取指令列。在左側面板中,依序點選「Application menu」圖示  >「Terminal」>「New terminal」。
-
從指令列複製 GitHub 存放區:
git clone https://github.com/rosera/pet-theory.git
-
在左側面板中,依序點選「Explorer」圖示 >「Open Folder」>「pet-theory」>「lab02」,然後按一下「OK」。
-
開啟終端機。
-
安裝必要的節點套件:
npm i && npm audit fix --force
輸出內容:
+ firebase-tools@10.7.0
added 3 packages from 11 contributors, removed 1 package and updated 8 packages in 79.808s
現在您可以建立 Firestore 資料庫了。
工作 3:設定 Firestore 資料庫
在終端機中準備 Firestore 資料庫的使用環境。
- 將專案的區域設為「」:
gcloud config set compute/region {{{project_0.default_region|REGION}}}
-
啟用 App Engine 應用程式:
gcloud app create --region={{{project_0.startup_script.app_region|REGION}}}
-
建立 Firestore 資料庫:
gcloud firestore databases create --region={{{project_0.startup_script.app_region|REGION}}}
現在您可以建立 Firestore 專案,並連結到您的 Google Cloud 帳戶了。
工作 4:建立 Firebase 專案
在無痕視窗中開啟 Firebase 控制台。
附註:研究室提供 Firebase 的存取權。只要複製 Firebase 控制台連結,即可存取 Firebase。請使用研究室提供的使用者名稱/密碼,透過 Firebase 進行驗證。
-
點選頁面右上角的帳戶圖示,確認目前是使用研究室為您佈建的 Qwiklabs 學員帳戶。
-
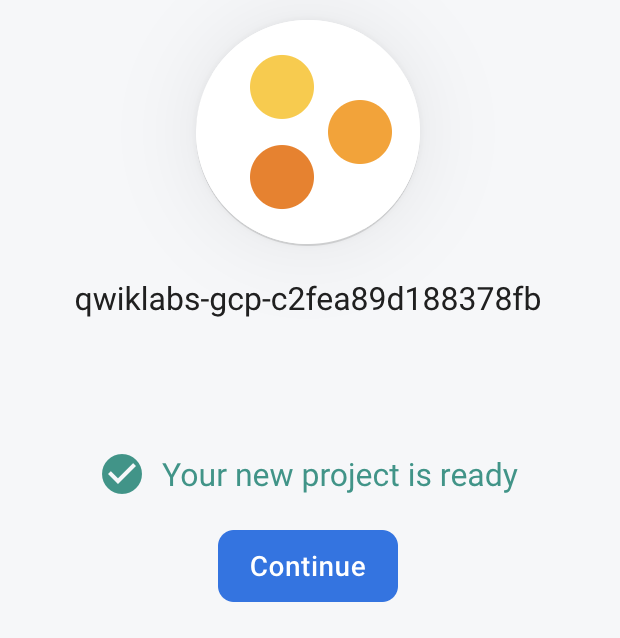
點選「新增專案」。系統提示您輸入專案名稱時,請使用下拉式選單中的專案 ID。
-
同意 Firebase 的條款並點選「Continue」,然後確認使用「即付即用」計費方案。
-
點選「Continue」,然後在隨即顯示的頁面中,為 Firebase 專案停用 Google Analytics。
-
點選「Add Firebase」。畫面上出現提示訊息,說明新專案已準備就緒時,請點選「Continue」:
測試已完成的工作
點選「Check my progress」確認目標已達成。
建立 Firebase 專案
工作 5:註冊應用程式
完成上一個步驟後,您應該是在 Firebase 控制台頁面中。
如果您已關閉該頁面,請開啟另一個無痕分頁,並使用以下連結前往 Firebase 控制台。
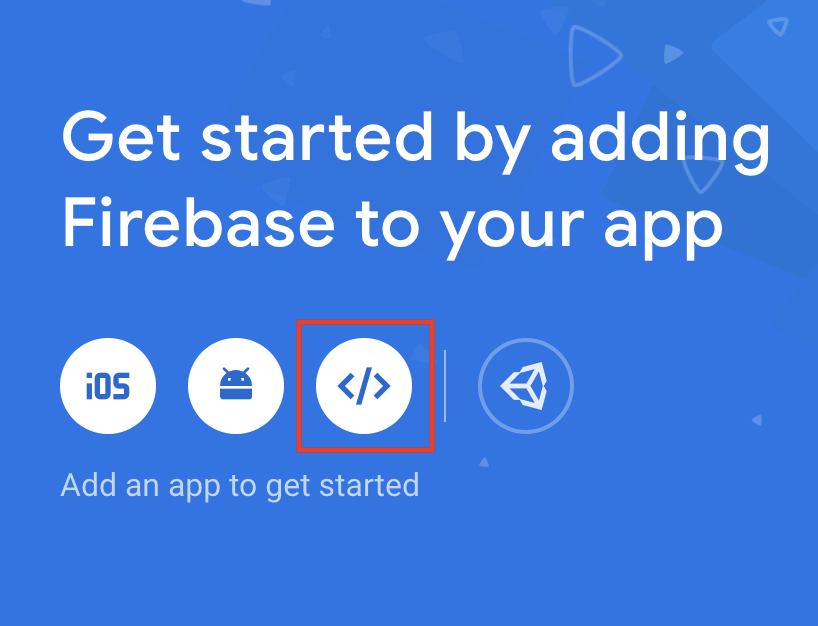
- 從「Get started by adding Firebase to your app」圖示清單中,選取「網頁圖示」(即下方醒目顯示的圖示):
-
系統提示您輸入「App nickname」時,請輸入「Pet Theory」。
-
勾選「Also set up Firebase hosting for this app」旁的方塊。
-
點選「Register app」按鈕。
-
依序點選「Next」>「Next」>「Continue to console」。您現在應該會在下方頁面中:
現在您為專案設定好 Firebase 了。接下來,您將初始化專案,以便參照 Firebase 主機。
測試已完成的工作
點選「Check my progress」確認目標已達成。
註冊應用程式
工作 6:向 Firebase 進行驗證並部署
使用 IDE 連結至 Firebase,然後部署應用程式。
請在編輯器提供的終端機中輸入指令。
- 向 Firebase 進行驗證:
firebase login --no-localhost
-
如果系統詢問 Firebase 是否能收集錯誤回報資訊,請輸入「Y」並按下 Enter 鍵。
-
複製系統產生的網址並貼到新的無痕模式瀏覽器分頁,然後按下 Enter 鍵 (直接點選連結會導致錯誤)。
-
選取您的研究室帳戶,然後點選「Allow」。點選「Yes, I just ran this command」繼續下一步,然後點選「Yes, this is my session ID」確認工作階段 ID。系統會隨即提供存取碼:
-
複製存取碼並貼到 Cloud Shell 提示「Enter authorization code:」中,然後按下 Enter 鍵。您會看到類似下方的回覆:
輸出內容:
✔ Success! Logged in as gcpstaging86673_student@qwiklabs.net
- 在您目前使用的目錄中將新的 Firebase 專案初始化:
firebase init
執行此指令後,系統會逐步引導您設定專案目錄和 Firebase 產品。
- 系統會要求您選取想在此資料夾設定的 Firebase CLI 功能。請使用方向鍵和空格鍵選取「Firestore」和「Hosting」,確認殼層與下方所示內容相同,然後按下 Enter 鍵:
? Which Firebase CLI features do you want to set up for this folder? Press Space to select features, then Enter to confirm your choices.
◯ Realtime Database: Configure a security rules file for Realtime Database and (optionally) provision default insta
◉ Firestore: Configure security rules and indexes files for Firestore
◯ Functions: Configure a Cloud Functions directory and its files
❯◉ Hosting: Configure files for Firebase Hosting and (optionally) set up GitHub Action deploys
◯ Hosting: Set up GitHub Action deploys
◯ Storage: Configure a security rules file for Cloud Storage
- 接著請完成剩餘步驟,以便設定 Firebase:
- 使用按鍵選取「Use an existing project」,然後按下 Enter 鍵。
- 從清單中選取您的 Qwiklabs 專案 ID (開頭為「qwiklabs-gcp-」),然後按下 Enter 鍵。
- 依序按下 Enter 鍵和 N 鍵,保留 firestore.rules 檔案。
- 依序按下 Enter 鍵 和 Y 鍵,保留 firestore.indexes.json 檔案。
- 按下 Enter 鍵保留公開目錄,然後按下 N 鍵禁止重寫 /index.html 檔案。
- 按下 Enter 鍵,然後在畫面上顯示「Set up automatic builds and deploys with GitHub?」時,按下 N 鍵。
- 系統提示覆寫 404.html 檔案時,輸入 N。
- 系統提示覆寫 index.html 檔案時,輸入 N。
您應該會收到下列輸出內容:
✔ Wrote public/404.html
✔ Wrote public/index.html
i Writing configuration info to firebase.json...
i Writing project information to .firebase...
i Writing gitignore file to .gitignore...
✔ Firebase initialization complete!
本機設定現已完成。接下來,您需要進行資料庫驗證步驟,讓各項服務能彼此存取。
工作 7:設定驗證機制和資料庫
請返回 Firebase 控制台來完成此步驟。
-
點選左側導覽選單中的「Project Overview」按鈕。
-
選取「Authentication」設定方塊,然後點選「Get Started」:
-
依序點選「Sign-in providers」和「Google」項目。
-
點選右上角的「Enable」切換鈕,並在「Support email for project」部分使用下拉式清單選取您的研究室帳戶。您現在應該會看見類似下方的頁面:
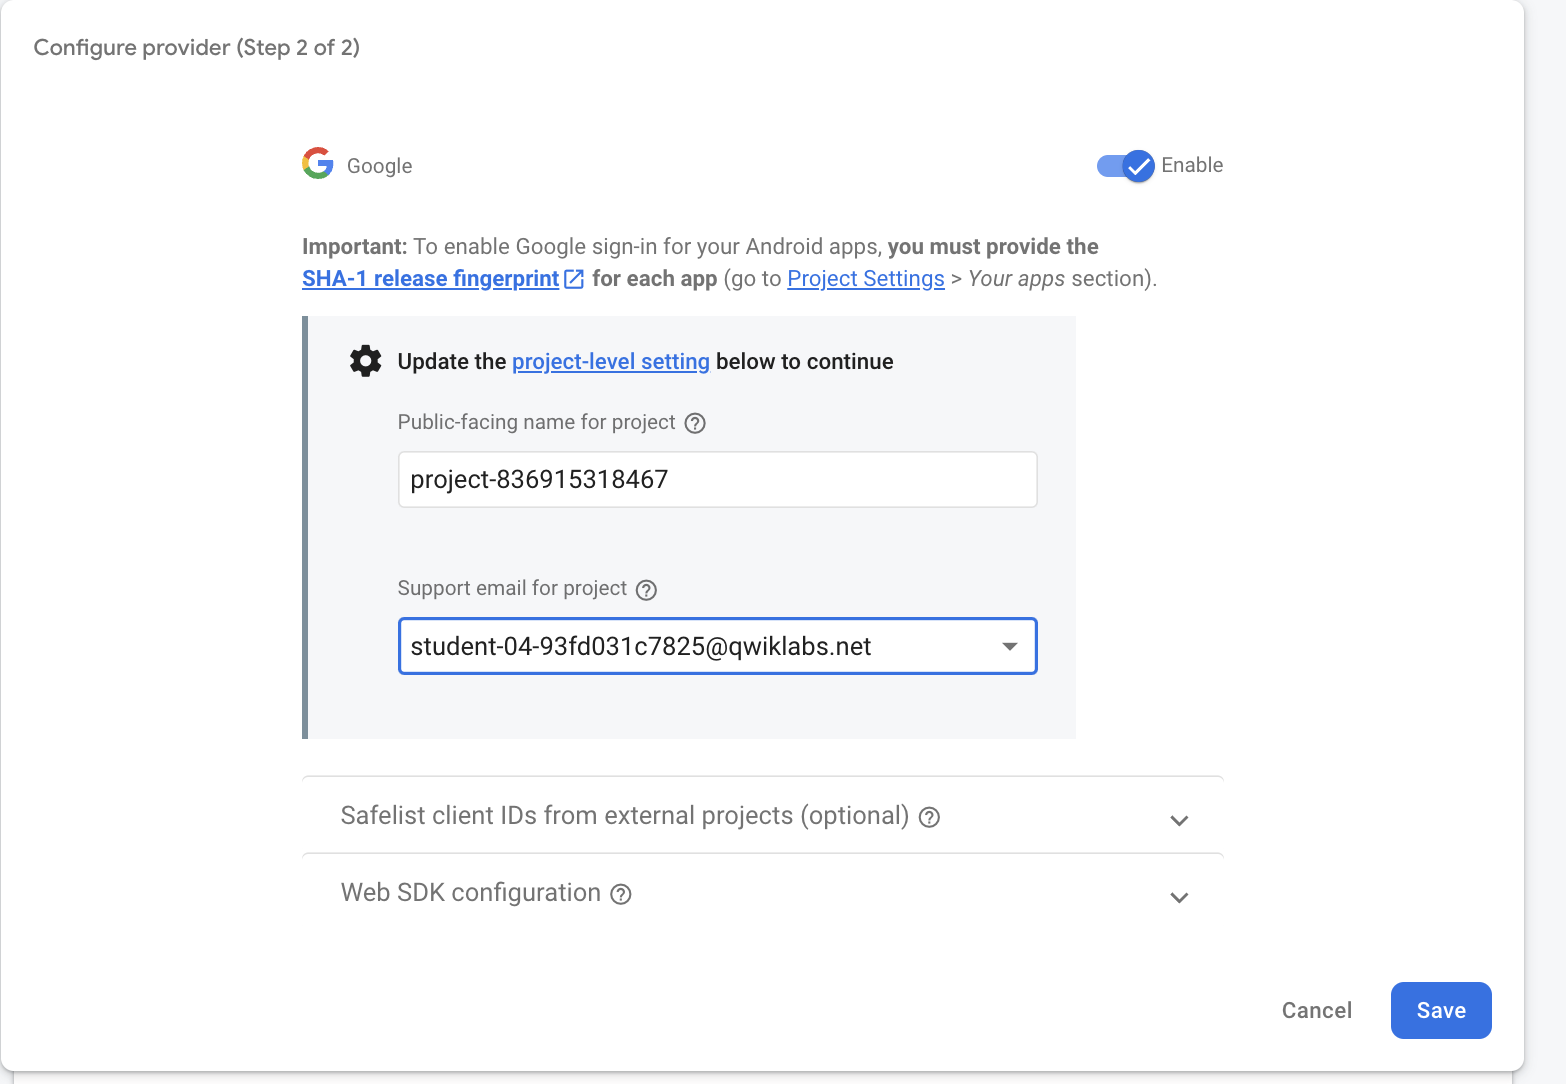
- 按照上述步驟完成驗證後,點選「Save」按鈕。
現在您已設定好 Firebase 驗證機制。在下一個步驟中,您將使用 Firebase 託管應用程式。
測試已完成的工作
點選「Check my progress」確認目標已達成。
設定驗證機制和資料庫
工作 8:情境:設定應用程式
您已協助阿克設定 Firebase 託管環境,供網站開發人員部署程式碼。不過,阿克從未啟用過 Firebase 驗證功能,也沒有將程式碼部署到 Firebase 的經驗,因此他透過電子郵件向小茹尋求協助...
|
IT 管理員阿克
|
小茹妳好:
感謝妳提供的訣竅!Firebase 環境看起來已經設定完成了。我接下來需要部署網站開發人員的程式碼。
可以請妳說明這會牽涉到哪些工作,以及我下一步應該做什麼嗎?
阿克敬上
|
|
顧問小茹
|
阿克你好:
真是好消息!我會透過電子郵件傳送相關指示給你,說明如何執行應用程式及新增下列功能:
- 設定登入用的網站驗證機制。
- 啟用相關功能,讓顧客可在「Profile」頁面記錄相關詳細資料。
- 建立自助式入口網站,供顧客預約看診時間。
小茹敬上
|
|

開發運作工程師阿克
|
小茹你好:
妳提到的工作聽起來需要花一些心力才能完成。
這表示我每次想新增功能的時候,都需要變更架構嗎?等待系統套用好這類更新就夠耗時了...
阿克敬上
|
|
顧問小茹
|
阿克你好:
大部分的繁重事務都可以交給 Firebase 資料庫處理。
如果想在瀏覽器中查看更新,只要透過指令列呼叫 firebase deploy 就行了,超級方便。
只要進行變更和部署後,網站就會套用變更了!
小茹敬上
|
|
IT 管理員阿克
|
小茹你好:
哇,這讓我安心多了!Firebase 託管真是實用 :-)
阿克敬上
|
現在阿克更加瞭解需要完成的工作了,接著請協助他將 Pet Theory 部署為 Firebase 應用程式。
工作 9:設定 Firebase 驗證功能並為網頁應用程式加入登入功能
請返回終端機完成此步驟。透過上一個步驟完成 Firebase 初始化流程後,指令列工作階段應該還保持開啟狀態。
- 執行下列指令,列出
lab02 目錄中的資料夾和檔案:
ls -1
- 請確認輸出內容如下所示:
README.md
firebase.json
firestore.indexes.json
firestore.rules
node_modules
package-lock.json
package.json
public
solution
- 使用程式碼編輯器開啟
pet-theory/lab02/firestore.rules:
rules_version = '2';
service cloud.firestore {
match /databases/{database}/documents {
match /customers/{email} {
allow read, write: if request.auth.token.email == email;
}
match /customers/{email}/{document=**} {
allow read, write: if request.auth.token.email == email;
}
}
}
附註:這項設定會確保 Firestore 資料庫使用者僅能存取自身資料。firestore.rules 檔案可提升 Firestore 資料庫的安全性。
想進一步瞭解 Firestore 資料庫安全性,請參閱這個網頁。
工作 10:部署應用程式
完成變更後,您就可以部署應用程式了。
請確認您目前仍在 pet-theory/lab02 資料夾中。
- 執行下列指令,部署 Firebase 應用程式:
firebase deploy
輸出內容:
✔ Deploy complete!
Project Console: https://console.firebase.google.com/project/qwiklabs-gcp-7d652f8cf1f91cce/overview
Hosting URL: https://qwiklabs-gcp-01-8be196f95006.web.app
- 複製託管網址 (應為
[PROJECT-ID].web.app),並在新分頁中開啟。
- 點選「使用 Google 帳戶登入」按鈕:
注意:如果看到「This browser is not supported or 3rd party cookies and data may be disabled」錯誤訊息,請確認您已在瀏覽器中啟用 Cookie。
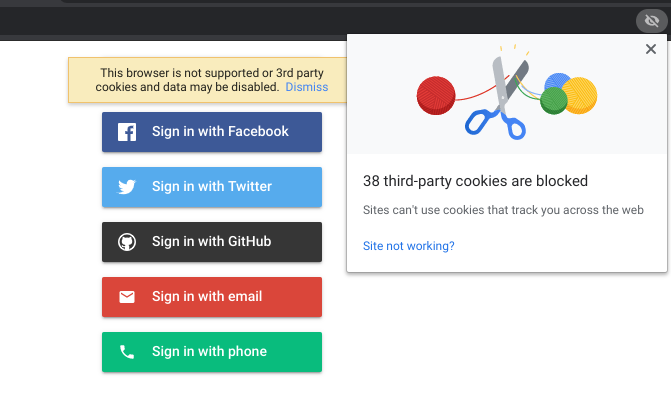 如要在 Chrome 中啟用 Cookie,請點選網址分頁最右側的眼睛圖示,在隨即彈出的視窗中按一下「網站無法正常運作嗎?藍色連結,然後接受 Cookie。
- 選取您的 Google 帳戶。以下頁面會隨即開啟:
注意:管理密碼是相當困難的工作,而且可能導致貴公司曝露在額外風險之中。此外,使用者不會想設定一組新的使用者 ID 和密碼。
像 Pet Theory 這樣的小公司並沒有足夠的資源,現有員工也沒有相關技能可以處理這項工作。
因此,在此情況下,讓應用程式使用者透過現有的 Google 帳戶 (或是其他識別資訊提供者) 登入,會是更好的選擇!
您已順利部署程式碼,讓使用者能利用 Google 驗證功能存取預約應用程式。
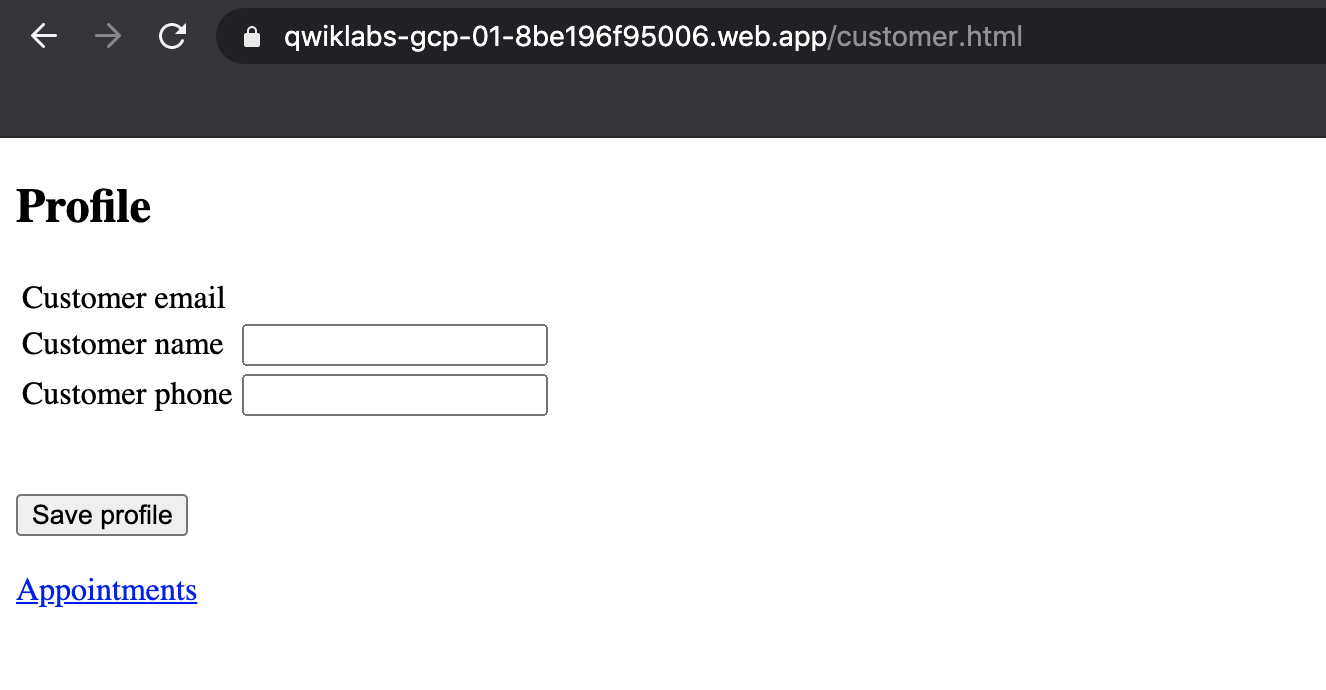
工作 11:在網頁應用程式新增顧客頁面
請返回終端機並使用編輯器查看「public」資料夾中的檔案。
- 開啟
customer.js 檔案,然後複製並貼上以下程式碼:
let user;
firebase.auth().onAuthStateChanged(function(newUser) {
user = newUser;
if (user) {
const db = firebase.firestore();
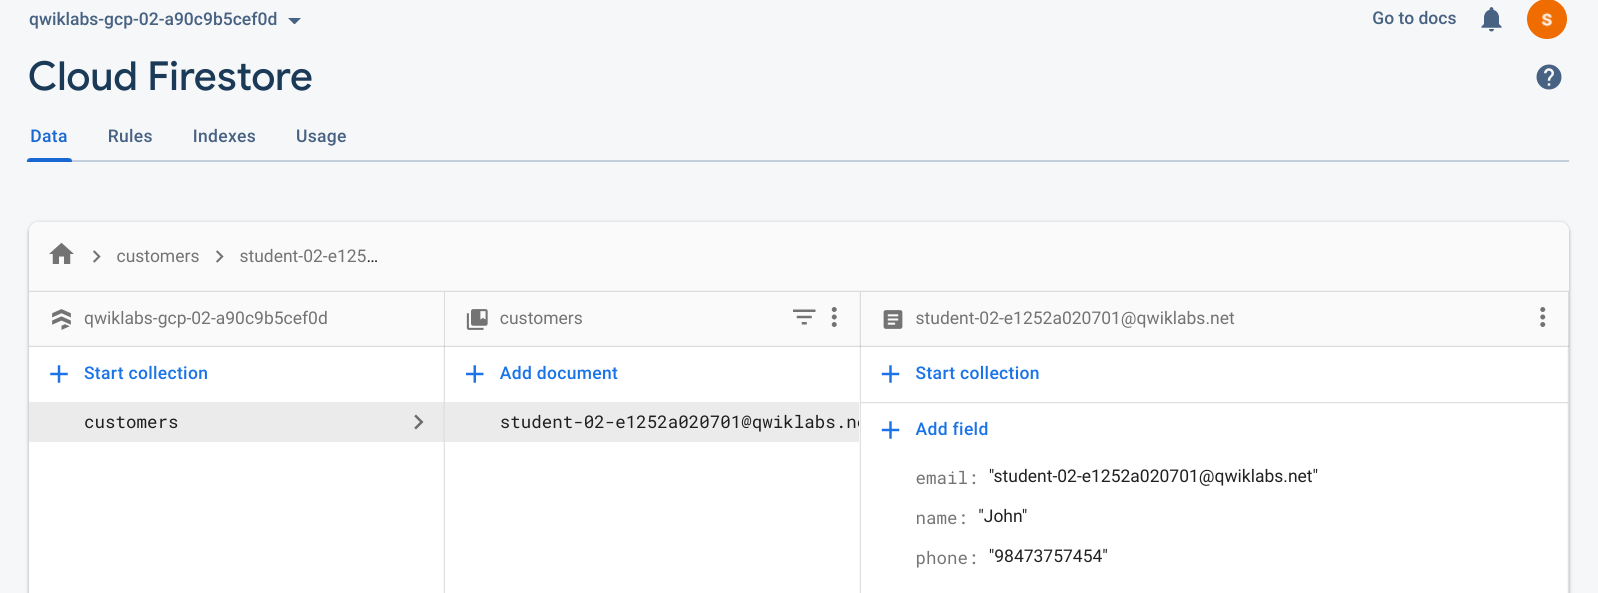
db.collection("customers").doc(user.email).onSnapshot(function(doc) {
const cust = doc.data();
if (cust) {
document.getElementById('customerName').setAttribute('value', cust.name);
document.getElementById('customerPhone').setAttribute('value', cust.phone);
}
document.getElementById('customerEmail').innerText = user.email;
});
}
});
document.getElementById('saveProfile').addEventListener('click', function(ev) {
const db = firebase.firestore();
var docRef = db.collection('customers').doc(user.email);
docRef.set({
name: document.getElementById('customerName').value,
email: user.email,
phone: document.getElementById('customerPhone').value,
})
})
- 開啟
styles.css 檔案,然後貼上以下程式碼:
body { background: #ECEFF1; color: rgba(0,0,0,0.87); font-family: Roboto, Helvetica, Arial, sans-serif; margin: 0; padding: 0; }
#message { background: white; max-width: 360px; margin: 100px auto 16px; padding: 32px 24px 16px; border-radius: 3px; }
#message h3 { color: #888; font-weight: normal; font-size: 16px; margin: 16px 0 12px; }
#message h2 { color: #ffa100; font-weight: bold; font-size: 16px; margin: 0 0 8px; }
#message h1 { font-size: 22px; font-weight: 300; color: rgba(0,0,0,0.6); margin: 0 0 16px;}
#message p { line-height: 140%; margin: 16px 0 24px; font-size: 14px; }
#message a { display: block; text-align: center; background: #039be5; text-transform: uppercase; text-decoration: none; color: white; padding: 16px; border-radius: 4px; }
#message, #message a { box-shadow: 0 1px 3px rgba(0,0,0,0.12), 0 1px 2px rgba(0,0,0,0.24); }
#load { color: rgba(0,0,0,0.4); text-align: center; font-size: 13px; }
@media (max-width: 600px) {
body, #message { margin-top: 0; background: white; box-shadow: none; }
body { border-top: 16px solid #ffa100; }
}
- 在指令列執行以下指令:
firebase deploy
輸出內容:
✔ Deploy complete!
Project Console: https://console.firebase.google.com/project/qwiklabs-gcp-7d652f8cf1f91cce/overview
Hosting URL: https://qwiklabs-gcp-01-8be196f95006.web.app
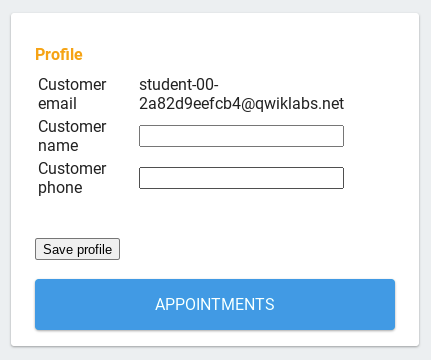
- 前往應用程式分頁,然後使用 CMND+SHIFT+R 鍵 (Mac) 或 CTRL+SHIFT+R 鍵 (Windows) 強制重新整理頁面。一般的重新整理方式無法讓系統顯示必要更新。輸入一些顧客資訊 (虛構姓名和電話號碼),然後點選「Save profile」。
- 返回 Firebase 控制台,然後依序點選「Build」>「Firestore Database」,查看已儲存的個人資料:
- 返回網頁應用程式頁面,然後點選「Appointments」連結。由於尚未部署預約功能的程式碼,因此系統會顯示空白頁面。
測試已完成的工作
點選「Check my progress」確認目標已達成。
在網頁應用程式中加入顧客頁面
工作 12:讓使用者預約看診時間
建構預約頁面,供使用者預約看診時間。
-
返回「程式碼編輯器」分頁。您需要在 public 目錄的兩個檔案中新增程式碼。
-
選取側邊選單中的「appointments.html」,然後貼上以下程式碼:
<!DOCTYPE html>
<html>
<head>
<meta charset="utf-8">
<meta name="viewport" content="width=device-width, initial-scale=1">
<title>Pet Theory appointments</title>
<script src="/__/firebase/6.4.2/firebase-app.js"></script>
<script src="/__/firebase/6.4.2/firebase-auth.js"></script>
<script src="/__/firebase/6.4.2/firebase-firestore.js"></script>
<script src="/__/firebase/init.js"></script>
<link type="text/css" rel="stylesheet" href="styles.css" />
</head>
<body>
<div id="message">
<h2>Scheduled appointments</h2>
<div id="appointments"></div>
<hr/>
<h2>Schedule a new appointment</h2>
<select id="timeslots">
<option value="0">Choose time</option>
</select>
<br><br>
<button id="makeAppointment">Schedule</button>
</div>
<script src="appointments.js"></script>
</body>
</html>
- 開啟 appointments.js 檔案,然後貼上以下程式碼:
let user;
firebase.auth().onAuthStateChanged(function(newUser) {
user = newUser;
if (user) {
const db = firebase.firestore();
const appColl = db.collection('customers').doc(user.email).collection('appointments');
appColl.orderBy('time').onSnapshot(function(snapshot) {
const div = document.getElementById('appointments');
div.innerHTML = '';
snapshot.docs.forEach(appointment => {
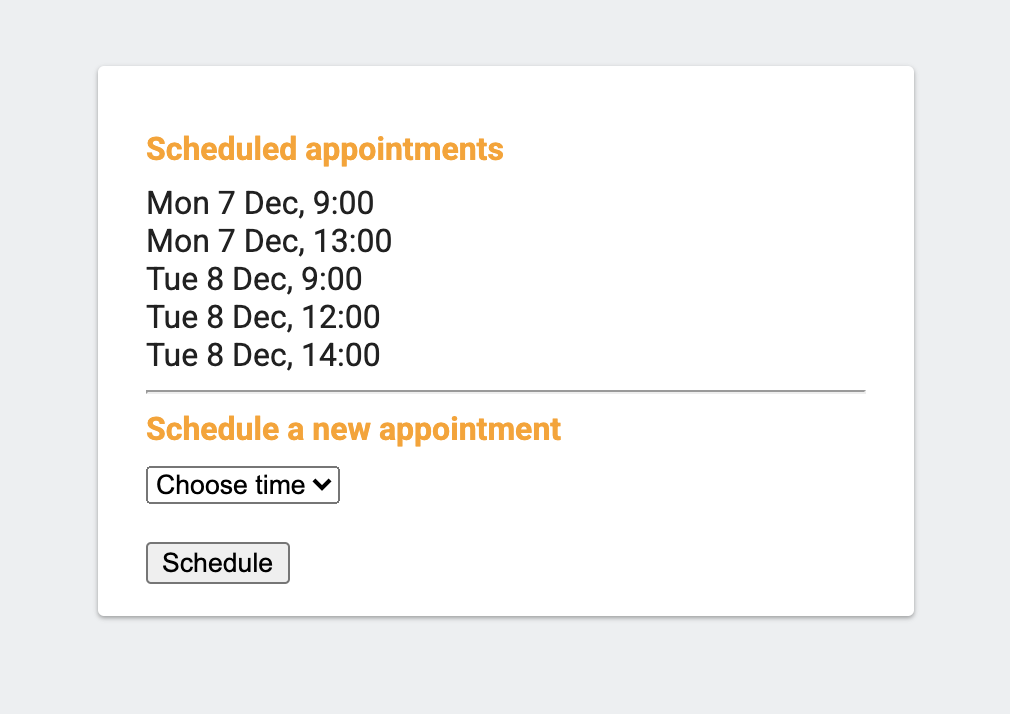
div.innerHTML += formatDate(appointment.data().time) + '<br/>';
})
if (div.innerHTML == '') {
div.innerHTML = 'No appointments scheduled';
}
});
}
});
const timeslots = document.getElementById('timeslots');
getOpenTimes().forEach(time => {
timeslots.add(new Option(formatDate(time), time));
});
document.getElementById('makeAppointment').addEventListener('click', function(ev) {
const millis = parseInt(timeslots.selectedOptions[0].value);
if (millis > 0) {
const db = firebase.firestore();
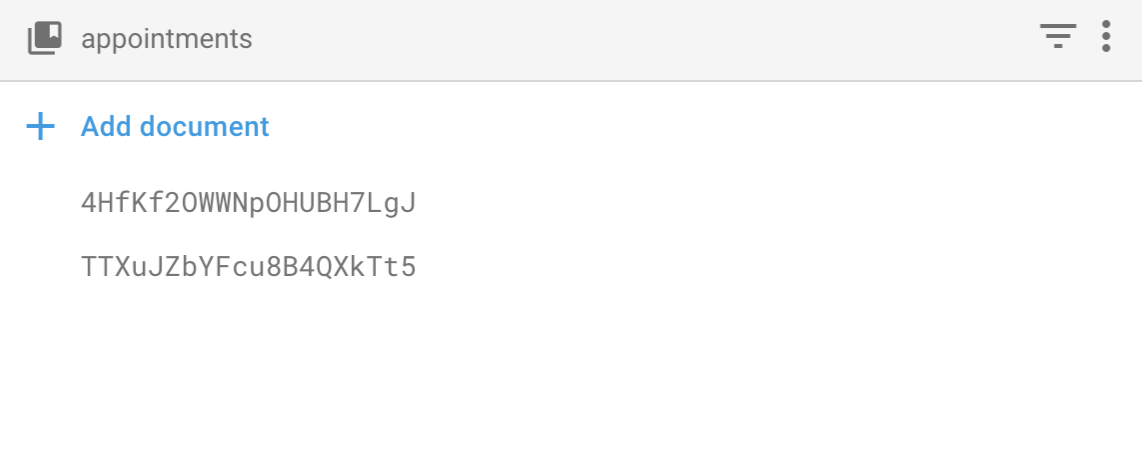
db.collection('customers').doc(user.email).collection('appointments').add({
time: millis
})
timeslots.remove(timeslots.selectedIndex);
}
})
function getOpenTimes() {
const retVal = [];
let startDate = new Date();
startDate.setMinutes(0);
startDate.setSeconds(0);
startDate.setMilliseconds(0);
let millis = startDate.getTime();
while (retVal.length < 5) {
const hours = Math.floor(Math.random() * 5) + 1;
millis += hours * 3600 * 1000;
if (isDuringOfficeHours(millis)) {
retVal.push(millis);
}
}
return retVal;
}
function isDuringOfficeHours(millis) {
const aDate = new Date(millis);
return aDate.getDay() != 0 && aDate.getDay() != 6 &&
aDate.getHours() >= 9 && aDate.getHours() <= 17;
}
function formatDate(millis) {
const aDate = new Date(millis);
const days = ['Sun', 'Mon', 'Tue', 'Wed', 'Thu', 'Fri', 'Sat'];
const months = ['Jan', 'Feb', 'Mar', 'Apr', 'May', 'Jun',
'Jul', 'Aug', 'Sep', 'Oct', 'Nov', 'Dec'];
return days[aDate.getDay()] + ' ' + aDate.getDate() + ' ' +
months[aDate.getMonth()] + ', ' + aDate.getHours() + ':' +
(aDate.getMinutes() < 10? '0'+aDate.getMinutes(): aDate.getMinutes());
}
- 檔案現已建構完成,請查看變更內容。在 Cloud Shell 中執行下列指令,即可部署應用程式:
firebase deploy
輸出內容:
✔ Deploy complete!
Project Console: https://console.firebase.google.com/project/qwiklabs-gcp-7d652f8cf1f91cce/overview
Hosting URL: https://qwiklabs-gcp-01-8be196f95006.web.app
- 前往網頁應用程式分頁 (也就是先前的空白頁面) 並重新整理,然後嘗試預約看診時間:
-
前往 Firebase 控制台,依序點選「Build」>「Firestore Database」,然後選取您剛才為使用者建立的 appointments 集合。
-
您應該會看見類似下方的預約程式碼集合:
工作 13:查看 Firestore 即時更新
Firestore 屬於即時資料庫。
在應用程式新增即時更新功能,即可善用這項特點。
-
開啟新的瀏覽器分頁並前往 [PROJECT ID].web.app,接著使用「Google」按鈕登入,然後點選「Appointments」。
-
將兩個瀏覽器分頁並排顯示。在第一個瀏覽器視窗中,預約新的看診時間。
-
查看另一個瀏覽器分頁。系統應該會自動新增預約時間,無須使用者手動重新整理:

還不錯吧!Firestore 能即時更新用戶端 (網頁應用程式和原生行動應用程式),使用者不必自行重新整理或重新載入。
- 前往 Firebase 控制台,點選 Cloud Firestore 中的「Data」分頁標籤,然後編輯資料。您甚至可以刪除使用者記錄中的
appointments 集合。即便如此,瀏覽器視窗仍會即時更新。
恭喜!
在本研究室中,您使用 Firebase 建立了健全的無伺服器網頁應用程式。在建立並設定 Firebase 專案後,您新增了 Firestore 安全機制來將伺服器端的驗證和授權作業自動化。接著,您為網頁應用程式加入了 Google 登入功能,還設定了資料庫,讓使用者能夠新增聯絡資訊和預約時間。最後,您瀏覽並部署了相關程式碼,讓使用者得以預約看診時間,還在網頁應用程式中看到 Firebase 的即時更新功能。您已經準備好參與本學習路徑的更多研究室了。
後續步驟/瞭解詳情
Google Cloud 教育訓練與認證
協助您瞭解如何充分運用 Google Cloud 的技術。我們的課程會介紹專業技能和最佳做法,讓您可以快速掌握要領並持續進修。我們提供從基本到進階等級的訓練課程,並有隨選、線上和虛擬課程等選項,方便您抽空參加。認證可協助您驗證及證明自己在 Google Cloud 技術方面的技能和專業知識。
使用手冊上次更新日期:2024 年 1 月 30 日
研究室上次測試日期:2023 年 1 月 8 日
Copyright 2024 Google LLC 保留所有權利。Google 和 Google 標誌是 Google LLC 的商標,其他公司和產品名稱則有可能是其關聯公司的商標。