체크포인트
Enable relevant APIs.
/ 5
Application is developed with Story tab.
/ 5
Application marketing campaign tab is developed.
/ 5
Application image playground with furniture recommendation tab is developed.
/ 5
Image playground with oven instructions tab is developed.
/ 10
Image playground with ER diagrams tab is developed
/ 10
Image playground with math reasoning tab is developed.
/ 10
Application video playground with video description tab is developed.
/ 10
Video playground with video tags tab is developed.
/ 10
Video playground with video highlights tab is developed.
/ 10
Video playground with video geolocation tab is developed.
/ 10
Application is deployed to Cloud Run.
/ 10
Vertex AI Gemini 1.0 Pro로 앱 개발
개요
Gemini는 멀티모달 사용 사례를 위해 설계된 생성형 AI 모델 제품군입니다. 이 제품은 Ultra, Pro, Nano의 세 가지 크기로 제공됩니다. Gemini 1.0 Pro는 개발자와 기업에서 각자의 사용 사례에 맞게 구축할 수 있습니다. Gemini 1.0 Pro는 입력으로 텍스트를 받고 출력으로 텍스트를 생성합니다. 입력으로 텍스트와 이미지를 받고 출력으로 텍스트를 생성하는 전용 Gemini 1.0 Pro Vision 멀티모달 엔드포인트도 있습니다. Python, Android(Kotlin), Node.js, Swift, JavaScript로 앱을 빌드하는 데 도움이 되는 SDK를 사용할 수 있습니다.
Google Cloud에서 API Gemini di Vertex AI는 여러 Gemini 모델과의 상호작용을 위한 통합 인터페이스를 제공합니다. API는 입력 및 출력 텍스트 또는 코드로 멀티모달 프롬프트를 지원합니다. 현재 Gemini API에서 사용할 수 있는 모델은 두 가지가 있습니다.
-
Gemini 1.0 Pro 모델(gemini-pro): 자연어 태스크, 멀티턴 텍스트 및 코드 채팅, 코드 생성을 처리하도록 설계되었습니다.
-
Gemini 1.0 Pro Vision 모델(gemini-pro-vision): 멀티모달 프롬프트를 지원합니다. 프롬프트 요청에 텍스트, 이미지, 동영상을 포함하고 텍스트 또는 코드 응답을 얻을 수 있습니다.
Vertex AI는 ML 모델과 AI 애플리케이션을 학습 및 배포하고 AI 기반 애플리케이션에서 사용할 대규모 언어 모델(LLM)을 맞춤설정할 수 있게 해주는 머신러닝(ML) 플랫폼입니다. Vertex AI를 사용하면 데이터를 완벽하게 제어하고 기업 보안, 안전, 개인 정보 보호, 데이터 거버넌스, 규정 준수를 위한 Google Cloud 추가 기능의 이점을 활용하여 Gemini를 맞춤설정할 수 있습니다. Vertex AI에 대해 자세히 알아보려면 실습 마지막에 있는 다음 단계 섹션의 링크를 참고하세요.
이 실습에서는 Python용 Vertex AI SDK를 사용해 Vertex AI Gemini API를 호출합니다.
목표
이번 실습에서는 다음 작업의 실행 방법을 알아봅니다.
- Streamlit 프레임워크를 사용하여 Python 앱을 개발합니다.
- Python용 Vertex AI SDK를 설치합니다.
- Vertex AI Gemini API를 사용하여 Gemini 1.0 Pro 모델(gemini-pro)과 상호작용하는 코드를 개발합니다.
- Vertex AI Gemini API를 사용하여 Gemini 1.0 Pro Vision(gemini-pro-vision) 모델과 상호작용하는 코드를 개발합니다.
- 애플리케이션을 컨테이너화하여 Cloud Run에서 배포 및 테스트합니다.
설정
각 실습에서는 정해진 기간 동안 새 Google Cloud 프로젝트와 리소스 집합이 무료로 제공됩니다.
-
시크릿 창을 사용하여 Qwiklabs에 로그인합니다.
-
실습 사용 가능 시간(예:
1:15:00)을 참고하여 해당 시간 내에 완료합니다.
일시중지 기능은 없습니다. 필요한 경우 다시 시작할 수 있지만 처음부터 시작해야 합니다. -
준비가 되면 실습 시작을 클릭합니다.
-
실습 사용자 인증 정보(사용자 이름 및 비밀번호)를 기록해 두세요. Google Cloud Console에 로그인합니다.
-
Google Console 열기를 클릭합니다.
-
다른 계정 사용을 클릭한 다음, 안내 메시지에 이 실습에 대한 사용자 인증 정보를 복사하여 붙여넣습니다.
다른 사용자 인증 정보를 사용하는 경우 오류가 발생하거나 요금이 부과됩니다. -
약관에 동의하고 리소스 복구 페이지를 건너뜁니다.
Cloud Shell 활성화
Cloud Shell은 여러 개발 도구가 포함된 가상 머신입니다. 5GB의 영구적인 홈 디렉터리를 제공하며 Google Cloud에서 실행됩니다. Cloud Shell을 사용하면 명령줄을 통해 Google Cloud 리소스에 액세스할 수 있습니다. gcloud는 Google Cloud의 명령줄 도구입니다. Cloud Shell에 사전 설치되어 있으며 탭 자동 완성을 지원합니다.
-
Google Cloud Console의 탐색창에서 Cloud Shell 활성화(
)를 클릭합니다.
-
계속을 클릭합니다.
환경을 프로비저닝하고 연결하는 데는 몇 분 정도 소요됩니다. 연결되면 사용자 인증도 처리되어 프로젝트가 PROJECT_ID로 설정됩니다. 예를 들면 다음과 같습니다.

샘플 명령어
-
활성 계정 이름을 나열합니다.
(출력)
(출력 예시)
-
프로젝트 ID를 나열합니다.
(출력)
(출력 예시)
작업 1. 환경 및 프로젝트 구성
-
실습 사용자 인증 정보로 Google Cloud 콘솔에 로그인하고 Cloud Shell 터미널 창을 엽니다.
-
Cloud Shell에서 프로젝트 ID 및 리전 환경 변수를 설정하려면 다음 명령어를 실행합니다.
PROJECT_ID=$(gcloud config get-value project) REGION={{{project_0.default_region|set at lab start}}} echo "PROJECT_ID=${PROJECT_ID}" echo "REGION=${REGION}" -
이 실습에서 다양한 Google Cloud 서비스를 사용하려면 몇 가지 API를 사용 설정해야 합니다.
gcloud services enable cloudbuild.googleapis.com cloudfunctions.googleapis.com run.googleapis.com logging.googleapis.com storage-component.googleapis.com aiplatform.googleapis.com
목표를 확인하려면 내 진행 상황 확인하기를 클릭합니다.
작업 2. 애플리케이션 환경 설정
이 작업에서는 Python 가상 환경을 설정하고 애플리케이션 종속 항목을 설치합니다.
Cloud Shell이 승인되었는지 확인하기
-
Cloud Shell이 승인되었는지 확인하려면 Cloud Shell 셸에서 다음 명령어를 실행합니다.
gcloud auth list -
Cloud Shell을 승인하라는 메시지가 표시되면 승인을 클릭합니다.
앱 디렉터리 만들기
-
앱 디렉터리를 만들려면 다음 명령어를 실행합니다.
mkdir ~/gemini-app -
~/gemini-app디렉터리로 변경합니다.cd ~/gemini-app 애플리케이션 파일은
~/gemini-app디렉터리에 생성됩니다. 이 디렉터리에는 이 실습의 뒷부분에서 사용할 Python 애플리케이션 소스 파일, 종속 항목 및 Docker 파일이 포함됩니다.
Python 가상 환경 설정하기
기존 Python 설치 위에 가상 환경을 생성하여 이 환경에 설치된 모든 패키지가 기본 환경의 패키지와 격리되도록 합니다. 가상 환경 내에서 사용하는 경우 pip와 같은 설치 도구가 Python 패키지를 가상 환경에 설치합니다.
-
Python 가상 환경을 만들려면
gemini-app폴더에서 다음 명령어를 실행합니다.python3 -m venv gemini-streamlit venv 모듈은 독립적인 자체 Python 패키지 세트를 사용하여 경량 가상 환경을 생성합니다. -
Python 가상 환경을 활성화합니다.
source gemini-streamlit/bin/activate
애플리케이션 종속 항목 설치하기
Python 요구사항 파일은 프로젝트에 필요한 종속 항목을 나열하는 간단한 텍스트 파일입니다. 먼저 요구사항 파일에는 세 가지 모듈이 필요합니다.
Google의 앱은 머신러닝 및 데이터 과학용 웹 앱을 만드는 데 사용되는 오픈소스 Python 라이브러리인 Streamlit를 사용하여 작성되었습니다. 이 앱은 Python용 Vertex AI SDK 라이브러리를 사용하여 Gemini API 및 모델과 상호작용합니다. Cloud Logging은 애플리케이션의 정보를 기록하는 데 사용됩니다.
-
요구사항 파일을 만들려면 다음 명령어를 실행하세요.
cat > ~/gemini-app/requirements.txt <<EOF streamlit google-cloud-aiplatform==1.38.1 google-cloud-logging==3.6.0 EOF -
애플리케이션 종속 항목을 설치합니다.
pip install -r requirements.txt pip는 Python용 패키지 설치 프로그램입니다.
다음 작업을 계속하기 전에 모든 패키지가 설치될 때까지 기다리시기 바랍니다.
작업 3. 앱 개발
앱 소스 코드는 여러 개의 .py 소스 파일로 작성됩니다. app.py의 기본 진입점부터 시작하겠습니다.
기본 앱 진입점 작성하기
-
app.py진입점 코드를 작성하려면 다음 명령어를 실행합니다.cat > ~/gemini-app/app.py <<EOF import os import streamlit as st from app_tab1 import render_story_tab from vertexai.preview.generative_models import GenerativeModel import vertexai import logging from google.cloud import logging as cloud_logging # configure logging logging.basicConfig(level=logging.INFO) # attach a Cloud Logging handler to the root logger log_client = cloud_logging.Client() log_client.setup_logging() PROJECT_ID = os.environ.get('PROJECT_ID') # Your Qwiklabs Google Cloud Project ID LOCATION = os.environ.get('REGION') # Your Qwiklabs Google Cloud Project Region vertexai.init(project=PROJECT_ID, location=LOCATION) @st.cache_resource def load_models(): text_model_pro = GenerativeModel("gemini-pro") multimodal_model_pro = GenerativeModel("gemini-pro-vision") return text_model_pro, multimodal_model_pro st.header("Vertex AI Gemini API", divider="rainbow") text_model_pro, multimodal_model_pro = load_models() tab1, tab2, tab3, tab4 = st.tabs(["Story", "Marketing Campaign", "Image Playground", "Video Playground"]) with tab1: render_story_tab(text_model_pro) EOF -
app.py파일의 콘텐츠를 확인합니다.cat ~/gemini-app/app.py 이 앱은
streamlit를 사용하여 UI에 여러 개의 탭을 만듭니다. 이 앱의 초기 버전에서는 스토리를 생성하는 기능이 포함된 첫 번째 탭인 Story(스토리)를 빌드한 다음, 실습의 후속 작업에서 다른 탭을 점진적으로 빌드합니다.앱은 먼저 PROJECT_ID 및 REGION 환경 변수의 값을 전달하여
Vertex AI SDK를 초기화합니다.그런 다음 Gemini 모델을 나타내는
GenerativeModel클래스를 사용하여gemini-pro및gemini-pro-vision모델을 로드합니다. 이 클래스에는 텍스트, 이미지, 동영상에서 콘텐츠를 생성하는 데 도움이 되는 메서드가 포함되어 있습니다.앱은 UI에 Story(스토리), Marketing Campaign(마케팅 캠페인), Image Playground(이미지 플레이그라운드), Video Playground(동영상 플레이그라운드)라는 4개의 탭을 생성합니다.
그러면 앱 코드는
render_tab1()함수를 호출하여 앱의 UI에서 스토리 탭의 UI를 생성합니다.
tab1 개발 - 스토리
-
앱 UI에서 스토리 탭을 렌더링하는 코드를 작성하려면 다음 명령어를 실행합니다.
cat > ~/gemini-app/app_tab1.py <<EOF import streamlit as st from vertexai.preview.generative_models import GenerativeModel from response_utils import * import logging # create the model prompt based on user input. def generate_prompt(): # Story character input character_name = st.text_input("Enter character name: \n\n",key="character_name",value="Mittens") character_type = st.text_input("What type of character is it? \n\n",key="character_type",value="Cat") character_persona = st.text_input("What personality does the character have? \n\n", key="character_persona",value="Mitten is a very friendly cat.") character_location = st.text_input("Where does the character live? \n\n",key="character_location",value="Andromeda Galaxy") # Story length and premise length_of_story = st.radio("Select the length of the story: \n\n",["Short","Long"],key="length_of_story",horizontal=True) story_premise = st.multiselect("What is the story premise? (can select multiple) \n\n",["Love","Adventure","Mystery","Horror","Comedy","Sci-Fi","Fantasy","Thriller"],key="story_premise",default=["Love","Adventure"]) creative_control = st.radio("Select the creativity level: \n\n",["Low","High"],key="creative_control",horizontal=True) if creative_control == "Low": temperature = 0.30 else: temperature = 0.95 prompt = f"""Write a {length_of_story} story based on the following premise: \n character_name: {character_name} \n character_type: {character_type} \n character_persona: {character_persona} \n character_location: {character_location} \n story_premise: {",".join(story_premise)} \n If the story is "short", then make sure to have 5 chapters or else if it is "long" then 10 chapters. Important point is that each chapter should be generated based on the premise given above. First start by giving the book introduction, chapter introductions and then each chapter. It should also have a proper ending. The book should have a prologue and an epilogue. """ return temperature, prompt # function to render the story tab, and call the model, and display the model prompt and response. def render_story_tab (text_model_pro: GenerativeModel): st.write("Using Gemini 1.0 Pro - Text only model") st.subheader("Generate a story") temperature, prompt = generate_prompt() config = { "temperature": temperature, "max_output_tokens": 2048, } generate_t2t = st.button("Generate my story", key="generate_t2t") if generate_t2t and prompt: # st.write(prompt) with st.spinner("Generating your story using Gemini..."): first_tab1, first_tab2 = st.tabs(["Story response", "Prompt"]) with first_tab1: response = get_gemini_pro_text_response(text_model_pro, prompt, generation_config=config) if response: st.write("Your story:") st.write(response) logging.info(response) with first_tab2: st.text(prompt) EOF -
app_tab1.py파일의 콘텐츠를 확인합니다.cat ~/gemini-app/app_tab1.py render_story_tab함수는 텍스트 입력 필드 및 기타 옵션을 렌더링하는 함수를 호출하여 탭의 UI 컨트롤을 생성합니다.generate_prompt함수는 Gemini API에 제공되는 텍스트 프롬프트를 생성합니다. 프롬프트 문자열은 스토리 캐릭터의 탭 UI에서 사용자가 입력한 값과 스토리 길이(짧음, 길음), 창의성 수준(낮음, 높음), 스토리 전제 등의 옵션을 연결하여 만들어집니다.또한 이 함수는 스토리의 선택된 창의성 수준에 따라
temperature값을 반환합니다. 이 값은 모델에temperature구성 파라미터로 제공되어 모델 예측의 무작위성을 제어합니다.max_output_tokens구성 파라미터는 메시지당 생성할 수 있는 최대 출력 토큰 수를 지정합니다.모델 응답을 생성하기 위해 탭 UI에 버튼이 생성됩니다. 버튼을 클릭하면 실습의 다음 단계에서 코딩할
get_gemini_pro_text_response함수가 호출됩니다.
response_utils 개발
response_utils.py 파일에는 모델의 응답을 생성하는 함수가 포함되어 있습니다.
-
모델의 텍스트 응답을 생성하는 코드를 작성하려면 다음 명령어를 실행합니다.
cat > ~/gemini-app/response_utils.py <<EOF from vertexai.preview.generative_models import (Content, GenerationConfig, GenerativeModel, GenerationResponse, Image, HarmCategory, HarmBlockThreshold, Part) def get_gemini_pro_text_response( model: GenerativeModel, prompt: str, generation_config: GenerationConfig, stream=True): safety_settings={ HarmCategory.HARM_CATEGORY_HARASSMENT: HarmBlockThreshold.BLOCK_NONE, HarmCategory.HARM_CATEGORY_HATE_SPEECH: HarmBlockThreshold.BLOCK_NONE, HarmCategory.HARM_CATEGORY_SEXUALLY_EXPLICIT: HarmBlockThreshold.BLOCK_NONE, HarmCategory.HARM_CATEGORY_DANGEROUS_CONTENT: HarmBlockThreshold.BLOCK_NONE, } responses = model.generate_content(prompt, generation_config = generation_config, safety_settings = safety_settings, stream=True) final_response = [] for response in responses: try: final_response.append(response.text) except IndexError: final_response.append("") continue return " ".join(final_response) EOF -
response_utils.py파일의 콘텐츠를 확인합니다.cat ~/gemini-app/response_utils.py get_gemini_pro_text_response함수는 Python용 Vertex AI SDK의VertexAI.preview.generative_models패키지의GenerativeModel및 기타 클래스의 일부를 사용합니다. 클래스의generate_content메서드에서 메서드로 전달된 텍스트 프롬프트를 사용하여 응답을 생성합니다.안전하지 않은 콘텐츠를 차단하여 모델 응답을 제어하기 위해
safety_settings객체도 이 메서드에 전달됩니다. 이 실습의 샘플 코드는 안전 설정 값을 사용하여 콘텐츠가 안전하지 않을 확률에 관계없이 항상 콘텐츠를 반환하도록 모델에 지시합니다. 생성된 콘텐츠를 평가한 다음 애플리케이션에 더 제한적인 구성이 필요한 경우 이러한 설정을 조정할 수 있습니다. 자세히 알아보려면 안전 설정 문서를 참조하세요.
작업 4. 로컬에서 앱 실행 및 테스트
이 작업에서는 streamlit를 사용하여 로컬에서 앱을 실행하고 앱 기능을 테스트합니다.
앱 실행
-
앱을 로컬에서 실행하려면 Cloud Shell에서 다음 명령어를 실행합니다.
streamlit run app.py \ --browser.serverAddress=localhost \ --server.enableCORS=false \ --server.enableXsrfProtection=false \ --server.port 8080 앱이 시작되고 앱에 액세스할 수 있는 URL이 제공됩니다.
-
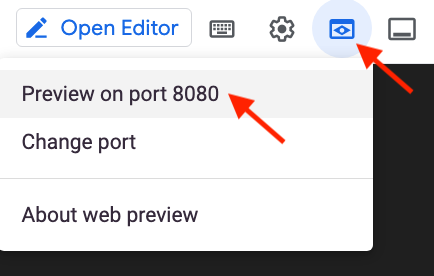
브라우저에서 앱 홈페이지를 시작하려면 Cloud Shell 메뉴바에서 웹 미리보기를 클릭한 다음 포트 8080에서 미리보기를 클릭합니다.
별도의 브라우저 탭에 앱 URL을 복사하여 붙여넣기해서 앱에 액세스할 수도 있습니다.
앱 테스트 - 스토리 탭
입력을 통해 스토리를 생성하고, 프롬프트를 확인하고, Gemini 1.0 Pro 모델에서 생성된 응답을 확인합니다.
-
스토리를 생성하려면 스토리 탭에서 기본 설정을 그대로 둔 다음 내 스토리 생성를 클릭합니다.
-
응답이 생성될 때까지 기다린 다음 스토리 응답 탭을 클릭합니다.
-
응답을 생성하는 데 사용된 프롬프트를 보려면 프롬프트 탭을 클릭합니다.
-
Cloud Shell 창에서 앱을 종료하고 Ctrl+C를 눌러 명령 프롬프트로 돌아갑니다.
목표를 확인하려면 내 진행 상황 확인하기를 클릭합니다.
작업 5. 마케팅 캠페인 생성
이 작업에서는 Gemini 1.0 Pro 텍스트 모델을 사용하여 회사를 위한 마케팅 캠페인을 생성합니다. 앱에서 두 번째 탭을 생성하는 코드를 개발합니다.
tab2 개발 - 마케팅 캠페인
-
앱 UI에서 마케팅 캠페인 탭을 렌더링하는 코드를 작성하려면 다음 명령어를 실행합니다.
cat > ~/gemini-app/app_tab2.py <<EOF import streamlit as st from vertexai.preview.generative_models import GenerativeModel from response_utils import * import logging # create the model prompt based on user input. def generate_prompt(): st.write("Using Gemini 1.0 Pro - Text only model") st.subheader("Generate your marketing campaign") product_name = st.text_input("What is the name of the product? \n\n",key="product_name",value="ZomZoo") product_category = st.radio("Select your product category: \n\n",["Clothing","Electronics","Food","Health & Beauty","Home & Garden"],key="product_category",horizontal=True) st.write("Select your target audience: ") target_audience_age = st.radio("Target age: \n\n",["18-24","25-34","35-44","45-54","55-64","65+"],key="target_audience_age",horizontal=True) # target_audience_gender = st.radio("Target gender: \n\n",["male","female","trans","non-binary","others"],key="target_audience_gender",horizontal=True) target_audience_location = st.radio("Target location: \n\n",["Urban", "Suburban","Rural"],key="target_audience_location",horizontal=True) st.write("Select your marketing campaign goal: ") campaign_goal = st.multiselect("Select your marketing campaign goal: \n\n",["Increase brand awareness","Generate leads","Drive sales","Improve brand sentiment"],key="campaign_goal",default=["Increase brand awareness","Generate leads"]) if campaign_goal is None: campaign_goal = ["Increase brand awareness","Generate leads"] brand_voice = st.radio("Select your brand voice: \n\n",["Formal","Informal","Serious","Humorous"],key="brand_voice",horizontal=True) estimated_budget = st.radio("Select your estimated budget ($): \n\n",["1,000-5,000","5,000-10,000","10,000-20,000","20,000+"],key="estimated_budget",horizontal=True) prompt = f"""Generate a marketing campaign for {product_name}, a {product_category} designed for the age group: {target_audience_age}. The target location is this: {target_audience_location}. Aim to primarily achieve {campaign_goal}. Emphasize the product's unique selling proposition while using a {brand_voice} tone of voice. Allocate the total budget of {estimated_budget}. With these inputs, make sure to follow following guidelines and generate the marketing campaign with proper headlines: \n - Briefly describe the company, its values, mission, and target audience. - Highlight any relevant brand guidelines or messaging frameworks. - Provide a concise overview of the campaign's objectives and goals. - Briefly explain the product or service being promoted. - Define your ideal customer with clear demographics, psychographics, and behavioral insights. - Understand their needs, wants, motivations, and pain points. - Clearly articulate the desired outcomes for the campaign. - Use SMART goals (Specific, Measurable, Achievable, Relevant, and Time-bound) for clarity. - Define key performance indicators (KPIs) to track progress and success. - Specify the primary and secondary goals of the campaign. - Examples include brand awareness, lead generation, sales growth, or website traffic. - Clearly define what differentiates your product or service from competitors. - Emphasize the value proposition and unique benefits offered to the target audience. - Define the desired tone and personality of the campaign messaging. - Identify the specific channels you will use to reach your target audience. - Clearly state the desired action you want the audience to take. - Make it specific, compelling, and easy to understand. - Identify and analyze your key competitors in the market. - Understand their strengths and weaknesses, target audience, and marketing strategies. - Develop a differentiation strategy to stand out from the competition. - Define how you will track the success of the campaign. - Use relevant KPIs to measure performance and return on investment (ROI). Provide bullet points and headlines for the marketing campaign. Do not produce any empty lines. Be very succinct and to the point. """ return prompt # function to render the story tab, and call the model, and display the model prompt and response. def render_mktg_campaign_tab (text_model_pro: GenerativeModel): st.write("Using Gemini 1.0 Pro - Text only model") st.subheader("Generate a marketing campaign") prompt = generate_prompt() config = { "temperature": 0.8, "max_output_tokens": 2048, } generate_t2m = st.button("Generate campaign", key="generate_t2m") if generate_t2m and prompt: # st.write(prompt) with st.spinner("Generating a marketing campaign using Gemini..."): first_tab1, first_tab2 = st.tabs(["Campaign response", "Prompt"]) with first_tab1: response = get_gemini_pro_text_response(text_model_pro, prompt, generation_config=config) if response: st.write("Marketing campaign:") st.write(response) logging.info(response) with first_tab2: st.text(prompt) EOF
기본 앱 진입점 수정하기
-
앱에 tab2를 추가하려면 다음 명령어를 실행합니다.
cat >> ~/gemini-app/app.py <<EOF from app_tab2 import render_mktg_campaign_tab with tab2: render_mktg_campaign_tab(text_model_pro) EOF
앱 테스트 - 마케팅 캠페인 탭
입력을 통해 마케팅 캠페인을 생성하고, 프롬프트를 확인하고, Gemini 1.0 Pro 모델에서 생성된 응답을 확인합니다.
-
앱을 로컬에서 실행하려면 Cloud Shell에서 다음 명령어를 실행합니다.
streamlit run app.py \ --browser.serverAddress=localhost \ --server.enableCORS=false \ --server.enableXsrfProtection=false \ --server.port 8080 앱이 시작되고 앱에 액세스할 수 있는 URL이 제공됩니다.
-
브라우저에서 앱 홈페이지를 시작하려면 Cloud Shell 메뉴바에서 웹 미리보기를 클릭한 다음 포트 8080에서 미리보기를 클릭합니다.
-
마케팅 캠페인을 생성하려면 마케팅 캠페인 탭에서 기본 설정을 그대로 둔 다음 캠페인 생성을 클릭합니다.
-
응답이 생성될 때까지 기다린 다음 캠페인 응답 탭을 클릭합니다.
-
응답을 생성하는 데 사용된 프롬프트를 보려면 프롬프트 탭을 클릭합니다.
-
위의 단계를 반복하고 제품 카테고리, 타겟층, 위치 및 캠페인 목표와 같은 다양한 매개변수 값을 사용하여 마케팅 캠페인을 생성합니다.
-
Cloud Shell 창에서 앱을 종료하고 Ctrl+C를 눌러 명령 프롬프트로 돌아갑니다.
목표를 확인하려면 내 진행 상황 확인하기를 클릭합니다.
작업 6. 이미지 플레이그라운드 생성
이 작업에서는 Gemini 1.0 Pro Vision 모델을 사용하여 이미지를 처리하고 모델에 제공된 이미지에서 추천 및 정보를 수신합니다.
tab3 개발 - 이미지 플레이그라운드
이 하위 작업에서는 이미지 플레이그라운드 탭에 대한 코드 그리고 모델과 상호작용하여 이미지에서 추천을 생성하는 코드를 구현합니다.
-
앱 UI에서 이미지 플레이그라운드 탭을 렌더링하는 코드를 작성하려면 다음 명령어를 실행합니다.
cat > ~/gemini-app/app_tab3.py <<EOF import streamlit as st from vertexai.preview.generative_models import GenerativeModel, Part from response_utils import * import logging # render the Image Playground tab with multiple child tabs def render_image_playground_tab(multimodal_model_pro: GenerativeModel): st.write("Using Gemini 1.0 Pro Vision - Multimodal model") recommendations, screens, diagrams, equations = st.tabs(["Furniture recommendation", "Oven instructions", "ER diagrams", "Math reasoning"]) with recommendations: room_image_uri = "gs://cloud-training/OCBL447/gemini-app/images/living_room.jpeg" chair_1_image_uri = "gs://cloud-training/OCBL447/gemini-app/images/chair1.jpeg" chair_2_image_uri = "gs://cloud-training/OCBL447/gemini-app/images/chair2.jpeg" chair_3_image_uri = "gs://cloud-training/OCBL447/gemini-app/images/chair3.jpeg" chair_4_image_uri = "gs://cloud-training/OCBL447/gemini-app/images/chair4.jpeg" room_image_url = "https://storage.googleapis.com/"+room_image_uri.split("gs://")[1] chair_1_image_url = "https://storage.googleapis.com/"+chair_1_image_uri.split("gs://")[1] chair_2_image_url = "https://storage.googleapis.com/"+chair_2_image_uri.split("gs://")[1] chair_3_image_url = "https://storage.googleapis.com/"+chair_3_image_uri.split("gs://")[1] chair_4_image_url = "https://storage.googleapis.com/"+chair_4_image_uri.split("gs://")[1] room_image = Part.from_uri(room_image_uri, mime_type="image/jpeg") chair_1_image = Part.from_uri(chair_1_image_uri,mime_type="image/jpeg") chair_2_image = Part.from_uri(chair_2_image_uri,mime_type="image/jpeg") chair_3_image = Part.from_uri(chair_3_image_uri,mime_type="image/jpeg") chair_4_image = Part.from_uri(chair_4_image_uri,mime_type="image/jpeg") st.image(room_image_url,width=350, caption="Image of a living room") st.image([chair_1_image_url,chair_2_image_url,chair_3_image_url,chair_4_image_url],width=200, caption=["Chair 1","Chair 2","Chair 3","Chair 4"]) st.write("Our expectation: Recommend a chair that would complement the given image of a living room.") prompt_list = ["Consider the following chairs:", "chair 1:", chair_1_image, "chair 2:", chair_2_image, "chair 3:", chair_3_image, "and", "chair 4:", chair_4_image, "\n" "For each chair, explain why it would be suitable or not suitable for the following room:", room_image, "Only recommend for the room provided and not other rooms. Provide your recommendation in a table format with chair name and reason as columns.", ] tab1, tab2 = st.tabs(["Response", "Prompt"]) generate_image_description = st.button("Generate recommendation", key="generate_image_description") with tab1: if generate_image_description and prompt_list: with st.spinner("Generating recommendation using Gemini..."): response = get_gemini_pro_vision_response(multimodal_model_pro, prompt_list) st.markdown(response) logging.info(response) with tab2: st.write("Prompt used:") st.text(prompt_list) EOF -
app_tab3.py파일의 콘텐츠를 확인합니다.cat ~/gemini-app/app_tab3.py render_image_playground_tab함수는 앱 사용자가 Gemini 1.0 Pro Vision 모델과 상호 작용할 수 있는 UI를 빌드합니다. 이 함수는 UI에 "가구 추천", "오븐 안내", "ER 다이어그램", "수학 추론"과 같은 일련의 탭을 생성합니다. 이 실습의 후속 작업에서 나머지 탭에 대한 코드를 작성합니다.Furniture recommendation탭에서는 거실 장면을 사용하여 시각적 이해를 수행합니다. 이 코드는 의자의 추가 이미지 세트와 함께 Gemini 1.0 Pro Vision 멀티모달 API 엔드포인트를 호출하여 거실 장면과 어울리는 의자를 추천받습니다.이 코드는 두 개 이상의 텍스트 프롬프트와 거실 및 의자의 이미지를 사용하여 모델에 목록으로 제공합니다.
Part클래스는 Cloud Storage 버킷에 호스팅된 멀티 파트 콘텐츠 URI에서 이미지를 가져오는 데 사용됩니다. 또한 프롬프트는 모델 출력의 표 형식을 지정하고 추천의 근거를 포함하도록 지정합니다.

response_utils 업데이트
response_utils.py 파일에는 모델의 응답을 생성하는 함수가 포함되어 있습니다.
-
파일을 업데이트하여 모델의 멀티모달 응답을 생성하는 코드를 추가합니다.
cat >> ~/gemini-app/response_utils.py <<EOF def get_gemini_pro_vision_response(model: GenerativeModel, prompt_list, generation_config={}, stream=True): generation_config = {'temperature': 0.1, 'max_output_tokens': 2048 } responses = model.generate_content(prompt_list, generation_config = generation_config, stream=True) final_response = [] for response in responses: try: final_response.append(response.text) except IndexError: final_response.append("") continue return(" ".join(final_response)) EOF
기본 앱 진입점 수정하기
-
앱에 tab3를 추가하려면 다음 명령어를 실행합니다.
cat >> ~/gemini-app/app.py <<EOF from app_tab3 import render_image_playground_tab with tab3: render_image_playground_tab(multimodal_model_pro) EOF
앱 테스트 - 이미지 플레이그라운드 탭
-
실습의 이전 단계에서 설명한 명령어를 사용하여 앱을 실행합니다.
-
브라우저에서 앱 홈페이지를 시작하려면 Cloud Shell 메뉴바에서 웹 미리보기를 클릭한 다음 포트 8080에서 미리보기를 클릭합니다.
-
이미지 플레이그라운드를 클릭한 다음 가구 추천을 클릭합니다.
이 탭에는 거실과 의자의 이미지가 표시됩니다.
-
추천 생성을 클릭합니다.
'FailedPrecondition: 400 필요한 리소스를 준비 중입니다. 잠시 기다렸다가 다시 시도하세요.'라는 오류가 나타나면 몇 분 기다렸다가 추천 생성을 다시 클릭합니다. -
Gemini 1.0 Pro Vision 모델의 응답을 확인합니다.
응답은 프롬프트에서 요청한 대로 표 형식으로 표시됩니다. 모델은 4개의 의자 중 2개의 의자를 추천하고 추천의 근거를 설명합니다.
-
Cloud Shell 창에서 앱을 종료하고 Ctrl+C를 눌러 명령 프롬프트로 돌아갑니다.
목표를 확인하려면 내 진행 상황 확인하기를 클릭합니다.
작업 7. 이미지 레이아웃 분석
이 작업에서는 Gemini 1.0 Pro Vision 모델을 사용해 이미지의 아이콘과 텍스트 레이아웃을 분석한 후 이미지에서 정보를 추출합니다.
이미지 플레이그라운드 탭 업데이트 - 오븐 안내
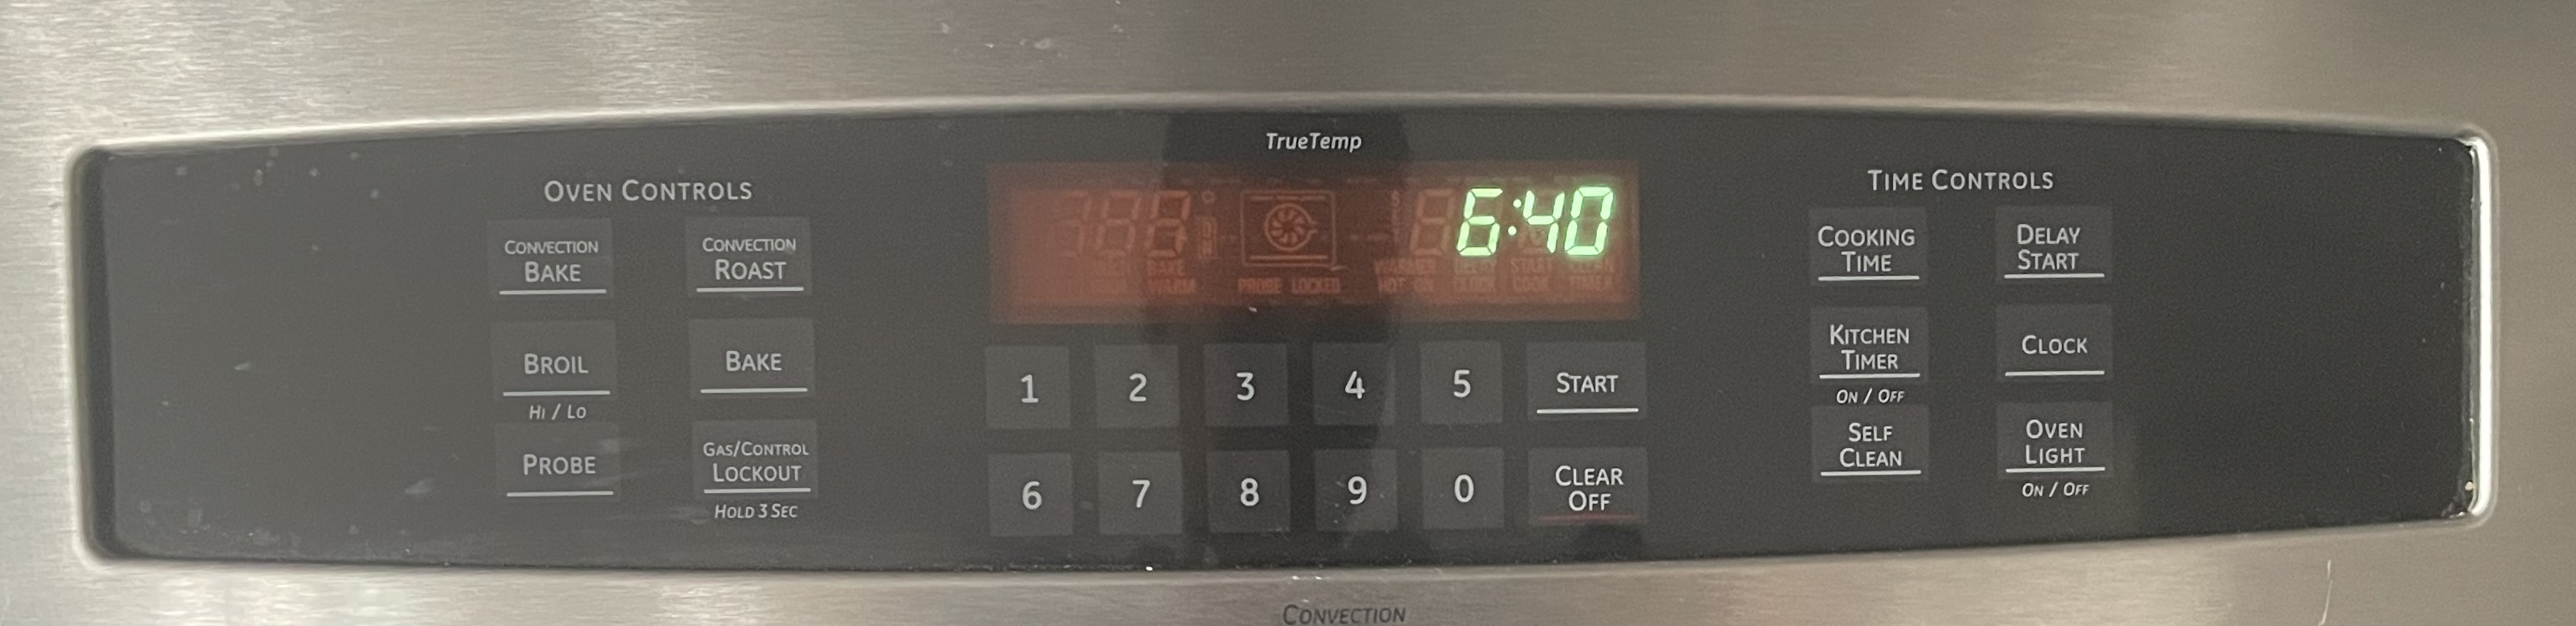
화면의 시각적 요소에서 정보를 추출하는 기능이 있는 Gemini는 스크린샷, 아이콘, 레이아웃을 분석하여 묘사된 장면을 전체적으로 이해할 수 있습니다. 이 작업에서는 모델에 주방 오븐의 제어판 이미지를 제공한 다음 모델에 특정 기능에 대한 설명서를 생성하라는 메시지를 표시합니다.
-
앱 UI의 이미지 플레이그라운드 탭에서 오븐 안내 탭에 대한 코드를 구현하려면 다음 명령어를 실행합니다.
cat >> ~/gemini-app/app_tab3.py <<EOF with screens: oven_screen_uri = "gs://cloud-training/OCBL447/gemini-app/images/oven.jpg" oven_screen_url = "https://storage.googleapis.com/"+oven_screen_uri.split("gs://")[1] oven_screen_img = Part.from_uri(oven_screen_uri, mime_type="image/jpeg") st.image(oven_screen_url, width=350, caption="Image of an oven control panel") st.write("Provide instructions for resetting the clock on this appliance in English") prompt = """How can I reset the clock on this appliance? Provide the instructions in English. If instructions include buttons, also explain where those buttons are physically located. """ tab1, tab2 = st.tabs(["Response", "Prompt"]) generate_instructions_description = st.button("Generate instructions", key="generate_instructions_description") with tab1: if generate_instructions_description and prompt: with st.spinner("Generating instructions using Gemini..."): response = get_gemini_pro_vision_response(multimodal_model_pro, [oven_screen_img, prompt]) st.markdown(response) logging.info(response) with tab2: st.write("Prompt used:") st.text(prompt+"\n"+"input_image") EOF 위의 코드는 오븐 안내 탭의 UI를 빌드합니다. 주방 오븐의 제어판 이미지가 텍스트와 함께 사용되며 패널에서 사용할 수 있는 특정 기능(이 경우 시계 재설정)에 대한 안내를 생성하라는 메시지를 모델에 표시합니다.
앱 테스트 - 이미지 플레이그라운드 - 오븐 안내 탭
-
실습의 이전 단계에서 설명한 명령어를 사용하여 앱을 실행합니다.
-
브라우저에서 앱 홈페이지를 시작하려면 Cloud Shell 메뉴바에서 웹 미리보기를 클릭한 다음 포트 8080에서 미리보기를 클릭합니다.
-
이미지 플레이그라운드를 클릭한 다음 오븐 안내를 클릭합니다.
탭에 오븐 제어판의 이미지가 표시됩니다.
-
안내 생성을 클릭합니다.
-
Gemini 1.0 Pro Vision 모델의 응답을 확인합니다.
응답에는 오븐의 제어판에서 시계를 재설정하는 데 사용할 수 있는 단계가 포함되어 있습니다. 또한 패널에서 버튼의 위치를 나타내는 안내가 포함되어 있어 이미지에서 패널의 레이아웃을 분석하는 모델의 능력을 보여 줍니다.
-
Cloud Shell 창에서 앱을 종료하고 Ctrl+C를 눌러 명령 프롬프트로 돌아갑니다.
목표를 확인하려면 내 진행 상황 확인하기를 클릭합니다.
작업 8. ER 다이어그램 분석
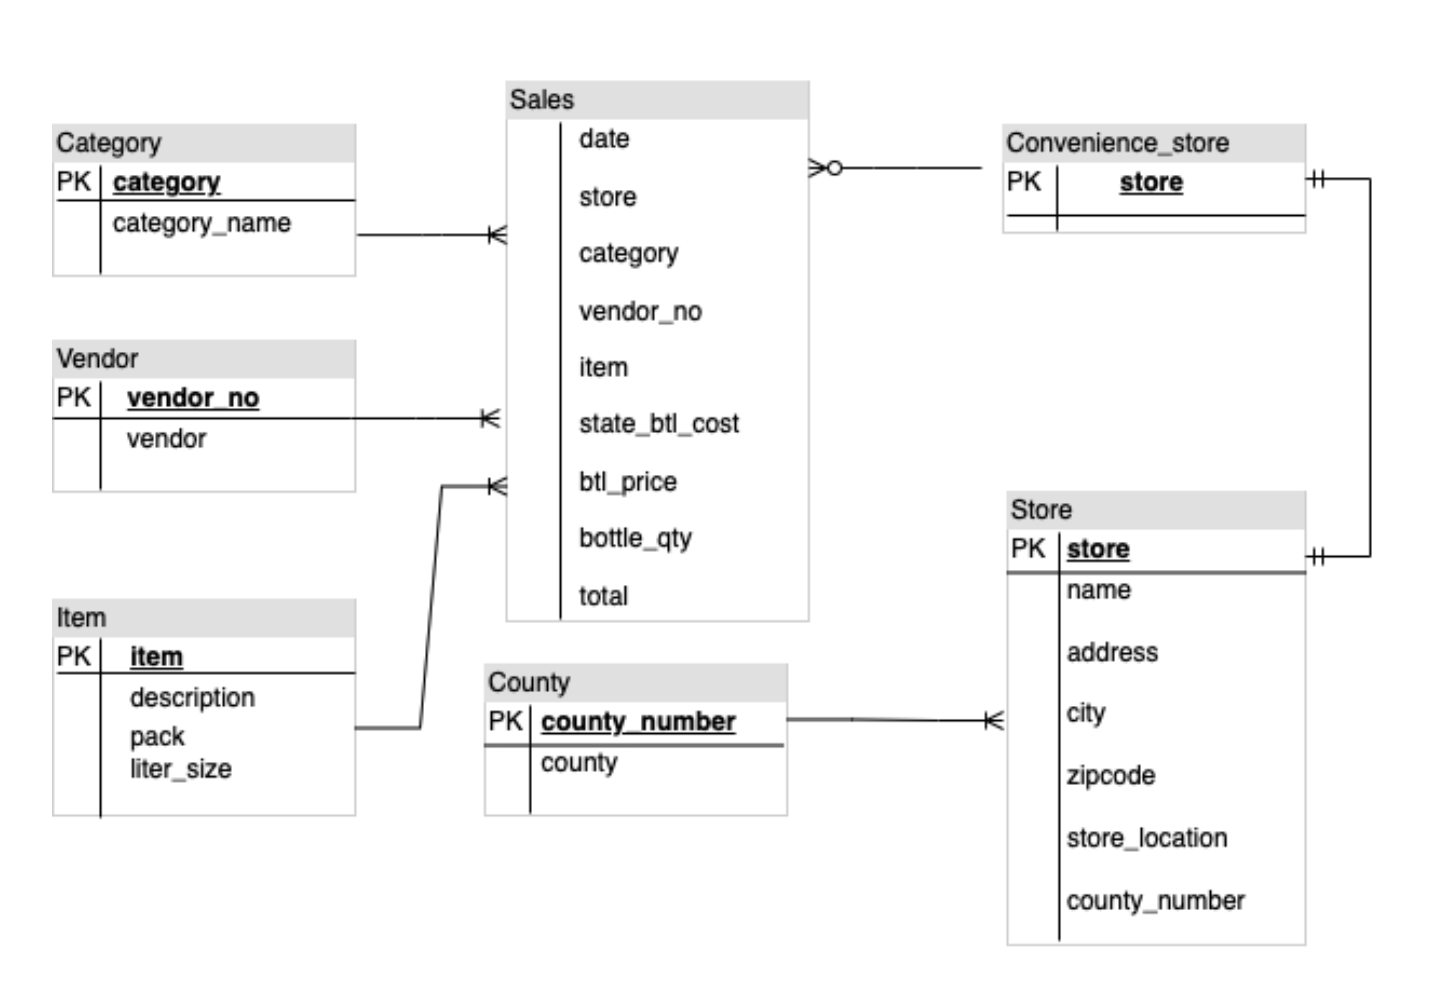
Gemini의 멀티모달 기능으로 다이어그램을 이해하고 문서 또는 코드 생성과 같은 실행 가능한 단계를 수행할 수 있습니다. 이 작업에서는 Gemini 1.0 Pro Vision 모델을 사용하여 엔티티-관계(ER) 다이어그램을 분석하고 다이어그램에서 찾은 엔티티와 관계에 대한 문서를 생성합니다.
이미지 플레이그라운드 탭 업데이트 - ER 다이어그램
이 작업에서는 모델에 ER 다이어그램 이미지를 제공한 다음 모델에 문서를 생성하라는 메시지를 표시합니다.
-
앱 UI의 이미지 플레이그라운드 탭에서 ER 다이어그램 탭에 대한 코드를 구현하려면 다음 명령어를 실행합니다.
cat >> ~/gemini-app/app_tab3.py <<EOF with diagrams: er_diag_uri = "gs://cloud-training/OCBL447/gemini-app/images/er.png" er_diag_url = "https://storage.googleapis.com/"+er_diag_uri.split("gs://")[1] er_diag_img = Part.from_uri(er_diag_uri,mime_type="image/png") st.image(er_diag_url, width=350, caption="Image of an ER diagram") st.write("Document the entities and relationships in this ER diagram.") prompt = """Document the entities and relationships in this ER diagram.""" tab1, tab2 = st.tabs(["Response", "Prompt"]) er_diag_img_description = st.button("Generate documentation", key="er_diag_img_description") with tab1: if er_diag_img_description and prompt: with st.spinner("Generating..."): response = get_gemini_pro_vision_response(multimodal_model_pro,[er_diag_img,prompt]) st.markdown(response) logging.info(response) with tab2: st.write("Prompt used:") st.text(prompt+"\n"+"input_image") EOF 위의 코드는 ER 다이어그램 탭의 UI를 빌드하는 코드입니다. ER 다이어그램의 이미지는 텍스트와 함께 사용되며 모델에서 다이어그램에 있는 항목 및 관계에 대한 문서를 생성하라는 메시지를 표시합니다.
앱 테스트 - 이미지 플레이그라운드 - ER 다이어그램 탭
-
실습의 이전 단계에서 설명한 명령어를 사용하여 앱을 실행합니다.
-
브라우저에서 앱 홈페이지를 시작하려면 Cloud Shell 메뉴바에서 웹 미리보기를 클릭한 다음 포트 8080에서 미리보기를 클릭합니다.
-
이미지 플레이그라운드를 클릭한 다음 ER 다이어그램을 클릭합니다.
탭에 ER 다이어그램 이미지가 표시됩니다.
-
문서 생성을 클릭합니다.
-
Gemini 1.0 Pro Vision 모델의 응답을 확인합니다.
응답에는 다이어그램에서 찾은 항목 목록과 그 관계가 포함되어 있습니다.
-
Cloud Shell 창에서 앱을 종료하고 Ctrl+C를 눌러 명령 프롬프트로 돌아갑니다.
목표를 확인하려면 내 진행 상황 확인하기를 클릭합니다.
작업 9. 수학 추론
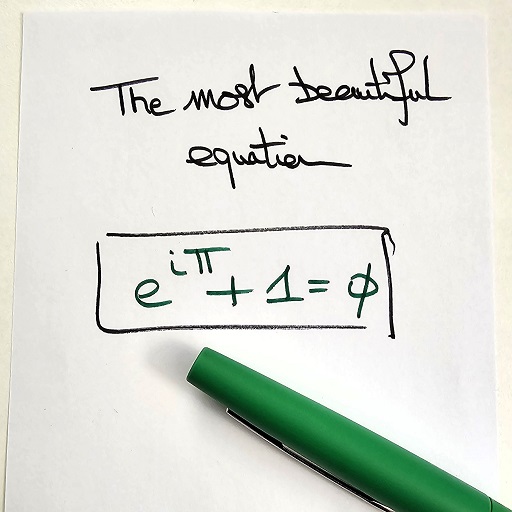
또한 Gemini 1.0 Pro Vision은 수학 공식과 방정식을 인식하고 특정 정보를 추출할 수도 있습니다. 이 기능은 수학 문제의 설명을 생성하는 데 특히 유용합니다.
이미지 플레이그라운드 탭 업데이트 - 수학 추론
이 작업에서는 Gemini 1.0 Pro Vision 모델을 사용하여 이미지에서 수학 공식을 추출하고 해석합니다.
-
앱 UI의 이미지 플레이그라운드 탭에서 수학 추론 탭에 대한 코드를 구현하려면 다음 명령어를 실행합니다.
cat >> ~/gemini-app/app_tab3.py <<EOF with equations: math_image_uri = "gs://cloud-training/OCBL447/gemini-app/images/math_eqn.jpg" math_image_url = "https://storage.googleapis.com/"+math_image_uri.split("gs://")[1] math_image_img = Part.from_uri(math_image_uri,mime_type="image/jpeg") st.image(math_image_url,width=350, caption="Image of a math equation") st.markdown(f""" Ask questions about the math equation as follows: - Extract the formula. - What is the symbol right before Pi? What does it mean? - Is this a famous formula? Does it have a name? """) prompt = """Follow the instructions. Surround math expressions with $. Use a table with a row for each instruction and its result. INSTRUCTIONS: - Extract the formula. - What is the symbol right before Pi? What does it mean? - Is this a famous formula? Does it have a name? """ tab1, tab2 = st.tabs(["Response", "Prompt"]) math_image_description = st.button("Generate answers", key="math_image_description") with tab1: if math_image_description and prompt: with st.spinner("Generating answers for formula using Gemini..."): response = get_gemini_pro_vision_response(multimodal_model_pro, [math_image_img, prompt]) st.markdown(response) logging.info(response) with tab2: st.write("Prompt used:") st.text(prompt) EOF 위의 코드는 수학 추론 탭의 UI를 빌드합니다. 수학 방정식의 이미지가 텍스트와 함께 사용되며 모델에 방정식의 답과 기타 특성을 생성하라는 메시지를 표시합니다.
앱 테스트 - 이미지 플레이그라운드 - 수학 추론 탭
-
실습의 이전 단계에서 설명한 명령어를 사용하여 앱을 실행합니다.
-
브라우저에서 앱 홈페이지를 시작하려면 Cloud Shell 메뉴바에서 웹 미리보기를 클릭한 다음 포트 8080에서 미리보기를 클릭합니다.
-
이미지 플레이그라운드를 클릭한 다음 수학 추론을 클릭합니다.
탭에 수학 방정식이 포함된 이미지가 표시됩니다.
-
정답 생성을 클릭합니다.
-
Gemini 1.0 Pro Vision 모델의 응답을 확인합니다.
응답에는 모델에 대한 프롬프트에 제공된 질문에 대한 답변이 포함되어 있습니다.
-
Cloud Shell 창에서 앱을 종료하고 Ctrl+C를 눌러 명령 프롬프트로 돌아갑니다.
목표를 확인하려면 내 진행 상황 확인하기를 클릭합니다.
작업 10. 동영상 플레이그라운드 생성
이 작업에서는 Gemini 1.0 Pro Vision 모델을 사용하여 동영상을 처리하고 모델에 제공된 동영상에서 태그와 정보를 생성합니다.
tab4 개발 - 동영상 플레이그라운드
Gemini 1.0 Pro Vision 모델은 동영상에서 무슨 일이 일어나고 있는지에 대해서도 설명할 수 있습니다. 이 하위 작업에서는 동영상 플레이그라운드 탭에 대한 코드와 모델과 상호작용하여 동영상에 대한 설명을 생성하는 코드를 구현합니다.
-
앱 UI에서 동영상 플레이그라운드 탭을 렌더링하는 코드를 작성하려면 다음 명령어를 실행합니다.
cat > ~/gemini-app/app_tab4.py <<EOF import streamlit as st from vertexai.preview.generative_models import GenerativeModel, Part from response_utils import * import logging # render the Video Playground tab with multiple child tabs def render_video_playground_tab(multimodal_model_pro: GenerativeModel): st.write("Using Gemini 1.0 Pro Vision - Multimodal model") video_desc, video_tags, video_highlights, video_geoloc = st.tabs(["Video description", "Video tags", "Video highlights", "Video geolocation"]) with video_desc: video_desc_uri = "gs://cloud-training/OCBL447/gemini-app/videos/mediterraneansea.mp4" video_desc_url = "https://storage.googleapis.com/"+video_desc_uri.split("gs://")[1] video_desc_vid = Part.from_uri(video_desc_uri, mime_type="video/mp4") st.video(video_desc_url) st.write("Generate a description of the video.") prompt = """Describe what is happening in the video and answer the following questions: \n - What am I looking at? - Where should I go to see it? - What are other top 5 places in the world that look like this? """ tab1, tab2 = st.tabs(["Response", "Prompt"]) video_desc_description = st.button("Generate video description", key="video_desc_description") with tab1: if video_desc_description and prompt: with st.spinner("Generating video description"): response = get_gemini_pro_vision_response(multimodal_model_pro, [prompt, video_desc_vid]) st.markdown(response) logging.info(response) with tab2: st.write("Prompt used:") st.write(prompt,"\n","{video_data}") EOF -
app_tab4.py파일의 콘텐츠를 확인합니다.cat ~/gemini-app/app_tab4.py render_video_playground_tab함수는 앱 사용자가 Gemini 1.0 Pro Vision 모델과 상호 작용할 수 있는 UI를 빌드합니다. 이 함수는 UI에 "동영상 설명", "동영상 태그", "동영상 하이라이트", "동영상 위치 정보"와 같은 일련의 탭을 생성합니다. 이 실습의 후속 작업에서 나머지 탭에 대한 코드를 작성합니다.Video description탭에서는 동영상과 함께 프롬프트를 사용하여 동영상에 대한 설명을 생성하고 동영상 속 장소와 유사한 다른 장소를 식별할 수 있습니다.
기본 앱 진입점 수정하기
-
앱에 tab4를 추가하려면 다음 명령어를 실행합니다.
cat >> ~/gemini-app/app.py <<EOF from app_tab4 import render_video_playground_tab with tab4: render_video_playground_tab(multimodal_model_pro) EOF
앱 테스트 - 동영상 플레이그라운드 탭
-
실습의 이전 단계에서 설명한 명령어를 사용하여 앱을 실행합니다.
-
브라우저에서 앱 홈페이지를 시작하려면 Cloud Shell 메뉴바에서 웹 미리보기를 클릭한 다음 포트 8080에서 미리보기를 클릭합니다.
-
동영상 플레이그라운드를 클릭한 다음 동영상 설명을 클릭합니다.
-
이 탭에는 한 장소의 동영상이 표시됩니다. 클릭하여 동영상을 재생합니다.
-
동영상 설명 생성을 클릭합니다.
-
Gemini 1.0 Pro Vision 모델의 응답을 확인합니다.
응답에는 장소에 대한 설명과 유사한 다른 5개의 장소가 포함되어 있습니다.
-
Cloud Shell 창에서 앱을 종료하고 Ctrl+C를 눌러 명령 프롬프트로 돌아갑니다.
목표를 확인하려면 내 진행 상황 확인하기를 클릭합니다.
작업 11. 동영상 태그 생성
이 작업에서는 Gemini 1.0 Pro Vision 모델을 사용하여 동영상에서 태그를 생성합니다.
동영상 플레이그라운드 탭 업데이트 - 동영상 태그
-
앱 UI의 동영상 플레이그라운드 탭에서 동영상 태그 탭에 대한 코드를 구현하려면 다음 명령어를 실행합니다.
cat >> ~/gemini-app/app_tab4.py <<EOF with video_tags: video_tags_uri = "gs://cloud-training/OCBL447/gemini-app/videos/photography.mp4" video_tags_url = "https://storage.googleapis.com/"+video_tags_uri.split("gs://")[1] video_tags_vid = Part.from_uri(video_tags_uri, mime_type="video/mp4") st.video(video_tags_url) st.write("Generate tags for the video.") prompt = """Answer the following questions using the video only: 1. What is in the video? 2. What objects are in the video? 3. What is the action in the video? 4. Provide 5 best tags for this video? Write the answer in table format with the questions and answers in columns. """ tab1, tab2 = st.tabs(["Response", "Prompt"]) video_tags_desc = st.button("Generate video tags", key="video_tags_desc") with tab1: if video_tags_desc and prompt: with st.spinner("Generating video tags"): response = get_gemini_pro_vision_response(multimodal_model_pro, [prompt, video_tags_vid]) st.markdown(response) logging.info(response) with tab2: st.write("Prompt used:") st.write(prompt,"\n","{video_data}") EOF 위의 코드는 동영상 태그 탭의 UI를 빌드합니다. 텍스트와 함께 동영상을 사용하여 모델에 태그를 생성하고 동영상 속 장면에 대한 질문에 답하라는 메시지를 표시합니다.
앱 테스트 - 동영상 플레이그라운드 - 동영상 태그 탭
-
실습의 이전 단계에서 설명한 명령어를 사용하여 앱을 실행합니다.
-
브라우저에서 앱 홈페이지를 시작하려면 Cloud Shell 메뉴바에서 웹 미리보기를 클릭한 다음 포트 8080에서 미리보기를 클릭합니다.
-
동영상 플레이그라운드를 클릭한 다음 동영상 태그를 클릭합니다.
-
이 탭에는 모델에 메시지를 표시하는 데 사용할 동영상이 표시됩니다. 클릭하여 동영상을 재생합니다.
-
동영상 태그 생성을 클릭합니다.
-
Gemini 1.0 Pro Vision 모델의 응답을 확인합니다.
응답에는 모델에 대한 프롬프트에 제공된 질문에 대한 답변이 포함되어 있습니다. 질문과 답변은 표 형식으로 출력되며 요청에 따라 5개의 태그가 포함됩니다.
-
Cloud Shell 창에서 앱을 종료하고 Ctrl+C를 눌러 명령 프롬프트로 돌아갑니다.
목표를 확인하려면 내 진행 상황 확인하기를 클릭합니다.
작업 12. 동영상 하이라이트 생성
이 작업에서는 Gemini 1.0 Pro Vision 모델을 사용하여 동영상에 표시된 사물, 사람, 컨텍스트에 대한 정보를 포함하는 하이라이트를 동영상에서 생성합니다.
이미지 플레이그라운드 탭 업데이트 - 동영상 하이라이트
-
앱 UI의 동영상 플레이그라운드 탭에서 동영상 하이라이트 탭에 대한 코드를 구현하려면 다음 명령어를 실행합니다.
cat >> ~/gemini-app/app_tab4.py <<EOF with video_highlights: video_highlights_uri = "gs://cloud-training/OCBL447/gemini-app/videos/pixel8.mp4" video_highlights_url = "https://storage.googleapis.com/"+video_highlights_uri.split("gs://")[1] video_highlights_vid = Part.from_uri(video_highlights_uri, mime_type="video/mp4") st.video(video_highlights_url) st.write("Generate highlights for the video.") prompt = """Answer the following questions using the video only: What is the profession of the girl in this video? Which features of the phone are highlighted here? Summarize the video in one paragraph. Write these questions and their answers in table format. """ tab1, tab2 = st.tabs(["Response", "Prompt"]) video_highlights_description = st.button("Generate video highlights", key="video_highlights_description") with tab1: if video_highlights_description and prompt: with st.spinner("Generating video highlights"): response = get_gemini_pro_vision_response(multimodal_model_pro, [prompt, video_highlights_vid]) st.markdown(response) logging.info(response) with tab2: st.write("Prompt used:") st.write(prompt,"\n","{video_data}") EOF 위의 코드는 동영상 하이라이트 탭의 UI를 빌드합니다. 동영상은 텍스트와 함께 사용되어 모델에 동영상에서 하이라이트를 생성하라는 메시지를 표시합니다.
앱 테스트 - 동영상 플레이그라운드 - 동영상 하이라이트 탭
-
실습의 이전 단계에서 설명한 명령어를 사용하여 앱을 실행합니다.
-
브라우저에서 앱 홈페이지를 시작하려면 Cloud Shell 메뉴바에서 웹 미리보기를 클릭한 다음 포트 8080에서 미리보기를 클릭합니다.
-
동영상 플레이그라운드를 클릭한 다음 동영상 하이라이트를 클릭합니다.
-
이 탭에는 모델에 메시지를 표시하는 데 사용할 동영상이 표시됩니다. 클릭하여 동영상을 재생합니다.
-
동영상 하이라이트 생성을 클릭합니다.
-
Gemini 1.0 Pro Vision 모델의 응답을 확인합니다.
응답에는 모델에 대한 프롬프트에 제공된 질문에 대한 답변이 포함되어 있습니다. 질문과 답변은 표 형식으로 출력되며 소녀의 직업, 사용하는 휴대폰의 기능 등 동영상에 나오는 기능을 나열합니다. 응답에는 동영상 속 장면에 대한 요약 설명도 포함되어 있습니다.
-
Cloud Shell 창에서 앱을 종료하고 Ctrl+C를 눌러 명령 프롬프트로 돌아갑니다.
목표를 확인하려면 내 진행 상황 확인하기를 클릭합니다.
작업 13. 동영상 위치 생성
이 작업에서는 Gemini 1.0 Pro Vision 모델을 사용하여 동영상의 장면이 촬영되는 위치를 결정합니다.
이미지 플레이그라운드 탭 업데이트 - 동영상 위치정보
-
앱 UI의 동영상 플레이그라운드 탭에서 동영상 위치정보 탭에 대한 코드를 구현하려면 다음 명령어를 실행합니다.
cat >> ~/gemini-app/app_tab4.py <<EOF with video_geoloc: video_geolocation_uri = "gs://cloud-training/OCBL447/gemini-app/videos/bus.mp4" video_geolocation_url = "https://storage.googleapis.com/"+video_geolocation_uri.split("gs://")[1] video_geolocation_vid = Part.from_uri(video_geolocation_uri, mime_type="video/mp4") st.video(video_geolocation_url) st.markdown("""Answer the following questions from the video: - What is this video about? - How do you know which city it is? - What street is this? - What is the nearest intersection? """) prompt = """Answer the following questions using the video only: What is this video about? How do you know which city it is? What street is this? What is the nearest intersection? Answer the following questions using a table format with the questions and answers as columns. """ tab1, tab2 = st.tabs(["Response", "Prompt"]) video_geolocation_description = st.button("Generate", key="video_geolocation_description") with tab1: if video_geolocation_description and prompt: with st.spinner("Generating location information"): response = get_gemini_pro_vision_response(multimodal_model_pro, [prompt, video_geolocation_vid]) st.markdown(response) logging.info(response) with tab2: st.write("Prompt used:") st.write(prompt,"\n","{video_data}") EOF 위의 코드는 동영상 위치정보 탭의 UI를 빌드합니다. 동영상은 텍스트와 함께 사용되어 동영상에 보이는 항목에 대한 위치 정보가 포함된 동영상에 대한 질문에 답하라는 메시지를 모델에 표시합니다.
앱 테스트 - 동영상 플레이그라운드 - 동영상 위치정보 탭
-
실습의 이전 단계에서 설명한 명령어를 사용하여 앱을 실행합니다.
-
브라우저에서 앱 홈페이지를 시작하려면 Cloud Shell 메뉴바에서 웹 미리보기를 클릭한 다음 포트 8080에서 미리보기를 클릭합니다.
-
동영상 플레이그라운드를 클릭한 다음 동영상 위치정보를 클릭합니다.
-
이 탭에는 모델에 메시지를 표시하는 데 사용할 동영상이 표시됩니다. 클릭하여 동영상을 재생합니다.
-
생성을 클릭합니다.
-
Gemini 1.0 Pro Vision 모델의 응답을 확인합니다.
응답에는 모델에 대한 프롬프트에 제공된 질문에 대한 답변이 포함되어 있습니다. 질문과 답변은 표 형식으로 출력되며 요청에 따라 위치 정보가 포함됩니다.
-
Cloud Shell 창에서 앱을 종료하고 Ctrl+C를 눌러 명령 프롬프트로 돌아갑니다.
목표를 확인하려면 내 진행 상황 확인하기를 클릭합니다.
작업 14. Cloud Run에 앱 배포
이제 로컬에서 앱을 테스트했으므로 Google Cloud의 Cloud Run에 앱을 배포하여 다른 사람들이 사용하도록 할 수 있습니다. Cloud Run은 Google의 확장 가능한 인프라에서 애플리케이션 컨테이너를 실행할 수 있게 해 주는 관리형 컴퓨팅 플랫폼입니다.
환경 설정
-
현재 위치가
app디렉터리인지 확인합니다.cd ~/gemini-app -
PROJECT_ID 및 REGION 환경 변수가 설정되어 있는지 확인합니다.
echo "PROJECT_ID=${PROJECT_ID}" echo "REGION=${REGION}" -
이러한 환경 변수가 설정되어 있지 않으면 명령어를 실행하여 설정하세요.
PROJECT_ID=$(gcloud config get-value project) REGION={{{project_0.default_region|set at lab start}}} echo "PROJECT_ID=${PROJECT_ID}" echo "REGION=${REGION}" -
서비스 및 아티팩트 저장소에 대한 환경 변수를 설정하세요.
SERVICE_NAME='gemini-app-playground' # Name of your Cloud Run service. AR_REPO='gemini-app-repo' # Name of your repository in Artifact Registry that stores your application container image. echo "SERVICE_NAME=${SERVICE_NAME}" echo "AR_REPO=${AR_REPO}"
Docker 저장소 만들기
-
Artifact Registry에 저장소를 만들려면 다음 명령어를 실행합니다.
gcloud artifacts repositories create "$AR_REPO" --location="$REGION" --repository-format=Docker Artifact Registry는 소프트웨어 패키지와 Docker 컨테이너 이미지의 저장 및 관리를 위한 단일 위치를 제공하는 Google Cloud 서비스입니다. -
저장소에 대한 인증을 설정합니다.
gcloud auth configure-docker "$REGION-docker.pkg.dev"
컨테이너 이미지 빌드
Dockerfile을 사용하여 애플리케이션의 컨테이너 이미지를 빌드하겠습니다. Dockerfile은 사용자가 명령줄에서 컨테이너 이미지를 조합하기 위해 호출할 수 있는 모든 명령어가 포함된 텍스트 문서입니다. 컨테이너 이미지를 빌드하고 실행하는 컨테이너 플랫폼인 Docker와 함께 사용됩니다.
-
Dockerfile을 만들려면 다음 명령어를 실행합니다.cat > ~/gemini-app/Dockerfile <<EOF FROM python:3.8 EXPOSE 8080 WORKDIR /app COPY . ./ RUN pip install -r requirements.txt ENTRYPOINT ["streamlit", "run", "app.py", "--server.port=8080", "--server.address=0.0.0.0"] EOF -
앱의 컨테이너 이미지를 빌드하려면 다음 명령어를 실행합니다.
gcloud builds submit --tag "$REGION-docker.pkg.dev/$PROJECT_ID/$AR_REPO/$SERVICE_NAME" gcloud build submit 명령어는 Cloud Build를 사용하여 빌드를 제출합니다. 태그 플래그와 함께 사용하면 Cloud Build는 Dockerfile을 사용하여 소스 디렉터리에 있는 애플리케이션 파일에서 컨테이너 이미지를 빌드합니다. Cloud Build는 Google Cloud에서 사용자의 사양에 따라 빌드를 실행하고 Docker 컨테이너 또는 Java 보관 파일과 같은 아티팩트를 생성하는 서비스입니다.
명령어가 완료될 때까지 기다렸다가 다음 단계를 진행하세요.
Cloud Run에서 앱 배포 및 테스트
마지막 작업은 Artifact Registry의 저장소에 빌드 및 푸시된 이미지로 Cloud Run에 서비스를 배포하는 것입니다.
-
Cloud Run에 앱을 배포하려면 다음 명령어를 실행합니다.
gcloud run deploy "$SERVICE_NAME" \ --port=8080 \ --image="$REGION-docker.pkg.dev/$PROJECT_ID/$AR_REPO/$SERVICE_NAME" \ --allow-unauthenticated \ --region=$REGION \ --platform=managed \ --project=$PROJECT_ID \ --set-env-vars=PROJECT_ID=$PROJECT_ID,REGION=$REGION -
서비스가 배포되면 이전 명령어의 출력에 서비스에 대한 URL이 생성됩니다. Cloud Run에서 앱을 테스트하려면 별도의 브라우저 탭 또는 창에서 해당 URL로 이동합니다.
-
테스트할 앱 기능을 선택합니다. 앱이 Vertex AI Gemini API에 응답을 생성하고 표시하라는 메시지를 표시합니다.
목표를 확인하려면 내 진행 상황 확인하기를 클릭합니다.
실습 종료
실습을 완료하면 실습 종료를 클릭합니다. Qwiklabs에서 사용된 리소스를 자동으로 삭제하고 계정을 지웁니다.
실습 경험을 평가할 수 있습니다. 해당하는 별표 수를 선택하고 의견을 입력한 후 제출을 클릭합니다.
별점의 의미는 다음과 같습니다.
- 별표 1개 = 매우 불만족
- 별표 2개 = 불만족
- 별표 3개 = 중간
- 별표 4개 = 만족
- 별표 5개 = 매우 만족
의견을 제공하고 싶지 않다면 대화상자를 닫으면 됩니다.
의견이나 제안 또는 수정할 사항이 있다면 지원 탭을 사용하세요.
수고하셨습니다
이 실습에서는 다음 작업을 수행했습니다.
- Streamlit 프레임워크를 사용하여 Python 앱을 개발했습니다.
- Python용 Vertex AI SDK를 설치했습니다.
- Vertex AI Gemini API를 사용하여 Gemini 1.0 Pro 모델(gemini-pro)과 상호작용하는 코드를 개발했습니다.
- 모델과 함께 텍스트 프롬프트를 사용하여 스토리 및 마케팅 캠페인을 생성했습니다.
- Vertex AI Gemini API를 사용하여 Gemini 1.0 Pro Vision(gemini-pro-vision) 모델과 상호작용하는 코드를 개발했습니다.
- 모델과 함께 텍스트, 이미지, 동영상을 사용하여 이미지와 동영상에서 정보를 처리하고 추출했습니다.
- Cloud Run에서 앱을 배포하고 테스트했습니다.
다음 단계/더 학습하기
Copyright 2023 Google LLC All rights reserved. Google 및 Google 로고는 Google LLC의 상표입니다. 기타 모든 회사명 및 제품명은 해당 업체의 상표일 수 있습니다.

