检查点
Enable relevant APIs.
/ 5
Application is developed with Story tab.
/ 5
Application marketing campaign tab is developed.
/ 5
Application image playground with furniture recommendation tab is developed.
/ 5
Image playground with oven instructions tab is developed.
/ 10
Image playground with ER diagrams tab is developed
/ 10
Image playground with math reasoning tab is developed.
/ 10
Application video playground with video description tab is developed.
/ 10
Video playground with video tags tab is developed.
/ 10
Video playground with video highlights tab is developed.
/ 10
Video playground with video geolocation tab is developed.
/ 10
Application is deployed to Cloud Run.
/ 10
借助 Vertex AI Gemini 1.0 Pro 开发应用
概览
Gemini 是一系列专为多模态应用场景设计的生成式 AI 模型的统称,提供了三个不同版本:Ultra、Pro 及 Nano。Gemini 1.0 Pro 可供开发人员和企业针对自身的应用场景进行构建。Gemini 1.0 Pro 可接受文本作为输入,并生成文本作为输出。此外还有一个专用的 Gemini 1.0 Pro Vision 多模态端点,可接受文本和图片作为输入,并生成文本作为输出。我们提供了多个 SDK,帮助您使用 Python、Android (Kotlin)、Node.js、Swift 和 JavaScript 语言构建应用。
在 Google Cloud 上,Vertex AI Gemini API 提供了与多种 Gemini 模型交互的统一界面。该 API 支持将多模态提示作为输入和输出文本或代码。该 Gemini API 目前支持以下两种模型:
-
Gemini 1.0 Pro 模型 (gemini-pro):旨在处理自然语言任务、多轮文本和代码聊天以及代码生成。
-
Gemini 1.0 Pro Vision 模型 (gemini-pro-vision):为多模态提示提供支持。您可以在提示请求中包含文本、图片和视频,并获取文本或代码回答。
Vertex AI 是一个机器学习 (ML) 平台,用于训练和部署 ML 模型和 AI 应用,以及自定义大语言模型 (LLM),以在依托 AI 技术的应用中使用。借助 Vertex AI,您可通过全面的数据控制功能来自定义 Gemini,并充分利用 Google Cloud 针对企业安全、隐私以及数据治理与合规性提供的其他功能。如需详细了解 Vertex AI,请查看本实验末尾后续步骤部分提供的链接。
在本实验中,您将使用 Python 版 Vertex AI SDK 来调用 Vertex AI Gemini API。
目标
在本实验中,您将学习如何执行以下任务:
- 使用 Streamlit 框架开发 Python 应用。
- 安装 Python 版 Vertex AI SDK。
- 使用 Vertex AI Gemini API 开发与 Gemini 1.0 Pro 模型 (gemini-pro) 交互的代码。
- 使用 Vertex AI Gemini API 开发与 Gemini 1.0 Pro Vision 模型 (gemini-pro-vision) 交互的代码。
- 将应用容器化,并在 Cloud Run 上对该应用进行部署和测试。
设置
对于每个实验,您都会免费获得一个新的 Google Cloud 项目及一组资源,它们都有固定的使用时限。
-
请使用无痕式窗口登录 Qwiklabs。
-
留意实验的访问时限(例如
1:15:00)并确保能在相应时间段内完成实验。
系统不提供暂停功能。如有需要,您可以重新开始实验,不过必须从头开始。 -
准备就绪时,点击开始实验。
-
请记好您的实验凭据(用户名和密码)。您需要使用这组凭据来登录 Google Cloud 控制台。
-
点击打开 Google 控制台。
-
点击使用其他帐号,然后将此实验的凭据复制并粘贴到相应提示框中。
如果您使用其他凭据,将会收到错误消息或产生费用。 -
接受条款并跳过恢复资源页面。
激活 Cloud Shell
Cloud Shell 是一种包含开发工具的虚拟机。它提供了一个 5 GB 的永久性主目录,并且在 Google Cloud 上运行。Cloud Shell 可让您通过命令行访问 Google Cloud 资源。gcloud 是 Google Cloud 的命令行工具。它会预先安装在 Cloud Shell 上,且支持 Tab 键自动补全功能。
-
在 Google Cloud Console 的导航窗格中,点击激活 Cloud Shell (
)。
-
点击继续。
预配和连接到环境需要一些时间。若连接成功,也就表明您已通过身份验证,且相关项目的 ID 会被设为您的 PROJECT_ID。例如:

命令示例
-
列出有效的帐号名称:
(输出)
(输出示例)
-
列出项目 ID:
(输出)
(输出示例)
任务 1. 配置您的环境和项目
-
使用您的实验凭据登录 Google Cloud 控制台,并打开 Cloud Shell 终端窗口。
-
如需设置项目 ID 和区域环境变量,请在 Cloud Shell 中运行以下命令:
PROJECT_ID=$(gcloud config get-value project) REGION={{{project_0.default_region|set at lab start}}} echo "PROJECT_ID=${PROJECT_ID}" echo "REGION=${REGION}" -
为了在本实验中使用各种 Google Cloud 服务,您必须启用一些 API:
gcloud services enable cloudbuild.googleapis.com cloudfunctions.googleapis.com run.googleapis.com logging.googleapis.com storage-component.googleapis.com aiplatform.googleapis.com
如需验证是否已完成以下目标,请点击检查我的进度:
任务 2. 设置应用环境
在此任务中,您将设置 Python 虚拟环境并安装应用依赖项。
确认 Cloud Shell 已获得授权
-
如需确认 Cloud Shell 是否已获得授权,请在 Cloud Shell 中运行以下命令:
gcloud auth list -
如果系统提示您为 Cloud Shell 授权,请点击授权。
创建应用目录
-
如需创建应用目录,请运行以下命令:
mkdir ~/gemini-app -
切换到
~/gemini-app目录:cd ~/gemini-app 应用文件在
~/gemini-app目录中创建。该目录将包含 Python 应用源文件、依赖项,以及我们稍后将在本实验中使用的 Docker 文件。
设置 Python 虚拟环境
在现有的 Python 安装版基础之上创建一个虚拟环境,以便此环境中安装的任何包都与基础环境中的包相互隔离。当在虚拟环境中使用时,pip 等安装工具会将 Python 包安装到虚拟环境中。
-
如需创建 Python 虚拟环境,请在
gemini-app文件夹中运行以下命令:python3 -m venv gemini-streamlit venv 模块会创建一个轻量级虚拟环境,拥有自己的独立 Python 软件包集。 -
激活 Python 虚拟环境:
source gemini-streamlit/bin/activate
安装应用依赖项
Python requirements 文件是一个简单的文本文件,其中列出了项目所需的依赖项。首先,我们的 requirements 文件中需要包含三个模块。
我们的应用是使用 Streamlit 编写的,Streamlit 是一个用于创建机器学习和数据科学 Web 应用的开源 Python 库。该应用使用 Python 版 Vertex AI SDK 库与 Gemini API 和模型进行交互。Cloud Logging 用于记录我们的应用中的信息。
-
如需创建 requirements 文件,请运行以下命令:
cat > ~/gemini-app/requirements.txt <<EOF streamlit google-cloud-aiplatform==1.38.1 google-cloud-logging==3.6.0 EOF -
安装应用依赖项:
pip install -r requirements.txt pip 是 Python 版软件包安装程序。
等到所有软件包安装完毕后,再继续下一个任务。
任务 3. 开发应用
应用源代码将被写入多个 .py 源文件中。我们先从 app.py 中的主入口点开始。
编写应用主入口点
-
如需创建
app.py入口点代码,请运行以下命令:cat > ~/gemini-app/app.py <<EOF import os import streamlit as st from app_tab1 import render_story_tab from vertexai.preview.generative_models import GenerativeModel import vertexai import logging from google.cloud import logging as cloud_logging # configure logging logging.basicConfig(level=logging.INFO) # attach a Cloud Logging handler to the root logger log_client = cloud_logging.Client() log_client.setup_logging() PROJECT_ID = os.environ.get('PROJECT_ID') # Your Qwiklabs Google Cloud Project ID LOCATION = os.environ.get('REGION') # Your Qwiklabs Google Cloud Project Region vertexai.init(project=PROJECT_ID, location=LOCATION) @st.cache_resource def load_models(): text_model_pro = GenerativeModel("gemini-pro") multimodal_model_pro = GenerativeModel("gemini-pro-vision") return text_model_pro, multimodal_model_pro st.header("Vertex AI Gemini API", divider="rainbow") text_model_pro, multimodal_model_pro = load_models() tab1, tab2, tab3, tab4 = st.tabs(["Story", "Marketing Campaign", "Image Playground", "Video Playground"]) with tab1: render_story_tab(text_model_pro) EOF -
查看
app.py文件中的内容:cat ~/gemini-app/app.py 该应用使用
streamlit在界面中创建多个标签页。在该应用的初始版本中,我们构建了第一个标签页 Story(故事),其中包含生成故事的功能;之后我们会在本实验的后续任务中逐步构建其他标签页。该应用首先会传入 PROJECT_ID 和 REGION 环境变量的值来初始化
Vertex AI SDK。然后,该应用使用表示 Gemini 模型的
GenerativeModel类来加载gemini-pro模型和gemini-pro-vision模型。此类包含多种方法,可帮助您通过文本、图片和视频内容生成内容。该应用在界面中创建了 4 个标签页,分别命名为 Story(故事)、Marketing Campaign(营销活动)、Image Playground(图片园地)和 Video Playground(视频园地)。
然后,应用代码将调用
render_tab1()函数来为应用界面中的 Story(故事)标签页创建界面。
开发 tab1 - Story(故事)
-
如需编写在应用界面中呈现 Story(故事)标签页的代码,请运行以下命令:
cat > ~/gemini-app/app_tab1.py <<EOF import streamlit as st from vertexai.preview.generative_models import GenerativeModel from response_utils import * import logging # create the model prompt based on user input. def generate_prompt(): # Story character input character_name = st.text_input("Enter character name: \n\n",key="character_name",value="Mittens") character_type = st.text_input("What type of character is it? \n\n",key="character_type",value="Cat") character_persona = st.text_input("What personality does the character have? \n\n", key="character_persona",value="Mitten is a very friendly cat.") character_location = st.text_input("Where does the character live? \n\n",key="character_location",value="Andromeda Galaxy") # Story length and premise length_of_story = st.radio("Select the length of the story: \n\n",["Short","Long"],key="length_of_story",horizontal=True) story_premise = st.multiselect("What is the story premise? (can select multiple) \n\n",["Love","Adventure","Mystery","Horror","Comedy","Sci-Fi","Fantasy","Thriller"],key="story_premise",default=["Love","Adventure"]) creative_control = st.radio("Select the creativity level: \n\n",["Low","High"],key="creative_control",horizontal=True) if creative_control == "Low": temperature = 0.30 else: temperature = 0.95 prompt = f"""Write a {length_of_story} story based on the following premise: \n character_name: {character_name} \n character_type: {character_type} \n character_persona: {character_persona} \n character_location: {character_location} \n story_premise: {",".join(story_premise)} \n If the story is "short", then make sure to have 5 chapters or else if it is "long" then 10 chapters. Important point is that each chapter should be generated based on the premise given above. First start by giving the book introduction, chapter introductions and then each chapter. It should also have a proper ending. The book should have a prologue and an epilogue. """ return temperature, prompt # function to render the story tab, and call the model, and display the model prompt and response. def render_story_tab (text_model_pro: GenerativeModel): st.write("Using Gemini 1.0 Pro - Text only model") st.subheader("Generate a story") temperature, prompt = generate_prompt() config = { "temperature": temperature, "max_output_tokens": 2048, } generate_t2t = st.button("Generate my story", key="generate_t2t") if generate_t2t and prompt: # st.write(prompt) with st.spinner("Generating your story using Gemini..."): first_tab1, first_tab2 = st.tabs(["Story response", "Prompt"]) with first_tab1: response = get_gemini_pro_text_response(text_model_pro, prompt, generation_config=config) if response: st.write("Your story:") st.write(response) logging.info(response) with first_tab2: st.text(prompt) EOF -
查看
app_tab1.py文件中的内容:cat ~/gemini-app/app_tab1.py render_story_tab函数可调用呈现文本输入字段和其他选项的函数,以生成标签页中的界面控件。generate_prompt函数会生成提供给 Gemini API 的文本提示。创建提示字符串时,需要将用户在标签页界面中输入的故事角色值以及故事长度(短、长)、创意水平(低、高)和故事前提等选项串联起来。该函数还根据所选的故事创意水平返回
temperature(温度)值。该值作为temperature(温度)配置参数提供给模型,用于控制模型预测结果的随机性。max_output_tokens配置参数指定每条消息生成的输出词元数上限。为了生成模型回答,我们在标签页界面中创建了一个按钮。点击该按钮时,将调用
get_gemini_pro_text_response函数,我们将在本实验的下一步骤中编写函数代码。
开发 response_utils
response_utils.py 文件包含生成模型回答的函数。
-
如需编写代码来生成模型的文本回答,请运行以下命令:
cat > ~/gemini-app/response_utils.py <<EOF from vertexai.preview.generative_models import (Content, GenerationConfig, GenerativeModel, GenerationResponse, Image, HarmCategory, HarmBlockThreshold, Part) def get_gemini_pro_text_response( model: GenerativeModel, prompt: str, generation_config: GenerationConfig, stream=True): safety_settings={ HarmCategory.HARM_CATEGORY_HARASSMENT: HarmBlockThreshold.BLOCK_NONE, HarmCategory.HARM_CATEGORY_HATE_SPEECH: HarmBlockThreshold.BLOCK_NONE, HarmCategory.HARM_CATEGORY_SEXUALLY_EXPLICIT: HarmBlockThreshold.BLOCK_NONE, HarmCategory.HARM_CATEGORY_DANGEROUS_CONTENT: HarmBlockThreshold.BLOCK_NONE, } responses = model.generate_content(prompt, generation_config = generation_config, safety_settings = safety_settings, stream=True) final_response = [] for response in responses: try: final_response.append(response.text) except IndexError: final_response.append("") continue return " ".join(final_response) EOF -
查看
response_utils.py文件中的内容:cat ~/gemini-app/response_utils.py get_gemini_pro_text_response函数在 Python 版 Vertex AI SDK 中使用vertexai.preview.generative_models软件包提供的GenerativeModel以及一些其他类。调用类的generate_content方法,使用传递给该方法的文本提示生成回答。safety_settings对象也会传递给此方法,通过屏蔽不安全的内容来控制模型回答。本实验中的示例代码使用的安全设置值指示模型始终返回内容,而不考虑内容不安全概率的高低。您可以先评估生成的内容,如果您的应用需要更严格的配置,再调整这些设置。如需了解详情,请参阅安全设置文档。
任务 4. 在本地运行并测试应用
在此任务中,您将使用 streamlit 在本地运行应用,并测试应用功能。
运行应用
-
如需在本地运行应用,请在 Cloud Shell 中执行以下命令:
streamlit run app.py \ --browser.serverAddress=localhost \ --server.enableCORS=false \ --server.enableXsrfProtection=false \ --server.port 8080 该应用即会启动,并向您提供一个用于访问该应用的网址。
-
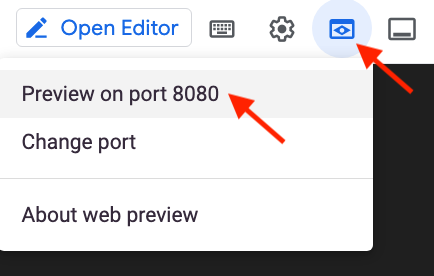
如需在浏览器中启动应用首页,请点击 Cloud Shell 菜单栏中的网页预览,然后点击在端口 8080 上预览。
您还可以将应用网址复制并粘贴到单独的浏览器标签页中来访问该应用。
测试应用 - Story(故事)标签页
提供输入以生成故事,查看提示,并查看 Gemini 1.0 Pro 模型生成的回答。
-
如需生成故事,请保留 Story(故事)标签页中的默认设置,然后点击 Generate my story(生成我的故事)。
-
等待模型生成回答,然后点击 Story response(故事回答)标签页。
-
如需查看用于生成回答的提示,请点击 Prompt(提示)标签页。
-
在 Cloud Shell 窗口中,结束应用并按下 Ctrl+C 返回命令提示符。
如需验证是否已完成以下目标,请点击检查我的进度:
任务 5. 生成营销活动
在此任务中,您将使用 Gemini 1.0 Pro 文本模型为公司生成营销活动。您将开发相应代码,以便在您的应用中生成第二个标签页。
开发 tab2 - Marketing Campaign(营销活动)
-
如需编写在应用界面中呈现 Marketing Campaign(营销活动)标签页的代码,请运行以下命令:
cat > ~/gemini-app/app_tab2.py <<EOF import streamlit as st from vertexai.preview.generative_models import GenerativeModel from response_utils import * import logging # create the model prompt based on user input. def generate_prompt(): st.write("Using Gemini 1.0 Pro - Text only model") st.subheader("Generate your marketing campaign") product_name = st.text_input("What is the name of the product? \n\n",key="product_name",value="ZomZoo") product_category = st.radio("Select your product category: \n\n",["Clothing","Electronics","Food","Health & Beauty","Home & Garden"],key="product_category",horizontal=True) st.write("Select your target audience: ") target_audience_age = st.radio("Target age: \n\n",["18-24","25-34","35-44","45-54","55-64","65+"],key="target_audience_age",horizontal=True) # target_audience_gender = st.radio("Target gender: \n\n",["male","female","trans","non-binary","others"],key="target_audience_gender",horizontal=True) target_audience_location = st.radio("Target location: \n\n",["Urban", "Suburban","Rural"],key="target_audience_location",horizontal=True) st.write("Select your marketing campaign goal: ") campaign_goal = st.multiselect("Select your marketing campaign goal: \n\n",["Increase brand awareness","Generate leads","Drive sales","Improve brand sentiment"],key="campaign_goal",default=["Increase brand awareness","Generate leads"]) if campaign_goal is None: campaign_goal = ["Increase brand awareness","Generate leads"] brand_voice = st.radio("Select your brand voice: \n\n",["Formal","Informal","Serious","Humorous"],key="brand_voice",horizontal=True) estimated_budget = st.radio("Select your estimated budget ($): \n\n",["1,000-5,000","5,000-10,000","10,000-20,000","20,000+"],key="estimated_budget",horizontal=True) prompt = f"""Generate a marketing campaign for {product_name}, a {product_category} designed for the age group: {target_audience_age}. The target location is this: {target_audience_location}. Aim to primarily achieve {campaign_goal}. Emphasize the product's unique selling proposition while using a {brand_voice} tone of voice. Allocate the total budget of {estimated_budget}. With these inputs, make sure to follow following guidelines and generate the marketing campaign with proper headlines: \n - Briefly describe the company, its values, mission, and target audience. - Highlight any relevant brand guidelines or messaging frameworks. - Provide a concise overview of the campaign's objectives and goals. - Briefly explain the product or service being promoted. - Define your ideal customer with clear demographics, psychographics, and behavioral insights. - Understand their needs, wants, motivations, and pain points. - Clearly articulate the desired outcomes for the campaign. - Use SMART goals (Specific, Measurable, Achievable, Relevant, and Time-bound) for clarity. - Define key performance indicators (KPIs) to track progress and success. - Specify the primary and secondary goals of the campaign. - Examples include brand awareness, lead generation, sales growth, or website traffic. - Clearly define what differentiates your product or service from competitors. - Emphasize the value proposition and unique benefits offered to the target audience. - Define the desired tone and personality of the campaign messaging. - Identify the specific channels you will use to reach your target audience. - Clearly state the desired action you want the audience to take. - Make it specific, compelling, and easy to understand. - Identify and analyze your key competitors in the market. - Understand their strengths and weaknesses, target audience, and marketing strategies. - Develop a differentiation strategy to stand out from the competition. - Define how you will track the success of the campaign. - Use relevant KPIs to measure performance and return on investment (ROI). Provide bullet points and headlines for the marketing campaign. Do not produce any empty lines. Be very succinct and to the point. """ return prompt # function to render the story tab, and call the model, and display the model prompt and response. def render_mktg_campaign_tab (text_model_pro: GenerativeModel): st.write("Using Gemini 1.0 Pro - Text only model") st.subheader("Generate a marketing campaign") prompt = generate_prompt() config = { "temperature": 0.8, "max_output_tokens": 2048, } generate_t2m = st.button("Generate campaign", key="generate_t2m") if generate_t2m and prompt: # st.write(prompt) with st.spinner("Generating a marketing campaign using Gemini..."): first_tab1, first_tab2 = st.tabs(["Campaign response", "Prompt"]) with first_tab1: response = get_gemini_pro_text_response(text_model_pro, prompt, generation_config=config) if response: st.write("Marketing campaign:") st.write(response) logging.info(response) with first_tab2: st.text(prompt) EOF
修改应用主入口点
-
如需为应用添加 tab2,请运行以下命令:
cat >> ~/gemini-app/app.py <<EOF from app_tab2 import render_mktg_campaign_tab with tab2: render_mktg_campaign_tab(text_model_pro) EOF
测试应用 - Marketing campaign(营销活动)标签页
提供输入以生成营销活动,查看提示,并查看 Gemini 1.0 Pro 模型生成的回答。
-
如需在本地运行应用,请在 Cloud Shell 中执行以下命令:
streamlit run app.py \ --browser.serverAddress=localhost \ --server.enableCORS=false \ --server.enableXsrfProtection=false \ --server.port 8080 该应用即会启动,并向您提供一个用于访问该应用的网址。
-
如需在浏览器中启动应用首页,请点击 Cloud Shell 菜单栏中的网页预览,然后点击在端口 8080 上预览。
-
如需生成营销活动,请保留 Marketing campaign(营销活动)标签页中的默认设置,然后点击 Generate campaign(生成营销活动)。
-
等待模型生成回答,然后点击 Campaign response(营销活动回答)标签页。
-
如需查看用于生成回答的提示,请点击 Prompt(提示)标签页。
-
重复上述步骤,生成具有不同参数值(例如商品类别、目标受众群体、位置和活动目标)的营销活动。
-
在 Cloud Shell 窗口中,结束应用并按下 Ctrl+C 返回命令提示符。
如需验证是否已完成以下目标,请点击检查我的进度:
任务 6. 生成图片园地
在此任务中,您将使用 Gemini 1.0 Pro Vision 模型来处理图片,并获得根据提供给模型的图片生成的建议和信息。
开发 tab3 - Image Playground(图片园地)
在此子任务中,您将实现 Image Playground(图片园地)标签页的代码,以及与模型交互以根据图片生成建议的代码。
-
如需编写在应用界面中呈现 Image Playground(图片园地)标签页的代码,请运行以下命令:
cat > ~/gemini-app/app_tab3.py <<EOF import streamlit as st from vertexai.preview.generative_models import GenerativeModel, Part from response_utils import * import logging # render the Image Playground tab with multiple child tabs def render_image_playground_tab(multimodal_model_pro: GenerativeModel): st.write("Using Gemini 1.0 Pro Vision - Multimodal model") recommendations, screens, diagrams, equations = st.tabs(["Furniture recommendation", "Oven instructions", "ER diagrams", "Math reasoning"]) with recommendations: room_image_uri = "gs://cloud-training/OCBL447/gemini-app/images/living_room.jpeg" chair_1_image_uri = "gs://cloud-training/OCBL447/gemini-app/images/chair1.jpeg" chair_2_image_uri = "gs://cloud-training/OCBL447/gemini-app/images/chair2.jpeg" chair_3_image_uri = "gs://cloud-training/OCBL447/gemini-app/images/chair3.jpeg" chair_4_image_uri = "gs://cloud-training/OCBL447/gemini-app/images/chair4.jpeg" room_image_url = "https://storage.googleapis.com/"+room_image_uri.split("gs://")[1] chair_1_image_url = "https://storage.googleapis.com/"+chair_1_image_uri.split("gs://")[1] chair_2_image_url = "https://storage.googleapis.com/"+chair_2_image_uri.split("gs://")[1] chair_3_image_url = "https://storage.googleapis.com/"+chair_3_image_uri.split("gs://")[1] chair_4_image_url = "https://storage.googleapis.com/"+chair_4_image_uri.split("gs://")[1] room_image = Part.from_uri(room_image_uri, mime_type="image/jpeg") chair_1_image = Part.from_uri(chair_1_image_uri,mime_type="image/jpeg") chair_2_image = Part.from_uri(chair_2_image_uri,mime_type="image/jpeg") chair_3_image = Part.from_uri(chair_3_image_uri,mime_type="image/jpeg") chair_4_image = Part.from_uri(chair_4_image_uri,mime_type="image/jpeg") st.image(room_image_url,width=350, caption="Image of a living room") st.image([chair_1_image_url,chair_2_image_url,chair_3_image_url,chair_4_image_url],width=200, caption=["Chair 1","Chair 2","Chair 3","Chair 4"]) st.write("Our expectation: Recommend a chair that would complement the given image of a living room.") prompt_list = ["Consider the following chairs:", "chair 1:", chair_1_image, "chair 2:", chair_2_image, "chair 3:", chair_3_image, "and", "chair 4:", chair_4_image, "\n" "For each chair, explain why it would be suitable or not suitable for the following room:", room_image, "Only recommend for the room provided and not other rooms. Provide your recommendation in a table format with chair name and reason as columns.", ] tab1, tab2 = st.tabs(["Response", "Prompt"]) generate_image_description = st.button("Generate recommendation", key="generate_image_description") with tab1: if generate_image_description and prompt_list: with st.spinner("Generating recommendation using Gemini..."): response = get_gemini_pro_vision_response(multimodal_model_pro, prompt_list) st.markdown(response) logging.info(response) with tab2: st.write("Prompt used:") st.text(prompt_list) EOF -
查看
app_tab3.py文件中的内容:cat ~/gemini-app/app_tab3.py render_image_playground_tab函数可以构建界面,使应用用户能够与 Gemini 1.0 Pro Vision 模型进行交互。该函数可以在界面中创建一系列标签页:“Furniture recommendation”(家具建议)、“Oven instructions”(烤箱使用说明)、“ER diagrams”(实体关系图表)、“Math reasoning”(数学推理)。您将在本实验的后续任务中编写其余标签页的代码。在
Furniture recommendation(家具建议)标签页中,使用客厅场景来进行视觉理解。除了提供一组额外的坐具图片之外,该代码还调用 Gemini 1.0 Pro Vision 多模态 API 端点,来获取能使客厅场景更富有生活气息的坐具款式的建议。该代码使用多个文本提示以及客厅和坐具的图片,并将这些信息以列表形式提供给模型。
Part类用于从托管在 Cloud Storage 存储桶中的多部分内容 URI 获取图片。该提示还指定了模型输出采用表格格式,并包含建议的依据。

更新 response_utils
response_utils.py 文件包含生成模型回答的函数。
-
更新文件,添加使模型生成多模态回答的代码:
cat >> ~/gemini-app/response_utils.py <<EOF def get_gemini_pro_vision_response(model: GenerativeModel, prompt_list, generation_config={}, stream=True): generation_config = {'temperature': 0.1, 'max_output_tokens': 2048 } responses = model.generate_content(prompt_list, generation_config = generation_config, stream=True) final_response = [] for response in responses: try: final_response.append(response.text) except IndexError: final_response.append("") continue return(" ".join(final_response)) EOF
修改应用主入口点
-
如需为应用添加 tab3,请运行以下命令:
cat >> ~/gemini-app/app.py <<EOF from app_tab3 import render_image_playground_tab with tab3: render_image_playground_tab(multimodal_model_pro) EOF
测试应用 - Image Playground(图片园地)标签页
-
使用本实验前面的步骤中提供的命令运行应用。
-
如需在浏览器中启动应用首页,请点击 Cloud Shell 菜单栏中的网页预览,然后点击在端口 8080 上预览。
-
点击 Image Playground(图片园地),然后点击 Furniture recommendation(家具建议)。
该标签页将显示客厅和坐具的图片。
-
点击 Generate recommendation(生成建议)。
如果您看到以下错误提示:“FailedPrecondition: 400 We are preparing necessary resources.Please wait few minutes and retry.”(FailedPrecondition: 400 我们正在准备所需的资源。请等待几分钟,然后重试),则请等待几分钟,然后再次点击 Generate recommendation(生成建议)。 -
查看 Gemini 1.0 Pro Vision 模型提供的回答。
回答按照提示中的要求以表格格式呈现。该模型从四把坐具中选择了两把来推荐,并提供了推荐理由。
-
在 Cloud Shell 窗口中,结束应用并按下 Ctrl+C 返回命令提示符。
如需验证是否已完成以下目标,请点击检查我的进度:
任务 7. 分析图片布局
在此任务中,您将使用 Gemini 1.0 Pro Vision 模型分析图片中图标和文本的布局,然后从图片中提取信息。
更新 Image Playground(图片园地)标签页 - Oven instructions(烤箱使用说明)
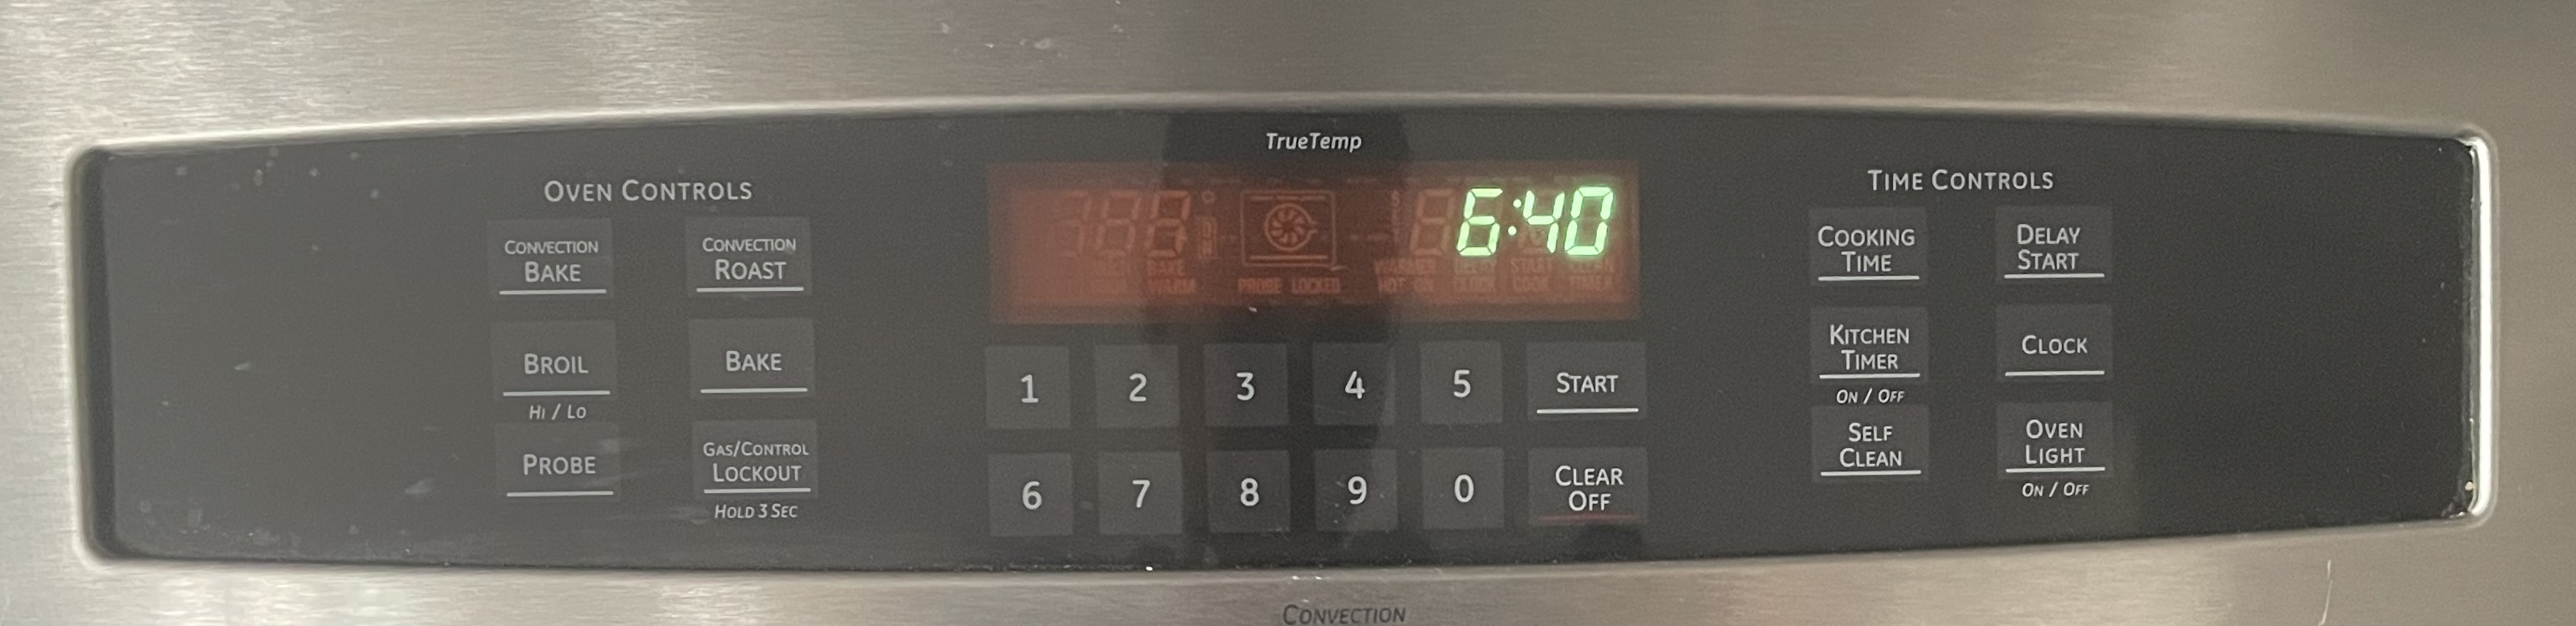
Gemini 具有从屏幕上的视觉元素中提取信息的功能,能够分析屏幕截图、图标和布局,帮助您全面了解所描绘的场景。在此任务中,您向模型提供厨房烤箱控制面板的图片,然后提示模型生成特定功能的使用说明。
-
如需在应用界面的 Image Playground(图片园地)标签页中实现 Oven instructions(烤箱使用说明)标签页的代码,请运行以下命令:
cat >> ~/gemini-app/app_tab3.py <<EOF with screens: oven_screen_uri = "gs://cloud-training/OCBL447/gemini-app/images/oven.jpg" oven_screen_url = "https://storage.googleapis.com/"+oven_screen_uri.split("gs://")[1] oven_screen_img = Part.from_uri(oven_screen_uri, mime_type="image/jpeg") st.image(oven_screen_url, width=350, caption="Image of an oven control panel") st.write("Provide instructions for resetting the clock on this appliance in English") prompt = """How can I reset the clock on this appliance? Provide the instructions in English. If instructions include buttons, also explain where those buttons are physically located. """ tab1, tab2 = st.tabs(["Response", "Prompt"]) generate_instructions_description = st.button("Generate instructions", key="generate_instructions_description") with tab1: if generate_instructions_description and prompt: with st.spinner("Generating instructions using Gemini..."): response = get_gemini_pro_vision_response(multimodal_model_pro, [oven_screen_img, prompt]) st.markdown(response) logging.info(response) with tab2: st.write("Prompt used:") st.text(prompt+"\n"+"input_image") EOF 上面的代码构建了 Oven instructions(烤箱使用说明)标签页的界面。结合使用厨房烤箱控制面板的图片与相应文本,提示模型生成面板上提供的特定功能的使用说明。本示例是关于重置时钟的使用说明。
测试应用 - Image Playground(图片园地) - Oven instructions(烤箱使用说明)标签页
-
使用本实验前面的步骤中提供的命令运行应用。
-
如需在浏览器中启动应用首页,请点击 Cloud Shell 菜单栏中的网页预览,然后点击在端口 8080 上预览。
-
点击 Image Playground(图片园地),然后点击 Oven instructions(烤箱使用说明)。
该标签页将显示烤箱控制面板的图片。
-
点击 Generate instructions(生成使用说明)。
-
查看 Gemini 1.0 Pro Vision 模型提供的回答。
回答将包含可用于重置烤箱控制面板上的时钟的步骤。此外,还会提供在面板上的何处可以找到该按钮的说明,由此展示了该模型分析图片中面板布局的功能。
-
在 Cloud Shell 窗口中,结束应用并按下 Ctrl+C 返回命令提示符。
如需验证是否已完成以下目标,请点击检查我的进度:
任务 8. 分析实体关系图表
Gemini 具有多模态功能,能够理解图表并执行一些可行的操作,例如生成文档或代码。在此任务中,您将使用 Gemini 1.0 Pro Vision 模型来分析实体关系 (ER) 图表,然后生成有关图表中的实体及相应关系的文档。
更新 Image Playground(图片园地)标签页 - ER diagrams(实体关系图表)
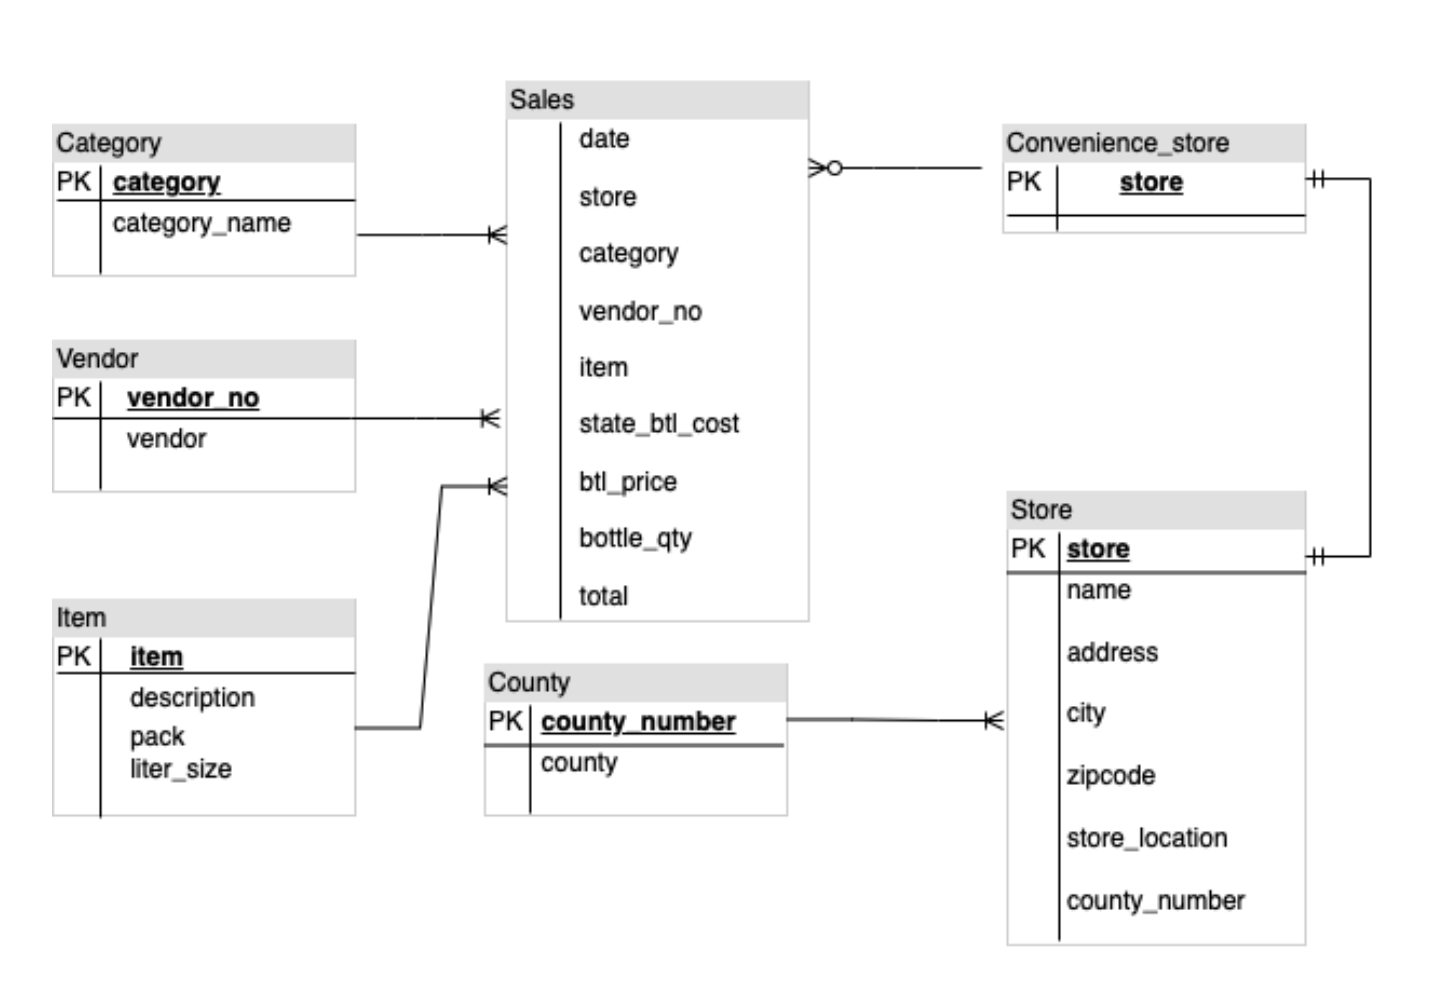
在此任务中,您将向模型提供 ER 图表的图片,然后提示模型生成文档。
-
如需在应用界面的 Image Playground(图片园地)标签页中实现 ER diagrams(实体关系图表)标签页的代码,请运行以下命令:
cat >> ~/gemini-app/app_tab3.py <<EOF with diagrams: er_diag_uri = "gs://cloud-training/OCBL447/gemini-app/images/er.png" er_diag_url = "https://storage.googleapis.com/"+er_diag_uri.split("gs://")[1] er_diag_img = Part.from_uri(er_diag_uri,mime_type="image/png") st.image(er_diag_url, width=350, caption="Image of an ER diagram") st.write("Document the entities and relationships in this ER diagram.") prompt = """Document the entities and relationships in this ER diagram.""" tab1, tab2 = st.tabs(["Response", "Prompt"]) er_diag_img_description = st.button("Generate documentation", key="er_diag_img_description") with tab1: if er_diag_img_description and prompt: with st.spinner("Generating..."): response = get_gemini_pro_vision_response(multimodal_model_pro,[er_diag_img,prompt]) st.markdown(response) logging.info(response) with tab2: st.write("Prompt used:") st.text(prompt+"\n"+"input_image") EOF 上面的代码构建了 ER diagrams(实体关系图表)标签页的界面。结合使用 ER 图表的图片和相应文本,提示模型生成有关图表中的实体及相应关系的文档。
测试应用 - Image Playground(图片园地) - ER diagrams(实体关系图表)标签页
-
使用本实验前面的步骤中提供的命令运行应用。
-
如需在浏览器中启动应用首页,请点击 Cloud Shell 菜单栏中的网页预览,然后点击在端口 8080 上预览。
-
点击 Image Playground(图片园地),然后点击 ER diagrams(实体关系图表)。
该标签页会显示实体关系图表的图片。
-
点击 Generate documentation(生成文档)。
-
查看 Gemini 1.0 Pro Vision 模型提供的回答。
回答将包含图表中的实体及相应关系。
-
在 Cloud Shell 窗口中,结束应用并按下 Ctrl+C 返回命令提示符。
如需验证是否已完成以下目标,请点击检查我的进度:
任务 9. 数学推理
Gemini 1.0 Pro Vision 还可以识别数学公式和方程,并从中提取特定信息。此功能对于生成有关数学问题的解析特别有用。
更新 Image Playground(图片园地)标签页 - Math reasoning(数学推理)
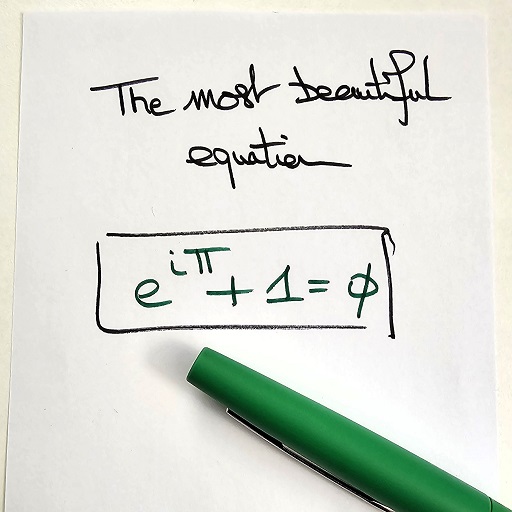
在此任务中,您将使用 Gemini 1.0 Pro Vision 模型从图片中提取并解析数学公式。
-
如需在应用界面的 Image Playground(图片园地)标签页中实现 Math reasoning(数学推理)标签页的代码,请运行以下命令:
cat >> ~/gemini-app/app_tab3.py <<EOF with equations: math_image_uri = "gs://cloud-training/OCBL447/gemini-app/images/math_eqn.jpg" math_image_url = "https://storage.googleapis.com/"+math_image_uri.split("gs://")[1] math_image_img = Part.from_uri(math_image_uri,mime_type="image/jpeg") st.image(math_image_url,width=350, caption="Image of a math equation") st.markdown(f""" Ask questions about the math equation as follows: - Extract the formula. - What is the symbol right before Pi? What does it mean? - Is this a famous formula? Does it have a name? """) prompt = """Follow the instructions. Surround math expressions with $. Use a table with a row for each instruction and its result. INSTRUCTIONS: - Extract the formula. - What is the symbol right before Pi? What does it mean? - Is this a famous formula? Does it have a name? """ tab1, tab2 = st.tabs(["Response", "Prompt"]) math_image_description = st.button("Generate answers", key="math_image_description") with tab1: if math_image_description and prompt: with st.spinner("Generating answers for formula using Gemini..."): response = get_gemini_pro_vision_response(multimodal_model_pro, [math_image_img, prompt]) st.markdown(response) logging.info(response) with tab2: st.write("Prompt used:") st.text(prompt) EOF 上面的代码构建了 Math reasoning(数学推理)标签页的界面。结合使用数学方程的图片和相应文本,提示模型生成方程的答案及其他特征。
测试应用 - Image Playground(图片园地) - Math reasoning(数学推理)标签页
-
使用本实验前面的步骤中提供的命令运行应用。
-
如需在浏览器中启动应用首页,请点击 Cloud Shell 菜单栏中的网页预览,然后点击在端口 8080 上预览。
-
点击 Image Playground(图片园地),然后点击 Math reasoning(数学推理)。
该标签页会显示包含数学方程的图片。
-
点击 Generate answers(生成答案)。
-
查看 Gemini 1.0 Pro Vision 模型提供的回答。
回答包含在模型提示中提供的问题的答案。
-
在 Cloud Shell 窗口中,结束应用并按下 Ctrl+C 返回命令提示符。
如需验证是否已完成以下目标,请点击检查我的进度:
任务 10. 生成视频园地
在此任务中,您将使用 Gemini 1.0 Pro Vision 模型来处理视频,并根据提供给模型的视频来生成标签和信息。
开发 tab4 - Video Playground(视频园地)
Gemini 1.0 Pro Vision 模型还可以提供有关视频内容的描述。在此子任务中,您将实现 Video Playground(视频园地)标签页的代码,以及与模型交互以生成视频描述的代码。
-
如需编写在应用界面中呈现 Video Playground(视频园地)标签页的代码,请运行以下命令:
cat > ~/gemini-app/app_tab4.py <<EOF import streamlit as st from vertexai.preview.generative_models import GenerativeModel, Part from response_utils import * import logging # render the Video Playground tab with multiple child tabs def render_video_playground_tab(multimodal_model_pro: GenerativeModel): st.write("Using Gemini 1.0 Pro Vision - Multimodal model") video_desc, video_tags, video_highlights, video_geoloc = st.tabs(["Video description", "Video tags", "Video highlights", "Video geolocation"]) with video_desc: video_desc_uri = "gs://cloud-training/OCBL447/gemini-app/videos/mediterraneansea.mp4" video_desc_url = "https://storage.googleapis.com/"+video_desc_uri.split("gs://")[1] video_desc_vid = Part.from_uri(video_desc_uri, mime_type="video/mp4") st.video(video_desc_url) st.write("Generate a description of the video.") prompt = """Describe what is happening in the video and answer the following questions: \n - What am I looking at? - Where should I go to see it? - What are other top 5 places in the world that look like this? """ tab1, tab2 = st.tabs(["Response", "Prompt"]) video_desc_description = st.button("Generate video description", key="video_desc_description") with tab1: if video_desc_description and prompt: with st.spinner("Generating video description"): response = get_gemini_pro_vision_response(multimodal_model_pro, [prompt, video_desc_vid]) st.markdown(response) logging.info(response) with tab2: st.write("Prompt used:") st.write(prompt,"\n","{video_data}") EOF -
查看
app_tab4.py文件中的内容:cat ~/gemini-app/app_tab4.py render_video_playground_tab函数可以构建界面,使应用用户能够与 Gemini 1.0 Pro Vision 模型进行交互。该函数可以在界面中创建一系列标签页:“Video description”(视频描述)、“Video tags”(视频标签)、“Video highlights”(视频重要信息)、“Video geolocation”(视频地理定位)。您将在本实验的后续任务中编写其余标签页的代码。Video description(视频描述)标签页使用提示和视频来生成视频描述,并识别与视频中的地点相似的其他地点。
修改应用主入口点
-
如需为应用添加 tab4,请运行以下命令:
cat >> ~/gemini-app/app.py <<EOF from app_tab4 import render_video_playground_tab with tab4: render_video_playground_tab(multimodal_model_pro) EOF
测试应用 - Video Playground(视频园地)标签页
-
使用本实验前面的步骤中提供的命令运行应用。
-
如需在浏览器中启动应用首页,请点击 Cloud Shell 菜单栏中的网页预览,然后点击在端口 8080 上预览。
-
点击 Video Playground(视频园地),然后点击 Video description(视频描述)。
-
该标签页将显示关于某个地点的视频。点击播放视频。
-
点击 Generate video description(生成视频描述)。
-
查看 Gemini 1.0 Pro Vision 模型提供的回答。
回答包含对该地点以及其他 5 个相似地点的描述。
-
在 Cloud Shell 窗口中,结束应用并按下 Ctrl+C 返回命令提示符。
如需验证是否已完成以下目标,请点击检查我的进度:
任务 11. 生成视频标签
在此任务中,您将使用 Gemini 1.0 Pro Vision 模型根据视频生成标签。
更新 Video Playground(视频园地)标签页 - Video tags(视频标签)
-
如需在应用界面的 Video Playground(视频园地)标签页中实现 Video tags(视频标签)标签页的代码,请运行以下命令:
cat >> ~/gemini-app/app_tab4.py <<EOF with video_tags: video_tags_uri = "gs://cloud-training/OCBL447/gemini-app/videos/photography.mp4" video_tags_url = "https://storage.googleapis.com/"+video_tags_uri.split("gs://")[1] video_tags_vid = Part.from_uri(video_tags_uri, mime_type="video/mp4") st.video(video_tags_url) st.write("Generate tags for the video.") prompt = """Answer the following questions using the video only: 1. What is in the video? 2. What objects are in the video? 3. What is the action in the video? 4.Provide 5 best tags for this video? Write the answer in table format with the questions and answers in columns. """ tab1, tab2 = st.tabs(["Response", "Prompt"]) video_tags_desc = st.button("Generate video tags", key="video_tags_desc") with tab1: if video_tags_desc and prompt: with st.spinner("Generating video tags"): response = get_gemini_pro_vision_response(multimodal_model_pro, [prompt, video_tags_vid]) st.markdown(response) logging.info(response) with tab2: st.write("Prompt used:") st.write(prompt,"\n","{video_data}") EOF 上面的代码构建了 Video tags(视频标签)标签页的界面。结合使用视频和相应文本,提示模型生成标签并回答有关视频中场景的问题。
测试应用 - Video Playground(视频园地) - Video tags(视频标签)标签页
-
使用本实验前面的步骤中提供的命令运行应用。
-
如需在浏览器中启动应用首页,请点击 Cloud Shell 菜单栏中的网页预览,然后点击在端口 8080 上预览。
-
点击 Video Playground(视频园地),然后点击 Video tags(视频标签)。
-
该标签页将显示用于提示模型的视频。点击播放视频。
-
点击 Generate video tags(生成视频标签)。
-
查看 Gemini 1.0 Pro Vision 模型提供的回答。
回答包含在模型提示中提供的问题的答案。问题和答案以表格格式输出,并按要求包含 5 个标签。
-
在 Cloud Shell 窗口中,结束应用并按下 Ctrl+C 返回命令提示符。
如需验证是否已完成以下目标,请点击检查我的进度:
任务 12. 生成视频重要信息
在此任务中,您将使用 Gemini 1.0 Pro Vision 模型根据视频来生成重要信息,其中包括有关视频中呈现的对象、人物和背景的信息。
更新 Video Playground(视频园地)标签页 - Video highlights(视频重要信息)
-
如需在应用界面的 Video Playground(视频园地)标签页中实现 Video highlights(视频重要信息)标签页的代码,请运行以下命令:
cat >> ~/gemini-app/app_tab4.py <<EOF with video_highlights: video_highlights_uri = "gs://cloud-training/OCBL447/gemini-app/videos/pixel8.mp4" video_highlights_url = "https://storage.googleapis.com/"+video_highlights_uri.split("gs://")[1] video_highlights_vid = Part.from_uri(video_highlights_uri, mime_type="video/mp4") st.video(video_highlights_url) st.write("Generate highlights for the video.") prompt = """Answer the following questions using the video only: What is the profession of the girl in this video? Which features of the phone are highlighted here? Summarize the video in one paragraph. Write these questions and their answers in table format. """ tab1, tab2 = st.tabs(["Response", "Prompt"]) video_highlights_description = st.button("Generate video highlights", key="video_highlights_description") with tab1: if video_highlights_description and prompt: with st.spinner("Generating video highlights"): response = get_gemini_pro_vision_response(multimodal_model_pro, [prompt, video_highlights_vid]) st.markdown(response) logging.info(response) with tab2: st.write("Prompt used:") st.write(prompt,"\n","{video_data}") EOF 上面的代码构建了 Video highlights(视频重要信息)标签页的界面。结合使用视频和相应文本,提示模型根据视频生成重要信息。
测试应用 - Video playground(视频园地) - Video highlights(视频重要信息)标签页
-
使用本实验前面的步骤中提供的命令运行应用。
-
如需在浏览器中启动应用首页,请点击 Cloud Shell 菜单栏中的网页预览,然后点击在端口 8080 上预览。
-
点击 Video Playground(视频园地),然后点击 Video highlights(视频重要信息)。
-
该标签页将显示用于提示模型的视频。点击播放视频。
-
点击 Generate video highlights(生成视频重要信息)。
-
查看 Gemini 1.0 Pro Vision 模型提供的回答。
回答包含在模型提示中提供的问题的答案。问题和答案以表格格式输出,并列出视频中的要素,例如女孩的职业、使用的手机功能等。回答还包含视频所呈现的场景的摘要描述。
-
在 Cloud Shell 窗口中,结束应用并按下 Ctrl+C 返回命令提示符。
如需验证是否已完成以下目标,请点击检查我的进度:
任务 13. 生成视频位置信息
在此任务中,您将使用 Gemini 1.0 Pro Vision 模型来确定视频所呈现的场景发生的位置。
更新 Video Playground(图片园地)标签页 - Video geolocation(视频地理定位)
-
如需在应用界面的 Video Playground(视频园地)标签页中实现 Video geolocation(视频地理定位)标签页的代码,请运行以下命令:
cat >> ~/gemini-app/app_tab4.py <<EOF with video_geoloc: video_geolocation_uri = "gs://cloud-training/OCBL447/gemini-app/videos/bus.mp4" video_geolocation_url = "https://storage.googleapis.com/"+video_geolocation_uri.split("gs://")[1] video_geolocation_vid = Part.from_uri(video_geolocation_uri, mime_type="video/mp4") st.video(video_geolocation_url) st.markdown("""Answer the following questions from the video: - What is this video about? - How do you know which city it is? - What street is this? - What is the nearest intersection? """) prompt = """Answer the following questions using the video only: What is this video about? How do you know which city it is? What street is this? What is the nearest intersection? Answer the following questions using a table format with the questions and answers as columns. """ tab1, tab2 = st.tabs(["Response", "Prompt"]) video_geolocation_description = st.button("Generate", key="video_geolocation_description") with tab1: if video_geolocation_description and prompt: with st.spinner("Generating location information"): response = get_gemini_pro_vision_response(multimodal_model_pro, [prompt, video_geolocation_vid]) st.markdown(response) logging.info(response) with tab2: st.write("Prompt used:") st.write(prompt,"\n","{video_data}") EOF 上面的代码构建了 Video geolocation(视频地理定位)标签页的界面。结合使用视频和相应文本,提示模型回答有关视频的问题,其中包括有关视频所呈现实体的位置信息。
测试应用 - Video playground(视频园地) - Video geolocation(视频地理定位)标签页
-
使用本实验前面的步骤中提供的命令运行应用。
-
如需在浏览器中启动应用首页,请点击 Cloud Shell 菜单栏中的网页预览,然后点击在端口 8080 上预览。
-
点击 Video Playground(视频园地),然后点击 Video geolocation(视频地理定位)。
-
该标签页将显示用于提示模型的视频。点击播放视频。
-
点击生成。
-
查看 Gemini 1.0 Pro Vision 模型提供的回答。
回答包含在模型提示中提供的问题的答案。问题和答案以表格格式输出,并按要求包含位置信息。
-
在 Cloud Shell 窗口中,结束应用并按下 Ctrl+C 返回命令提示符。
如需验证是否已完成以下目标,请点击检查我的进度:
任务 14. 将应用部署到 Cloud Run
您已经在本地测试了该应用,接下来可以将该应用部署到 Google Cloud 上的 Cloud Run 以供其他人使用。Cloud Run 是一个托管式计算平台,可让您直接在 Google 可伸缩的基础设施上运行容器。
设置环境
-
确保您位于
app目录:cd ~/gemini-app -
验证是否已设置 PROJECT_ID 和 REGION 环境变量:
echo "PROJECT_ID=${PROJECT_ID}" echo "REGION=${REGION}" -
如果未设置这些环境变量,请运行以下命令设置:
PROJECT_ID=$(gcloud config get-value project) REGION={{{project_0.default_region|set at lab start}}} echo "PROJECT_ID=${PROJECT_ID}" echo "REGION=${REGION}" -
为服务和工件仓库设置环境变量:
SERVICE_NAME='gemini-app-playground' # Name of your Cloud Run service. AR_REPO='gemini-app-repo' # Name of your repository in Artifact Registry that stores your application container image. echo "SERVICE_NAME=${SERVICE_NAME}" echo "AR_REPO=${AR_REPO}"
创建 Docker 仓库
-
如需在 Artifact Registry 中创建仓库,请运行以下命令:
gcloud artifacts repositories create "$AR_REPO" --location="$REGION" --repository-format=Docker Artifact Registry 是一项 Google Cloud 服务,可让用户在一个位置存储并管理自己的软件包和 Docker 容器映像。 -
针对仓库设置身份验证:
gcloud auth configure-docker "$REGION-docker.pkg.dev"
构建容器映像
我们将使用 Dockerfile 为应用构建容器映像。Dockerfile 是一个文本文档,其中包含用户可以在命令行上调用以组建容器映像的所有命令。它与用于构建和运行容器映像的容器平台 Docker 搭配使用。
-
如需创建
Dockerfile,请运行以下命令:cat > ~/gemini-app/Dockerfile <<EOF FROM python:3.8 EXPOSE 8080 WORKDIR /app COPY . ./ RUN pip install -r requirements.txt ENTRYPOINT ["streamlit", "run", "app.py", "--server.port=8080", "--server.address=0.0.0.0"] EOF -
如需为应用构建容器映像,请运行以下命令:
gcloud builds submit --tag "$REGION-docker.pkg.dev/$PROJECT_ID/$AR_REPO/$SERVICE_NAME" gcloud builds submit 命令使用 Cloud Build 提交 build。如果命令中指定了“tag”标志,Cloud Build 将使用 Dockerfile 根据源目录中的应用文件来构建容器映像。 Cloud Build 是一项根据您在 Google Cloud 上指定的规范来执行构建的服务,可生成 Docker 容器或 Java 软件包 (JAR) 等工件。
等待命令运行完毕后,再继续下一步。
在 Cloud Run 上部署并测试应用
最后一项任务是使用所构建并推送到 Artifact Registry 中仓库的映像,将服务部署到 Cloud Run。
-
如需将应用部署到 Cloud Run,请运行以下命令:
gcloud run deploy "$SERVICE_NAME" \ --port=8080 \ --image="$REGION-docker.pkg.dev/$PROJECT_ID/$AR_REPO/$SERVICE_NAME" \ --allow-unauthenticated \ --region=$REGION \ --platform=managed \ --project=$PROJECT_ID \ --set-env-vars=PROJECT_ID=$PROJECT_ID,REGION=$REGION -
系统部署服务后,上一条命令的输出中会生成该服务的网址。如需在 Cloud Run 上测试应用,请在单独的浏览器标签页或窗口中访问该网址。
-
选择您要测试的应用功能。该应用将提示 Vertex AI Gemini API 生成并显示回答。
如需验证是否已完成以下目标,请点击检查我的进度:
结束实验
完成实验后,请点击结束实验。Qwiklabs 会移除您使用过的资源并为您清理帐号。
系统会提示您为实验体验评分。请选择相应的评分星级,输入评论,然后点击提交。
星级的含义如下:
- 1 颗星 = 非常不满意
- 2 颗星 = 不满意
- 3 颗星 = 一般
- 4 颗星 = 满意
- 5 颗星 = 非常满意
如果您不想提供反馈,可以关闭该对话框。
如果要留言反馈、提出建议或做出更正,请使用支持标签页。
恭喜!
在本实验中,您完成了以下操作:
- 使用 Streamlit 框架开发 Python 应用。
- 安装 Python 版 Vertex AI SDK。
- 使用 Vertex AI Gemini API 开发与 Gemini 1.0 Pro 模型 (gemini-pro) 交互的代码。
- 使用文本提示模型生成故事和营销活动。
- 使用 Vertex AI Gemini API 开发与 Gemini 1.0 Pro Vision 模型 (gemini-pro-vision) 交互的代码。
- 使用文本、图片和视频提示模型处理并提取图片和视频中的信息。
- 在 Cloud Run 上部署并测试应用。
后续步骤/了解详情
版权所有 2023 Google LLC 保留所有权利。Google 和 Google 徽标是 Google LLC 的商标。其他所有公司名称和产品名称可能是其各自相关公司的商标。

