Checkpoints
Create an integration
/ 20
View and modify an existing integration
/ 20
Configure Approval task
/ 10
Check recipient email
/ 30
Build and Configure an Integration using Application Integration
- GSP1253
- Overview
- Setup and requirements
- Part 1: Design and create an Integration
- Task 1. Create an integration
- Task 2. View and modify an existing integration
- Part 2: Add advanced features
- Task 1. Configure Approval task
- Task 2. Check recipient email
- Task 3. Conditionally call the corresponding provisioning system
- Task 4. (Optional) Test the Integration workflow
- Congratulations
GSP1253

Overview
Application Integration is an Integration-Platform-as-a-Service (iPaaS) solution on Google Cloud that offers a comprehensive set of core integration tools to connect and manage the applicatons and data required to support various business operations.
This hands-on lab introduces you to the core concepts and functionalities of Application Integration. You will learn how to build an integration using recommended best practices. With Application Integration's out-of-the-box triggers, configurable tasks, and friendly user interface, you can create enterprise-level integrations with ease.
What you'll learn
In this lab you will learn how to do the following:
Part 1: Design and create an integration
- Create an integration that subscribs to a Pub/Sub topic and connects to an inventory database
- Update the inventory db based on the incoming message
- Add a Trigger and use the Test feature verify the integration functionality
- Debug integration invocations using Logs
Part 2: Add advanced features
- Implement approval logic to resume integration workflow based on the order information
- Conditionally call the corresponding provisioning system based on the product ordered
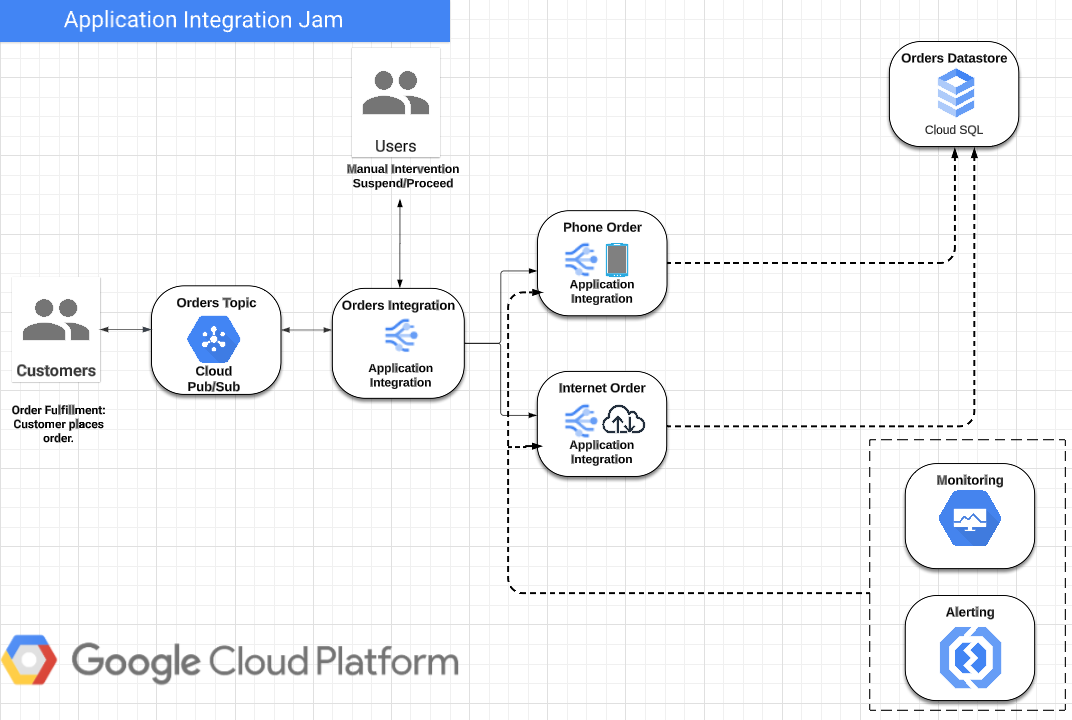
You will incrementally build out the below solution. There are a total of two parts to this lab, each focusing on different topics. Along the way, you will get hands-on experience creating connectors, data mapping, using conditional tasks, and more.
Setup and requirements
Before you click the Start Lab button
Read these instructions. Labs are timed and you cannot pause them. The timer, which starts when you click Start Lab, shows how long Google Cloud resources will be made available to you.
This hands-on lab lets you do the lab activities yourself in a real cloud environment, not in a simulation or demo environment. It does so by giving you new, temporary credentials that you use to sign in and access Google Cloud for the duration of the lab.
To complete this lab, you need:
- Access to a standard internet browser (Chrome browser recommended).
- Time to complete the lab---remember, once you start, you cannot pause a lab.
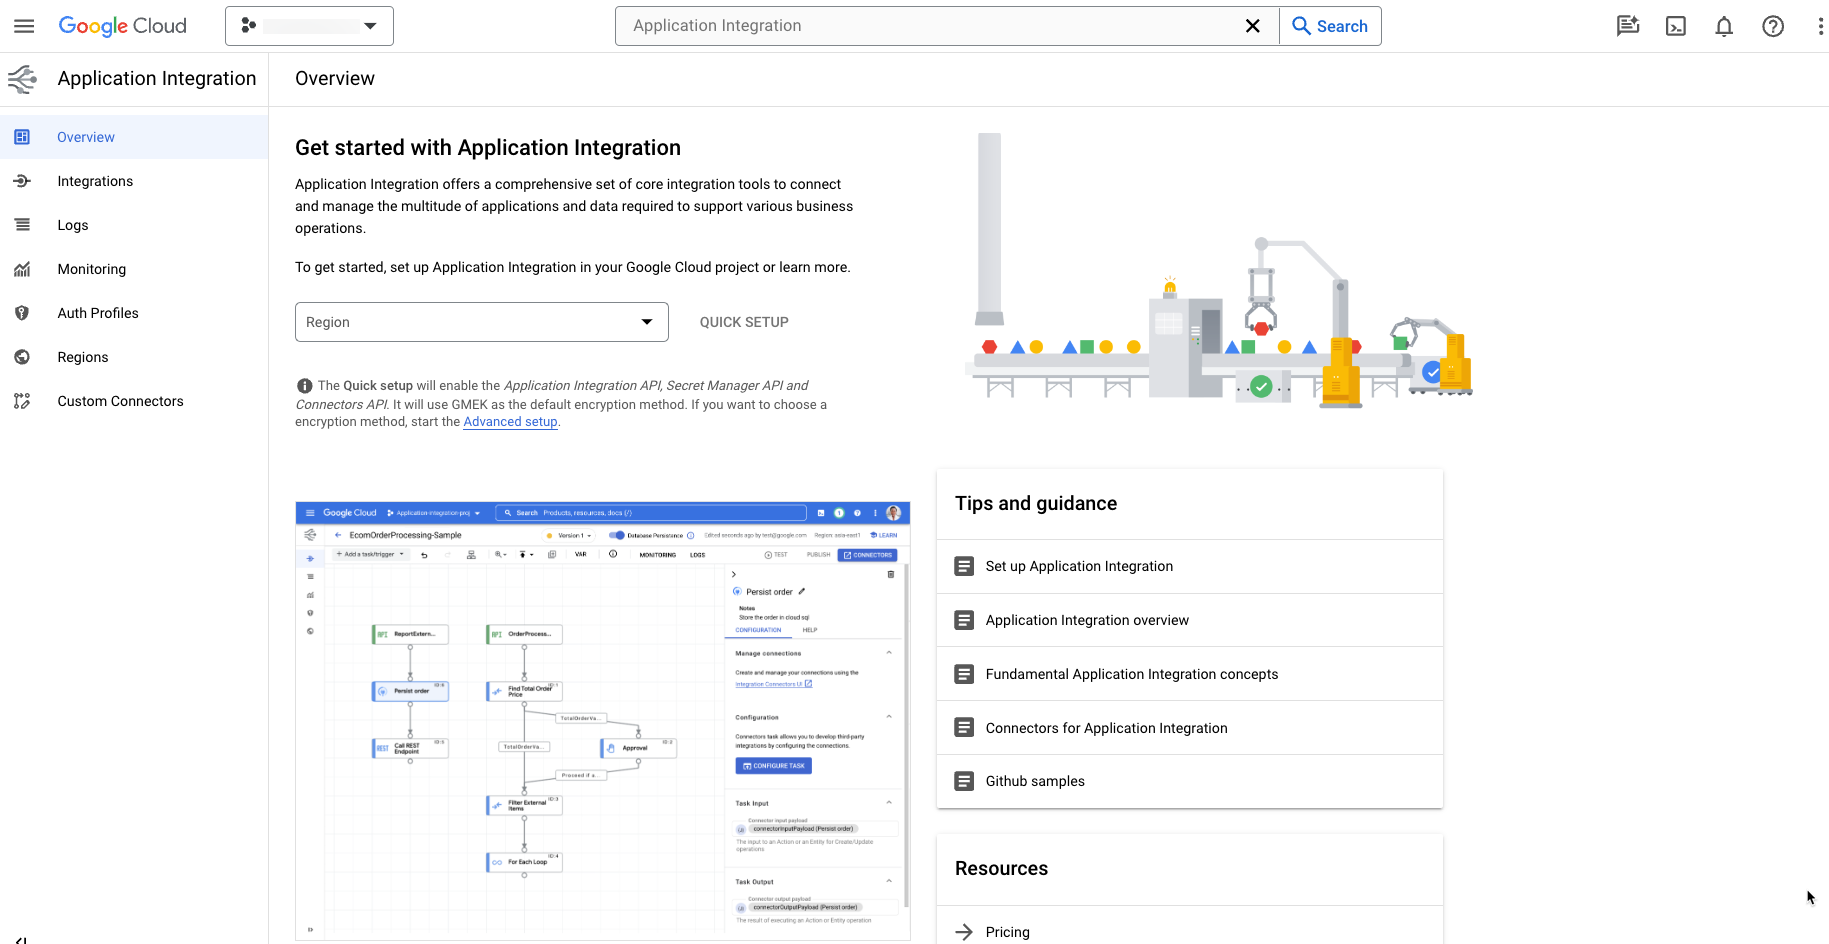
Learn more with Application Integration
While the lab is provisioning, take a look the Application Integration documentation, which explains the various fundamental concepts of Application Integration used throughout this lab.
How to start your lab and sign in to the Google Cloud console
-
Click the Start Lab button. If you need to pay for the lab, a pop-up opens for you to select your payment method. On the left is the Lab Details panel with the following:
- The Open Google Cloud console button
- Time remaining
- The temporary credentials that you must use for this lab
- Other information, if needed, to step through this lab
-
Click Open Google Cloud console (or right-click and select Open Link in Incognito Window if you are running the Chrome browser).
The lab spins up resources, and then opens another tab that shows the Sign in page.
Tip: Arrange the tabs in separate windows, side-by-side.
Note: If you see the Choose an account dialog, click Use Another Account. -
If necessary, copy the Username below and paste it into the Sign in dialog.
{{{user_0.username | "Username"}}} You can also find the Username in the Lab Details panel.
-
Click Next.
-
Copy the Password below and paste it into the Welcome dialog.
{{{user_0.password | "Password"}}} You can also find the Password in the Lab Details panel.
-
Click Next.
Important: You must use the credentials the lab provides you. Do not use your Google Cloud account credentials. Note: Using your own Google Cloud account for this lab may incur extra charges. -
Click through the subsequent pages:
- Accept the terms and conditions.
- Do not add recovery options or two-factor authentication (because this is a temporary account).
- Do not sign up for free trials.
After a few moments, the Google Cloud console opens in this tab.

Open Application Integration
- Navigate to the Application Integration page by typing Application Integration into the search bar at the top of the page.
- Click the search result, Application Integration.

- You will see the Application Integration console as below:
Lab Scenario
In this lab you manage an inventory database. As orders are placed, an Integration is triggered that updates the inventory database.
- If the order size exceeds a certain threshold, it waits for user approval before resuming the integration.
- If the order is under that threshold it auto-resumes to the next step of calling the corresponding provisioning system based on the product ordered.
Part 1: Design and create an Integration
Persona: IPaaS Integration Developer
Use Case
You have a requirement to design and create an Integration flow that supports the business by using the Google Cloud Application Integration platform.
How can Application Integration help?
With Application Integration, business organizations can:
- Configure and use integrations to connect enterprise applications like Salesforce, databases like MySQL, and event driven systems like Pub/Sub.
- Create long-running processes triggered by a variety of source data inputs.
- Invoke integrations in response to external events or on a customized schedule.
- Access and transform data payloads between applications into meaningful schema.
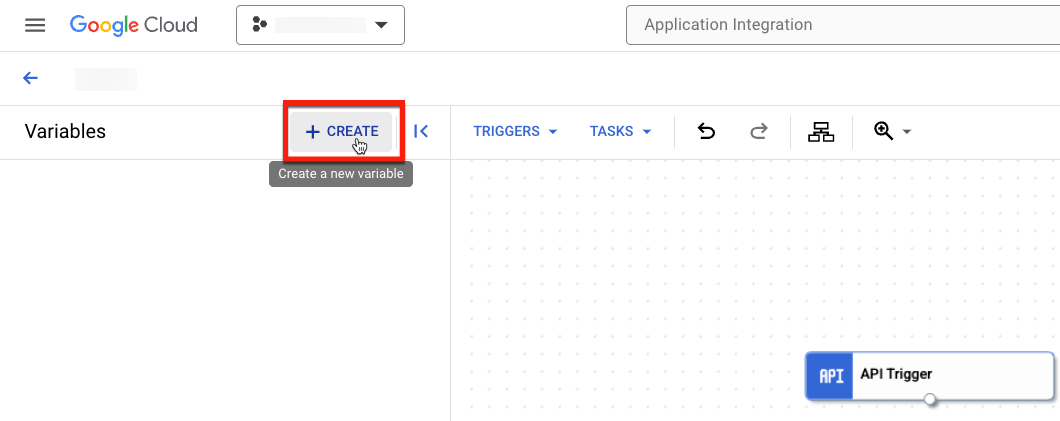
Task 1. Create an integration
- From the Navigation menu, click on Application Integration and select Integrations. You will see a list of existing integrations.
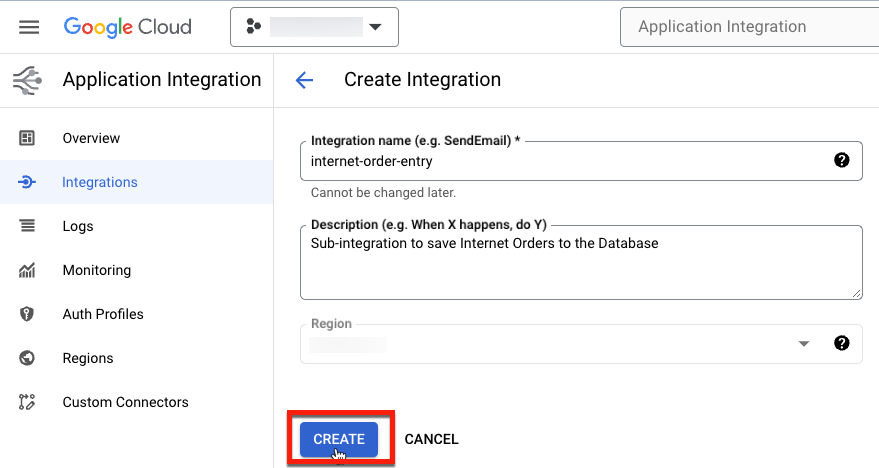
- Click on CREATE INTEGRATION.

- Fill in the details as below then click on CREATE.
- Integration name: internet-order-entry
- Description: Sub-Integration to save Internet Orders to the Database
- Region: From the dropdown list select the Region (Please use the Lab Region from Lab Setup)
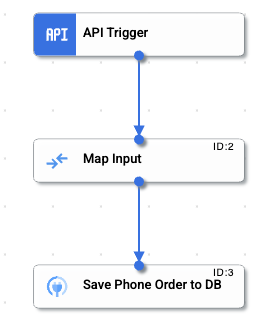
- Now that the internet-order-entry is open, click on Triggers, then select API from the dropdown list and drag it to the designer console.
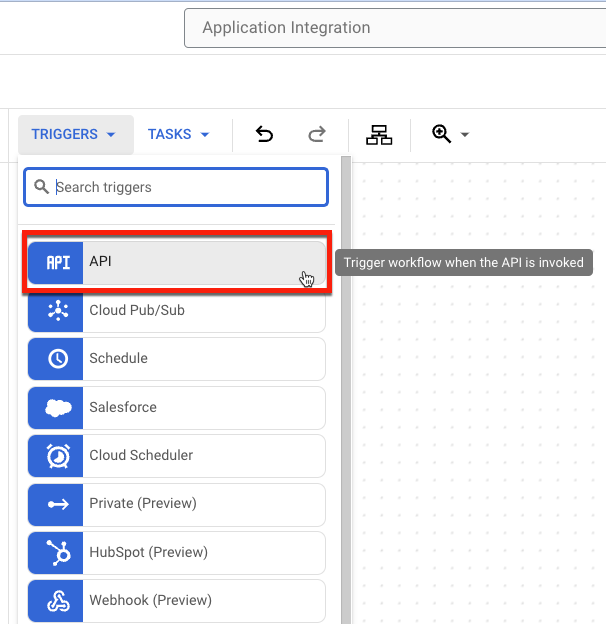
You should see API Trigger added to your integration designer console.

Add a variable
- Now create a new variable by clicking the CREATE button in the variables window.
- Enter the information provided below to create the new variable.
- Name: input
- Variable Type: Input to Integration
- Data Type: JSON
- Select Infer from a sample JSON payload and add the value
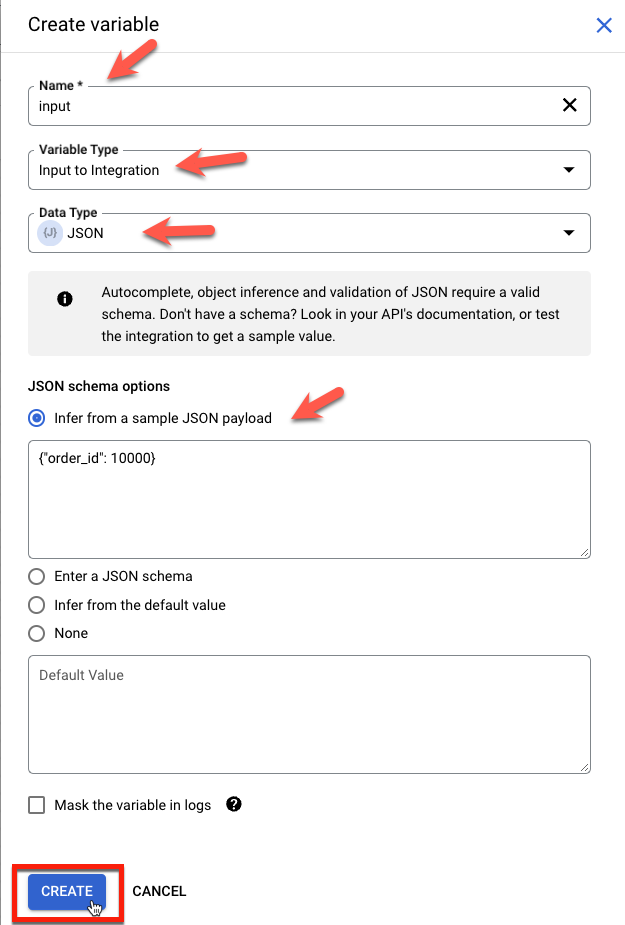
- Click Create.
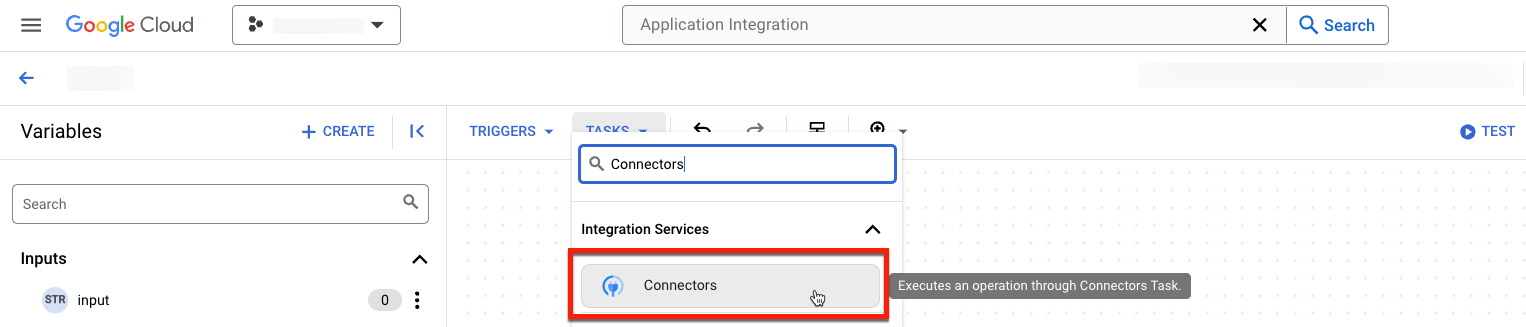
Add a Task
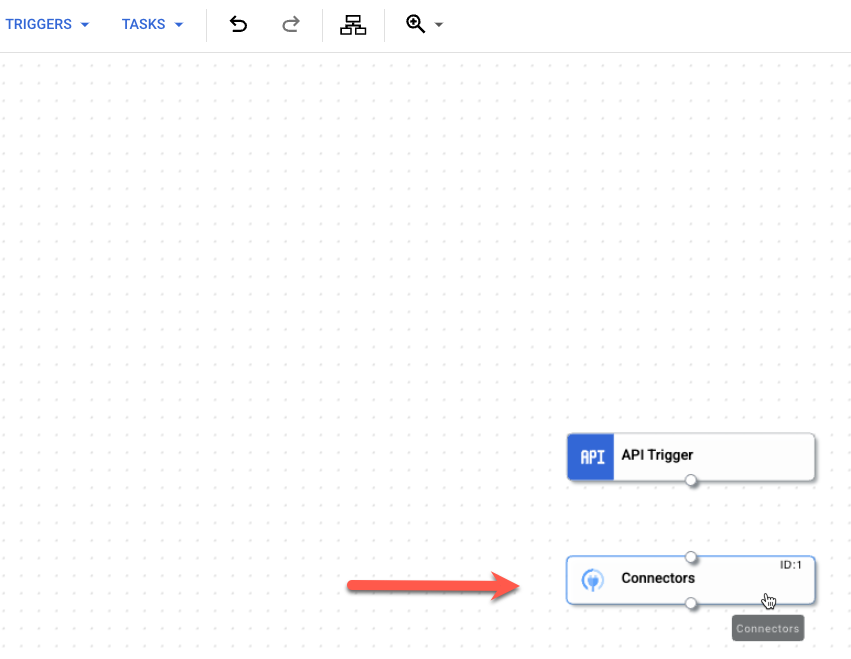
- Click on Tasks and search for Connectors. Once found, click and drag the connectors task to the Integration designer console.
- Place the Connectors block below the API Trigger block.
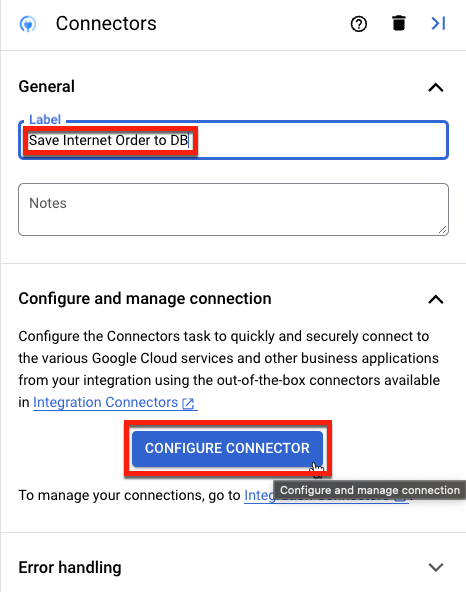
- On the Connectors panel change the Label name to Save Internet Order to DB. After updating the label click on Configure Connector.
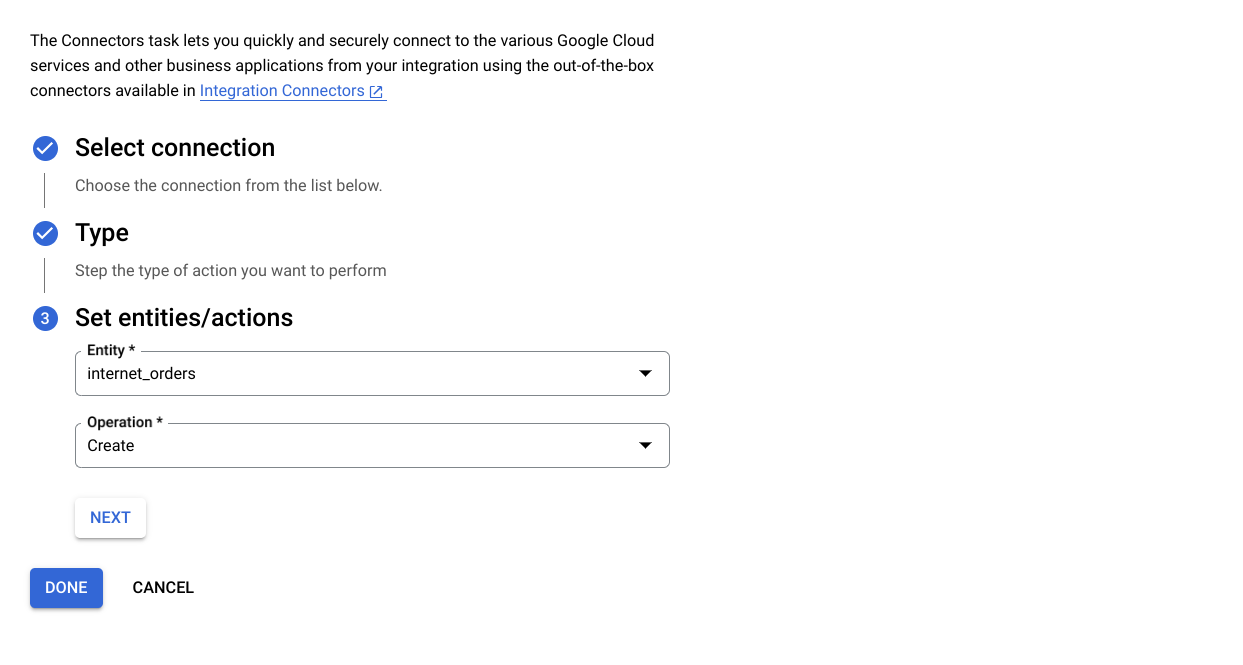
- Select the region from the dropdown list (Use the Lab Region from Lab Setup) and then choose cloudsql-mysql from the Connection list. Click Next.
- Under Type select Entities, and click Next.
- For Entity select internet_orders and for Operation select Create.
- Then click Next and Done.
- Click on Tasks and search for Data Mapping.
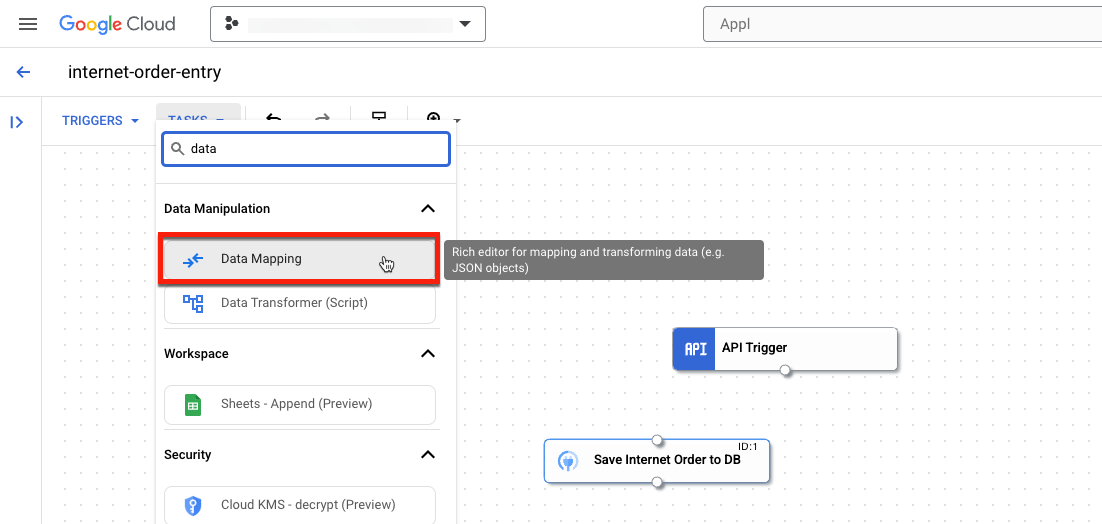
- Drag the Data Mapping block to the Integration designer console. Make sure you put it in between the
API Triggerand theDatabase connector.
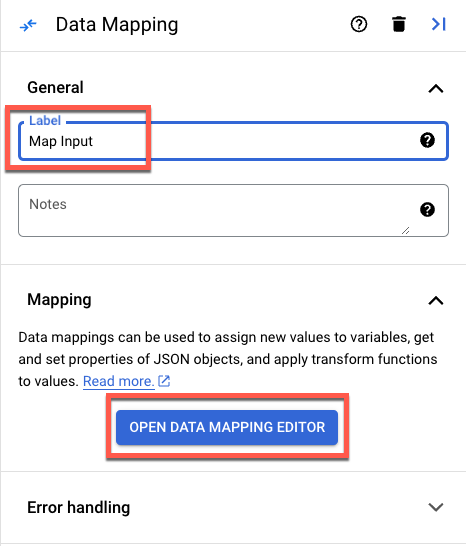
- On the Integration designer console, click on the Data Mapping task to open the mapping panel on the right.
- Change the Label name to Map Input and click the Open Data Mapping Editor button.
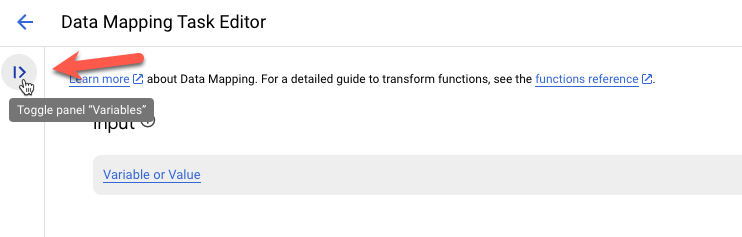
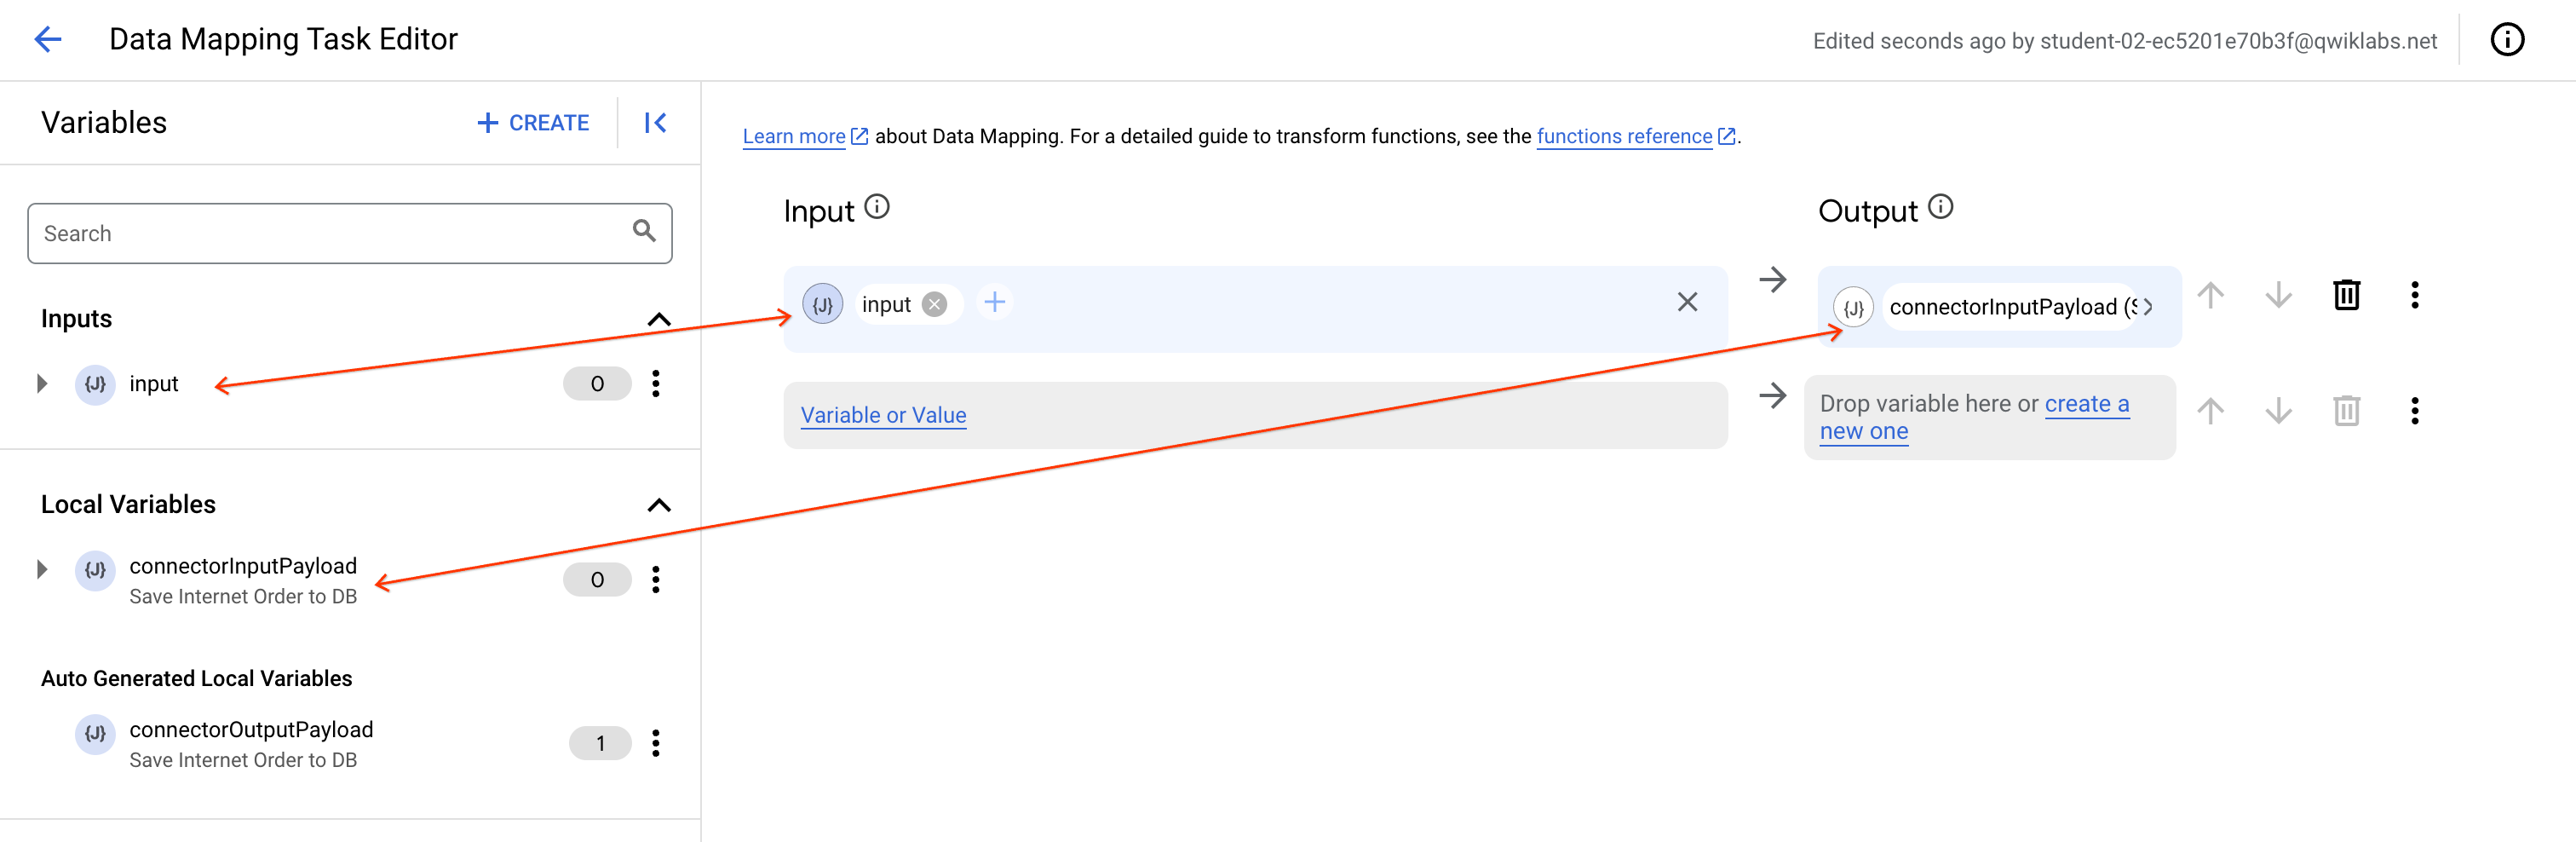
- In the Data Mapping Editor toggle the Variables panel. Once opened you will see a list of variables populated on the left.
- Select input and drag it to the Input section
- Select connectorInputPayload and drag it to the Output section.
-
Close the Data Mapping Editor.
-
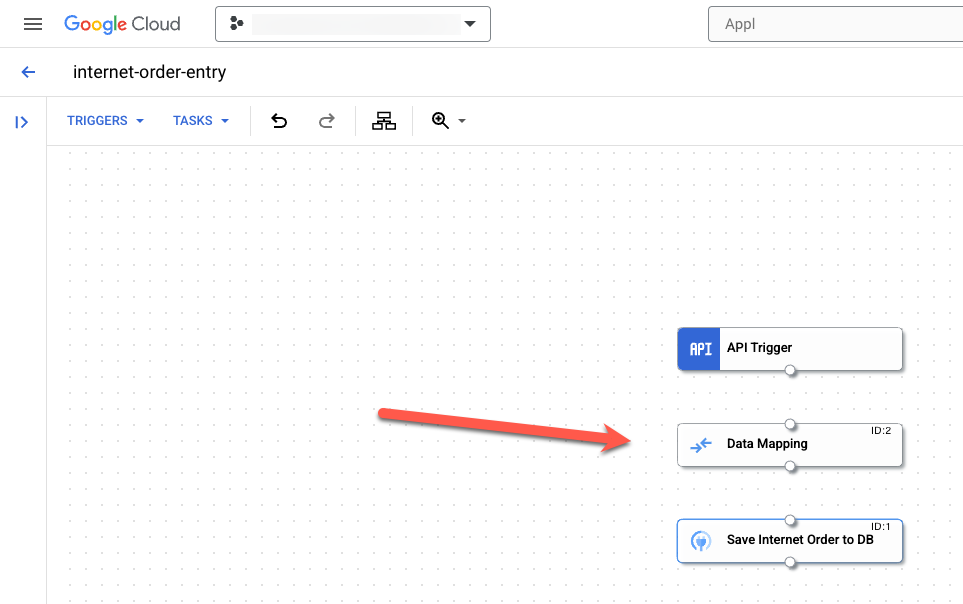
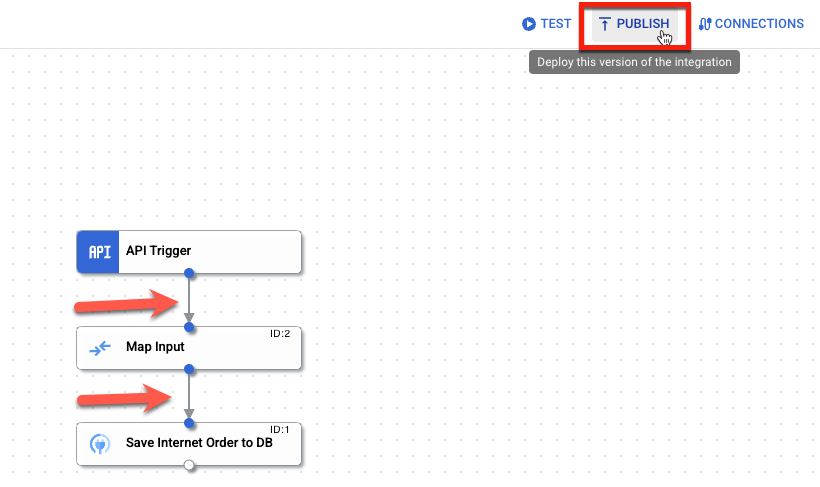
Now you need to pull forks by clicking on the empty circles in each block. Connect the API Trigger to the Map Input, the Map Input to the Orders DB. Once completed click Publish.
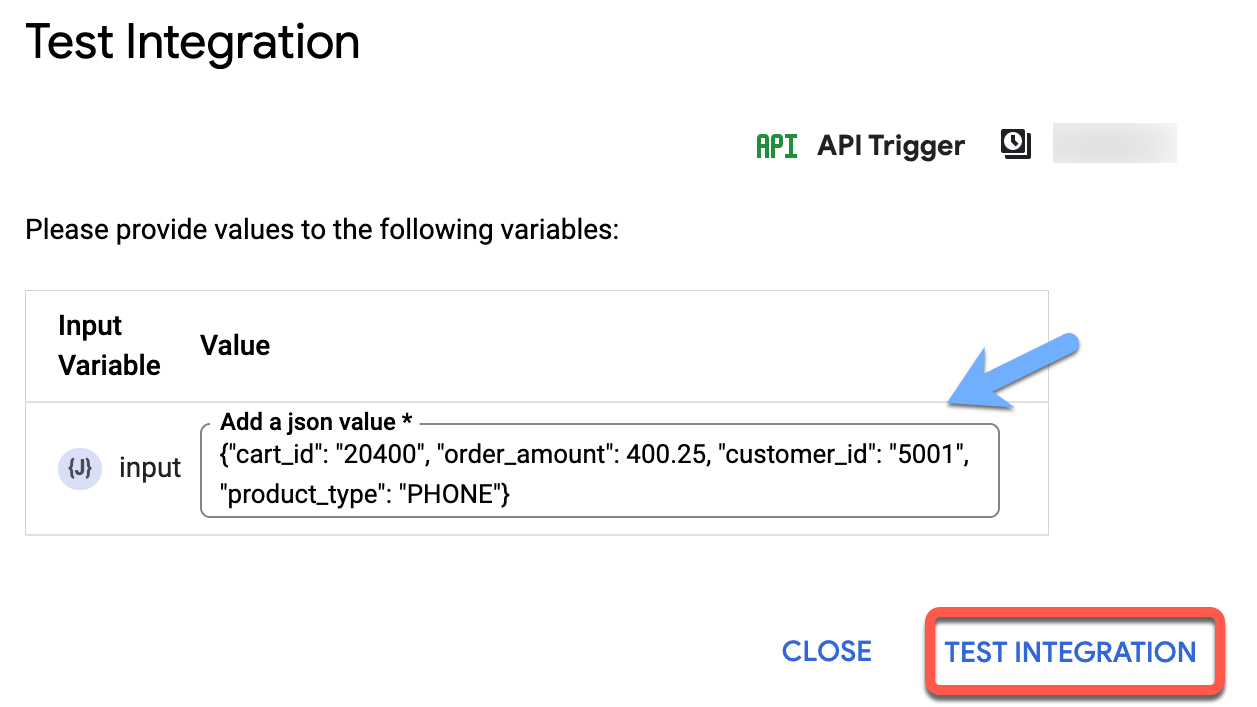
Test Integration
- Click on TEST and enter the sample JSON payload below as input:
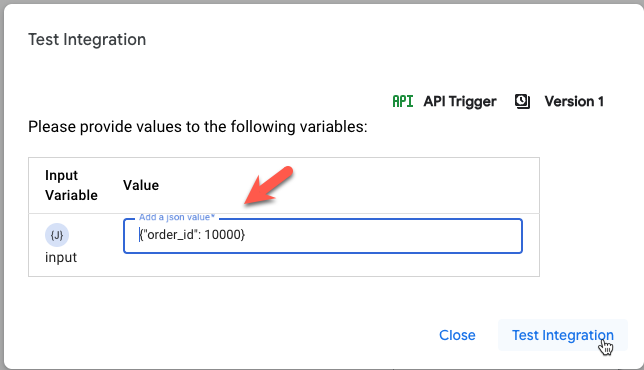
-
click TEST INTEGRATION.
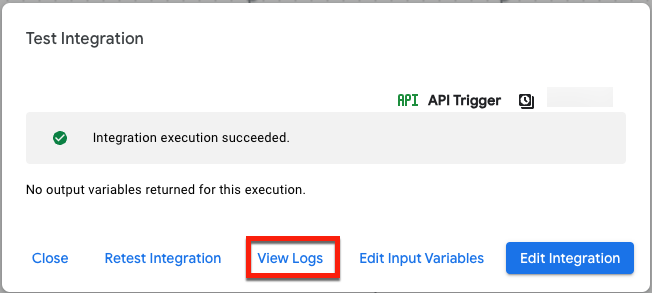
-
Click on VIEW LOGS to check logs.

- Open the logs by clicking the dropdown next to internet-order-entry.
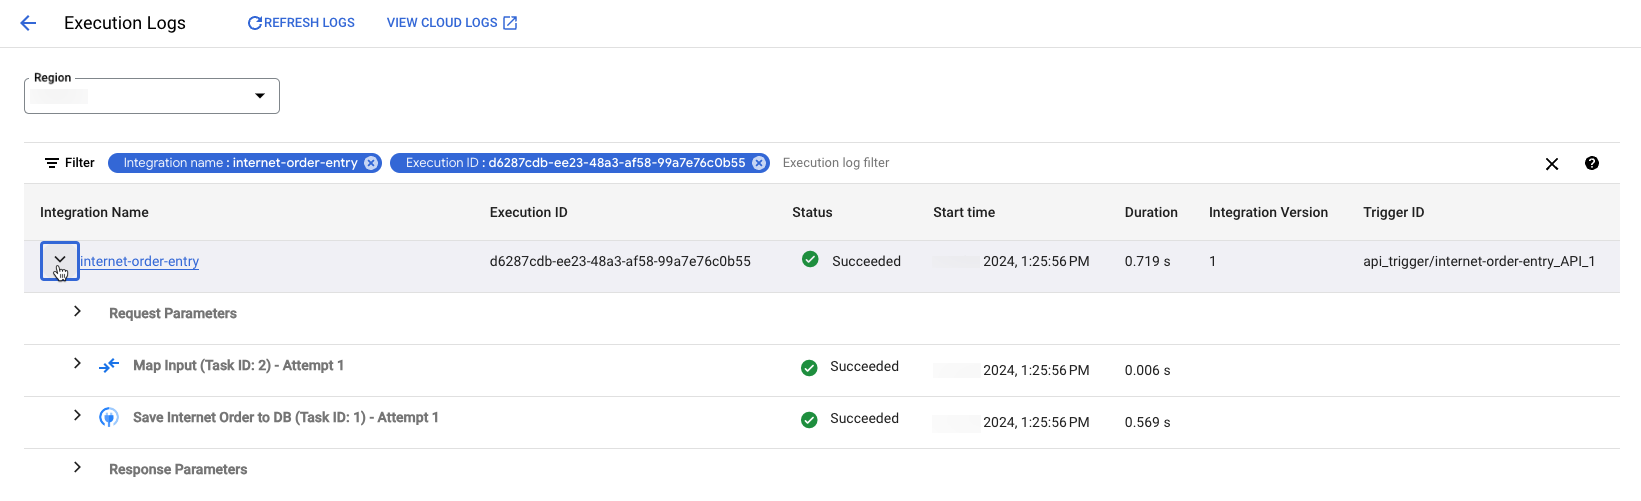
Validate that the integration has succeeded.
You've successfully created and configured an Integration. In the next step you will view and modify existing integrations.
Click Check my progress to verify your performed tasks.
Task 2. View and modify an existing integration
You are able to leverage other created integrations in a holistic integration design. Next, you will modify an exiting integration.
- Go back to the left navigation menu and select Integrations to see the list of existing integrations.
- Click to open the phone-order-entry. This integration is saving phone orders to the database.
- Click on TEST and enter the sample JSON payload below as input:
-
Click TEST INTEGRATION.
-
Click on VIEW LOGS to check logs. Validate that the phone-entry integration is working as expected.
-
Return to the Navigation menu select Integrations again to see the list of existing integrations.
-
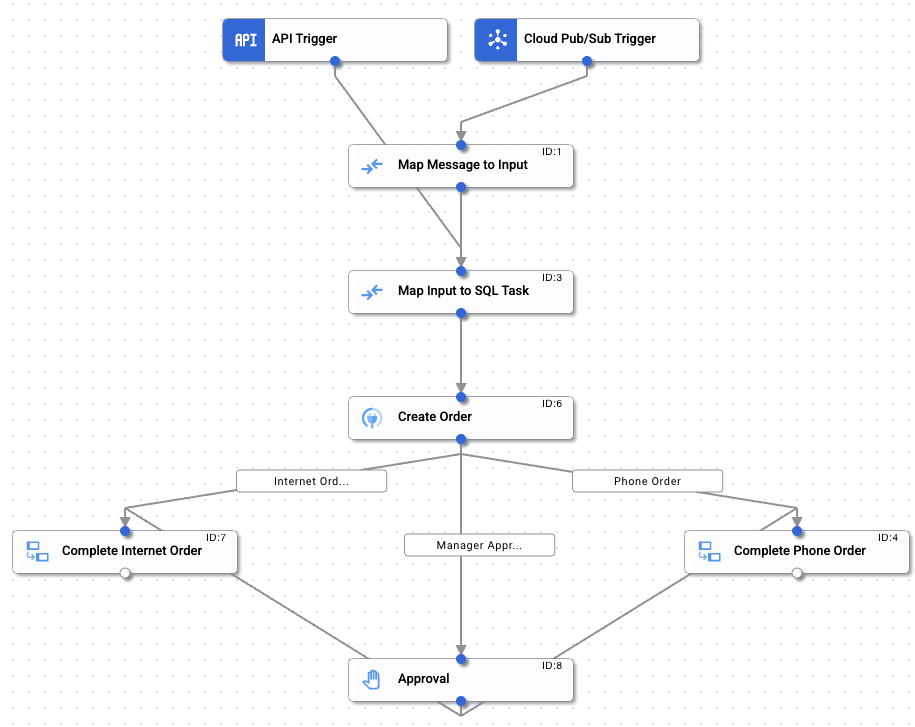
Click to open the order-entry. This integration is the main integration calling sub-integrations based on the order type. You will be modifying it to add some steps.
-
Click on Enable Editing on the top right.

- Click on Tasks and search for Call Integration. Pull the task out to the Integration designer console and drop next to the Complete Phone Order.

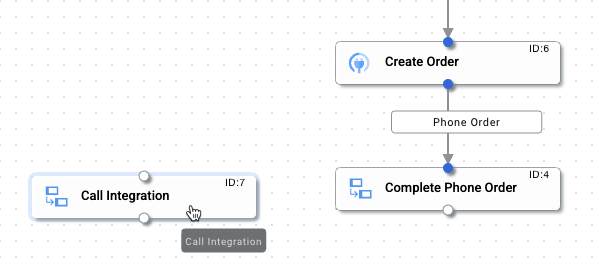
- Once completed, pull a fork from the Create Order task to the newly created Call Integration task.
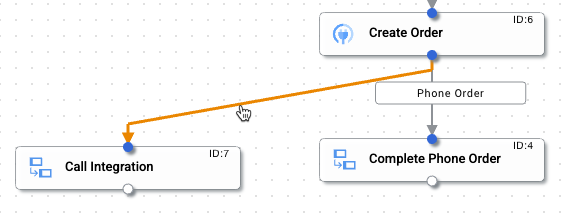
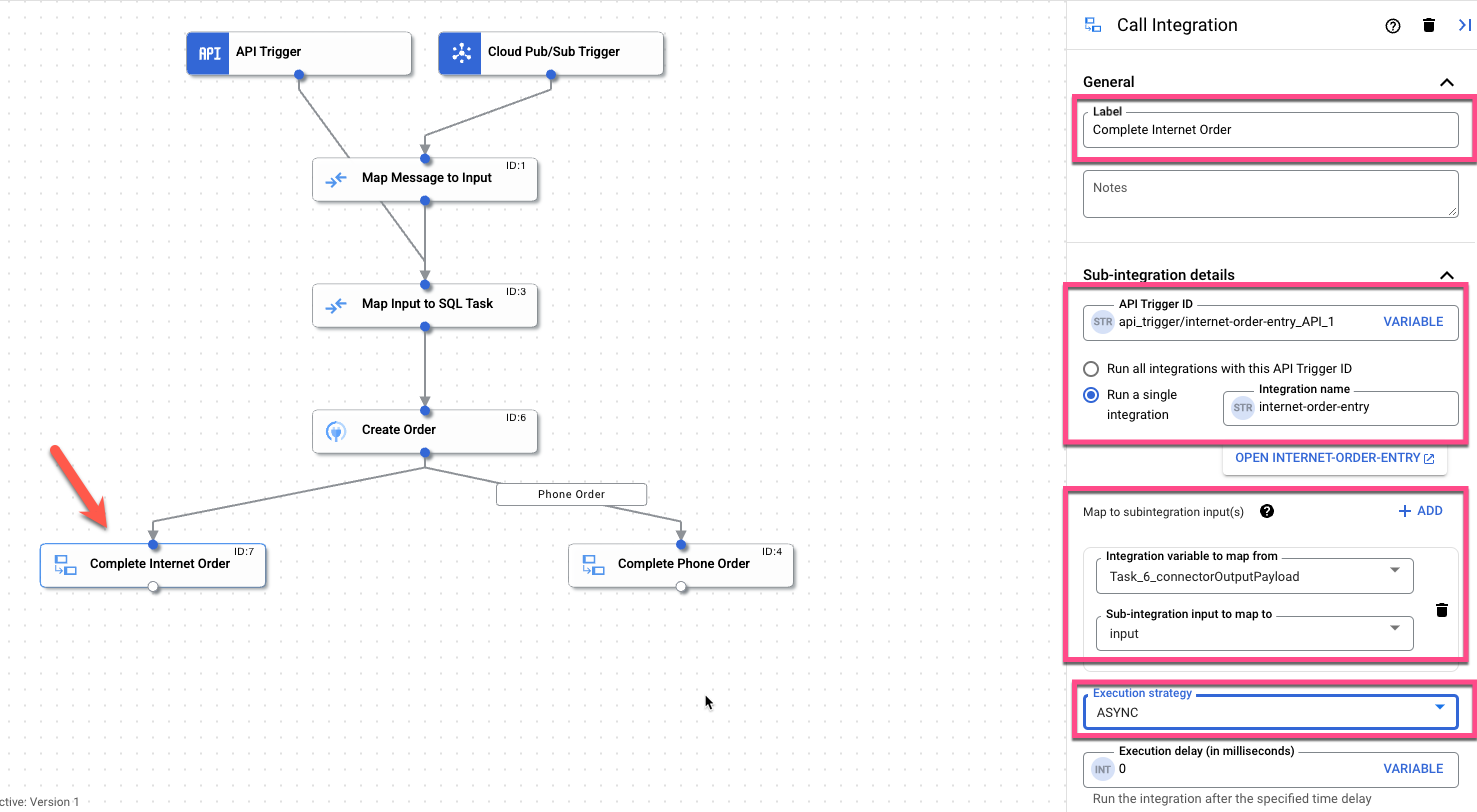
- Next, click the Call Integration task and change the Label to Complete Internet Order.
- In the Configuration section, add the provided information below.
- Click into the API Trigger ID and select: api_trigger/internet-order-entry_API_1
- Then select Run a single integration and then select the internet-order-entry integration name.
- Click ADD next to Map to subintegration input(s):
- Integration variable to map from: Task_6_connectorOutputPayload
- Sub-integration input to map to: input
- Execution Strategy: ASYNC
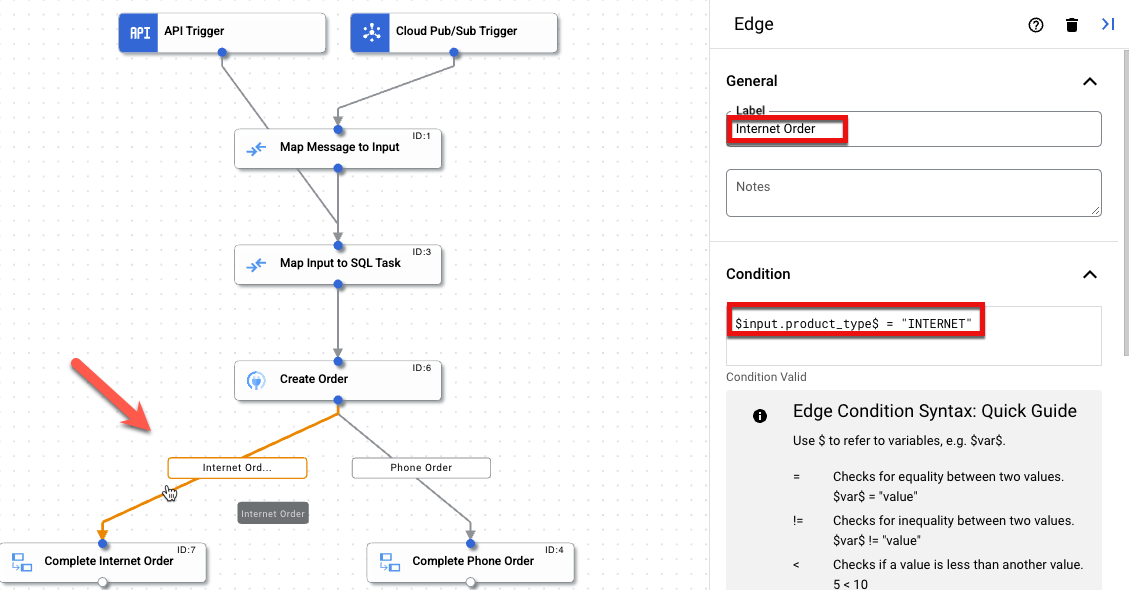
internet-order-entry under the Run a single integrationselections ensure you go back to the internet-order-entry integration and check that it has been Published so the order-entry integration can visibly see it.Complete Phone Order subintegration in a similar fashion you will need to make similar configuration changes on that task. Ensure that you change the API Trigger ID to api_trigger/phone-order-entry_API_1 & the Run a single integration: phone-order-entry integration name. This also includes changing the Map to subintegration input(s)- Select the Edge coming from Create Order to Complete Internet Order. Change the Label name to Internet Order and add a condition.
- Click on Publish and SKIP when asked to create a new version to deploy the order-entry integration.
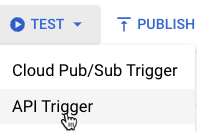
- Then, click TEST and select API Trigger.
- Enter the sample JSON payload below as input and click on TEST INTEGRATION to test the integration:
- Click on VIEW LOGS to check the logs.
You are looking for an output that states that the Integration execution succeeded. If you want to trace every portion of the Integration workflow then looking at the logs will give you insight into every step of the process. If you are not met with a successful output then consider looking at the logs to see what information indicates the failure. Ensure that you re-check every step you’ve completed thus far and spell check each entry used up to this point.
Click Check my progress to verify your performed tasks.
Part 2: Add advanced features
Persona: IPaaS Integration Developer
Use Case
You are an Integration Developer and have a requirement to modify an existing integration flow for the business. The existing integration flow works inline with order entry information pertaining to telecom products that your business delivers such as internet and phone services. The business has decided to add some advanced features to work inline with customer orders.
You are asked to implement approval logic to gain permissions from key leaders in the business for orders that traverse the Integration.
How can Application Integration help?
In this section, you will learn about Application Integration's Advanced features. You will use the Approval task and have the integration flow support the pre-configured sub-integrations with new logic and conditions that support the order inputs. You will:
- Implement Approval logic to resume Integration workflow based on the order information.
- Conditionally call the corresponding provisioning system based on the product ordered
Start off by adding the Approval logic into the existing integration workflow. You'll configure it according to the order amount information specified in the input variables that traverse the integration.
Approval task
Configure the Approval task to email the outlined business manager(s) to review and approve the orders that meet a certain criteria the business has outlined.
Scenario
The business wants to route any orders greater than 10,000 for manager approval(s) via email. If the order amount is less than 10,000 then the order does not need approval and can traverse the integration and conditionally call the corresponding provisioning system based on the product that was ordered.
Task 1. Configure Approval task
- In the Application Integration console, open the order-entry integration.
- Click the Tasks button at the top of the order-entry integration page.
- Search for the Approval task, then select it.

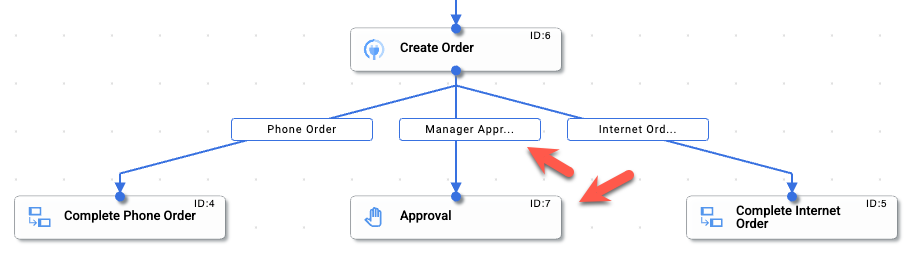
- Pull the task out to the Integration designer console, and drop it right under both of the Phone & Internet orders.
- Now you have to configure the Approval task to work inline with the existing Integration. Pull a Fork from the Create Order connector to the newly created Approval task.
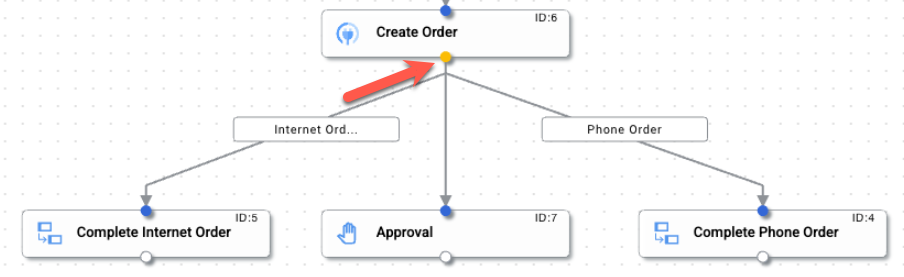
- Next, click the Edge that was created.
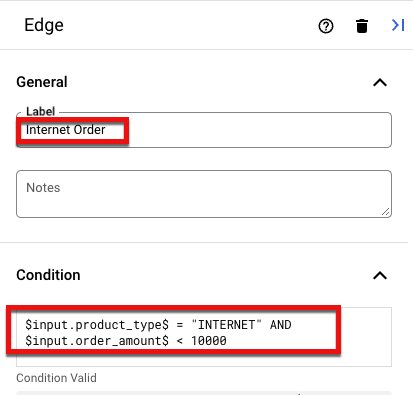
- Fill out the Label and Condition information in the Edge window below.
Label: Manager Approval
Condition:
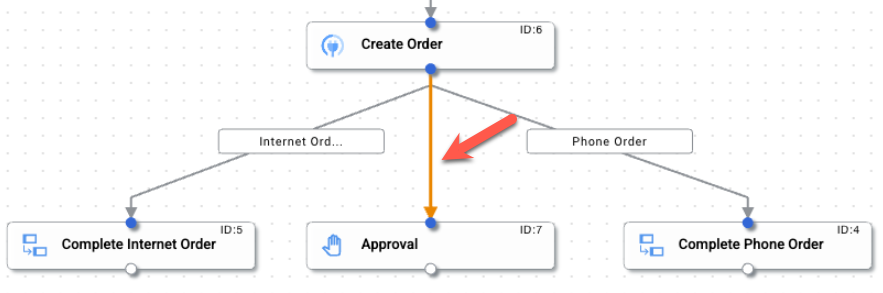
- Now pull a fork from the Approval task to the Complete Internet Order.
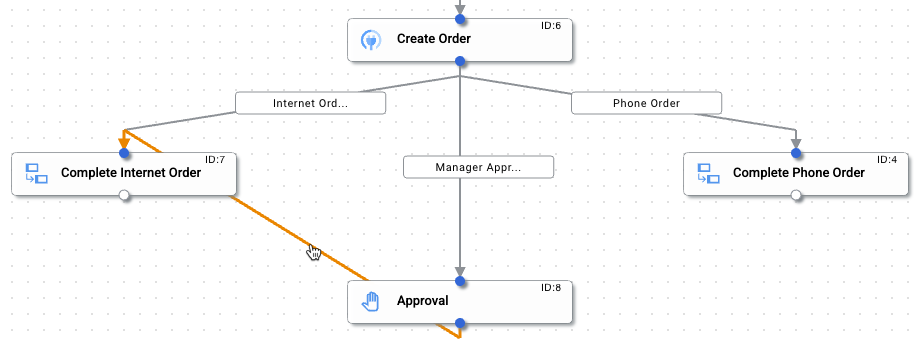
- Do the same for the Phone Order.

Now that your Edges has been configured, move forward with configuring the Approval Task.
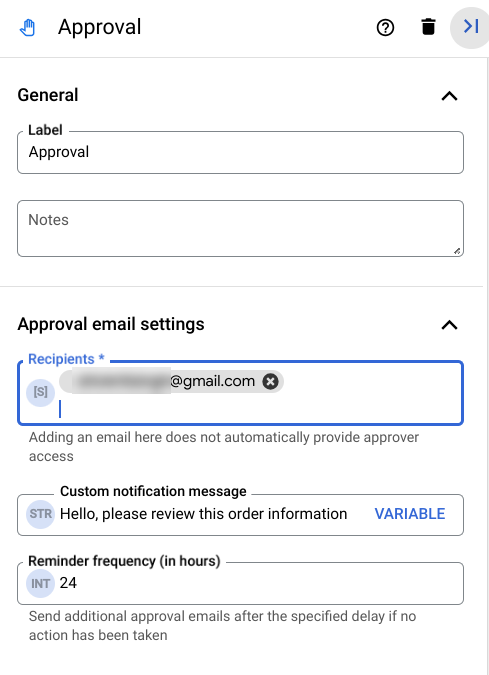
- Click on the Approval task and open it. You will only modify two sections of the task: The Recipients and the Custom notification message.
The Recipients email address will be a valid email address you have access to, like your personal or corporate email. Do not use the student temporary email address (ending in @qwiklabs.net), that email is inbox blocked from receiving/sending email.
Provide the following information:
- Recipients: (valid email address)
- Custom notification message: Hello, please review this order information and approve at your earliest convenience.
With the Approval task now configured you will need to add the appropriate role in IAM (Identity and Access Management) to the Recipients you entered. You will be adding the Application Integration Approver & Apigee Integration Viewer role.
-
Open the Google Cloud console by navigating to https://console.cloud.google.com/ in a new "Incognito browser tab".
-
Once opened, copy the Project ID. You will be utilizing this for the next steps.

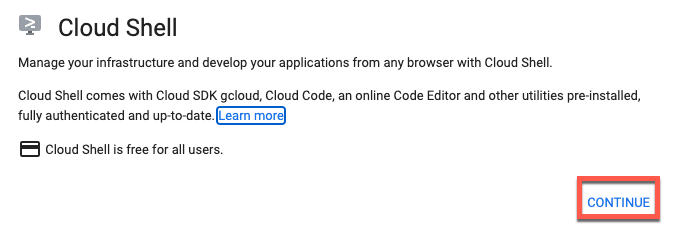
Email Address you used previously in the Approval task. You will be using that as well in the next steps.- Click the Activate Cloud Shell button.

- Click Continue.
- Set the GOOGLE_CLOUD_PROJECT to the project id you copied in step 10 by replacing the value in the <> and executing the following command:
- Set the RECIPIENT_EMAIL to the email address you used for the recipient(s) section by replacing the value in the <> and executing the following command:
- Now execute the following command to give your email account the Application Integration Approver role:
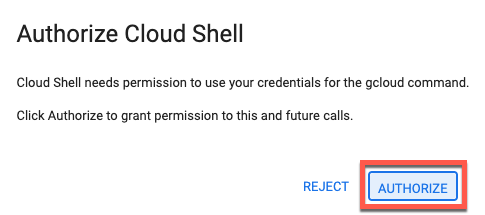
- If this window pops up when executing the command in step 15 click Authorize and execute the command once again if an error arises.
- Now execute the following command to give your email account the Apigee Integration Viewer role:
- Once the command has run successfully, click the Navigation menu in the top left of the console and navigate to IAM & Admin > IAM.
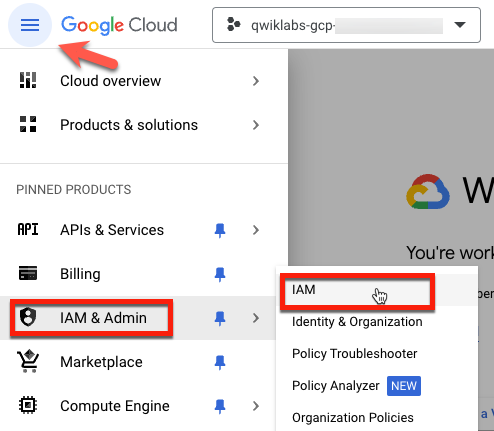
- Validate that the "Application Integration Approver" and "Apigee Integration Viewer" roles were correctly assigned to your student username.

Now that the appropriate IAM account has been put in place for approvals, move forward with testing the Approval task to see if it is configured correctly.
Click Check my progress to verify your performed tasks.
Test Approval task
-
Return to the Application Integration console.
-
Navigate back to the "order-entry" integration and click the "Test" button.
-
Once the menu opens click "API Trigger". Click Publish and Test.
-
Copy & Paste the provided JSON information below into the API Trigger and then click Test Integration.
You should be met with a message saying Integration execution succeeded.
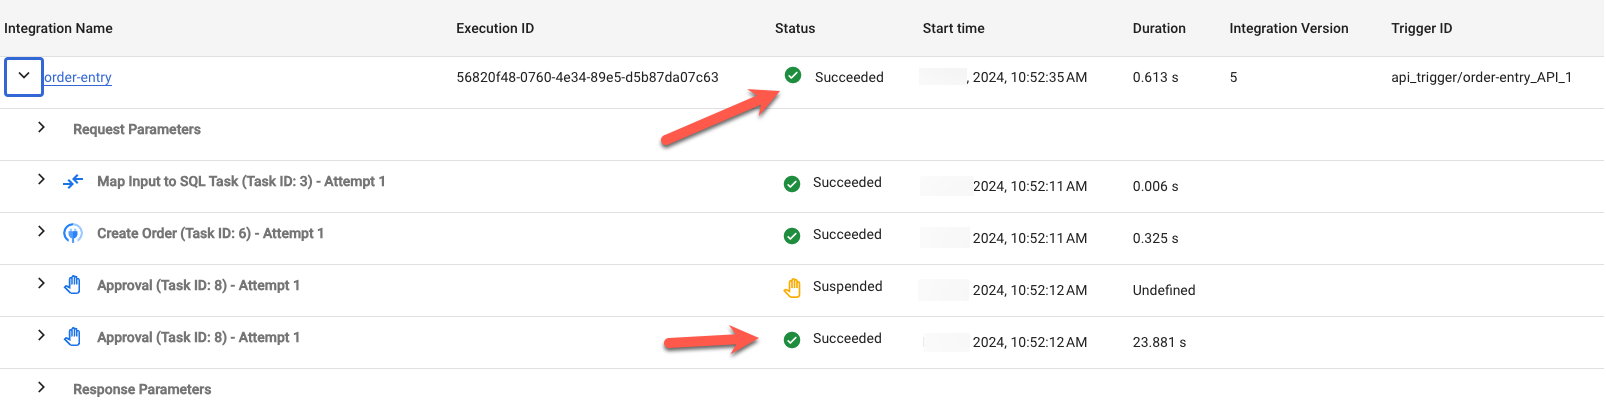
- Once successful, click View Logs to get more context into the Approval flow so that you can verify its functionality. Since the order_amount entered was >= 10000, the condition should Suspend the integration until the Approval process has been completed.
Do not close this log window, you will return to this window later in the lab. Proceed to the next step.
With this information you know that the Integration is currently in a Suspended state until the order that has the order amount details matching the previously configured condition is approved.
You will now check the Application Integration Recipients email you configured for an approval / rejection letter.
Task 2. Check recipient email
- From your mobile device or a new Incognito tab, navigate to the email account you used for the Approval task and go to the Inbox.
Then sign in.
- Look for an email with a subject line of [ACTION REQUIRED] and looks like this image below.
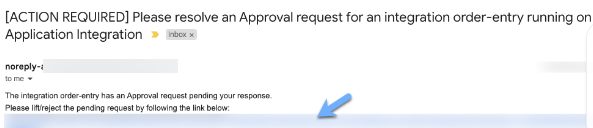
- Click the URL at the bottom of the email to get redirected to the Integration Execution Pause window. Once inside press the Approve button.
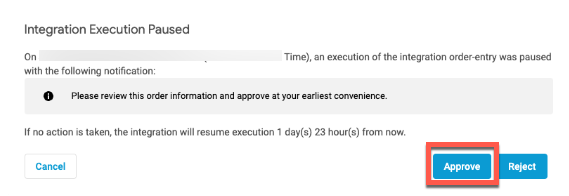
- You should get an Approval Status Change window stating that you can now move forward with the Integration flow.

- Now return to the Google Cloud console, https://console.cloud.google.com/ in an Incognito browser and log back into the console with the pre-provisioned Username and Password for this lab.
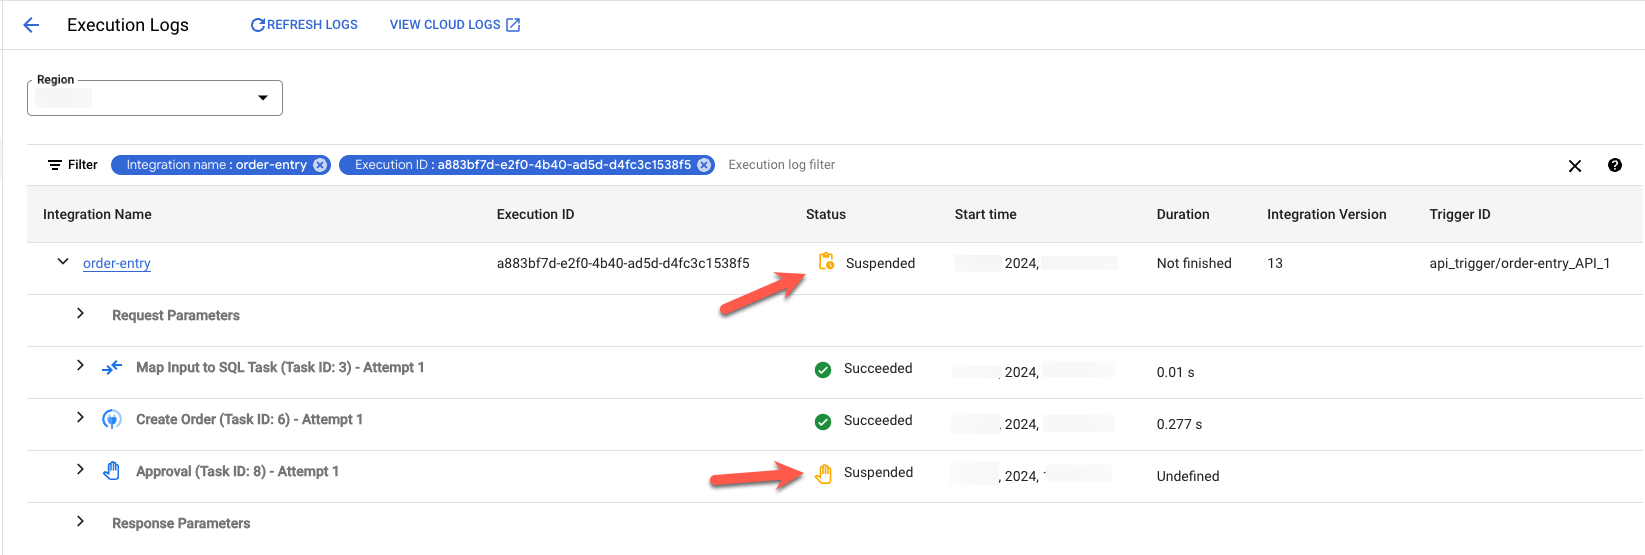
- Once logged in, go back to the Log window tab you kept open of the order-entry integration. Once there, click the "Refresh Logs" button at the top of the page to get an updated status of the order-entry integration.
The updated logs after approving the request inside of the email should look like this. With this diagram you can now see that the Suspended state has been lifted via the email approval and that the Integration flow can proceed with conditionally calling the corresponding provisioning system based on the product ordered.
Click Check my progress to verify your performed tasks.
Task 3. Conditionally call the corresponding provisioning system
In this section you will learn how to conditionally call the corresponding provisioning system based on the product ordered from the initial JSON input.
Now that you have the Approval Task configured you can focus on the overall design. There is some logic that you need to add to support the overall integration flow.
Start off by modifying the pre-built edge conditions that work inline with the product order sub-integrations. You will modify Internet Order and Phone Order conditions to support the integration flow for the Suspend task.
Modify the conditions
In this section, you'll modify the existing Phone Order and Internet Order conditions.
- In the Application Integration console, click the edge named Phone Order.
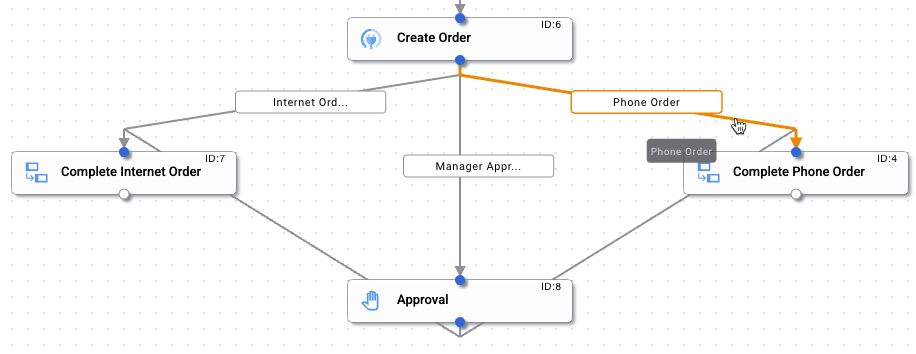
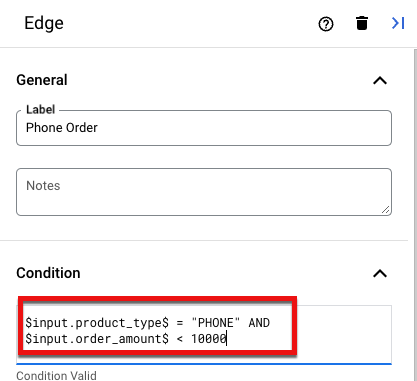
- In the Phone Order edge window add the new condition information into the Condition box:
- Now click on the Internet Order edge and add the new condition information into the Condition box:
-
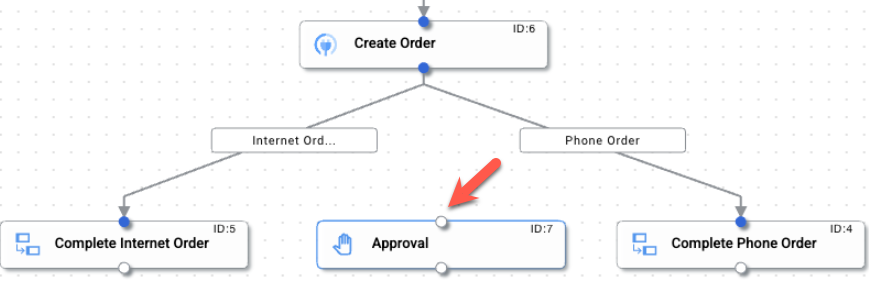
Now, both of the order conditions now focus on the
product_typeand theorder_amountinputs (variables). -
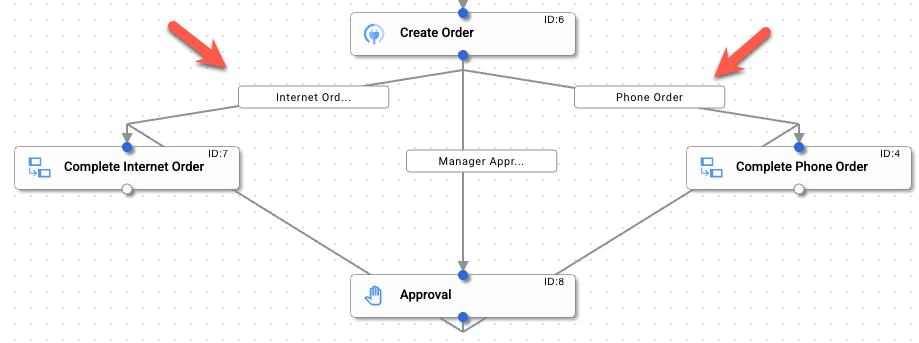
The Integration Design is now complete, and the overall design should look like the image below. Ensure that the complete orders have enough space on the designer by pulling the orders out on the left and right sides of the designer.
Task 4. (Optional) Test the Integration workflow
You can test the Integration workflow you created up to this point. Ensure that the Integration is published before testing.
- Open the API Trigger and add the provided JSON information:
-
Click Test Integration. You should be met with a message saying Integration execution succeeded.
-
Try to change the values of the product and order amount to see if the Integration is working as expected with the conditions that were previously set.
Congratulations
In Part 1, you learned how to create a new integration using the Application Integration platform, added a Trigger, a connector task, and Data Mapper, and viewed and modified an existing integration.
In Part 2, you created and configured an Approval task with logic to work in line with the order use case. You also added additional logic to support existing order conditions to support the overall Approval logic. This integration flow will now conditionally call the corresponding provisioning system based on the product ordered.
Google Cloud training and certification
...helps you make the most of Google Cloud technologies. Our classes include technical skills and best practices to help you get up to speed quickly and continue your learning journey. We offer fundamental to advanced level training, with on-demand, live, and virtual options to suit your busy schedule. Certifications help you validate and prove your skill and expertise in Google Cloud technologies.
Manual last updated May 23, 2024
Lab last tested May 23, 2024
Copyright 2024 Google LLC All rights reserved. Google and the Google logo are trademarks of Google LLC. All other company and product names may be trademarks of the respective companies with which they are associated.