Checkpoints
Create BigQuery Python notebook and connect to runtime
/ 10
Create the cloud resource connection and grant IAM role
/ 10
Review images, dataset, and grant IAM role to service account
/ 10
Create the dataset and customer reviews table in BigQuery
/ 30
Create the Gemini Pro model in BigQuery
/ 10
Prompt Gemini to analyze customer reviews for keywords and sentiment
/ 20
Respond to customer reviews
/ 10
Analyze Customer Reviews with Gemini Using Python Notebooks
- GSP1249
- Overview
- Objectives
- Setup and requirements
- Task 1. Create BigQuery Python notebook and connect to runtime
- Task 2. Create the cloud resource connection and grant IAM role
- Task 3. Review audio files, dataset, and grant IAM role to service account
- Task 4. Create the dataset, and customer reviews table in BigQuery
- Task 5. Create the Gemini Pro model in BigQuery
- Task 6. Prompt Gemini to analyze customer reviews for keywords and sentiment
- Task 7. Respond to customer reviews
- Congratulations!
GSP1249

Overview
In this lab you learn how to extract keywords and assess customer sentiment in customer reviews using BigQuery Machine Learning with remote models (Gemini Pro).
BigQuery is a fully managed, AI-ready data analytics platform that helps you maximize value from your data and is designed to be multi-engine, multi-format, and multi-cloud. One of its key features is BigQuery Machine Learning, which lets you create and run machine learning (ML) models by using SQL queries or with Colab Enterprise notebooks.
Gemini is a family of generative AI models developed by Google DeepMind that is designed for multimodal use cases. The Gemini API gives you access to the Gemini Pro, Gemini Pro Vision, and Gemini Flash models.
At the end of this lab you will build a Python-based customer service application in a Colab Enterprise notebook within BigQuery, using the Gemini Flash model to respond to audio-based customer reviews.
Objectives
In this lab, you learn how to:
- Create a Python notebook in BigQuery using Colab Enterprise.
- Create a Cloud Resource connection in BigQuery.
- Create the dataset and tables in BigQuery.
- Create the Gemini remote models in BigQuery.
- Prompt Gemini to analyze keywords and setiment (positive, or negative) for text based customer reviews.
- Generate a report with a count of positive, and negative reviews.
- Respond to customer reviews at scale.
- Create an application for customer service representatives to respond to audio based customer reviews.
Setup and requirements
Before you click the Start Lab button
Read these instructions. Labs are timed and you cannot pause them. The timer, which starts when you click Start Lab, shows how long Google Cloud resources will be made available to you.
This hands-on lab lets you do the lab activities yourself in a real cloud environment, not in a simulation or demo environment. It does so by giving you new, temporary credentials that you use to sign in and access Google Cloud for the duration of the lab.
To complete this lab, you need:
- Access to a standard internet browser (Chrome browser recommended).
- Time to complete the lab---remember, once you start, you cannot pause a lab.
How to start your lab and sign in to the Google Cloud console
-
Click the Start Lab button. If you need to pay for the lab, a pop-up opens for you to select your payment method. On the left is the Lab Details panel with the following:
- The Open Google Cloud console button
- Time remaining
- The temporary credentials that you must use for this lab
- Other information, if needed, to step through this lab
-
Click Open Google Cloud console (or right-click and select Open Link in Incognito Window if you are running the Chrome browser).
The lab spins up resources, and then opens another tab that shows the Sign in page.
Tip: Arrange the tabs in separate windows, side-by-side.
Note: If you see the Choose an account dialog, click Use Another Account. -
If necessary, copy the Username below and paste it into the Sign in dialog.
{{{user_0.username | "Username"}}} You can also find the Username in the Lab Details panel.
-
Click Next.
-
Copy the Password below and paste it into the Welcome dialog.
{{{user_0.password | "Password"}}} You can also find the Password in the Lab Details panel.
-
Click Next.
Important: You must use the credentials the lab provides you. Do not use your Google Cloud account credentials. Note: Using your own Google Cloud account for this lab may incur extra charges. -
Click through the subsequent pages:
- Accept the terms and conditions.
- Do not add recovery options or two-factor authentication (because this is a temporary account).
- Do not sign up for free trials.
After a few moments, the Google Cloud console opens in this tab.

Task 1. Create BigQuery Python notebook and connect to runtime
In this task you create a BigQuery Python notebook and connect the notebook to the runtime.
Create the BigQuery Python notebook
-
In the Google Cloud console, on the Navigation menu, click BigQuery.
-
Click DONE on the Welcome pop-up.
-
Click PYTHON NOTEBOOK.
-
Select
for the region. -
Click SELECT.
You will also notice that the Python notebook is added in the notebooks section of the explorer under your project.
-
Delete all of the cells that are in the notebook by clicking the trash icon that appears when you hover over each cell.
Once complete, the notebook should be blank and you are ready to move on to the next step.
Connect to the runtime
-
Click Connect.
-
Click on the Qwiklabs student ID.
Please wait. It may take up to 3 minutes to connect to the runtime.
At some point, you will see the connection status update to Connected at the bottom of your browser window.
Click Check my progress to verify the objective.
Task 2. Create the cloud resource connection and grant IAM role
Create the cloud resource connection in BigQuery
In this task you create a Cloud resource connection in BigQuery, so you can work with Gemini Pro and Gemini Flash models. You will also grant the cloud resource connection's service account IAM permissions, through a role, to enable it access the Vertex AI services.
You will use the Python SDK and the Google Cloud CLI to create the resource connection. But first you need to import Python libraries and set the project_id and region variables.
-
Create a new code cell with the code below:
# Import Python libraries import vertexai from vertexai.generative_models import GenerativeModel, Part from google.cloud import bigquery from google.cloud import storage import json import io import matplotlib.pyplot as plt from IPython.display import HTML, display from IPython.display import Audio from pprint import pprint This code will import the Python libraries.
-
Run this cell. The libraries are now loaded and ready to be used.
-
Create a new code cell with the code below:
# Set Python variables for project_id and region project_id = "{{{project_0.project_id|Project ID}}}" region = " {{{ project_0.default_region | "REGION" }}}" Note: project_id and region are saved here as Python variables not SQL variables, therefore you can only refer to them in cells using Python code, not SQL code. -
Run this cell. The variables for project_id and region are set.
-
Create a new code cell with the code below:
# Create the resource connection !bq mk --connection \ --connection_type=CLOUD_RESOURCE \ --location=US \ gemini_conn This code will use the Google Cloud CLI command
bq mk --conectionto create the resource connection. -
Run this cell. The resource connection is now created.
-
Click the view actions button next to your project id in the Explorer.
-
Choose Refresh contents.
-
Expand external connections. Notice
us.gemini_connis now listed as an external connection. -
Click us.gemini_conn.
-
In the Connection info pane, copy the service account ID to a text file for use in the next task.
Grant Vertex AI User role to the connection's service account
-
In the console, on the Navigation menu, click IAM & Admin.
-
Click Grant Access.
-
In the New principals field, enter the service account ID that you copied earlier.
-
In the Select a role field, enter Vertex AI, and then select Vertex AI User role.
-
Click Save.
The result is the service account now includes the Vertext AI User role.
Click Check my progress to verify the objective.
Task 3. Review audio files, dataset, and grant IAM role to service account
In this task, you review the dataset and the audio files, then you grant IAM permissions to the cloud resource connection's service account.
Review the audio files, image files, and customer reviews dataset on Cloud Storage
Before you dive into this task to grant permissions to the resource connection service account, review the dataset and the image files.
-
In the Google Cloud console, select the Navigation menu (
), and then select Cloud Storage.
-
Click on the
-bucket bucket. -
The bucket contains the gsp1249 folder, open the folder. You will see five items in it:
- The
audiofolder contains all audio files you will analyze. Feel free to access the audio folder and review the audio files. - The
customer_reviews.csvfile is the dataset that contains the text based customer reviews. - The
imagesfolder contains an image file you will use later in this lab. Feel free to access this folder and view the image file contained within it. -
notebook.ipynb, this is a copy of the notebook you are creating in this lab. Feel free to review it as needed.
Note: You can use the Authenticated URL to download and review each item. - The
Grant IAM Storage Object Admin role to the connection's service account
Granting IAM permissions to the resource connection's service account before you start working in BigQuery will ensure you do not encounter access denied errors when running queries.
-
Return to the root of the bucket.
-
Click PERMISSIONS.
-
Click GRANT ACCESS.
-
In the New principals field, enter the service account ID you copied earlier.
-
In the Select a role field, enter Storage Object, and then select Storage Object Admin role.
-
Click Save.
The result is the service account now includes the Storage Object Admin role.
Click Check my progress to verify the objective.
Task 4. Create the dataset, and customer reviews table in BigQuery
In this task, you create a dataset for the project, the table for customer reviews.
Create the dataset
For the dataset you will use the following properties:
| Field | Value |
|---|---|
| Dataset ID | gemini_demo |
| Location type | select Multi-region |
| Multi-region | select US |
-
Return to the Python notebook in BigQuery.
-
Create a new code cell with the code below:
# Create the dataset %%bigquery CREATE SCHEMA IF NOT EXISTS `{{{project_0.project_id|Project ID}}}.gemini_demo` OPTIONS(location="US"); Notice the code starts with
%%bigquery, this tells Python that the code immediately following this statement will be SQL code. -
Run this cell.
The result is the SQL code will create the
gemini_demodataset in your project residing in the US region listed underneath your project in the BigQuery Explorer.
Create the customer reviews table with sample data
To create the customer reviews table you will use a SQL query.
-
Create a new code cell with the code below:
# Create the customer reviews table %%bigquery LOAD DATA OVERWRITE gemini_demo.customer_reviews (customer_review_id INT64, customer_id INT64, location_id INT64, review_datetime DATETIME, review_text STRING, social_media_source STRING, social_media_handle STRING) FROM FILES ( format = 'CSV', uris = ['gs://{{{project_0.project_id|Project ID}}}-bucket/gsp1249/customer_reviews.csv']); -
Run this cell.
The result is the
customer_reviewstable is created with sample customer review data, including thecustomer_review_id,customer_id,location_id,review_datetime,review_text,social_media_source, andsocial_media_handlefor each review in the dataset. -
In the Explorer, click on the customer_reviews table and review the schema and details.
-
Query the table to review records by creating a new code cell with the code below.
# Create the customer reviews table %%bigquery SELECT * FROM `gemini_demo.customer_reviews` ORDER BY review_datetime -
Run this cell.
The result is the records are displayed from the table with all columns included.
Click Check my progress to verify the objective.
Task 5. Create the Gemini Pro model in BigQuery
Now that the tables are created, you can begin to work with them. In this task, you create the Gemini Pro model in BigQuery.
-
Return to the Python notebook.
-
Create a new code cell with the code below:
# Create the customer reviews table %%bigquery CREATE OR REPLACE MODEL `gemini_demo.gemini_pro` REMOTE WITH CONNECTION `us.gemini_conn` OPTIONS (endpoint = 'gemini-pro') -
Run this cell.
The result is the
gemini_promodel is created and you see it added to thegemini_demodataset, in the models section. -
In the Explorer, click on the gemini_pro model and review the details and schema.
Click Check my progress to verify the objective.
Task 6. Prompt Gemini to analyze customer reviews for keywords and sentiment
In this task, you will use Gemini Pro model to analyze each customer review for sentiment, either positive or negative.
Analyze the customer reviews for positive and negative sentiment
-
Create a new code cell with the code below:
# Create the sentiment analysis table %%bigquery CREATE OR REPLACE TABLE `gemini_demo.customer_reviews_analysis` AS ( SELECT ml_generate_text_llm_result, social_media_source, review_text, customer_id, location_id, review_datetime FROM ML.GENERATE_TEXT( MODEL `gemini_demo.gemini_pro`, ( SELECT social_media_source, customer_id, location_id, review_text, review_datetime, CONCAT( 'Classify the sentiment of the following text as positive or negative.', review_text, "In your response don't include the sentiment explanation. Remove all extraneous information from your response, it should be a boolean response either positive or negative.") AS prompt FROM `gemini_demo.customer_reviews` ), STRUCT( 0.2 AS temperature, TRUE AS flatten_json_output))); -
Run this cell.
This query takes customer reviews from the
customer_reviewstable, constructs the prompt, and then uses these with thegemini_promodel to classify the sentiment of each review. The results are then stored in a new tablecustomer_reviews_analysisso that you may use it later for further analysis.Please wait. The model takes approximately 30 seconds to process the customer review records.
When the model is finished, the result is the
customer_reviews_analysistable is created. -
In the Explorer, click on the customer_reviews_analysis table and review the schema and details.
-
Create a new code cell with the code below:
# Pull the first 100 records from the customer_reviews_analysis table %%bigquery SELECT * FROM `gemini_demo.customer_reviews_analysis` ORDER BY review_datetime -
Run this cell.
The result is rows with the
ml_generate_text_llm_resultcolumn (containing the sentiment analysis), the customer review text, customer id and location id.Take a look at some of the records. You may notice some of the results for positive and negative may not be formatted correctly, with extraneous characters like periods, or extra space. You can santize the records by using the view below.
Create a view to sanitize the records
-
Create a new code cell with the code below:
# Sanitize the records within a new view %%bigquery CREATE OR REPLACE VIEW gemini_demo.cleaned_data_view AS SELECT REPLACE(REPLACE(LOWER(ml_generate_text_llm_result), '.', ''), ' ', '') AS sentiment, REGEXP_REPLACE( REGEXP_REPLACE( REGEXP_REPLACE(social_media_source, r'Google(\+|\sReviews|\sLocal|\sMy\sBusiness|\sreviews|\sMaps)?', 'Google'), 'YELP', 'Yelp' ), r'SocialMedia1?', 'Social Media' ) AS social_media_source, review_text, customer_id, location_id, review_datetime FROM `gemini_demo.customer_reviews_analysis`; -
Run this cell.
The code creates the view,
cleaned_data_viewand includes the sentiment results, the review text, the customer id and the location id. It then takes the sentiment result (positive or negative) and ensures that all letters are made lower case, and extreanous charaters like extra spaces or periods are removed. The resulting view will make it easier to do further analysis in later steps within this lab. -
Create a new code cell with the code below:
# Pull the first 100 records from the cleaned_data_view view %%bigquery SELECT * FROM `gemini_demo.cleaned_data_view` ORDER BY review_datetime -
Run this cell.
Notice that the
sentimentcolumn now has clean values for positive and negative reviews. You will be able to use this view in later steps to build a report.
Create a report of positive and negative review counts
You can use Python and the Matplotlib library to create a bar chart report of the counts of positive and negative reviews.
-
Create new code cell to use the BigQuery client to query the cleaned_data_view for positive and negative reviews, and group the reviews by sentiment, storing the results in a dataframe.
# Task 6.5 - Create the BigQuery client, and query the cleaned data view for positive and negative reviews, store the results in a dataframe and then show the first 10 records client = bigquery.Client() query = "SELECT sentiment, COUNT(*) AS count FROM `gemini_demo.cleaned_data_view` WHERE sentiment IN ('positive', 'negative') GROUP BY sentiment;" query_job = client.query(query) results = query_job.result().to_dataframe() results.head(10) -
Run this cell.
The result of running the cell is a table output with total counts of positive and negative reviews.
-
Create a new cell to define variables for the report.
# Define variable for the report. sentiment = results["sentiment"].tolist() count = results["count"].tolist() -
Run this cell. There is no output.
-
Create a new cell to build the report.
# Task 6.7 - Build the report. plt.bar(sentiment, count, color='skyblue') plt.xlabel("Sentiment") plt.ylabel("Total Count") plt.title("Bar Chart from BigQuery Data") plt.show() -
Run this cell.
The result is a bar chart with the counts of positive and negative reviews.
-
Alternatively you can build a simple, color-coded report of the counts of negative and positive sentiment using the code below:
# Create an HTML table for the counts of negative and positive sentiment and color codes the results. html_counts = f"""
""" # Display the HTML tables display(HTML(html_counts))Negative Positive {count[0]} {count[1]}
Click Check my progress to verify the objective.
Task 7. Respond to customer reviews
Data beans wants to experiment with customer reviews using images and audio recordings. In this section of this notebook you will use CloudStorage, BigQuery, Gemini Flash, and Python to perform sentiment analysis on customer reviews provided to data beans as images and audio files. And from the resulting analysis you will generate customer service responses to be sent back to the customer thanking them for their review and actions the cofee house can take based upon the review.
You will do this both at scale and then later with one image and audio file, so that you may learn how to create a Proof of Concept application for customer service representatives. This enables a "human-in-the-loop" strategy for the customer feedback process, where customer service representatives can take action with both the customer and individual coffee houses.
Processing audio files at scale with JSON responses
-
Create a new cell to conduct sentiment analysis on audio files and respond to the customer.
# Conduct sentiment analysis on audio files and respond to the customer. vertexai.init(project="{{{project_0.project_id|Project ID}}}", location="{{{project_0.default_region|region}}}") model = GenerativeModel(model_name="gemini-1.5-flash") prompt = """ Please provide a transcript for the audio. Then provide a summary for the audio. Then identify the keywords in the transcript. Be concise and short. Do not make up any information that is not part of the audio and do not be verbose. Then determine the sentiment of the audio: positive, neutral or negative. Also, you are a customr service representative. How would you respond to this customer review? From the customer reviews provide actions that the location can take to improve. The response and the actions should be simple, and to the point. Do not include any extraneous characters in your response. Answer in JSON format with five keys: transcript, summary, keywords, sentiment, response and actions. Transcript should be a string, summary should be a sting, keywords should be a list, sentiment should be a string, customer response should be a string and actions should be string. """ bucket_name = "{{{project_0.project_id|Project ID}}}-bucket" folder_name = 'gsp1249/audio' # Include the trailing '/' def list_mp3_files(bucket_name, folder_name): storage_client = storage.Client() bucket = storage_client.bucket(bucket_name) print('Accessing ', bucket, ' with ', storage_client) blobs = bucket.list_blobs(prefix=folder_name) mp3_files = [] for blob in blobs: if blob.name.endswith('.mp3'): mp3_files.append(blob.name) return mp3_files file_names = list_mp3_files(bucket_name, folder_name) if file_names: print("MP3 files found:") print(file_names) for file_name in file_names: audio_file_uri = f"gs://{bucket_name}/{file_name}" print('Processing file at ', audio_file_uri) audio_file = Part.from_uri(audio_file_uri, mime_type="audio/mpeg") contents = [audio_file, prompt] response = model.generate_content(contents) print(response.text) else: print("No MP3 files found in the specified folder.") A few key points about this cell:
- The first line initializes Vertex AI with your project ID and region, you will need to populate these values.
- The next line creates a model in BigQuery named model, based upon the Gemini Flash model.
- You then define a prompt to be used by the Gemini Flash model. The prompt effectively converts the audio file to text, then analyzes the sentiment of the text, and once the analysis is complete, creates a customer response for each file.
- You need to set your bucket as the bucket_name string variable. Note: folder_name is used as well for gsp1249/audio subfolder. Don't change this.
- A function called list_mp3_files is created identify all mp3 files within the bucket. Then these files are processed by the Gemini Flash model within the if statement.
-
Run this cell.
The result is all 5 of the audio files are analysed and the output of the analysis is provided as a JSON response. The JSON response could be parsed accordingly and routed to the appropriate applications to respond to the customer or the location with actions for improvement.
Creating an application for customer service representatives
In this section of the lab, you will learn how to create a customer service application based upon a negative review analysis. You will:
- Use the same prompt in the previous cell to analyze a single negative review.
- Generate the transcript from the negative review audio file, create the JSON object from the model output with the appropriate formatting, and save specific parts of the JSON object as Python variables, so that you can use these with HTML as part of your application.
- Generate the HTML table, load the image the customer uploaded for the review and load the audio file in the player.
- Display the HTML table, with the image and the player for the audio file.
-
Create a new cell, and enter the following code, so that you can Generate the transcript for the negative review audio file, create the JSON object, and associated variables.
# Generate the transcript for the negative review audio file, create the JSON object, and associated variables audio_file_uri = f"gs://{bucket_name}/{folder_name}/data-beans_review_7061.mp3" print(audio_file_uri) audio_file = Part.from_uri(audio_file_uri, mime_type="audio/mpeg") contents = [audio_file, prompt] response = model.generate_content(contents) print('Generating Transcript...') #print(response.text) results = response.text # print("your results are", results, type(results)) print('Transcript created...') print('Transcript ready for analysis...') json_data = results.replace('```json', '') json_data = json_data.replace('```', '') jason_data = '"""' + results + '"""' # print(json_data, type(json_data)) data = json.loads(json_data) # print(data) transcript = data["transcript"] summary = data["summary"] sentiment = data["sentiment"] keywords = data["keywords"] response = data["response"] actions = data["actions"] A few key points about this cell:
- The code in the cell will select a specific audio file from Cloud Storage (data-beans_review_7061.mp3).
- It then sends the file to prompt in the previous cell labeled Task 7.1 to be processed by the Gemini Flash model.
- The model's response is extracted to JSON format.
- Then the JSON data is parsed, and stores Python variables for the transcript, summary, sentiment, keywords, customer response, and actions.
-
Run the cell.
The output is minimal, just the uri of the audio file processed and processing messages.
-
Create an HTML based table from the selected values and load the audio file containing the negative review into the player.
# Create an HTML table (including the image) from the selected values. html_string = f""" customer_id: 7061 - @coffee_lover789
""" print('The table has been created.'){transcript} {sentiment} feedback {keywords[0]} {keywords[1]} {keywords[2]} {keywords[3]} Customer summary:{summary} Recommended actions:{actions} Suggested Response:{response} A few key points about this cell:
- The code in the cell will construct an HTML table string.
- Then insert the values for the transcript, sentiment, keywords, image, summary, actions, and response into the table cells.
- The code will also apply styling to the table elements.
- When the cell is run, the output of the cell will indicate when the table has been created.
-
Look for the
<td style="padding:10px;">tag with the{summary}output included. Add new line of code before this tag. -
Paste
<td rowspan="3" style="padding: 10px;"><img src="<authenticated url here>" alt="Customer Image" style="max-width: 300px;"></td>into this new line of code. -
Find the Authenticated URL for the image_7061.png file. Go to Cloud Storage, select the only bucket you have there, the images folder, and then click on the image.
-
On the resulting page, copy the Authenticated URL for the image.
-
Return to the Python notebook in BigQuery. Replace the
<authenticated url here>with the actual Authenticated URL in the code you just pasted. -
Run the cell.
Again the output is minimal. Just some processing messages, indicating each step completes.
-
Create a new cell to download the audio file and load it into the player, using the code below:
# Download the audio file from Google Cloud Storage and load into the player storage_client = storage.Client() bucket = storage_client.bucket(bucket_name) blob = bucket.blob(f"{folder_name}/data-beans_review_7061.mp3") audio_bytes = io.BytesIO(blob.download_as_bytes()) # Assuming a sample rate of 44100 Hz (common for MP3 files) sample_rate = 44100 print('The audio file is loaded in the player.') A few key points about this cell:
- The code in the cell accesses the Cloud Storage bucket and retrieves the specific audio file (data-beans_review_7061.mp3).
- Then it downloads the file as a byte stream and determines the sample rate of the file, so that it may be played in a player directly in the notebook.
- When the cell is run, the output of the cell is a message stating the audio file is loaded into the player and ready for playback.
-
Run the cell.
-
Create a new cell and enter the code below:
# Task 7.5 - Build the mockup as output to the cell. print('Analysis complete. Review the results below.') display(HTML(html_string)) display(Audio(audio_bytes.read(), rate=sample_rate, autoplay=True)) -
Run the cell.
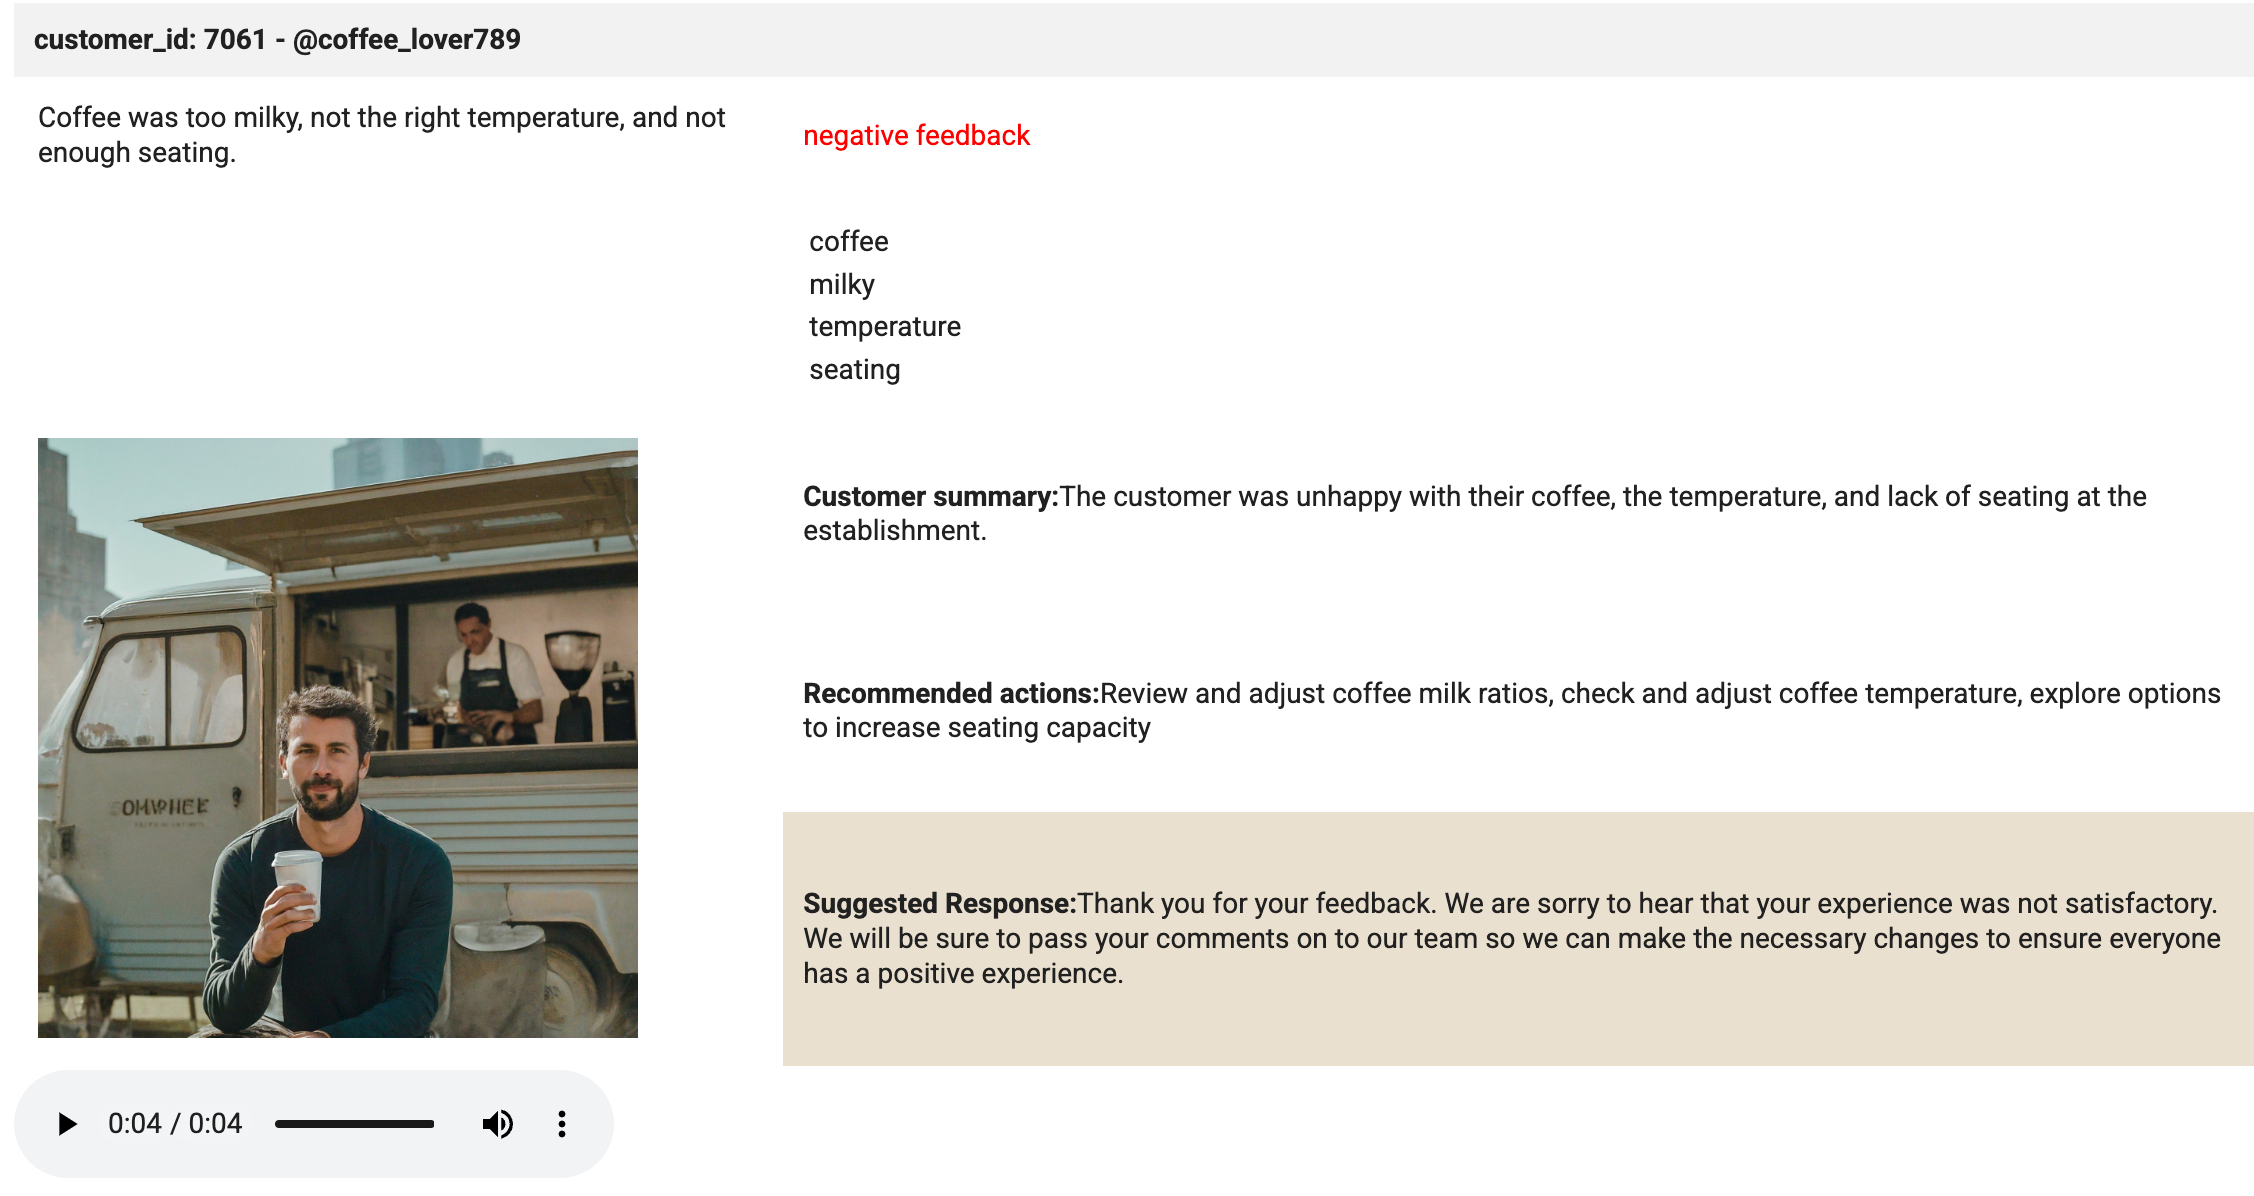
This cell is where the magic happens. The display method is used to display the HTML and the Audio file loaded into the player. Review the output of the cell. It should look identical to the image below:
Click Check my progress to verify the objective.
Congratulations!
You successfully created cloud resource connection in BigQuery. You also created created a dataset, tables, and models to prompt Gemini to analyze sentiment and keywords on customer reviews. Finally, you used Gemini to analyze audio-based customer reviews to generate summaries and keywords to repond to customer reviews within a customer service application.
Next steps / learn more
- Introduction to BigQuery ML
- Scaling machine learning with BigQuery ML inference engine - Blog
- Gemini Models
- Generative AI
Google Cloud training and certification
...helps you make the most of Google Cloud technologies. Our classes include technical skills and best practices to help you get up to speed quickly and continue your learning journey. We offer fundamental to advanced level training, with on-demand, live, and virtual options to suit your busy schedule. Certifications help you validate and prove your skill and expertise in Google Cloud technologies.
Manual Last Updated July 26, 2024
Lab Last Tested July 26, 2024
Copyright 2024 Google LLC All rights reserved. Google and the Google logo are trademarks of Google LLC. All other company and product names may be trademarks of the respective companies with which they are associated.

